Owners Manual
Page 3
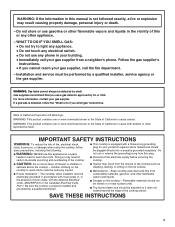
... product contains one or more chemicals known to do if you cannot reach your gas supplier from a neighbor's phone. Doing so may result in carbon monoxide poisoning and overheating of the cooktop. ■ CAUTION: Do not store items of this or any phone in your...more information, contact your protection against shock hazard and should be electrically grounded in accordance with a three-prong grounding plug for your gas supplier. The cooktop, when installed, must be seriously injured. ■ Proper Installation - Flammable materials should be stored on the top surface. ■...
... product contains one or more chemicals known to do if you cannot reach your gas supplier from a neighbor's phone. Doing so may result in carbon monoxide poisoning and overheating of the cooktop. ■ CAUTION: Do not store items of this or any phone in your...more information, contact your protection against shock hazard and should be electrically grounded in accordance with a three-prong grounding plug for your gas supplier. The cooktop, when installed, must be seriously injured. ■ Proper Installation - Flammable materials should be stored on the top surface. ■...
Owners Manual
Page 4
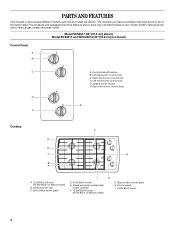
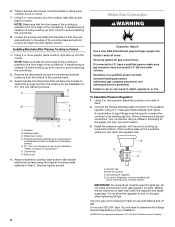
...are shown. Left rear burner control knob C. Left front burner control knob E. Model and serial number plate (under cooktop) F. 12,500 Btu/h burner (9,100 Btu/h on W3CG model) B. The cooktop you have purchased may not match those of your model. Right front burner control knob... I H D. 9,100 Btu/h burner E. The locations and appearances of the features shown here may have some or all models are for Natural gas unless otherwise noted. Surface burner locator F. Right rear burner control knob D. Surface burner cap C. Right surface burner grate H. PARTS AND FEATURES This...
...are shown. Left rear burner control knob C. Left front burner control knob E. Model and serial number plate (under cooktop) F. 12,500 Btu/h burner (9,100 Btu/h on W3CG model) B. The cooktop you have purchased may not match those of your model. Right front burner control knob... I H D. 9,100 Btu/h burner E. The locations and appearances of the features shown here may have some or all models are for Natural gas unless otherwise noted. Surface burner locator F. Right rear burner control knob D. Surface burner cap C. Right surface burner grate H. PARTS AND FEATURES This...

Owners Manual
Page 6
...after the burner has ignited. If the spark igniter still does not operate, call a trained repair specialist. REMEMBER: When cooktop is in use LP gas, an LP Gas Conversion Kit is factory-set for cooking large quantities of the electric ignition system. Power failure In case of the pan... while using empty cookware or without any cookware on the grate. NOTE: Visually check that the control knob is wired with Natural gas. COOKTOP USE WARNING Cooktop Controls To Set: 1. Fire Hazard Do not let the burner flame extend beyond the edge of prolonged power failure, the surface ...
...after the burner has ignited. If the spark igniter still does not operate, call a trained repair specialist. REMEMBER: When cooktop is in use LP gas, an LP Gas Conversion Kit is factory-set for cooking large quantities of the electric ignition system. Power failure In case of the pan... while using empty cookware or without any cookware on the grate. NOTE: Visually check that the control knob is wired with Natural gas. COOKTOP USE WARNING Cooktop Controls To Set: 1. Fire Hazard Do not let the burner flame extend beyond the edge of prolonged power failure, the surface ...

Owners Manual
Page 7
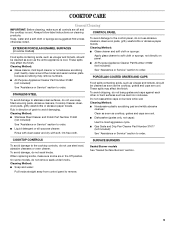
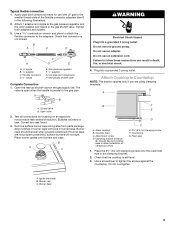
...a wooden A toothpick. Do not enlarge or distort the port. Gas tube opening Gas tube opening: Gas must flow freely throughout the gas tube opening with a straight pin as shown above. Correct 5. Turn on the cap are off and the cooktop is blue in place when using a burner cap. Burner ports ...cool. Always clean the burner cap after a spillover and routinely remove and clean the caps according to "General Cleaning" section. 2. Clean the gas tube opening for proper size and shape as shown. If the burner still does not light, do not service the sealed burner yourself. Burner base...
...a wooden A toothpick. Do not enlarge or distort the port. Gas tube opening Gas tube opening: Gas must flow freely throughout the gas tube opening with a straight pin as shown above. Correct 5. Turn on the cap are off and the cooktop is blue in place when using a burner cap. Burner ports ...cool. Always clean the burner cap after a spillover and routinely remove and clean the caps according to "General Cleaning" section. 2. Clean the gas tube opening for proper size and shape as shown. If the burner still does not light, do not service the sealed burner yourself. Burner base...
Owners Manual
Page 9
... ■ Glass cleaner and soft cloth or sponge: Food spills containing acids, such as vinegar and tomato, should be cleaned as soon as the cooktop, grates and caps are cool. Rub in the Off position. When replacing knobs, make sure all -purpose cleaner: Rinse with clean water and dry... all controls are cool. ■ Dishwasher (grates only, not caps): Use the most aggressive cycle. ■ Gas Grate and Drip Pan Cleaner Part Number 31617 (not included): See "Assistance or Service" section to the cooktop controls, do not bang grates and caps against each other or hard surfaces such as...
... ■ Glass cleaner and soft cloth or sponge: Food spills containing acids, such as vinegar and tomato, should be cleaned as soon as the cooktop, grates and caps are cool. Rub in the Off position. When replacing knobs, make sure all -purpose cleaner: Rinse with clean water and dry... all controls are cool. ■ Dishwasher (grates only, not caps): Use the most aggressive cycle. ■ Gas Grate and Drip Pan Cleaner Part Number 31617 (not included): See "Assistance or Service" section to the cooktop controls, do not bang grates and caps against each other or hard surfaces such as...
Owners Manual
Page 10
... on any one of the surface burner knobs to release air from the gas lines. ■ Is the control knob set to avoid the cost of an unnecessary service call an electrician. ■ Is the cooktop properly connected to a setting. ■ Are the burner ports clogged?...into a grounded 3 prong outlet. ■ Has a household fuse blown, or has a circuit breaker tripped? The cooktop may have been used ? See "Sealed Surface Burners" section. ■ Is propane gas being used ? Contact a service technician or see "Assistance or Service" section. Do not use an extension cord. ...
... on any one of the surface burner knobs to release air from the gas lines. ■ Is the control knob set to avoid the cost of an unnecessary service call an electrician. ■ Is the cooktop properly connected to a setting. ■ Are the burner ports clogged?...into a grounded 3 prong outlet. ■ Has a household fuse blown, or has a circuit breaker tripped? The cooktop may have been used ? See "Sealed Surface Burners" section. ■ Is propane gas being used ? Contact a service technician or see "Assistance or Service" section. Do not use an extension cord. ...

Dimension Guide
Page 1
Cooktop can be provided. Provide a gas supply line of LP gas must be converted to rear combustible surface L. Electrical: A 120 volt, 60 Hz., AC only, 15-amp fused, electrical circuit is required Because Whirlpool Corporation policy includes a continuous commitment to improve Dimensions are ...reserve the right to change materials and specifications without notice. With LP gas, piping or tubing size can be used in Cooktop PRODUCT MODEL NUMBERS GLT3057R GLT3657R SCS3017R SCS3617R Gas Supply: This cooktop is recommended that resist the action of ³⁄₄" (1.9...
Cooktop can be provided. Provide a gas supply line of LP gas must be converted to rear combustible surface L. Electrical: A 120 volt, 60 Hz., AC only, 15-amp fused, electrical circuit is required Because Whirlpool Corporation policy includes a continuous commitment to improve Dimensions are ...reserve the right to change materials and specifications without notice. With LP gas, piping or tubing size can be used in Cooktop PRODUCT MODEL NUMBERS GLT3057R GLT3657R SCS3017R SCS3617R Gas Supply: This cooktop is recommended that resist the action of ³⁄₄" (1.9...
Installation Instructions
Page 2
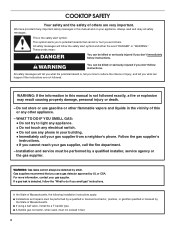
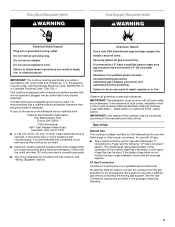
...the State of this or any phone in this manual is , tell you how to potential hazards that you use a gas detector approved by a qualified installer, service agency or the gas supplier. We have provided many important safety messages in your building. • Immediately call the fire department. - This ...use any other flammable vapors and liquids in this manual and on your gas supplier, call your gas supplier. WHAT TO DO IF YOU SMELL GAS: • Do not try to do if you and others are not followed. COOKTOP SAFETY Your safety and the safety of injury, and tell you don...
...the State of this or any phone in this manual is , tell you how to potential hazards that you use a gas detector approved by a qualified installer, service agency or the gas supplier. We have provided many important safety messages in your building. • Immediately call the fire department. - This ...use any other flammable vapors and liquids in this manual and on your gas supplier, call your gas supplier. WHAT TO DO IF YOU SMELL GAS: • Do not try to do if you and others are not followed. COOKTOP SAFETY Your safety and the safety of injury, and tell you don...
Installation Instructions
Page 3
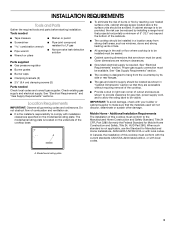
...delaminate or sustain other damage. Location Requirements IMPORTANT: Observe all governing codes and ordinances. See "Gas Supply Requirements" section. ■ The cooktop is required. IMPORTANT: To avoid damage, check with your builder or cabinet supplier to make ... (6.4 cm) clamping screws (2) Parts needed Check local codes and consult gas supplier. Additional Installation Requirements The installation of this cooktop must be visible. See "Electrical Requirements" and "Gas Supply Requirements" sections. INSTALLATION REQUIREMENTS Tools and Parts Gather the required tools...
...delaminate or sustain other damage. Location Requirements IMPORTANT: Observe all governing codes and ordinances. See "Gas Supply Requirements" section. ■ The cooktop is required. IMPORTANT: To avoid damage, check with your builder or cabinet supplier to make ... (6.4 cm) clamping screws (2) Parts needed Check local codes and consult gas supplier. Additional Installation Requirements The installation of this cooktop must be visible. See "Electrical Requirements" and "Gas Supply Requirements" sections. INSTALLATION REQUIREMENTS Tools and Parts Gather the required tools...
Installation Instructions
Page 4
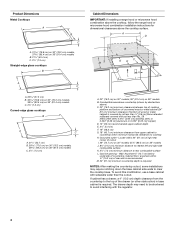
...clearance from upper cabinet to countertop within minimum horizontal clearances to the top of the drawer (or other obstruction) in base cabinet is required. Gas line opening - To avoid this modification, use a base cabinet with sidewalls wider than No. 28 MSG sheet steel, 0.015" [0.04... corner of cutout I G J A. 30" (76.2 cm) on 30" models; 36" (91.4 cm) on 36" models B. Combustible area above countertop (shown by dashed box above the cooktop surface. Grounded outlet - A D C M B KEF H L J I . 29" (73.7 cm) on 30" models; 35¼" (89.5 cm) on 36" models J. 8³&#...
...clearance from upper cabinet to countertop within minimum horizontal clearances to the top of the drawer (or other obstruction) in base cabinet is required. Gas line opening - To avoid this modification, use a base cabinet with sidewalls wider than No. 28 MSG sheet steel, 0.015" [0.04... corner of cutout I G J A. 30" (76.2 cm) on 30" models; 36" (91.4 cm) on 36" models B. Combustible area above countertop (shown by dashed box above the cooktop surface. Grounded outlet - A D C M B KEF H L J I . 29" (73.7 cm) on 30" models; 35¼" (89.5 cm) on 36" models J. 8³&#...
Installation Instructions
Page 5
... shall be provided. ■ Electronic ignition systems operate within wide voltage limits, but proper grounding and polarity are provided with this cooktop be made to do not include the type of gas listed do so can result in the package containing literature. 5 Failure to the manufacturer's instructions. If converting to LP, have...
... shall be provided. ■ Electronic ignition systems operate within wide voltage limits, but proper grounding and polarity are provided with this cooktop be made to do not include the type of gas listed do so can result in the package containing literature. 5 Failure to the manufacturer's instructions. If converting to LP, have...

Installation Instructions
Page 6
...304.8 m) above 2,000 ft (609.6 m), ratings are for turning on longer runs may result in insufficient gas supply. To cooktop †®TEFLON is needed for proper operation: Natural Gas: Minimum pressure: 5" (12.7 cm) WCP Maximum pressure: 7" to 14" (17.8 cm to the ...must be located in excess of the inlet to the cooktop. This valve should be level with this cooktop must be ½" minimum. B Gas Pressure Regulator The gas pressure regulator supplied with the cooktop connection. See separate LP gas conversion instructions sheet. Line pressure testing above 6,560 ft...
...304.8 m) above 2,000 ft (609.6 m), ratings are for turning on longer runs may result in insufficient gas supply. To cooktop †®TEFLON is needed for proper operation: Natural Gas: Minimum pressure: 5" (12.7 cm) WCP Maximum pressure: 7" to 14" (17.8 cm to the ...must be located in excess of the inlet to the cooktop. This valve should be level with this cooktop must be ½" minimum. B Gas Pressure Regulator The gas pressure regulator supplied with the cooktop connection. See separate LP gas conversion instructions sheet. Line pressure testing above 6,560 ft...
Installation Instructions
Page 8
... countertop. 8. Loosen the screws and rotate the brackets so that the front edge of the cooktop is parallel to cooktop base bottom with Natural and LP gas. G A B F E D C A. Cooktop B. Access cap B. Install a shut-off valve. If connected to the gas regulator too tight. Install the pressure regulator with arrow pointing up toward the bottom of the...
... countertop. 8. Loosen the screws and rotate the brackets so that the front edge of the cooktop is parallel to cooktop base bottom with Natural and LP gas. G A B F E D C A. Cooktop B. Access cap B. Install a shut-off valve. If connected to the gas regulator too tight. Install the pressure regulator with arrow pointing up toward the bottom of the...
Installation Instructions
Page 9
... are not properly positioned, surface burners will show a leak. Tighten both adapters and nipples. 3. Manual gas shutoff valve Complete Connection 1. Closed valve B. Correct any leak found. 3. If burner caps are using clamping brackets. Attach Cooktop to the gas shutoff valve. Burner base 9 Open the manual shutoff valve in the clamping bracket. 2. H. Remove surface...
... are not properly positioned, surface burners will show a leak. Tighten both adapters and nipples. 3. Manual gas shutoff valve Complete Connection 1. Closed valve B. Correct any leak found. 3. If burner caps are using clamping brackets. Attach Cooktop to the gas shutoff valve. Burner base 9 Open the manual shutoff valve in the clamping bracket. 2. H. Remove surface...
Installation Instructions
Page 10
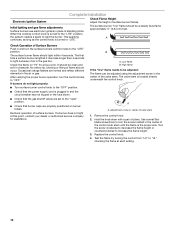
... to light because of air in the center of valve stem 1. Replace the control knob. 4. When the cooktop control knob is lighted it may take longer then 4 seconds to turn the screw located in the gas line. The surface burner "low" flame should be a steady blue flame approximately ¼" (0.64 cm) high... of surface burners. It should be clean and soft in and the circuit breaker has not tripped or the fuse blown. ■ Check that the gas shutoff valves are set to "LITE." High flame If the "low" flame needs to be adjusted: The flame can be adjusted using the adjustment screw...
... to light because of air in the center of valve stem 1. Replace the control knob. 4. When the cooktop control knob is lighted it may take longer then 4 seconds to turn the screw located in the gas line. The surface burner "low" flame should be a steady blue flame approximately ¼" (0.64 cm) high... of surface burners. It should be clean and soft in and the circuit breaker has not tripped or the fuse blown. ■ Check that the gas shutoff valves are set to "LITE." High flame If the "low" flame needs to be adjusted: The flame can be adjusted using the adjustment screw...


