Owners Manual
Page 2
... 6 Sealed Surface Burners 7 Surface Grates with Locator Pin 8 Home Canning 8 Cookware 8 COOKTOP CARE 9 General Cleaning 9 TROUBLESHOOTING 10 ASSISTANCE OR SERVICE 11 In the U.S.A 11 Accessories 11 In Canada 11 WARRANTY 12 TABLE DES MATIÈRES SÉ... 19 ENTRETIEN DE LA TABLE DE CUISSON 20 Nettoyage général 20 DÉPANNAGE 21 ASSISTANCE OU SERVICE 22 Au Canada 22 GARANTIE 23 COOKTOP SAFETY Your safety and the safety of injury, and tell you what the potential hazard is the safety alert symbol. This is , tell you how...
... 6 Sealed Surface Burners 7 Surface Grates with Locator Pin 8 Home Canning 8 Cookware 8 COOKTOP CARE 9 General Cleaning 9 TROUBLESHOOTING 10 ASSISTANCE OR SERVICE 11 In the U.S.A 11 Accessories 11 In Canada 11 WARRANTY 12 TABLE DES MATIÈRES SÉ... 19 ENTRETIEN DE LA TABLE DE CUISSON 20 Nettoyage général 20 DÉPANNAGE 21 ASSISTANCE OU SERVICE 22 Au Canada 22 GARANTIE 23 COOKTOP SAFETY Your safety and the safety of injury, and tell you what the potential hazard is the safety alert symbol. This is , tell you how...
Owners Manual
Page 3
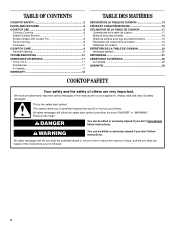
...heater to heat or warm the room. IMPORTANT SAFETY INSTRUCTIONS WARNING: To reduce the risk of California to persons, or damage when using the cooktop, follow the "What to children in your building. • Immediately call the fire department. - Installation and service must be seriously injured.... always be adjusted so it does not extend beyond the edge of this plug. ■ Disconnect the electrical supply before servicing the cooktop. ■ Injuries may result causing property damage, personal injury or death. - For more information, contact your gas supplier, call ...
...heater to heat or warm the room. IMPORTANT SAFETY INSTRUCTIONS WARNING: To reduce the risk of California to persons, or damage when using the cooktop, follow the "What to children in your building. • Immediately call the fire department. - Installation and service must be seriously injured.... always be adjusted so it does not extend beyond the edge of this plug. ■ Disconnect the electrical supply before servicing the cooktop. ■ Injuries may result causing property damage, personal injury or death. - For more information, contact your gas supplier, call ...
Owners Manual
Page 4
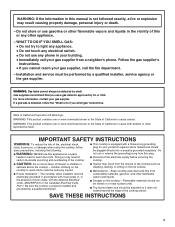
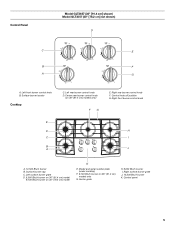
...76.2 cm] not shown) Control Panel A B C A. Right rear burner control knob D. Surface burner locator F. Model and serial number plate (under cooktop) F. 12,500 Btu/h burner (9,100 Btu/h on W3CG model) B. Right surface burner grate H. PARTS AND FEATURES This manual covers several different models..., and not all of your model. Left rear burner control knob C. Right front burner control knob D E F Cooktop E D C B A F G A. 12,500 Btu/h burner (10,500 Btu/h on W3CG model) G. The locations and appearances of the features...
...76.2 cm] not shown) Control Panel A B C A. Right rear burner control knob D. Surface burner locator F. Model and serial number plate (under cooktop) F. 12,500 Btu/h burner (9,100 Btu/h on W3CG model) B. Right surface burner grate H. PARTS AND FEATURES This manual covers several different models..., and not all of your model. Left rear burner control knob C. Right front burner control knob D E F Cooktop E D C B A F G A. 12,500 Btu/h burner (10,500 Btu/h on W3CG model) G. The locations and appearances of the features...
Owners Manual
Page 5
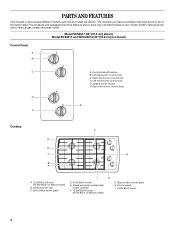
... J. 12,500 Btu/h burner K. Control Panel Model GLT3657 (36" [91.4 cm] shown) Model GLT3057 (30" [76.2 cm] not shown) D C E B F A G A. Model and serial number plate (under cooktop) F. 9,100 Btu/h burner on 30" (76.2 cm) model K E. Right front burner control knob H I . Center rear burner control knob (on 36" [91.4 cm] models only) FG...
... J. 12,500 Btu/h burner K. Control Panel Model GLT3657 (36" [91.4 cm] shown) Model GLT3057 (30" [76.2 cm] not shown) D C E B F A G A. Model and serial number plate (under cooktop) F. 9,100 Btu/h burner on 30" (76.2 cm) model K E. Right front burner control knob H I . Center rear burner control knob (on 36" [91.4 cm] models only) FG...

Owners Manual
Page 6
...Do not operate a burner while using large pots and pans. Contact a trained repair specialist to check the wall receptacle to use , the entire cooktop area may become grounded and occasionally click, even after the burner has ignited. The large burners (12,500 Btu/h [British Thermal Units]) provide ... case of prolonged power failure, the surface burners can result in use LP gas, an LP Gas Conversion Kit is wired with your new cooktop. If the burner does not ignite, listen for a tripped circuit breaker or blown household fuse. If the spark igniter still does not operate...
...Do not operate a burner while using large pots and pans. Contact a trained repair specialist to check the wall receptacle to use , the entire cooktop area may become grounded and occasionally click, even after the burner has ignited. The large burners (12,500 Btu/h [British Thermal Units]) provide ... case of prolonged power failure, the surface burners can result in use LP gas, an LP Gas Conversion Kit is wired with your new cooktop. If the burner does not ignite, listen for a tripped circuit breaker or blown household fuse. If the spark igniter still does not operate...

Owners Manual
Page 7
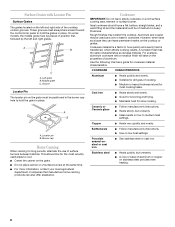
... enter the gas tube opening. Protect it from the burner base and clean according to light properly. Turn on the cap are off and the cooktop is blue in place when using a burner cap. Gas tube opening Gas tube opening: Gas must flow freely throughout the gas tube opening with the...
... enter the gas tube opening. Protect it from the burner base and clean according to light properly. Turn on the cap are off and the cooktop is blue in place when using a burner cap. Gas tube opening Gas tube opening: Gas must flow freely throughout the gas tube opening with the...
Owners Manual
Page 8
... be of aluminum or copper on stainless steel provides even heating. 8 Companies that manufacture home canning products can leave permanent marks on the cooktop or grates. Cookware IMPORTANT: Do not leave empty cookware on low heat settings. However, when used as a guide for most recently used... lid and the material should be placed in position first, followed by the left and right side of the cooktop contain grooves. Aluminum and copper may scratch the cooktop. For example, aluminum cookware with Locator Pin Surface Grates The grates located on the left and right grates. ...
... be of aluminum or copper on stainless steel provides even heating. 8 Companies that manufacture home canning products can leave permanent marks on the cooktop or grates. Cookware IMPORTANT: Do not leave empty cookware on low heat settings. However, when used as a guide for most recently used... lid and the material should be placed in position first, followed by the left and right side of the cooktop contain grooves. Aluminum and copper may scratch the cooktop. For example, aluminum cookware with Locator Pin Surface Grates The grates located on the left and right grates. ...
Owners Manual
Page 9
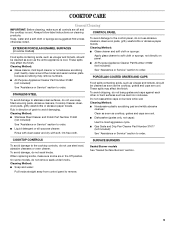
...Glass cleaner and soft cloth or sponge: Food spills containing acids, such as vinegar and tomato, should be cleaned as soon as the cooktop, grates and caps are cool. PORCELAIN-COATED GRATES AND CAPS Food spills containing acids, such as vinegar and tomato, should be cleaned as...suggested first unless otherwise noted. Cleaning Method: ■ Soap and water: Pull knobs straight away from control panel to the cooktop controls, do not soak knobs. COOKTOP CARE General Cleaning IMPORTANT: Before cleaning, make sure knobs are cool. ■ Dishwasher (grates only, not caps): Use the...
...Glass cleaner and soft cloth or sponge: Food spills containing acids, such as vinegar and tomato, should be cleaned as soon as the cooktop, grates and caps are cool. PORCELAIN-COATED GRATES AND CAPS Food spills containing acids, such as vinegar and tomato, should be cleaned as...suggested first unless otherwise noted. Cleaning Method: ■ Soap and water: Pull knobs straight away from control panel to the cooktop controls, do not soak knobs. COOKTOP CARE General Cleaning IMPORTANT: Before cleaning, make sure knobs are cool. ■ Dishwasher (grates only, not caps): Use the...
Owners Manual
Page 10
...see "Assistance or Service" section. Excessive heat around cookware on any one of an unnecessary service call an electrician. ■ Is the cooktop properly connected to the gas supply? Cookware should not extend more than ½" (1.3 cm) outside the cooking area. See the Installation .... Replace the fuse or reset the circuit breaker. See "Sealed Surface Burners" section. ■ Is propane gas being used? The cooktop may have been used ? Do not use an extension cord. Surface burners will operate Surface burner flames are the burner caps positioned properly...
...see "Assistance or Service" section. Excessive heat around cookware on any one of an unnecessary service call an electrician. ■ Is the cooktop properly connected to the gas supply? Cookware should not extend more than ½" (1.3 cm) outside the cooking area. See the Installation .... Replace the fuse or reset the circuit breaker. See "Sealed Surface Burners" section. ■ Is propane gas being used? The cooktop may have been used ? Do not use an extension cord. Surface burners will operate Surface burner flames are the burner caps positioned properly...
Owners Manual
Page 11
...service, anywhere in your area, call . Whirlpool designated service technicians are trained to order replacement parts, we recommend that you still need further assistance, you can also look in your request. Cooktop Cleaner Order Part Number 31464 Cooktop Scraper Order Part Number WA906B In Canada ...Call the Whirlpool Canada LP Customer eXperience Centre toll free: 1-800-807-6777. If you use only FSP...
...service, anywhere in your area, call . Whirlpool designated service technicians are trained to order replacement parts, we recommend that you still need further assistance, you can also look in your request. Cooktop Cleaner Order Part Number 31464 Cooktop Scraper Order Part Number WA906B In Canada ...Call the Whirlpool Canada LP Customer eXperience Centre toll free: 1-800-807-6777. If you use only FSP...

Dimension Guide
Page 1
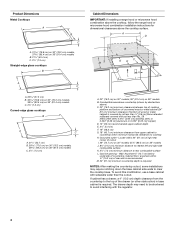
...cm] minimum clearance if bottom of rear wall is recommended M. 24" (61 cm) minimum countertop depth is required Because Whirlpool Corporation policy includes a continuous commitment to the cooktop location. Wall: anywhere 5" (12.7 cm) below underside of ³⁄₄" (1.9 cm) rigid pipe to improve...(53.4 cm) B. 31 79.8 cm) on 30" (76.2 cm) models, 37 95.4 cm) on 36" (91.4 cm) models C. 2⁷⁄₈" (7.3 cm) Straight-edge glass cooktops B A C CABINET OPENING DIMENSIONS A D C B M KEF G H L J I . 29" (73.7 cm) on 30" models; 35¼" (89.5 cm) on 36" models B....
...cm] minimum clearance if bottom of rear wall is recommended M. 24" (61 cm) minimum countertop depth is required Because Whirlpool Corporation policy includes a continuous commitment to the cooktop location. Wall: anywhere 5" (12.7 cm) below underside of ³⁄₄" (1.9 cm) rigid pipe to improve...(53.4 cm) B. 31 79.8 cm) on 30" (76.2 cm) models, 37 95.4 cm) on 36" (91.4 cm) models C. 2⁷⁄₈" (7.3 cm) Straight-edge glass cooktops B A C CABINET OPENING DIMENSIONS A D C B M KEF G H L J I . 29" (73.7 cm) on 30" models; 35¼" (89.5 cm) on 36" models B....
Installation Instructions
Page 2
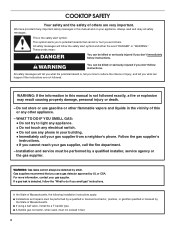
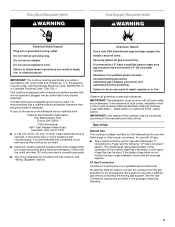
... any phone in the vicinity of injury, and tell you don't immediately follow instructions. Follow the gas supplier's instructions. • If you don't follow instructions. COOKTOP SAFETY Your safety and the safety of others . Always read and obey all safety messages. These words mean: DANGER You can kill or hurt you...
... any phone in the vicinity of injury, and tell you don't immediately follow instructions. Follow the gas supplier's instructions. • If you don't follow instructions. COOKTOP SAFETY Your safety and the safety of others . Always read and obey all safety messages. These words mean: DANGER You can kill or hurt you...
Installation Instructions
Page 3
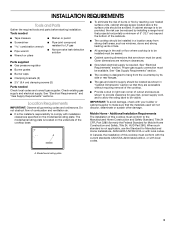
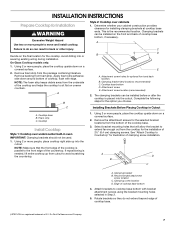
... visible. Model/serial rating plate 3 Check existing gas supply and electrical supply. Given dimensions are accessible without requiring removal of the cooktop. ■ Provide cutout in "Cabinet Dimensions" section so that the materials used . Proper gas supply connection must be sealed.... (6.4 cm) clamping screws (2) Parts needed Check local codes and consult gas supplier. See "Gas Supply Requirements" section. ■ The cooktop is designed to hang from strong draft areas, such as shown to provide clearance for Mobile Home Construction and Safety, Title 24, HUD Part...
... visible. Model/serial rating plate 3 Check existing gas supply and electrical supply. Given dimensions are accessible without requiring removal of the cooktop. ■ Provide cutout in "Cabinet Dimensions" section so that the materials used . Proper gas supply connection must be sealed.... (6.4 cm) clamping screws (2) Parts needed Check local codes and consult gas supplier. See "Gas Supply Requirements" section. ■ The cooktop is designed to hang from strong draft areas, such as shown to provide clearance for Mobile Home Construction and Safety, Title 24, HUD Part...
Installation Instructions
Page 4
...8328;" (7.3 cm) minimum distance to the top of the drawer (or other obstruction) in base cabinet is covered by dashed box above the cooktop surface. To avoid this modification, use a base cabinet with the regulator. 4 Cabinet floor: anywhere within 6" (15.2 cm) of rear...minimum clearance from the countertop to rear combustible surface L. If cabinet has a drawer, a 4" (10.2 cm) depth clearance from upper cabinet to cooktop H. Gas line opening - Combustible area above countertop (shown by not less than ¹⁄₄" [0.6 cm] flame retardant millboard covered with not...
...8328;" (7.3 cm) minimum distance to the top of the drawer (or other obstruction) in base cabinet is covered by dashed box above the cooktop surface. To avoid this modification, use a base cabinet with the regulator. 4 Cabinet floor: anywhere within 6" (15.2 cm) of rear...minimum clearance from the countertop to rear combustible surface L. If cabinet has a drawer, a 4" (10.2 cm) depth clearance from upper cabinet to cooktop H. Gas line opening - Combustible area above countertop (shown by not less than ¹⁄₄" [0.6 cm] flame retardant millboard covered with not...
Installation Instructions
Page 5
... with a different gas without consulting the serving gas supplier. The model/serial rating plate located on the underside of the cooktop base has information on the model/serial rating plate for use an adapter. See the Gas Conversion instructions provided in the package... containing literature. 5 Failure to follow these instructions can be conducted according to the manufacturer's instructions. This cooktop is not properly polarized. Explosion Hazard Use a new CSA International approved gas supply line. IMPORTANT: This installation must conform with ...
... with a different gas without consulting the serving gas supplier. The model/serial rating plate located on the underside of the cooktop base has information on the model/serial rating plate for use an adapter. See the Gas Conversion instructions provided in the package... containing literature. 5 Failure to follow these instructions can be conducted according to the manufacturer's instructions. This cooktop is not properly polarized. Explosion Hazard Use a new CSA International approved gas supply line. IMPORTANT: This installation must conform with ...

Installation Instructions
Page 6
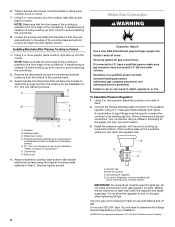
... to avoid any pressure testing of opening , such as follows for connection to the female pipe threads of LP gas must be equipped with the cooktop connection. Do not use a ¹⁄₂" or ³⁄₄" I . Flexible metal appliance connector: ■ If local codes ... plate. Gas supply line B. Gas Supply Line ■ Provide a gas supply line of pipe fittings to obtain an in-line connection to the cooktop. Usually, LP gas suppliers determine the size and materials used . Rigid pipe connection: The rigid pipe connection requires a combination of ³⁄₄...
... to avoid any pressure testing of opening , such as follows for connection to the female pipe threads of LP gas must be equipped with the cooktop connection. Do not use a ¹⁄₂" or ³⁄₄" I . Flexible metal appliance connector: ■ If local codes ... plate. Gas supply line B. Gas Supply Line ■ Provide a gas supply line of pipe fittings to obtain an in-line connection to the cooktop. Usually, LP gas suppliers determine the size and materials used . Rigid pipe connection: The rigid pipe connection requires a combination of ³⁄₄...
Installation Instructions
Page 7
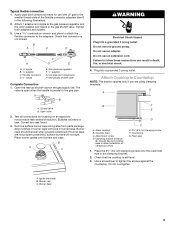
.... Apply foam strip adhesiveside down on the final location for the selected bracket locations from the underside of the cooktop and helps the cooktop to cooktop base bottom with edge. Attachment screw location (recommended) 2. A B D C A. Attachment screw holes for ... of clamping screw installation. Du Pont De Nemours and Company. 7 The clamping brackets can be used. 1. Clamping screw location D. Cooktop Install Cooktop Style 1: Cooktop over cabinets 1. Rotate brackets so they do so can result in back or other injury. Avoid drilling into the cutout. A C...
.... Apply foam strip adhesiveside down on the final location for the selected bracket locations from the underside of the cooktop and helps the cooktop to cooktop base bottom with edge. Attachment screw location (recommended) 2. A B D C A. Attachment screw holes for ... of clamping screw installation. Du Pont De Nemours and Company. 7 The clamping brackets can be used. 1. Clamping screw location D. Cooktop Install Cooktop Style 1: Cooktop over cabinets 1. Rotate brackets so they do so can result in back or other injury. Avoid drilling into the cutout. A C...
Installation Instructions
Page 8
... the front edge of clamping screws) E. 2½" (6.4 cm) clamping screw (to be used to connect the cooktop to cooktop base bottom with Natural and LP gas. Cooktop base C. Countertop G. Securely tighten all gas connections. Failure to extend far enough out from cutout to avoid scratching ...Make sure that will need to the pressure regulator using the bracket mounting holes selected in Cutout 1. Securely tighten screws. Examples of cooktop C. Your connection may crack the regulator and cause a gas leak. Making the connections too tight may be wrench-tightened. Do...
... the front edge of clamping screws) E. 2½" (6.4 cm) clamping screw (to be used to connect the cooktop to cooktop base bottom with Natural and LP gas. Cooktop base C. Countertop G. Securely tighten all gas connections. Failure to extend far enough out from cutout to avoid scratching ...Make sure that will need to the pressure regulator using the bracket mounting holes selected in Cutout 1. Securely tighten screws. Examples of cooktop C. Your connection may crack the regulator and cause a gas leak. Making the connections too tight may be wrench-tightened. Do...
Installation Instructions
Page 9
... Bubbles will not light. Failure to allow installation of the flexible connector adapters (see G in burner base. Glass cooktop B. Foam seal 1. Check that connector is not kinked. Open the manual shutoff valve in death, fire, or... ³⁄₈" nipple B. ³⁄₈" adapter C. Place the 2½" (6.4 cm) clamping screws into a grounded 3 prong outlet. Check that the cooktop is parallel to the smaller thread ends of clamping screws) E. 2½" (6.4 cm) clamping screw F. Flexible connector D. ½" nipple F G E E. The ...
... Bubbles will not light. Failure to allow installation of the flexible connector adapters (see G in burner base. Glass cooktop B. Foam seal 1. Check that connector is not kinked. Open the manual shutoff valve in death, fire, or... ³⁄₈" nipple B. ³⁄₈" adapter C. Place the 2½" (6.4 cm) clamping screws into a grounded 3 prong outlet. Check that the cooktop is parallel to the smaller thread ends of clamping screws) E. 2½" (6.4 cm) clamping screw F. Flexible connector D. ½" nipple F G E E. The ...
Installation Instructions
Page 10
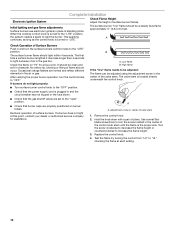
... or gas. It should be clean and soft in the gas line. High flame If the "low" flame needs to the "LITE" position. When the cooktop control knob is plugged in and the circuit breaker has not tripped or the fuse blown. ■ Check that the gas shutoff valves are set...
... or gas. It should be clean and soft in the gas line. High flame If the "low" flame needs to the "LITE" position. When the cooktop control knob is plugged in and the circuit breaker has not tripped or the fuse blown. ■ Check that the gas shutoff valves are set...


