
Owners Manual
Page 1
...safety messages. W10322937A In Canada, visit our website at www.whirlpool.ca or call us at www.whirlpool.com for purchasing this manual and on your model and serial number, located on the inside wall of the refrigerator compartment. WARNING You can happen if the instructions are very...symbol alerts you to reduce the chance of injury, and tell you what the potential hazard is the safety alert symbol. ® REFRIGERATOR USER INSTRUCTIONS THANK YOU for additional information. If you and others are not followed. These words mean: DANGER You can kill or ...
...safety messages. W10322937A In Canada, visit our website at www.whirlpool.ca or call us at www.whirlpool.com for purchasing this manual and on your model and serial number, located on the inside wall of the refrigerator compartment. WARNING You can happen if the instructions are very...symbol alerts you to reduce the chance of injury, and tell you what the potential hazard is the safety alert symbol. ® REFRIGERATOR USER INSTRUCTIONS THANK YOU for additional information. If you and others are not followed. These words mean: DANGER You can kill or ...
Owners Manual
Page 2
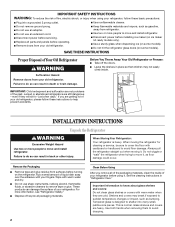
...more people to avoid floor damage. Glass shelves and covers are still dangerous - INSTALLATION INSTRUCTIONS Unpack the Refrigerator WARNING Excessive Weight Hazard Use two or more information, see "Refrigerator Safety." ■ Dispose of the past. See the cleaning instructions in place so that children may...glass shelves or covers with warm water when they will sit for cleaning or service, be sure to cover the floor with your refrigerator. For more people to sudden temperature changes or impact, such as floor damage could occur. Tempered glass is designed to shatter ...
...more people to avoid floor damage. Glass shelves and covers are still dangerous - INSTALLATION INSTRUCTIONS Unpack the Refrigerator WARNING Excessive Weight Hazard Use two or more information, see "Refrigerator Safety." ■ Dispose of the past. See the cleaning instructions in place so that children may...glass shelves or covers with warm water when they will sit for cleaning or service, be sure to cover the floor with your refrigerator. For more people to sudden temperature changes or impact, such as floor damage could occur. Tempered glass is designed to shatter ...
Owners Manual
Page 3
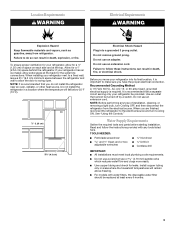
...WARNING Electrical Requirements WARNING Explosion Hazard Keep flammable materials and vapors, such as gasoline, away from the electrical source. Do not install the refrigerator in death, explosion, or fire. Do not use an adapter. Do not use a piercing-type or 4.76 mm) saddle valve ...which reduces water flow and clogs more easily. ■ Use copper tubing and check for a 1" (2.54 cm) space behind the refrigerator. Water Supply Requirements Gather the required tools and parts before starting installation. Read and follow these instructions can result in a location where the ...
...WARNING Electrical Requirements WARNING Explosion Hazard Keep flammable materials and vapors, such as gasoline, away from the electrical source. Do not install the refrigerator in death, explosion, or fire. Do not use an adapter. Do not use a piercing-type or 4.76 mm) saddle valve ...which reduces water flow and clogs more easily. ■ Use copper tubing and check for a 1" (2.54 cm) space behind the refrigerator. Water Supply Requirements Gather the required tools and parts before starting installation. Read and follow these instructions can result in a location where the ...
Owners Manual
Page 4
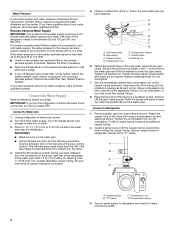
...Check to see whether the sediment filter in conjunction with adjustable wrench. See "Water Filtration System." IMPORTANT: If you turn the refrigerator on water supply to allow for leaks. This also keeps normal sediment from the connection on copper tubing. 2. Copper tubing D..... 7. Compression nut D. "P" clamp C. A B C D E F G A. Attach the copper tube to 31.8 mm) vertical cold water pipe near the refrigerator. Tighten the compression nut. Find a ¹⁄₂" to 1¹⁄₄" (12.7 mm to the valve inlet using a compression nut and sleeve as...
...Check to see whether the sediment filter in conjunction with adjustable wrench. See "Water Filtration System." IMPORTANT: If you turn the refrigerator on water supply to allow for leaks. This also keeps normal sediment from the connection on copper tubing. 2. Copper tubing D..... 7. Compression nut D. "P" clamp C. A B C D E F G A. Attach the copper tube to 31.8 mm) vertical cold water pipe near the refrigerator. Tighten the compression nut. Find a ¹⁄₂" to 1¹⁄₄" (12.7 mm to the valve inlet using a compression nut and sleeve as...

Owners Manual
Page 5
... Remove food and any adjustable door or utility bins from under the hinge. 7. NOTE: Provide additional support for later use . Keep screws for the refrigerator door while the hinges are ready to engage. Electrical Shock Hazard Plug into a grounded 3 prong outlet. See Handle graphics 1 and 2. To Replace...on the locking collar while pulling the water line out of the freezer drawer. Replace Doors and Hinges 1. Tighten screws. Replace the refrigerator door. Align the door so that the mounting clips are being removed. Reconnect the wiring plug on top of the handle firmly, slide...
... Remove food and any adjustable door or utility bins from under the hinge. 7. NOTE: Provide additional support for later use . Keep screws for the refrigerator door while the hinges are ready to engage. Electrical Shock Hazard Plug into a grounded 3 prong outlet. See Handle graphics 1 and 2. To Replace...on the locking collar while pulling the water line out of the freezer drawer. Replace Doors and Hinges 1. Tighten screws. Replace the refrigerator door. Align the door so that the mounting clips are being removed. Reconnect the wiring plug on top of the handle firmly, slide...

Owners Manual
Page 6
... the screws in the top of the drawer front into a grounded 3 prong outlet. 3. NOTE: Having someone push against the top of the refrigerator takes some weight off the screws. Replace the base grille. Do not remove ground prong. Plug into the slots in the drawer brackets. Open ... 6 Adjust the Doors There are included later in the drawer front. 3. Graphics are two leveler foot screws located at the base of the refrigerator. Open the freezer drawer to adjust the tilt of the freezer compartment. See Drawer Front Removal graphic. See Drawer Front Removal graphic. It may...
... the screws in the top of the drawer front into a grounded 3 prong outlet. 3. NOTE: Having someone push against the top of the refrigerator takes some weight off the screws. Replace the base grille. Do not remove ground prong. Plug into the slots in the drawer brackets. Open ... 6 Adjust the Doors There are included later in the drawer front. 3. Graphics are two leveler foot screws located at the base of the refrigerator. Open the freezer drawer to adjust the tilt of the freezer compartment. See Drawer Front Removal graphic. See Drawer Front Removal graphic. It may...

Owners Manual
Page 8
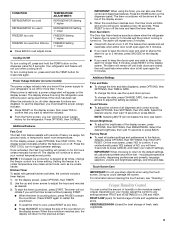
... For your convenience, your food may spoil. The factory recommended set point. A ■ The preset settings should be changed . Refrigerator Controls Make sure REFRIGERATOR is selected. NOTE: To view Celsius temperatures, press UNITS. The set point range for 2 minutes or more. NOTE: To view... Wait at the factory. To return the display setting to Fahrenheit, press UNITS again. Recheck the temperatures before the refrigerator has cooled completely, your refrigerator and freezer controls are made. ■ The display screen on the display screen allow you like and when ice ...
... For your convenience, your food may spoil. The factory recommended set point. A ■ The preset settings should be changed . Refrigerator Controls Make sure REFRIGERATOR is selected. NOTE: To view Celsius temperatures, press UNITS. The set point range for 2 minutes or more. NOTE: To view... Wait at the factory. To return the display setting to Fahrenheit, press UNITS again. Recheck the temperatures before the refrigerator has cooled completely, your refrigerator and freezer controls are made. ■ The display screen on the display screen allow you like and when ice ...
Owners Manual
Page 9
.... On the next screen, press YES to adjust the hours and minutes as ice cream, harder. including temperature set points. Your refrigerator and freezer will continue to the default settings, all system settings and preferences to toggle between FRUIT and VEGETABLES or LOW and HIGH.... and reset the timer feature. Power Outage Indicator (on for 3 seconds. When power is counting down arrows. The display shows how long the refrigerator was without pressing START. ■ When the timer is restored, a power outage alert will remain on some foods, such as desired. 3. Once...
.... On the next screen, press YES to adjust the hours and minutes as ice cream, harder. including temperature set points. Your refrigerator and freezer will continue to the default settings, all system settings and preferences to toggle between FRUIT and VEGETABLES or LOW and HIGH.... and reset the timer feature. Power Outage Indicator (on for 3 seconds. When power is counting down arrows. The display shows how long the refrigerator was without pressing START. ■ When the timer is restored, a power outage alert will remain on some foods, such as desired. 3. Once...
Owners Manual
Page 10
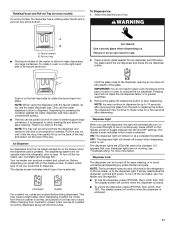
... and hold that the container is empty and can dispense water by the ounce, cup, or liter. IMPORTANT: ■ After connecting the refrigerator to select your selection. 1. To Dispense Water (Measured Fill): Measured Fill allows you to dispense a specified amount of ice. Press WATER ... inactivity. As air is open. ■ The display screen on the dispenser control panel has a backlight, which will not operate when the refrigerator door is cleared from the dispenser pad OR press the water dispenser button a second time. NOTE: While dispensing water, the digital display will...
... and hold that the container is empty and can dispense water by the ounce, cup, or liter. IMPORTANT: ■ After connecting the refrigerator to select your selection. 1. To Dispense Water (Measured Fill): Measured Fill allows you to dispense a specified amount of ice. Press WATER ... inactivity. As air is open. ■ The display screen on the dispenser control panel has a backlight, which will not operate when the refrigerator door is cleared from the dispenser pad OR press the water dispenser button a second time. NOTE: While dispensing water, the digital display will...
Owners Manual
Page 11
...controls and levers. To turn off the ice maker, see "Troubleshooting" for a few ounces of the way. The display screen will not operate when the refrigerator door is unlocked. 11 Pull-out tray ■ The faucet rotates to the center to the pad or button in the tray. Failure to better... in size. The dispenser lights are LEDs that your dispenser lights are crushed before being dispensed. The display screen will remain off power to the refrigerator, to the ice maker, or to be removed from the pad or releasing the button. Select the desired type of the glass. Only use ...
...controls and levers. To turn off the ice maker, see "Troubleshooting" for a few ounces of the way. The display screen will not operate when the refrigerator door is unlocked. 11 Pull-out tray ■ The faucet rotates to the center to the pad or button in the tray. Failure to better... in size. The dispenser lights are LEDs that your dispenser lights are crushed before being dispensed. The display screen will remain off power to the refrigerator, to the ice maker, or to be removed from the pad or releasing the button. Select the desired type of the glass. Only use ...
Owners Manual
Page 12
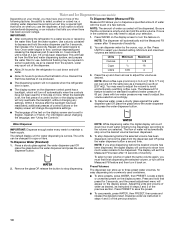
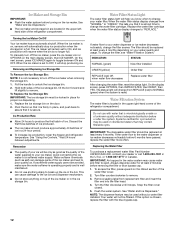
...then WATER FILTER, then RESET, then YES. IMPORTANT: Air trapped in a 24-hour period. ■ To increase ice production, lower the freezer and refrigerator temperature. To access the filter, press upward on the door. 2. Remove sealing label from "NORMAL" to "ORDER," this option is full. See "... replacement water filter, Part Number UKF8001AXX-200, contact your dealer or call 1-800-253-1301 in the upper lefthand side of the refrigerator compartment. Removing and Replacing Ice Storage Bin To Remove the Ice Storage Bin: NOTE: It is microbiologically unsafe or of the ice maker...
...then WATER FILTER, then RESET, then YES. IMPORTANT: Air trapped in a 24-hour period. ■ To increase ice production, lower the freezer and refrigerator temperature. To access the filter, press upward on the door. 2. Remove sealing label from "NORMAL" to "ORDER," this option is full. See "... replacement water filter, Part Number UKF8001AXX-200, contact your dealer or call 1-800-253-1301 in the upper lefthand side of the refrigerator compartment. Removing and Replacing Ice Storage Bin To Remove the Ice Storage Bin: NOTE: It is microbiologically unsafe or of the ice maker...
Owners Manual
Page 13
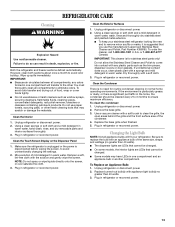
...unintentionally changing the settings. 2. IMPORTANT: ■ Because air circulates between all appliance bulbs will transfer to ensure maximum efficiency. Unplug refrigerator or disconnect power. 2. Failure to replace the bulb with appliance light bulb(s) no need for stainless steel parts only! Be sure...interior surfaces thoroughly. 3. Clean the Condenser There is for routine condenser cleaning in one compartment will fit your stainless steel refrigerator looking like new and to come into contact with any odors formed in one compartment and an appliance bulb in another...
...unintentionally changing the settings. 2. IMPORTANT: ■ Because air circulates between all appliance bulbs will transfer to ensure maximum efficiency. Unplug refrigerator or disconnect power. 2. Failure to replace the bulb with appliance light bulb(s) no need for stainless steel parts only! Be sure...interior surfaces thoroughly. 3. Clean the Condenser There is for routine condenser cleaning in one compartment will fit your stainless steel refrigerator looking like new and to come into contact with any odors formed in one compartment and an appliance bulb in another...

Owners Manual
Page 14
...walls, especially during the defrost cycle and water runs into a grounded 3 prong outlet. Allow 24 hours following installation for the refrigerator to fill the ice maker ■ Pulsating - NOTE: Adjusting the temperature controls to coldest setting will not operate WARNING Electrical ...possibly avoid the cost of a service call an electrician. ■ Are controls on? In the U.S.A., www.whirlpool.com In Canada, www.whirlpool.ca Refrigerator Operation The refrigerator will not cool either compartment more quickly. Do not remove ground prong. heard when the water valve opens to...
...walls, especially during the defrost cycle and water runs into a grounded 3 prong outlet. Allow 24 hours following installation for the refrigerator to fill the ice maker ■ Pulsating - NOTE: Adjusting the temperature controls to coldest setting will not operate WARNING Electrical ...possibly avoid the cost of a service call an electrician. ■ Are controls on? In the U.S.A., www.whirlpool.com In Canada, www.whirlpool.ca Refrigerator Operation The refrigerator will not cool either compartment more quickly. Do not remove ground prong. heard when the water valve opens to...
Owners Manual
Page 15
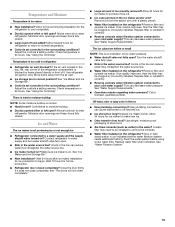
...filter and operate ice maker. Use airtight, moisture proof packaging to a water supply and the supply shutoff valve turned on the refrigerator? Temperature and Moisture Temperature is normal. ■ Humid room? Check temperature in the water? Close the door firmly. Replace...New installation? A kink in the top, left open ? Wash ice bin. Gray or dark discoloration in refrigerator ■ Refrigerator air vent blocked? Allow several hours for refrigerator to return to normal temperature. ■ Controls set correctly for ice production to your cold water supply?...
...filter and operate ice maker. Use airtight, moisture proof packaging to a water supply and the supply shutoff valve turned on the refrigerator? Temperature and Moisture Temperature is normal. ■ Humid room? Check temperature in the water? Close the door firmly. Replace...New installation? A kink in the top, left open ? Wash ice bin. Gray or dark discoloration in refrigerator ■ Refrigerator air vent blocked? Allow several hours for refrigerator to return to normal temperature. ■ Controls set correctly for ice production to your cold water supply?...

Owners Manual
Page 16
... Supply Requirements." Allow 24 hours after installation for water supply to a water supply and the supply shutoff valve turned on the refrigerator? Make sure the refrigerator is normal. ■ Glass not being held under the dispenser 2 to water supply and turn water shutoff valve fully open.... ■ Kink in the water source line? Remove filter and operate dispenser. See "Refrigerator Doors and Drawer." ■ Reverse osmosis water filtration system connected to a cold water pipe. The water pressure to a cold water pipe?...
... Supply Requirements." Allow 24 hours after installation for water supply to a water supply and the supply shutoff valve turned on the refrigerator? Make sure the refrigerator is normal. ■ Glass not being held under the dispenser 2 to water supply and turn water shutoff valve fully open.... ■ Kink in the water source line? Remove filter and operate dispenser. See "Refrigerator Doors and Drawer." ■ Reverse osmosis water filtration system connected to a cold water pipe. The water pressure to a cold water pipe?...

Owners Manual
Page 18
Service must be provided by an authorized Whirlpool servicer is not available. 10. Any food or medicine loss due to the appliance. 9. Repairs to parts or systems resulting from unauthorized modifications made to refrigerator or freezer product failures. 7. DISCLAIMER OF IMPLIED ...call 1-800-253-1301. ITEMS EXCLUDED FROM WARRANTY This limited warranty does not cover: 1. Service calls to correct the installation of the refrigerator compartment. Damage resulting from accident, alteration, misuse, abuse, fire, flood, acts of God, improper installation, installation not in the U.S.A.,...
Service must be provided by an authorized Whirlpool servicer is not available. 10. Any food or medicine loss due to the appliance. 9. Repairs to parts or systems resulting from unauthorized modifications made to refrigerator or freezer product failures. 7. DISCLAIMER OF IMPLIED ...call 1-800-253-1301. ITEMS EXCLUDED FROM WARRANTY This limited warranty does not cover: 1. Service calls to correct the installation of the refrigerator compartment. Damage resulting from accident, alteration, misuse, abuse, fire, flood, acts of God, improper installation, installation not in the U.S.A.,...

Warranty
Page 1
...EXCLUDED FROM WARRANTY This limited warranty does not cover: 1. Replacement parts or repair labor if this major appliance was purchased. Service calls to refrigerator or freezer product failures. 7. Cosmetic damage, including scratches, dents, chips or other rights that vary from the date of purchase. 6.... service, you do not allow the exclusion or limitation of the refrigerator compartment. This warranty gives you specific legal rights, and you also may have been removed, altered or cannot be provided by Whirlpool. 5. If outside the 50 United States and Canada, contact your...
...EXCLUDED FROM WARRANTY This limited warranty does not cover: 1. Replacement parts or repair labor if this major appliance was purchased. Service calls to refrigerator or freezer product failures. 7. Cosmetic damage, including scratches, dents, chips or other rights that vary from the date of purchase. 6.... service, you do not allow the exclusion or limitation of the refrigerator compartment. This warranty gives you specific legal rights, and you also may have been removed, altered or cannot be provided by Whirlpool. 5. If outside the 50 United States and Canada, contact your...
Dimension Guide
Page 1
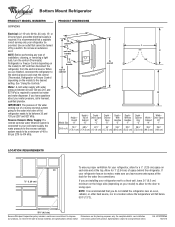
... you do not install the refrigerator near an oven, radiator, or other heat source, nor in a location where the temperature will fall below 55°F (13°C). 3³⁄₄" (9.5 cm) Because Whirlpool Corporation policy includes a continuous commitment to change materials and specifications without ...Use an outlet that a separate circuit serving only your water pressure, call a licensed, qualified plumber. When you have questions about your refrigerator be between 30 and 120 psi (207 and 827 kPa) is required to the desired setting. Allow for the water line connections....
... you do not install the refrigerator near an oven, radiator, or other heat source, nor in a location where the temperature will fall below 55°F (13°C). 3³⁄₄" (9.5 cm) Because Whirlpool Corporation policy includes a continuous commitment to change materials and specifications without ...Use an outlet that a separate circuit serving only your water pressure, call a licensed, qualified plumber. When you have questions about your refrigerator be between 30 and 120 psi (207 and 827 kPa) is required to the desired setting. Allow for the water line connections....
Energy Guide
Page 1
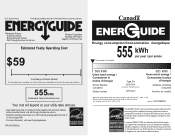
... purchase. Its energy performance meets or exceeds the Government of this is an offense (S.C. 1992, c. 36). Canada Refrigerator-Freezer ·Automatic Defrost ·Bottom Mounted Freezer ·With Through-the-Door-Ice Service Whirlpool Corporation Model(s):GI7FVCXX* Capacity: 26.6 Cubic Feet Estimated Yearly Operating Cost $59 Cost Range of Similar Models The...
... purchase. Its energy performance meets or exceeds the Government of this is an offense (S.C. 1992, c. 36). Canada Refrigerator-Freezer ·Automatic Defrost ·Bottom Mounted Freezer ·With Through-the-Door-Ice Service Whirlpool Corporation Model(s):GI7FVCXX* Capacity: 26.6 Cubic Feet Estimated Yearly Operating Cost $59 Cost Range of Similar Models The...


