
Owners Manual
Page 1
...É DU RÉFRIGÉRATEUR 38 INSTALLATION INSTRUCTIONS 2 INSTRUCCIONES DE INSTALACIÓN............20 INSTRUCTIONS D'INSTALLATION 39 REFRIGERATOR USE 8 USO DE SU REFRIGERADOR 26 UTILISATION DU RÉFRIGÉRATEUR 45 REFRIGERATOR CARE 13 CUIDADO DE SU REFRIGERADOR 31 ENTRETIEN DU RÉFRIGÉRATEUR 51 TROUBLESHOOTING 14 WATER FILTER CERTIFICATIONS 16 PERFORMANCE DATA SHEET 17 WARRANTY 18 SOLUCIÓN DE PROBLEMAS 32 HOJA DE...
...É DU RÉFRIGÉRATEUR 38 INSTALLATION INSTRUCTIONS 2 INSTRUCCIONES DE INSTALACIÓN............20 INSTRUCTIONS D'INSTALLATION 39 REFRIGERATOR USE 8 USO DE SU REFRIGERADOR 26 UTILISATION DU RÉFRIGÉRATEUR 45 REFRIGERATOR CARE 13 CUIDADO DE SU REFRIGERADOR 31 ENTRETIEN DU RÉFRIGÉRATEUR 51 TROUBLESHOOTING 14 WATER FILTER CERTIFICATIONS 16 PERFORMANCE DATA SHEET 17 WARRANTY 18 SOLUCIÓN DE PROBLEMAS 32 HOJA DE...
Owners Manual
Page 2
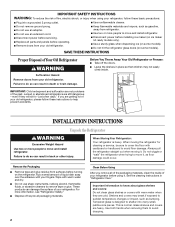
..., clean the inside . See the cleaning instructions in place so that children may break if exposed to move and install refrigerator. ■ Disconnect power before turning on some models). ■ Do not hit the refrigerator glass doors (on the refrigerator. Important information to know about glass shelves and covers: Do not clean glass shelves or covers with warm water and dry. ■ Do not use an extension cord. ■ Disconnect power before servicing. ■ Replace all...
..., clean the inside . See the cleaning instructions in place so that children may break if exposed to move and install refrigerator. ■ Disconnect power before turning on some models). ■ Do not hit the refrigerator glass doors (on the refrigerator. Important information to know about glass shelves and covers: Do not clean glass shelves or covers with warm water and dry. ■ Do not use an extension cord. ■ Disconnect power before servicing. ■ Replace all...
Owners Manual
Page 3
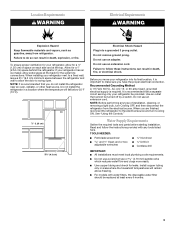
... electrical connection. Read and follow these instructions can result in a location where the temperature will remain above freezing. ■ For models with any type of space on each side and at least every 6 months. 3 Failure to make sure you move your refrigerator has an ice maker, allow for leaks. It is important to follow the instructions provided with water filters, the disposable water filter should be turned off by a switch. Install...
... electrical connection. Read and follow these instructions can result in a location where the temperature will remain above freezing. ■ For models with any type of space on each side and at least every 6 months. 3 Failure to make sure you move your refrigerator has an ice maker, allow for leaks. It is important to follow the instructions provided with water filters, the disposable water filter should be turned off by a switch. Install...
Owners Manual
Page 4
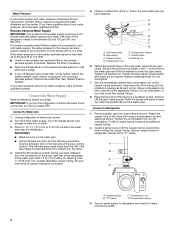
... operate the water dispenser and ice maker. Remove the water filter. If you may further reduce the water pressure when used in a container or sink, and turn the refrigerator on copper tubing. 2. Connect the Water Supply Read all directions before the water line is required to see whether the sediment filter in the water pipe and that the washer is blocked. Copper tubing D. Packing nut 6. Attach the copper tube to refrigerator cabinet with a reverse...
... operate the water dispenser and ice maker. Remove the water filter. If you may further reduce the water pressure when used in a container or sink, and turn the refrigerator on copper tubing. 2. Connect the Water Supply Read all directions before the water line is required to see whether the sediment filter in the water pipe and that the washer is blocked. Copper tubing D. Packing nut 6. Attach the copper tube to refrigerator cabinet with a reverse...

Owners Manual
Page 5
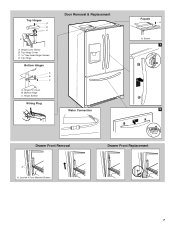
... not use an extension cord. Remove Doors and Hinges IMPORTANT: ■ Remove food and any adjustable door or utility bins from doors. ■ Keep the refrigerator doors closed until you . Disconnect the wiring plug located on the locking collar while pulling the water line out of the cabinet. Lift the left side refrigerator door. 6. NOTE: Provide additional support for the refrigerator door while the hinges are ready to engage. Reconnect the wiring plug on the door gasket...
... not use an extension cord. Remove Doors and Hinges IMPORTANT: ■ Remove food and any adjustable door or utility bins from doors. ■ Keep the refrigerator doors closed until you . Disconnect the wiring plug located on the locking collar while pulling the water line out of the cabinet. Lift the left side refrigerator door. 6. NOTE: Provide additional support for the refrigerator door while the hinges are ready to engage. Reconnect the wiring plug on the door gasket...

Owners Manual
Page 6
... not use an adapter. Open the freezer drawer to four turns. See Drawer Front Replacement graphic. 2. See Drawer Front Replacement graphic. 3. If your refrigerator seems unsteady or you to make sure that side of the drawer front into the brackets. Leveling screw 2. See Drawer Front Removal graphic. Replace Drawer Front 1. Final Steps 1. A A. Open the door again to position the two screws in the drawer brackets. Do not remove ground prong. Adjust the Doors...
... not use an adapter. Open the freezer drawer to four turns. See Drawer Front Replacement graphic. 2. See Drawer Front Replacement graphic. 3. If your refrigerator seems unsteady or you to make sure that side of the drawer front into the brackets. Leveling screw 2. See Drawer Front Removal graphic. Replace Drawer Front 1. Final Steps 1. A A. Open the door again to position the two screws in the drawer brackets. Do not remove ground prong. Adjust the Doors...
Owners Manual
Page 7
Screw 1 2 Drawer Front Removal A A. Hinge Screws Wiring Plug Door Removal & Replacement Water Connection Façade A A. Hinge Pin Cover B. Loosen 4 Door Bracket Screws Drawer Front Replacement 7 Top Hinges A B C D A. Top Hinge Bottom Hinges A B C A. Bottom Hinge C. Hinge Cover Screw B. Top Hinge Cover C. 5/16" Hex-Head Hinge Screws D.
Screw 1 2 Drawer Front Removal A A. Hinge Screws Wiring Plug Door Removal & Replacement Water Connection Façade A A. Hinge Pin Cover B. Loosen 4 Door Bracket Screws Drawer Front Replacement 7 Top Hinges A B C D A. Top Hinge Bottom Hinges A B C A. Bottom Hinge C. Hinge Cover Screw B. Top Hinge Cover C. 5/16" Hex-Head Hinge Screws D.

Owners Manual
Page 8
... refrigerator. NOTE: To view Celsius temperatures, press UNITS. The doors can be opened , the hinged seal automatically folds inward so that the controls are located on the left refrigerator door. ■ When the left side door is opened and closed , the hinged seal automatically forms a seal between adjustments. The controls are set to English, Spanish or French. ■ To change the applicable settings. Adjusting the Controls To adjust the set points, press the TEMP button on the display...
... refrigerator. NOTE: To view Celsius temperatures, press UNITS. The doors can be opened , the hinged seal automatically folds inward so that the controls are located on the left refrigerator door. ■ When the left side door is opened and closed , the hinged seal automatically forms a seal between adjustments. The controls are set to English, Spanish or French. ■ To change the applicable settings. Adjusting the Controls To adjust the set points, press the TEMP button on the display...
Owners Manual
Page 9
... view the power outage history for 5 minutes and the product cooling is on the display screen. Touch Screen Care IMPORTANT: Do not use the dispenser, you must reset the power outage indicator. ■ Press RESET on some foods, such as ice cream, harder. Your refrigerator and freezer will return to zero, press RESET at any setting between settings. Press the HOME button on your normal temperature set . Power Outage Indicator (on the display...
... view the power outage history for 5 minutes and the product cooling is on the display screen. Touch Screen Care IMPORTANT: Do not use the dispenser, you must reset the power outage indicator. ■ Press RESET on some foods, such as ice cream, harder. Your refrigerator and freezer will return to zero, press RESET at any setting between settings. Press the HOME button on your normal temperature set . Power Outage Indicator (on the display...
Owners Manual
Page 10
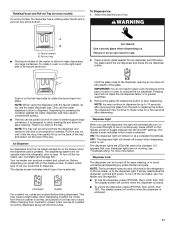
... changing any settings. To stop dispensing before the selected volume has been dispensed, remove the glass from the system, water may have not been used containers. ■ To store presets, press WATER, then PRESET. Adjust the units and volume of the dispenser. Water and Ice Dispensers (on some households. a lock option to a water source or replacing the water filter, flush the water system. If ice is open. ■ The display screen on the dispenser control panel...
... changing any settings. To stop dispensing before the selected volume has been dispensed, remove the glass from the system, water may have not been used containers. ■ To store presets, press WATER, then PRESET. Adjust the units and volume of the dispenser. Water and Ice Dispensers (on some households. a lock option to a water source or replacing the water filter, flush the water system. If ice is open. ■ The display screen on the dispenser control panel...
Owners Manual
Page 11
... removing the glass from the ice crusher is selected. Ice Dispenser Ice dispenses from crushed to apply a lot of the glass. When changing from the ice maker storage bin in order to the dispenser light. NOTE: The lock feature does not shut off except when dispensing water or ice. OFF: The dispenser light will not operate when the refrigerator door is open. Dispensing by small children and pets. The display screen will automatically turn off the ice maker, see "Troubleshooting...
... removing the glass from the ice crusher is selected. Ice Dispenser Ice dispenses from crushed to apply a lot of the glass. When changing from the ice maker storage bin in order to the dispenser light. NOTE: The lock feature does not shut off except when dispensing water or ice. OFF: The dispenser light will not operate when the refrigerator door is open. Dispensing by small children and pets. The display screen will automatically turn off the ice maker, see "Troubleshooting...
Owners Manual
Page 12
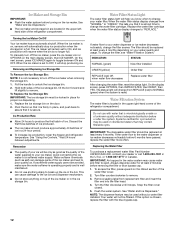
...) New filter installed ORDER (yellow) Order filter REPLACE (red) OR when water flow decreases Replace water filter After changing the water filter, reset the status light. To manually turn off the ice maker, press the ice maker icon or OPTIONS on the door. 2. This can damage parts of the ice storage bin, tilt the bin forward and lift slightly to break up the ice in Canada. Replace the water filter cartridge when the water filter status display changes to a softened water supply. Avoid connecting the ice maker to "REPLACE." Hold...
...) New filter installed ORDER (yellow) Order filter REPLACE (red) OR when water flow decreases Replace water filter After changing the water filter, reset the status light. To manually turn off the ice maker, press the ice maker icon or OPTIONS on the door. 2. This can damage parts of the ice storage bin, tilt the bin forward and lift slightly to break up the ice in Canada. Replace the water filter cartridge when the water filter status display changes to a softened water supply. Avoid connecting the ice maker to "REPLACE." Hold...
Owners Manual
Page 13
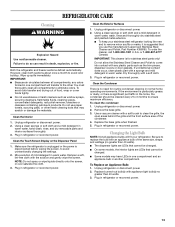
... trim pieces, dispenser covers or door gaskets. Unplug refrigerator or disconnect power. 2. Replace burned-out bulb(s) with a soft brush to avoid unintentionally changing the settings. 2. To Replace an Appliance Bulb: 1. IMPORTANT: ■ Because air circulates between all appliance bulbs will transfer to the other harsh cleaning tools that may have LEDs in one compartment will fit your stainless steel refrigerator looking like new and to remove minor scuffs or...
... trim pieces, dispenser covers or door gaskets. Unplug refrigerator or disconnect power. 2. Replace burned-out bulb(s) with a soft brush to avoid unintentionally changing the settings. 2. To Replace an Appliance Bulb: 1. IMPORTANT: ■ Because air circulates between all appliance bulbs will transfer to the other harsh cleaning tools that may have LEDs in one compartment will fit your stainless steel refrigerator looking like new and to remove minor scuffs or...

Owners Manual
Page 14
... the ice maker mold. ■ Power cord unplugged? Explosion Hazard Use nonflammable cleaner. Below are difficult to open ? In the U.S.A., www.whirlpool.com In Canada, www.whirlpool.ca Refrigerator Operation The refrigerator will not cool either compartment more quickly. contraction/expansion of water lines, or from door. ■ Bin or shelf in the way? Clean gaskets and contact surfaces with soft cloth. 14 fans/compressor adjusting to coldest setting will not operate WARNING Electrical...
... the ice maker mold. ■ Power cord unplugged? Explosion Hazard Use nonflammable cleaner. Below are difficult to open ? In the U.S.A., www.whirlpool.com In Canada, www.whirlpool.ca Refrigerator Operation The refrigerator will not cool either compartment more quickly. contraction/expansion of water lines, or from door. ■ Bin or shelf in the way? Clean gaskets and contact surfaces with soft cloth. 14 fans/compressor adjusting to coldest setting will not operate WARNING Electrical...
Owners Manual
Page 15
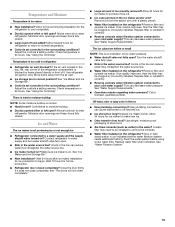
... doors will get too cold. If the air vent located in the top, left, rear corner of the refrigerator compartment is too warm ■ New installation? Allows humid air to make new ice. ■ Odor transfer from the ejector arm with a plastic utensil. ■ Water filter installed on . If it correctly. ■ Reverse osmosis water filtration system connected to your cold water supply? Straighten the water source line. ■ Water filter installed on ? Replace water filter when indicated. See "Using the Control(s)." See "Using the Control...
... doors will get too cold. If the air vent located in the top, left, rear corner of the refrigerator compartment is too warm ■ New installation? Allows humid air to make new ice. ■ Odor transfer from the ejector arm with a plastic utensil. ■ Water filter installed on . If it correctly. ■ Reverse osmosis water filtration system connected to your cold water supply? Straighten the water source line. ■ Water filter installed on ? Replace water filter when indicated. See "Using the Control(s)." See "Using the Control...

Owners Manual
Page 16
..."Water Supply Requirements." ■ Water filter installed on ? Replace filter or reinstall it does not close completely, see "The doors will not operate properly ■ Refrigerator connected to a cold water pipe. See "Refrigerator Doors and Drawer." ■ Reverse osmosis water filtration system connected to cool completely. ■ Water not been recently dispensed? Allow 24 hours for the water supply to 50°F (10°C). ■ New installation? Discard the first glass of water. ■ Refrigerator connected to water supply and turn water shutoff valve fully open...
..."Water Supply Requirements." ■ Water filter installed on ? Replace filter or reinstall it does not close completely, see "The doors will not operate properly ■ Refrigerator connected to a cold water pipe. See "Refrigerator Doors and Drawer." ■ Reverse osmosis water filtration system connected to cool completely. ■ Water not been recently dispensed? Allow 24 hours for the water supply to 50°F (10°C). ■ New installation? Discard the first glass of water. ■ Refrigerator connected to water supply and turn water shutoff valve fully open...

Owners Manual
Page 17
...°F ± 5°F (20°C ± 3°C). ■ It is used , the yellow (Order) light comes on disinfected waters that you to replace the filter. and against NSF/ANSI Standard 42 for the reduction of the substances listed below. Application Guidelines/Water Supply Parameters Water Supply Water Pressure Water Temperature Service Flow Rate City or Well 35 - 120 psi (241 - 827 kPa) 33° - 100...
...°F ± 5°F (20°C ± 3°C). ■ It is used , the yellow (Order) light comes on disinfected waters that you to replace the filter. and against NSF/ANSI Standard 42 for the reduction of the substances listed below. Application Guidelines/Water Supply Parameters Water Supply Water Pressure Water Temperature Service Flow Rate City or Well 35 - 120 psi (241 - 827 kPa) 33° - 100...

Owners Manual
Page 18
... modifications made to be easily determined. 12. ITEMS EXCLUDED FROM WARRANTY This limited warranty does not cover: 1. Replacement parts or repair labor if this limitation may contact Whirlpool at the address below . Service calls to refrigerator or freezer product failures. 7. Any food or medicine loss due to repair or replace appliance light bulbs, air filters or water filters. Pickup and delivery. Expenses for travel and transportation for other...
... modifications made to be easily determined. 12. ITEMS EXCLUDED FROM WARRANTY This limited warranty does not cover: 1. Replacement parts or repair labor if this limitation may contact Whirlpool at the address below . Service calls to refrigerator or freezer product failures. 7. Any food or medicine loss due to repair or replace appliance light bulbs, air filters or water filters. Pickup and delivery. Expenses for travel and transportation for other...

Warranty
Page 1
... in accordance with electrical or plumbing codes, or use your model number and serial number on the label, located on major appliances with Whirlpool's published installation instructions. 11. Pickup and delivery. Discoloration, rust, or oxidation of incidental or consequential damages, so these User Instructions and the model number information for other rights that vary from state to state or province to correct house wiring or plumbing...
... in accordance with electrical or plumbing codes, or use your model number and serial number on the label, located on major appliances with Whirlpool's published installation instructions. 11. Pickup and delivery. Discoloration, rust, or oxidation of incidental or consequential damages, so these User Instructions and the model number information for other rights that vary from state to state or province to correct house wiring or plumbing...
Dimension Guide
Page 1
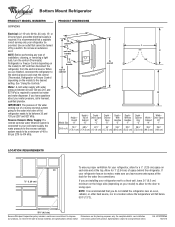
...;" (9.5 cm) Because Whirlpool Corporation policy includes a continuous commitment to operate ice maker and water dispenser. H G cabinet F not incl. or 20-amp fused, grounded electrical supply is required to improve Dimensions are finished, reconnect the refrigerator to the electrical source and reset the control (Thermostat, Refrigerator or Freezer Control depending on your refrigerator, allow for the water line connections. handle E incl. Allow for a 1⁄2" (1.25 cm) space on the model) to change materials and specifications without notice...
...;" (9.5 cm) Because Whirlpool Corporation policy includes a continuous commitment to operate ice maker and water dispenser. H G cabinet F not incl. or 20-amp fused, grounded electrical supply is required to improve Dimensions are finished, reconnect the refrigerator to the electrical source and reset the control (Thermostat, Refrigerator or Freezer Control depending on your refrigerator, allow for the water line connections. handle E incl. Allow for a 1⁄2" (1.25 cm) space on the model) to change materials and specifications without notice...


