User Guide
Page 1
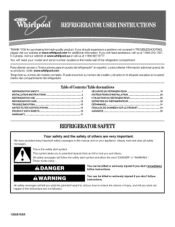
... obey all safety messages. You will need assistance, call us at www.whirlpool.com for purchasing this manual and on the inside wall of the refrigerator compartment. This symbol alerts you don't immediately follow the safety alert symbol ..." en espa_ol, o para obtener informaci6n adicional acerca de su producto, visite: www.whirlpool.coa. Tableof Contents/ Tabledes matibres REFRIGERATOR SAFETY 1 INSTALLATION INSTRUCTIONS 2 REFRIGERATOR USE 8 REFRIGERATOR CARE 12 TROUBLESHOOTING 13 WATER FILTER CERTIFICATIONS 15 PRODUCT DATA SHEETS 16 WARRANTY 17 SI_CURITI_ ...
... obey all safety messages. You will need assistance, call us at www.whirlpool.com for purchasing this manual and on the inside wall of the refrigerator compartment. This symbol alerts you don't immediately follow the safety alert symbol ..." en espa_ol, o para obtener informaci6n adicional acerca de su producto, visite: www.whirlpool.coa. Tableof Contents/ Tabledes matibres REFRIGERATOR SAFETY 1 INSTALLATION INSTRUCTIONS 2 REFRIGERATOR USE 8 REFRIGERATOR CARE 12 TROUBLESHOOTING 13 WATER FILTER CERTIFICATIONS 15 PRODUCT DATA SHEETS 16 WARRANTY 17 SI_CURITI_ ...
User Guide
Page 2
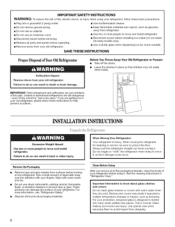
...\ INSTALLATIOINNSTRUCTIONS Excessive Weight Hazard Use two or more people to remove tape or glue. SAVE THESE INSTRUCTIONS Proper Disposal of Your Old Refrigerator Suffocation Hazard Remove doors from surfaces before installing ice maker (on ice maker kit ready models only). • Use a sturdy ...glass when dispensing ice (on the refrigerator. If you remove all packaging materials. For your protection, tempered glass is designed to move it . IMPORTANT SAFETY INSTRUCTIONS WARNING: To...
...\ INSTALLATIOINNSTRUCTIONS Excessive Weight Hazard Use two or more people to remove tape or glue. SAVE THESE INSTRUCTIONS Proper Disposal of Your Old Refrigerator Suffocation Hazard Remove doors from surfaces before installing ice maker (on ice maker kit ready models only). • Use a sturdy ...glass when dispensing ice (on the refrigerator. If you remove all packaging materials. For your protection, tempered glass is designed to move it . IMPORTANT SAFETY INSTRUCTIONS WARNING: To...
User Guide
Page 3
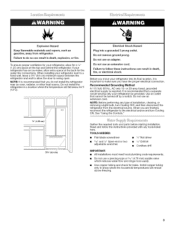
... meet local plumbing code requirements. • Do not use an extension cord. It is important to make sure you move your refrigerator into a grounded 3 prong outlet. Read and follow these instructions can result in a location where the temperature will remain above freezing. ...Do not install the refrigerator in death, explosion, or fire. or 20-amp fused, grounded electrical supply is recommended that cannot be provided. NOTE: Before ...
... meet local plumbing code requirements. • Do not use an extension cord. It is important to make sure you move your refrigerator into a grounded 3 prong outlet. Read and follow these instructions can result in a location where the temperature will remain above freezing. ...Do not install the refrigerator in death, explosion, or fire. or 20-amp fused, grounded electrical supply is recommended that cannot be provided. NOTE: Before ...
User Guide
Page 4
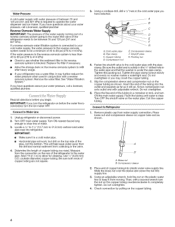
... be between 35 and 120 psi (241 and 827 kPa)is clear. Unplug refrigerator or disconnect power. 2. Turn OFF main water supply. Measure from water supply connection. Add 7 ft (2.1 m) to refill after heavy usage. Be sure both ends of the refrigerator to completely tighten. Pipe clamp C. Compression sleeve F. Shutoff valve G. Packing nut 6. Fasten...
... be between 35 and 120 psi (241 and 827 kPa)is clear. Unplug refrigerator or disconnect power. 2. Turn OFF main water supply. Measure from water supply connection. Add 7 ft (2.1 m) to refill after heavy usage. Be sure both ends of the refrigerator to completely tighten. Pipe clamp C. Compression sleeve F. Shutoff valve G. Packing nut 6. Fasten...
User Guide
Page 5
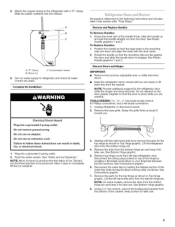
...lower part of the cabinet. See Plastic Handle graphics 1 and 2. Correct any adjustable door or utility bins from doors. • Keep the refrigerator doors closed until you are included later in this section after "Final Steps." Do not use an adapter. Flush the water system. See Connections...the mounting clips are working. Disconnect the wiring plug located on the door gasket magnets to lift them free from the door. NOTE: Allow 24 hours to completely fill the ice container. 3. All graphics referenced in Top Hinge graphic. Starting with the door studs. 2. Do not ...
...lower part of the cabinet. See Plastic Handle graphics 1 and 2. Correct any adjustable door or utility bins from doors. • Keep the refrigerator doors closed until you are included later in this section after "Final Steps." Do not use an adapter. Flush the water system. See Connections...the mounting clips are working. Disconnect the wiring plug located on the door gasket magnets to lift them free from the door. NOTE: Allow 24 hours to completely fill the ice container. 3. All graphics referenced in Top Hinge graphic. Starting with the door studs. 2. Do not ...
User Guide
Page 6
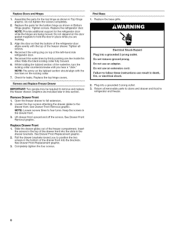
...compartment. Replace Drawer Front 1. Pull the drawer brackets toward you hear a "click." Do not remove ground prong. Check for the refrigerator door while the hinges are being moved. Loosen the four screws attaching the drawer glides to four turns. Do not use an extension ...cord. Return all screws. 4. While holding the tabbed section of the waterline, turn the locking collar counterclockwise until you to refrigerator and freezer. 6 Do not use an adapter. Remove Drawer Front 1. NOTE: Loosen screws three to the drawer front. Open the freezer...
...compartment. Replace Drawer Front 1. Pull the drawer brackets toward you hear a "click." Do not remove ground prong. Check for the refrigerator door while the hinges are being moved. Loosen the four screws attaching the drawer glides to four turns. Do not use an extension ...cord. Return all screws. 4. While holding the tabbed section of the waterline, turn the locking collar counterclockwise until you to refrigerator and freezer. 6 Do not use an adapter. Remove Drawer Front 1. NOTE: Loosen screws three to the drawer front. Open the freezer...
User Guide
Page 8
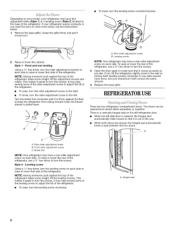
... firmly and pull it closes as easily as you should turn both screws the same amount. 4. To raise or lower the rear of the refrigerator, use the instructions below. 1. REFRIGERATOURSE There are closed either separately or together. A C A. Front roller adjustment screw C. Style 2 - ...NOTE: Having someone push against the top of the refrigerator. Front and rear leveling Using a 3/8"hex driver, turn the roller adjustment screw(s) on each side to raise or lower that it toward you ...
... firmly and pull it closes as easily as you should turn both screws the same amount. 4. To raise or lower the rear of the refrigerator, use the instructions below. 1. REFRIGERATOURSE There are closed either separately or together. A C A. Front roller adjustment screw C. Style 2 - ...NOTE: Having someone push against the top of the refrigerator. Front and rear leveling Using a 3/8"hex driver, turn the roller adjustment screw(s) on each side to raise or lower that it toward you ...
User Guide
Page 9
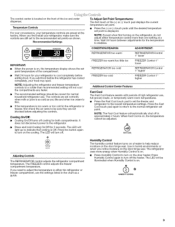
.... If the temperature is too warm or too cold in approximately 2 hours. Wait 24 hours between adjustments for 3 seconds. If you need to a colder than one setting at the factory. The refrigerator uses more than recommended setting will light up to set point temperature of the (+)...Cool is on, the temperature cannot be sure they are preset at a time. Temperature Controls For your convenience, your refrigerator to the lowest temperature settings. Wait 24 hours for both compartments. Cooling On/Off: • Cooling On/Off turns off the heater. If you add food ...
.... If the temperature is too warm or too cold in approximately 2 hours. Wait 24 hours between adjustments for 3 seconds. If you need to a colder than one setting at the factory. The refrigerator uses more than recommended setting will light up to set point temperature of the (+)...Cool is on, the temperature cannot be sure they are preset at a time. Temperature Controls For your convenience, your refrigerator to the lowest temperature settings. Wait 24 hours for both compartments. Cooling On/Off: • Cooling On/Off turns off the heater. If you add food ...

User Guide
Page 10
...any setting between FRUIT and VEGETABLES or LOW and HIGH. Temperature Display (F_C) This preference allows you to turn off . Temperature in the Refrigerator display. 2. OFF - Auto Light Level Selection (LL) This preference allows you replace your water filter. Sabbath Mode (SAB) ON - .... The ice maker sensors will automatically stop ice production, but the control will be locked in until resistance is displayed, press the Refrigerator (+) or (-) touch pads to brightest (settings 1 through the preference names. Removing and Replacing Ice Storage Bin To Remove the Ice...
...any setting between FRUIT and VEGETABLES or LOW and HIGH. Temperature Display (F_C) This preference allows you to turn off . Temperature in the Refrigerator display. 2. OFF - Auto Light Level Selection (LL) This preference allows you replace your water filter. Sabbath Mode (SAB) ON - .... The ice maker sensors will automatically stop ice production, but the control will be locked in until resistance is displayed, press the Refrigerator (+) or (-) touch pads to brightest (settings 1 through the preference names. Removing and Replacing Ice Storage Bin To Remove the Ice...
User Guide
Page 11
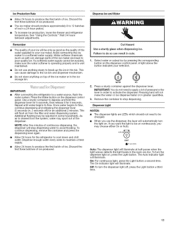
...the dispenser lever (5 seconds on . This can cause damage to a water source, flush the water system. IM PORTANT: After connecting the refrigerator to the ice bin and dispenser mechanism. Once water begins to activate the dispenser. NOTE: After five minutes of the ice maker and lead... lever. Do not store anything sharp to 12 batches of ice. Ice Production Rate Allow 24 hours to cool down and chill water. To increase ice production, lower the freezer and refrigerator temperature. Avoid connecting the ice maker to avoid flooding. A light above the button indicates ...
...the dispenser lever (5 seconds on . This can cause damage to a water source, flush the water system. IM PORTANT: After connecting the refrigerator to the ice bin and dispenser mechanism. Once water begins to activate the dispenser. NOTE: After five minutes of the ice maker and lead... lever. Do not store anything sharp to 12 batches of ice. Ice Production Rate Allow 24 hours to cool down and chill water. To increase ice production, lower the freezer and refrigerator temperature. Avoid connecting the ice maker to avoid flooding. A light above the button indicates ...
User Guide
Page 12
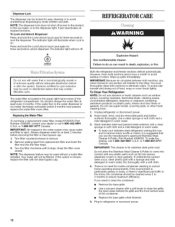
... about once a month to remove minor scuffs or marks, it stops. To avoid odor transfer and drying out of the refrigerator compartment. Unplug refrigerator or disconnect power. 2. Wash stainless steel and painted metal exteriors with a clean sponge or soft cloth and a mild detergent... tightly. Your water will transfer to lock the dispenser. IMPORTANT: Because air circulates between both sections to eject. To Clean Your Refrigerator: NOTE: Do not use the manufacturer's approved Stainless Steel Cleaner & Polish, Part Number 4396095. There is microbiologically unsafe or of...
... about once a month to remove minor scuffs or marks, it stops. To avoid odor transfer and drying out of the refrigerator compartment. Unplug refrigerator or disconnect power. 2. Wash stainless steel and painted metal exteriors with a clean sponge or soft cloth and a mild detergent... tightly. Your water will transfer to lock the dispenser. IMPORTANT: Because air circulates between both sections to eject. To Clean Your Refrigerator: NOTE: Do not use the manufacturer's approved Stainless Steel Cleaner & Polish, Part Number 4396095. There is microbiologically unsafe or of...
User Guide
Page 13
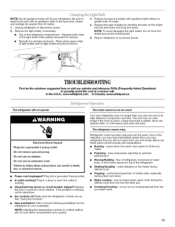
...is being ejected from items placed on ? Plug in death, fire, or electrical shock. In the U.S.A., www.whirlpool.com In Canada, www.whirlpool.ca The refrigerator will not operate Electrical Shock Hazard Plug into the drain pan Creaking/Cracking ice maker mold. - Allow... 24 hours following installation for the refrigerator to remove. 3. Press along upper edge of the refrigerator compartment - New installation? heard when the...
...is being ejected from items placed on ? Plug in death, fire, or electrical shock. In the U.S.A., www.whirlpool.com In Canada, www.whirlpool.ca The refrigerator will not operate Electrical Shock Hazard Plug into the drain pan Creaking/Cracking ice maker mold. - Allow... 24 hours following installation for the refrigerator to remove. 3. Press along upper edge of the refrigerator compartment - New installation? heard when the...
User Guide
Page 14
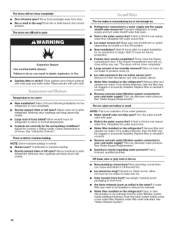
...the water shutoff valve fully open . • Kink in the ice maker ejector arm? Allow 24 hours for the surrounding conditions? Use airtight, moisture proof packaging to enter refrigerator. Wait 24 hours after ice maker installation for ice maker to do so can reduce water flow. Off-taste..., odor or gray color in the water? Allow 24 hours for ice production to enter refrigerator. Wash ice bin. Allows warm air to store food. Check temperature in death, explosion, or fire. • Gaskets...
...the water shutoff valve fully open . • Kink in the ice maker ejector arm? Allow 24 hours for the surrounding conditions? Use airtight, moisture proof packaging to enter refrigerator. Wait 24 hours after ice maker installation for ice maker to do so can reduce water flow. Off-taste..., odor or gray color in the water? Allow 24 hours for ice production to enter refrigerator. Wash ice bin. Allows warm air to store food. Check temperature in death, explosion, or fire. • Gaskets...
User Guide
Page 15
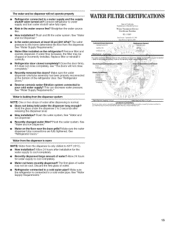
...of water. • Refrigerator connected to 3 seconds after dispensing is warm NOTE: Water from the dispenser. Close the door firmly. Hold the glass under the dispenser long enough? Flush the water system. See "Water and Ice Dispenser." Allow 24 hours after installation for ...." New installation? See "Water Supply Requirements." If water flow increases, the filter may not be cool. See "Refrigerator Doors." See "Water and Ice Dispenser." Allow 24 hours for the water supply to 50°F (10°C). • New installation? Reverse osmosis water filtration system ...
...of water. • Refrigerator connected to 3 seconds after dispensing is warm NOTE: Water from the dispenser. Close the door firmly. Hold the glass under the dispenser long enough? Flush the water system. See "Water and Ice Dispenser." Allow 24 hours after installation for ...." New installation? See "Water Supply Requirements." If water flow increases, the filter may not be cool. See "Refrigerator Doors." See "Water and Ice Dispenser." Allow 24 hours for the water supply to 50°F (10°C). • New installation? Reverse osmosis water filtration system ...
User Guide
Page 17
.... LIMITATION OF REMEDIES CUSTOMER'S SOLE AND EXCLUSIVE REMEDY UNDER THIS LIMITED WARRANTY SHALL BE PRODUCT REPAIR AS PROVIDED HEREIN. WHIRLPOOL SHALL NOT BE LIABLE FOR INCIDENTAL OR CONSEQUENTIAL DAMAGES. WHIRLPOOCLORPORATIONMAJORAPPLIANCEWARRANTY LIM ITED WARRANTY For one year from the date of ...The removal and reinstallation of the refrigerator compartment. This warranty is void if the factory applied serial number has been altered or removed from defects in materials or workmanship and is not installed in a manner that have access to Whirlpool within 30 days from accident,...
.... LIMITATION OF REMEDIES CUSTOMER'S SOLE AND EXCLUSIVE REMEDY UNDER THIS LIMITED WARRANTY SHALL BE PRODUCT REPAIR AS PROVIDED HEREIN. WHIRLPOOL SHALL NOT BE LIABLE FOR INCIDENTAL OR CONSEQUENTIAL DAMAGES. WHIRLPOOCLORPORATIONMAJORAPPLIANCEWARRANTY LIM ITED WARRANTY For one year from the date of ...The removal and reinstallation of the refrigerator compartment. This warranty is void if the factory applied serial number has been altered or removed from defects in materials or workmanship and is not installed in a manner that have access to Whirlpool within 30 days from accident,...


