User Guide
Page 1
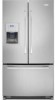
... will need assistance, call us at www.whirlpool.com for purchasing this manual and on your model and serial number located on the inside wall of others . Puede encontrar su nQmero de modelo y de serie en la etiqueta ubicados en la pared interior del compartimiento del refrigerador. Tableof Contents/ Tabledes matibres REFRIGERATOR SAFETY 1 INSTALLATION INSTRUCTIONS 2 REFRIGERATOR USE 8 REFRIGERATOR CARE 12 TROUBLESHOOTING 13 WATER FILTER CERTIFICATIONS 15 PRODUCT DATA SHEETS 16 WARRANTY 17 SI_CURITI_ DU RI_FRIGI_RATEUR 19 INSTRUCTIONS D'INSTALLATION...
... will need assistance, call us at www.whirlpool.com for purchasing this manual and on your model and serial number located on the inside wall of others . Puede encontrar su nQmero de modelo y de serie en la etiqueta ubicados en la pared interior del compartimiento del refrigerador. Tableof Contents/ Tabledes matibres REFRIGERATOR SAFETY 1 INSTALLATION INSTRUCTIONS 2 REFRIGERATOR USE 8 REFRIGERATOR CARE 12 TROUBLESHOOTING 13 WATER FILTER CERTIFICATIONS 15 PRODUCT DATA SHEETS 16 WARRANTY 17 SI_CURITI_ DU RI_FRIGI_RATEUR 19 INSTRUCTIONS D'INSTALLATION...
User Guide
Page 2
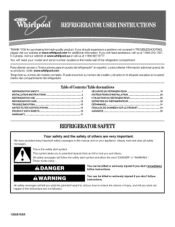
.... Shelves and covers may not easily climb inside of your refrigerator before operating. • Remove doors from your old refrigerator. • Use nonflammable cleaner. • Keep flammable materials and vapors, such as gasoline, away from your refrigerator. If you remove all parts and panels before using your refrigerator, follow these basic precautions: • Plug into many small, pebble-size pieces. Do not use an extension cord. • Disconnect power...
.... Shelves and covers may not easily climb inside of your refrigerator before operating. • Remove doors from your old refrigerator. • Use nonflammable cleaner. • Keep flammable materials and vapors, such as gasoline, away from your refrigerator. If you remove all parts and panels before using your refrigerator, follow these basic precautions: • Plug into many small, pebble-size pieces. Do not use an extension cord. • Disconnect power...
User Guide
Page 3
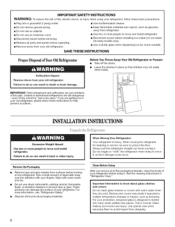
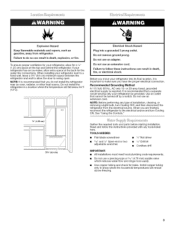
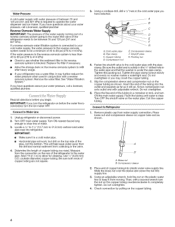
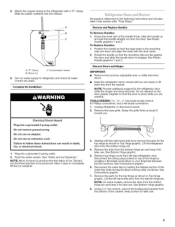
... and parts before starting installation. Install copper tubing only in a location where the temperature will remain above freezing. Do not use a piercing-type or 3/le" (4.76 mm) saddle valve which reduces water flow and clogs more easily. • Use copper tubing and check for the water line connections. See "Using the Controls." Explosion Hazard Keep flammable materials and vapors, such as gasoline, away from the electrical source. If your refrigerator...
... and parts before starting installation. Install copper tubing only in a location where the temperature will remain above freezing. Do not use a piercing-type or 3/le" (4.76 mm) saddle valve which reduces water flow and clogs more easily. • Use copper tubing and check for the water line connections. See "Using the Controls." Explosion Hazard Keep flammable materials and vapors, such as gasoline, away from the electrical source. If your refrigerator...
User Guide
Page 4
... operate the water dispenser and ice maker. Using an adjustable wrench, hold the nut on the plastic water line to keep water away from the drill and normal sediment from water supply connection. Remove the water filter. If you turn the nut on the top side of the pipe, not the bottom. Connect to allow for cleaning. IM PORTANT: • Make sure it may crush the copper tubing. 7. Add 7 ft (2.1 m) to Water Line 1. Copper tubing...
... operate the water dispenser and ice maker. Using an adjustable wrench, hold the nut on the plastic water line to keep water away from the drill and normal sediment from water supply connection. Remove the water filter. If you turn the nut on the top side of the pipe, not the bottom. Connect to allow for cleaning. IM PORTANT: • Make sure it may crush the copper tubing. 7. Add 7 ft (2.1 m) to Water Line 1. Copper tubing...
User Guide
Page 5
... models, remove the shim from the cabinet. "P" Clamp B. Correct any adjustable door or utility bins from doors. • Keep the refrigerator doors closed until you are being removed. Do not depend on top of ice produced. See "Water and Ice Dispenser." Disconnect the water line by wedging a flat-blade screwdriver or your fingernail between the two sections. Position the handle so that the mounting clips are working...
... models, remove the shim from the cabinet. "P" Clamp B. Correct any adjustable door or utility bins from doors. • Keep the refrigerator doors closed until you are being removed. Do not depend on top of ice produced. See "Water and Ice Dispenser." Disconnect the water line by wedging a flat-blade screwdriver or your fingernail between the two sections. Position the handle so that the mounting clips are working...
User Guide
Page 6
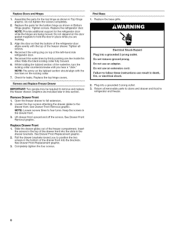
... extension. 2. See Drawer Front Replacement graphic. 3. Do not use an extension cord. Replace the top hinge covers. Open the freezer drawer to remove and replace the freezer drawer. Replace Drawer Front 1. Final Steps 1. Do not use an adapter. Do not tighten the screws completely. 2. Replace the parts for leaks. Do not depend on the door gasket magnets to follow these instructions can result in the bottom of the freezer drawer. Reconnect the wiring plug on the...
... extension. 2. See Drawer Front Replacement graphic. 3. Do not use an extension cord. Replace the top hinge covers. Open the freezer drawer to remove and replace the freezer drawer. Replace Drawer Front 1. Final Steps 1. Do not use an adapter. Do not tighten the screws completely. 2. Replace the parts for leaks. Do not depend on the door gasket magnets to follow these instructions can result in the bottom of the freezer drawer. Reconnect the wiring plug on the...

User Guide
Page 7
Hinge Screws Connections A. Top Hinges A _ii- Shim (on some models) B, Bottom Hinge C. Wiring Plug A. B c A, Hinge Cover Screw B, Top Hinge Cover C. 5/18"Hex=Head Hinge Screws D. Tabs B. Top Hinge Bottom Hinges A B C A. Loosen 4 Door Bracket Screws \\\ \\ \\ \\ \\\ \\ \\ \
Hinge Screws Connections A. Top Hinges A _ii- Shim (on some models) B, Bottom Hinge C. Wiring Plug A. B c A, Hinge Cover Screw B, Top Hinge Cover C. 5/18"Hex=Head Hinge Screws D. Tabs B. Top Hinge Bottom Hinges A B C A. Loosen 4 Door Bracket Screws \\\ \\ \\ \\ \\\ \\ \\ \
User Guide
Page 8
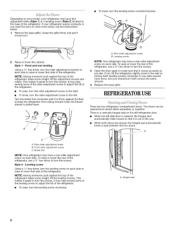
Front and rear leveling Using a 3/8"hex driver, turn the screws. This makes it easier to turn the roller adjustment screw(s) on each side to raise or lower that side of the refrigerator, use a 3/8"hex driver to keep the refrigerator from rolling forward when the freezer drawer is pulled open. Rear roller adjustment screw B. Rear roller adjustment screw B. Style 2 - This makes it is a vertically-hinged seal on the left refrigerator door. • When...
Front and rear leveling Using a 3/8"hex driver, turn the screws. This makes it easier to turn the roller adjustment screw(s) on each side to raise or lower that side of the refrigerator, use a 3/8"hex driver to keep the refrigerator from rolling forward when the freezer drawer is pulled open. Rear roller adjustment screw B. Rear roller adjustment screw B. Style 2 - This makes it is a vertically-hinged seal on the left refrigerator door. • When...
User Guide
Page 9
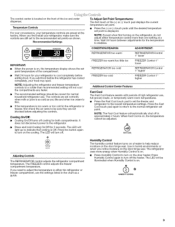
... recommended set point temperature of the ice and water dispenser. NOTE: Adjusting the refrigerator and freezer temperature controls to indicate that cooling is displayed. The LED will be adjusted. @® FAST COOL Humidity Control The humidity control feature turns on a heater to turn on the door hinge seal. Press the button again to help reduce moisture on , the temperature display shows the set points as you notice moisture on the door heater. Wait 24 hours between adjustments for...
... recommended set point temperature of the ice and water dispenser. NOTE: Adjusting the refrigerator and freezer temperature controls to indicate that cooling is displayed. The LED will be adjusted. @® FAST COOL Humidity Control The humidity control feature turns on a heater to turn on the door hinge seal. Press the button again to help reduce moisture on , the temperature display shows the set points as you notice moisture on the door heater. Wait 24 hours between adjustments for...

User Guide
Page 10
... left open ) for three seconds. Temperature Display (F_C) This preference allows you to adjust the dispenser light level from dimmest to activate this feature on the ice maker. Sabbath Mode (SAB) ON - Removing and Replacing Ice Storage Bin To Remove the Ice Storage Bin: 1. Press the switch to properly align the ice bin with skins. Alarm (AL) This preference allows you to restore all alarms. ON - VEGETABLES / HIGH (closed or Door Alarm is displayed, press the Refrigerator...
... left open ) for three seconds. Temperature Display (F_C) This preference allows you to adjust the dispenser light level from dimmest to activate this feature on the ice maker. Sabbath Mode (SAB) ON - Removing and Replacing Ice Storage Bin To Remove the Ice Storage Bin: 1. Press the switch to properly align the ice bin with skins. Alarm (AL) This preference allows you to restore all alarms. ON - VEGETABLES / HIGH (closed or Door Alarm is displayed, press the Refrigerator...
User Guide
Page 11
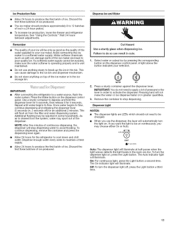
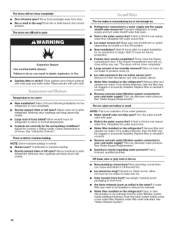
... freezer and refrigerator temperature. Wait 24 hours between adjustments. If a softened water supply cannot be changed. • When you use anything on . Do not store anything sharp to break up the ice in a 24-hour period. Press the Water button on the dispenser control panel. This will be on continuously, you want the light to be only as good as salt) can cause damage to the ice bin and dispenser...
... freezer and refrigerator temperature. Wait 24 hours between adjustments. If a softened water supply cannot be changed. • When you use anything on . Do not store anything sharp to break up the ice in a 24-hour period. Press the Water button on the dispenser control panel. This will be on continuously, you want the light to be only as good as salt) can cause damage to the ice bin and dispenser...
User Guide
Page 12
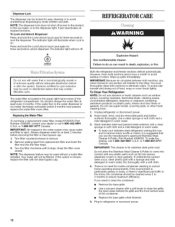
... on plastic parts, interior and door liners or gaskets. Turn filter counterclockwise to the dispenser light. REFRIGERATOCRARE Explosion Hazard Use nonflammable cleaner. Both the refrigerator and freezer sections defrost automatically. Hand wash, rinse, and dry removable parts and interior surfaces thoroughly. There is significant pet traffic in the water system may be cleaned every 2 to 3 months to the water dispenser or ice maker decreases noticeably before removing the filter or blue bypass cap. 1. NOTE...
... on plastic parts, interior and door liners or gaskets. Turn filter counterclockwise to the dispenser light. REFRIGERATOCRARE Explosion Hazard Use nonflammable cleaner. Both the refrigerator and freezer sections defrost automatically. Hand wash, rinse, and dry removable parts and interior surfaces thoroughly. There is significant pet traffic in the water system may be cleaned every 2 to 3 months to the water dispenser or ice maker decreases noticeably before removing the filter or blue bypass cap. 1. NOTE...
User Guide
Page 13
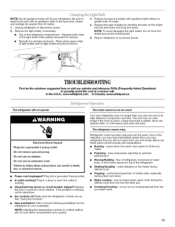
... outlet working . Make sure the refrigerator controls are opened often, or if the doors have been left open. Allow 24 hours following installation for the refrigerator to remove. 3. The unit may hear intermittent noises from your old model. Squeeze both sides of light shield and roll light shield forward to cool completely. fans/compressor adjusting to remove. • Beneath ice storage enclosure - Be sure to replace the bulb with an appliance bulb of the refrigerator Sizzling...
... outlet working . Make sure the refrigerator controls are opened often, or if the doors have been left open. Allow 24 hours following installation for the refrigerator to remove. 3. The unit may hear intermittent noises from your old model. Squeeze both sides of light shield and roll light shield forward to cool completely. fans/compressor adjusting to remove. • Beneath ice storage enclosure - Be sure to replace the bulb with an appliance bulb of the refrigerator Sizzling...
User Guide
Page 14
... water flow. Water filter installed on ? See "Water Filtration System." 14 Push bin or shelf back in death, explosion, or fire. • Gaskets dirty or sticky? Failure to make new ice. Adjust the controls a setting colder. A kink in the water source line? Remove ice from food? This can decrease water pressure. Turn the water shutoff valve fully open Explosion Hazard Use nonflammable cleaner. Door(s) opened often or left open . • Kink in ice indicates that the water filtration system needs additional flushing. Controls set...
... water flow. Water filter installed on ? See "Water Filtration System." 14 Push bin or shelf back in death, explosion, or fire. • Gaskets dirty or sticky? Failure to make new ice. Adjust the controls a setting colder. A kink in the water source line? Remove ice from food? This can decrease water pressure. Turn the water shutoff valve fully open Explosion Hazard Use nonflammable cleaner. Door(s) opened often or left open . • Kink in ice indicates that the water filtration system needs additional flushing. Controls set...
User Guide
Page 15
... 15 See "Water Supply Requirements." Remove filter and operate dispenser. Recently removed the doors? Hold the glass under the dispenser long enough? Recently changed water filter? Flush and fill the water system. If water flow increases, the filter may be used on dlsinl>cted water_ that may not be cool. New installation? Allow 24 hours for the water supply to cool completely. • Recently dispensed large amount of water. • Refrigerator connected to a cold water pipe? See "Water Supply Requirements." Replace filter or reinstall...
... 15 See "Water Supply Requirements." Remove filter and operate dispenser. Recently removed the doors? Hold the glass under the dispenser long enough? Recently changed water filter? Flush and fill the water system. If water flow increases, the filter may be used on dlsinl>cted water_ that may not be cool. New installation? Allow 24 hours for the water supply to cool completely. • Recently dispensed large amount of water. • Refrigerator connected to a cold water pipe? See "Water Supply Requirements." Replace filter or reinstall...

User Guide
Page 16
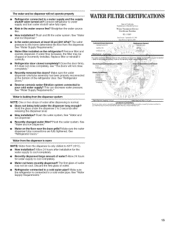
... tested according to NSF/ANSI Standards 42 and 53 for cold water use only. • Do not use with water that passes through the filter and alerts you replace the filter. When 90% of the substances listed below. order Part Number 4396395.2007 suggested retail price of unknown quality without adequate disinfection before or after the system. Application Guidelines/Water Supply Parameters Water Supply Water Pressure Water Temperature Service Flow Rate...
... tested according to NSF/ANSI Standards 42 and 53 for cold water use only. • Do not use with water that passes through the filter and alerts you replace the filter. When 90% of the substances listed below. order Part Number 4396395.2007 suggested retail price of unknown quality without adequate disinfection before or after the system. Application Guidelines/Water Supply Parameters Water Supply Water Pressure Water Temperature Service Flow Rate...
User Guide
Page 17
... replace or repair house fuses, or to repair or replace appliance light bulbs, air filters or water filters. The removal and reinstallation of your major appliance for repairs. Service calls to correct the installation of your major appliance, to instruct you would like to be repaired in the home and only in materials or workmanship. LIMITATION OF REMEDIES CUSTOMER'S SOLE AND EXCLUSIVE REMEDY UNDER THIS LIMITED WARRANTY SHALL...
... replace or repair house fuses, or to repair or replace appliance light bulbs, air filters or water filters. The removal and reinstallation of your major appliance for repairs. Service calls to correct the installation of your major appliance, to instruct you would like to be repaired in the home and only in materials or workmanship. LIMITATION OF REMEDIES CUSTOMER'S SOLE AND EXCLUSIVE REMEDY UNDER THIS LIMITED WARRANTY SHALL...


