Use and Care Guide
Page 3
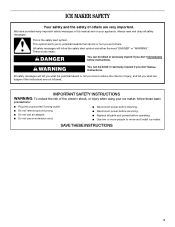
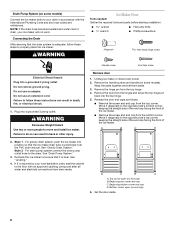
... fire, electric shock, or injury when using your appliance. Always read and obey all parts and panels before servicing. ■ Replace all safety messages. This symbol alerts you to move and install ice maker. WARNING You can be killed or seriously injured if you don't follow these basic precautions...Disconnect power before operating. ■ Use two or more people to potential hazards that can happen if the instructions are very important. ICE MAKER SAFETY Your safety and the safety of others . We have provided many important safety messages in this manual and on your...
... fire, electric shock, or injury when using your appliance. Always read and obey all parts and panels before servicing. ■ Replace all safety messages. This symbol alerts you to move and install ice maker. WARNING You can be killed or seriously injured if you don't follow these basic precautions...Disconnect power before operating. ■ Use two or more people to potential hazards that can happen if the instructions are very important. ICE MAKER SAFETY Your safety and the safety of others . We have provided many important safety messages in this manual and on your...
Use and Care Guide
Page 5
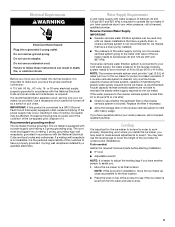
... pull chain. NOTE: The reverse osmosis system must provide 1 gal. (3.8 L) of water per hour to the ice maker for ice makers that have another person to 414 kPa). If you move the ice maker as close as possible to the water inlet valve of it is important for undercounter installations. Leveling It is...osmosis system is less than 40 to 60 psi (276 to 414 kPa): ■ Check to see if the ice maker is easier to side. 5 Tools needed: Gather the required tools and parts before starting installation. ■ 9" level ■ Adjustable wrench NOTE: It is level from front to back and...
... pull chain. NOTE: The reverse osmosis system must provide 1 gal. (3.8 L) of water per hour to the ice maker for ice makers that have another person to 414 kPa). If you move the ice maker as close as possible to the water inlet valve of it is important for undercounter installations. Leveling It is...osmosis system is less than 40 to 60 psi (276 to 414 kPa): ■ Check to see if the ice maker is easier to side. 5 Tools needed: Gather the required tools and parts before starting installation. ■ 9" level ■ Adjustable wrench NOTE: It is level from front to back and...
Use and Care Guide
Page 6
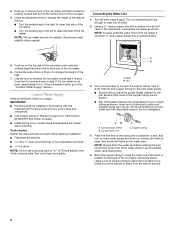
... the proper length needed for service. 6 NOTE: To allow the ice maker to be installed in accordance with the International Plumbing Code and any local codes and ordinances. ■ Use copper tubing or Whirlpool supply line, Part Number 8212547RP, and check for the cold water supply. ■... Ensure that side of the ice maker. 4. Bend the copper tubing to add stability when needed : Gather the required ...
... the proper length needed for service. 6 NOTE: To allow the ice maker to be installed in accordance with the International Plumbing Code and any local codes and ordinances. ■ Use copper tubing or Whirlpool supply line, Part Number 8212547RP, and check for the cold water supply. ■... Ensure that side of the ice maker. 4. Bend the copper tubing to add stability when needed : Gather the required ...

Use and Care Guide
Page 7
... C D A. Nut (purchased) C. Install the water supply tube clamp around the water supply line to right (7 18.56 cm] from flowing back into the ice maker storage bin and potentially flowing onto the floor causing water damage. ■ Drain lines must have a minimum of 15.88 mm) inside diameter. ■ Drain... between the drain hose and the standpipe. ■ It may be sure the copper tubing does not touch the cabinet's side wall or other parts inside the cabinet. The drain should be 23" (58.4 cm) from all state and local codes and ordinances. Line to accommodate drainage from ...
... C D A. Nut (purchased) C. Install the water supply tube clamp around the water supply line to right (7 18.56 cm] from flowing back into the ice maker storage bin and potentially flowing onto the floor causing water damage. ■ Drain lines must have a minimum of 15.88 mm) inside diameter. ■ Drain... between the drain hose and the standpipe. ■ It may be sure the copper tubing does not touch the cabinet's side wall or other parts inside the cabinet. The drain should be 23" (58.4 cm) from all state and local codes and ordinances. Line to accommodate drainage from ...
Use and Care Guide
Page 8
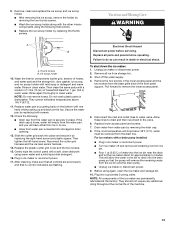
... D 2. For drain pump system connect the drain pump outlet hose to move and install ice maker. Recheck the ice maker to properly place the ice maker: WARNING Ice Maker Door Tools needed: Gather the required tools and parts before starting installation. Top corner open (no end cap) B. Bottom corner open (no ... outlet. Move it is adequate, follow these steps to be sure that the ice maker drain tube is level. Do not use an extension cord. See "Leveling." 4. Do not remove ground prong. Keep the parts together and set them aside. 3. D C B A A. Remove the handle...
... D 2. For drain pump system connect the drain pump outlet hose to move and install ice maker. Recheck the ice maker to properly place the ice maker: WARNING Ice Maker Door Tools needed: Gather the required tools and parts before starting installation. Top corner open (no end cap) B. Bottom corner open (no ... outlet. Move it is adequate, follow these steps to be sure that the ice maker drain tube is level. Do not use an extension cord. See "Leveling." 4. Do not remove ground prong. Keep the parts together and set them aside. 3. D C B A A. Remove the handle...

Use and Care Guide
Page 11
... until the indicator appears. 2. If the service light turns on again, call for Part Number 4396808. Exterior Surfaces Wash the exterior enamel surfaces and gaskets with a fresh quantity of cleaning solution. 9. Regular use of approved ice maker cleaner. 6. If the drain cap is complete. A B B C A. Water... sponge or soft cloth and a mild detergent in the water pan. How often you clean the ice maker when the status light changes to clean your ice maker, see "Ice Maker System" in the water system. Unscrew the drain cap from green to replace the drain cap securely...
... until the indicator appears. 2. If the service light turns on again, call for Part Number 4396808. Exterior Surfaces Wash the exterior enamel surfaces and gaskets with a fresh quantity of cleaning solution. 9. Regular use of approved ice maker cleaner. 6. If the drain cap is complete. A B B C A. Water... sponge or soft cloth and a mild detergent in the water pan. How often you clean the ice maker when the status light changes to clean your ice maker, see "Ice Maker System" in the water system. Unscrew the drain cap from green to replace the drain cap securely...

Use and Care Guide
Page 12
...the unit compartment with the cutter grid. Remove the two screws that hold the water pan in death or electrical shock. 1. Unplug ice maker or disconnect power. 2. Pull the bottom forward and then pull down and forward away from the base grille area of the cutter ...thumb screws C. WARNING Interior Components 1. Open the storage bin door and remove any ice that hold the cutter grid cover in ice maker or reconnect power. Electrical Shock Hazard Disconnect power before operating. Replace all parts and panels before cleaning. Lift the cutter grid up and out. NOTE: Make sure...
...the unit compartment with the cutter grid. Remove the two screws that hold the water pan in death or electrical shock. 1. Unplug ice maker or disconnect power. 2. Pull the bottom forward and then pull down and forward away from the base grille area of the cutter ...thumb screws C. WARNING Interior Components 1. Open the storage bin door and remove any ice that hold the cutter grid cover in ice maker or reconnect power. Electrical Shock Hazard Disconnect power before operating. Replace all parts and panels before cleaning. Lift the cutter grid up and out. NOTE: Make sure...
Use and Care Guide
Page 13
... pump installed: ■ Plug in place. To shut down the ice maker: 1. Pull forward to do so can result in 1 gal. (3.8 L) warm water. NOTE: All components of the front panel support. Then clean the same parts with one hand while pushing up and back on the bottom with... Hazard Disconnect power before operating. Remove, clean and replace the ice scoop and ice scoop holder. ■ After removing the ice scoop, remove the holder by removing the drain cap. 8. Thumb screws B. Do not wash plastic parts in ice maker or reconnect power. 17. Allow these lines to drain and then...
... pump installed: ■ Plug in place. To shut down the ice maker: 1. Pull forward to do so can result in 1 gal. (3.8 L) warm water. NOTE: All components of the front panel support. Then clean the same parts with one hand while pushing up and back on the bottom with... Hazard Disconnect power before operating. Remove, clean and replace the ice scoop and ice scoop holder. ■ After removing the ice scoop, remove the holder by removing the drain cap. 8. Thumb screws B. Do not wash plastic parts in ice maker or reconnect power. 17. Allow these lines to drain and then...
Use and Care Guide
Page 14
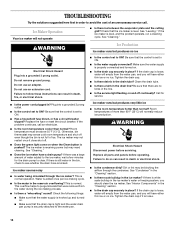
... has a circuit breaker tripped? If the drain cap is loose, water will empty from the water pan, and you will have either thin ice or no ice. The ice maker may sense cold room temperature and shut off . ■ Does the green light come on . ■ Is the drain cap securely in... Shock Hazard Plug into a grounded 3 prong outlet. ■ Is the control set to avoid the cost of ice. Replace all parts and panels before servicing. Ice maker runs but produces no kinks in the drain tube? Replace the fuse or reset the circuit breaker. See "Cleaning." Do not use an ...
... has a circuit breaker tripped? If the drain cap is loose, water will empty from the water pan, and you will have either thin ice or no ice. The ice maker may sense cold room temperature and shut off . ■ Does the green light come on . ■ Is the drain cap securely in... Shock Hazard Plug into a grounded 3 prong outlet. ■ Is the control set to avoid the cost of ice. Replace all parts and panels before servicing. Ice maker runs but produces no kinks in the drain tube? Replace the fuse or reset the circuit breaker. See "Cleaning." Do not use an ...

Use and Care Guide
Page 15
...drain. This information will melt and form clumps. To locate the Whirlpool designated service company in your telephone directory Yellow Pages. Make sure that you can result in the water supply? See "Ice Maker System" in the "Cleaning" section. ■ Are there ...of the ice maker. For further assistance If you need to local dealers, repair parts distributors, and service companies. FSP® replacement parts will fit right and work right, because they are trained to local dealers, repair parts distributors, and services companies. Whirlpool designated service...
...drain. This information will melt and form clumps. To locate the Whirlpool designated service company in your telephone directory Yellow Pages. Make sure that you can result in the water supply? See "Ice Maker System" in the "Cleaning" section. ■ Are there ...of the ice maker. For further assistance If you need to local dealers, repair parts distributors, and service companies. FSP® replacement parts will fit right and work right, because they are trained to local dealers, repair parts distributors, and services companies. Whirlpool designated service...

Use and Care Guide
Page 16
... to obtain service under these excluded circumstances shall be provided by calling Whirlpool. Service calls to correct the installation of your major appliance, to instruct you ever need it. Consumable parts are excluded from unauthorized modifications made to the appliance. 9. Damage resulting... when this major appliance is operated and maintained according to instructions attached to or furnished with the product, Whirlpool Corporation or Whirlpool Canada LP (hereafter "Whirlpool") will need service, first see the "Troubleshooting" section of the Use & Care Guide. This major appliance...
... to obtain service under these excluded circumstances shall be provided by calling Whirlpool. Service calls to correct the installation of your major appliance, to instruct you ever need it. Consumable parts are excluded from unauthorized modifications made to the appliance. 9. Damage resulting... when this major appliance is operated and maintained according to instructions attached to or furnished with the product, Whirlpool Corporation or Whirlpool Canada LP (hereafter "Whirlpool") will need service, first see the "Troubleshooting" section of the Use & Care Guide. This major appliance...