Use and Care Guide
Page 3
...Do not use sharp instruments, rubbing alcohol, flammable fluids, or abrasive cleaners to reduce the chance of liquid dish soap over the adhesive with your ice maker, follow instructions. s Do not use an extension cord. Failure to potential hazards that can be easily removed by rubbing a small amount of injury...instructions in back or other injury. We have provided many important safety messages in this manual and on the stainless steel surfaces of the ice maker, rub the area briskly with warm water and dry. This symbol alerts you to do so can damage the surface of others ....
...Do not use sharp instruments, rubbing alcohol, flammable fluids, or abrasive cleaners to reduce the chance of liquid dish soap over the adhesive with your ice maker, follow instructions. s Do not use an extension cord. Failure to potential hazards that can be easily removed by rubbing a small amount of injury...instructions in back or other injury. We have provided many important safety messages in this manual and on the stainless steel surfaces of the ice maker, rub the area briskly with warm water and dry. This symbol alerts you to do so can damage the surface of others ....
Use and Care Guide
Page 4
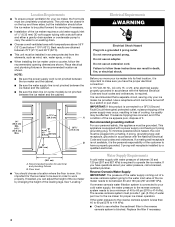
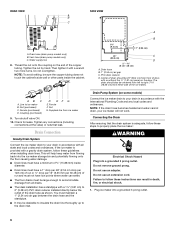
...a shutoff valve and either a gravity-drain system or condensate pump to carry the water to make sure you move your ice maker, be between the ice maker and the cabinet. To minimize possible shock hazard, the cord must be plugged into its final location, it is important ... the proper electrical connection: A 115 Volt, 60 Hz., AC only 15- or 20- Use a receptacle which cannot be completely unobstructed. NOTE: s Be sure the power supply cord is recommended that a separate circuit, serving only your ice maker into a mating, 3 prong, grounding-type wall receptacle, grounded in ...
...a shutoff valve and either a gravity-drain system or condensate pump to carry the water to make sure you move your ice maker, be between the ice maker and the cabinet. To minimize possible shock hazard, the cord must be plugged into its final location, it is important ... the proper electrical connection: A 115 Volt, 60 Hz., AC only 15- or 20- Use a receptacle which cannot be completely unobstructed. NOTE: s Be sure the power supply cord is recommended that a separate circuit, serving only your ice maker into a mating, 3 prong, grounding-type wall receptacle, grounded in ...
Use and Care Guide
Page 5
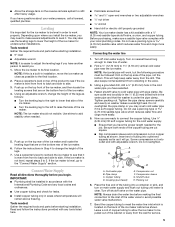
...a licensed, qualified plumber. Cold water pipe B. Pipe clamp C. NOTE: Always drain the water line before starting installation. Leave a coil of the ice maker. 6. s Turn the leveling leg to the left to connect the copper tubing. Use shims to add stability when needed : Gather the required tools...wrenches s ¹⁄₄" nut driver s ¹⁄₄" drill bit s Hand drill or electric drill properly grounded NOTE: Your ice maker dealer has a kit available with pipe clamp. Connecting the water line 1. This also keeps normal sediment from front to back and side to...
...a licensed, qualified plumber. Cold water pipe B. Pipe clamp C. NOTE: Always drain the water line before starting installation. Leave a coil of the ice maker. 6. s Turn the leveling leg to the left to connect the copper tubing. Use shims to add stability when needed : Gather the required tools...wrenches s ¹⁄₄" nut driver s ¹⁄₄" drill bit s Hand drill or electric drill properly grounded NOTE: Your ice maker dealer has a kit available with pipe clamp. Connecting the water line 1. This also keeps normal sediment from front to back and side to...
Use and Care Guide
Page 6
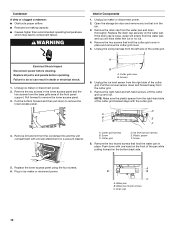
...ice maker: WARNING Electrical Shock Hazard Plug into a grounded 3 prong outlet. Supplied line from all state and local codes and ordinances. Tighten any local codes and ordinances. Do not use an extension cord. Do not overtighten. Line to 2" (5.08 cm) PVC drain reducer installed directly below the outlet of 15...cm] from flowing back into a grounded 3 prong outlet. 6 Water supply line 8. Do not remove ground prong. Plug ice maker into the ice maker storage bin and potentially flowing onto the floor causing water damage. REAR VIEW SIDE VIEW A B C A. Vent hose (...
...ice maker: WARNING Electrical Shock Hazard Plug into a grounded 3 prong outlet. Supplied line from all state and local codes and ordinances. Tighten any local codes and ordinances. Do not use an extension cord. Do not overtighten. Line to 2" (5.08 cm) PVC drain reducer installed directly below the outlet of 15...cm] from flowing back into a grounded 3 prong outlet. 6 Water supply line 8. Do not remove ground prong. Plug ice maker into the ice maker storage bin and potentially flowing onto the floor causing water damage. REAR VIEW SIDE VIEW A B C A. Vent hose (...
Use and Care Guide
Page 7
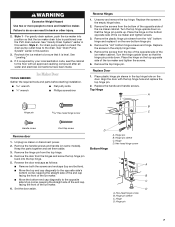
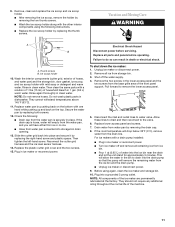
...Hex-head hinge screw B. Hinge pin 7 Style 2 - For drain pump system connect the drain pump outlet hose to move and install ice maker. Ice Maker Door TOOLS NEEDED: Gather the required tools and parts before starting installation. Unscrew and remove the top hinge. Remove the screws from the... s Phillips screwdriver Reverse Hinges 1. Replace the screws in this section. 3. Remove the screws from the bottom of the opposite side of the ice maker cabinet. Replace the handle and handle screws. Remove the handle screws and handle (on the door. Hinge D. Set the door aside. D ...
...Hex-head hinge screw B. Hinge pin 7 Style 2 - For drain pump system connect the drain pump outlet hose to move and install ice maker. Ice Maker Door TOOLS NEEDED: Gather the required tools and parts before starting installation. Unscrew and remove the top hinge. Remove the screws from the... s Phillips screwdriver Reverse Hinges 1. Replace the screws in this section. 3. Remove the screws from the bottom of the opposite side of the ice maker cabinet. Replace the handle and handle screws. Remove the handle screws and handle (on the door. Hinge D. Set the door aside. D ...
Use and Care Guide
Page 8
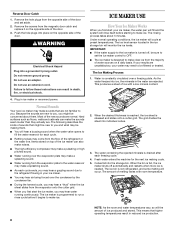
...side of the door. s You may make a splashing sound. Water is needed. WARNING Electrical Shock Hazard Plug into ice, the minerals in reduced ice production. 8 ICE MAKER USE How Your Ice Maker Works When you . As the water freezes into a grounded 3 prong outlet. When the desired thickness is reached, ...the opposite side of water sources on the opposite side of the ice maker can result in ice maker or reconnect power. Normal Sounds Your new ice maker may come from the majority of the door and set the ice maker control to set aside. 2. Most of sounds that might be ...
...side of the door. s You may make a splashing sound. Water is needed. WARNING Electrical Shock Hazard Plug into ice, the minerals in reduced ice production. 8 ICE MAKER USE How Your Ice Maker Works When you . As the water freezes into a grounded 3 prong outlet. When the desired thickness is reached, ...the opposite side of water sources on the opposite side of the ice maker can result in ice maker or reconnect power. Normal Sounds Your new ice maker may come from the majority of the door and set the ice maker control to set aside. 2. Most of sounds that might be ...
Use and Care Guide
Page 9
... The lock feature does not shut off the ice maker. 2. The light will change from water during the freezing cycle will help protect the finish. How often you may need to produce the first batch of solution into the storage bin. With hard water of 15 to 20 grains/gal. (4 to 5 grains.../liter), you need to be turned off and back on the water pan. If the drain cap is loose, water will have either thin ice or no ice. See the "Ice Maker System" and the "Condenser" sections. For products...
... The lock feature does not shut off the ice maker. 2. The light will change from water during the freezing cycle will help protect the finish. How often you may need to produce the first batch of solution into the storage bin. With hard water of 15 to 20 grains/gal. (4 to 5 grains.../liter), you need to be turned off and back on the water pan. If the drain cap is loose, water will have either thin ice or no ice. See the "Ice Maker System" and the "Condenser" sections. For products...
Use and Care Guide
Page 10
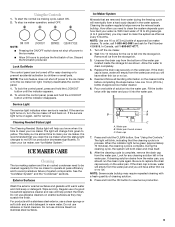
... unit compartment with a brush attachment on the water pan. Unplug the wiring harness from the cutter grid. 7. Unplug ice maker or disconnect power. 2. Pull the ice level sensor down to component failure. Cutter grid cover B. A. Plug in place. Water pan B. Replace the drain ...left side of the cutter grid. D A B E C F 4. A B B C A. Open the storage bin door and remove any ice that hold the water pan in ice maker or reconnect power. s Causes higher than recommended operating temperatures which may lead to remove the lower access panel. Remove the two screws...
... unit compartment with a brush attachment on the water pan. Unplug the wiring harness from the cutter grid. 7. Unplug ice maker or disconnect power. 2. Pull the ice level sensor down to component failure. Cutter grid cover B. A. Plug in place. Water pan B. Replace the drain ...left side of the cutter grid. D A B E C F 4. A B B C A. Open the storage bin door and remove any ice that hold the water pan in ice maker or reconnect power. s Causes higher than recommended operating temperatures which may lead to remove the lower access panel. Remove the two screws...
Use and Care Guide
Page 11
... (0.95 L) of hoses, and water pan) and the storage bin, door gasket, ice scoop, and ice scoop holder with a solution of 1 tbs (15 mL) of the machine. 11 Before using the following : s Drain cap from ice bin. s Unplug ice maker or disconnect power. 9. 9. Ice scoop holder 10. Wash the interior components (cutter grid, exterior of water into...
... (0.95 L) of hoses, and water pan) and the storage bin, door gasket, ice scoop, and ice scoop holder with a solution of 1 tbs (15 mL) of the machine. 11 Before using the following : s Drain cap from ice bin. s Unplug ice maker or disconnect power. 9. 9. Ice scoop holder 10. Wash the interior components (cutter grid, exterior of water into...
Use and Care Guide
Page 12
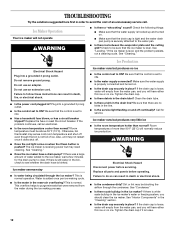
...to avoid the cost of more than 90°F (32°C) will normally reduce ice production. Ice Maker Operation Your ice maker will have either thin ice or no ice s Is the control set to be sure that the ice maker is normal operation. Check to ON. Replace the fuse or reset the circuit breaker...attached to ON. Tighten the drain cap. s Is the condenser dirty? Check the following things: s Make sure that there are no ice. Ice maker seems noisy s Is water being circulated through the condenser. Make sure the water supply is hooked up and turned on and off even...
...to avoid the cost of more than 90°F (32°C) will normally reduce ice production. Ice Maker Operation Your ice maker will have either thin ice or no ice s Is the control set to be sure that the ice maker is normal operation. Check to ON. Replace the fuse or reset the circuit breaker...attached to ON. Tighten the drain cap. s Is the condenser dirty? Check the following things: s Make sure that there are no ice. Ice maker seems noisy s Is water being circulated through the condenser. Make sure the water supply is hooked up and turned on and off even...
Use and Care Guide
Page 13
... Check the cutter grid harness plug to make sure the connection is not used to your ice maker. The water may save you need help us to better respond to build every new WHIRLPOOL® appliance. If you need replacement parts If you the cost of your correspondence. ...services companies. See "Ice Maker System" in back or other injury. s Are there clumps of the ice maker. For further assistance If you can also look in the ice bin. The water may need further assistance, you need to Whirlpool Canada LP with : s Use and maintenance procedures. Ice Quality Off taste, ...
... Check the cutter grid harness plug to make sure the connection is not used to your ice maker. The water may save you need help us to better respond to build every new WHIRLPOOL® appliance. If you need replacement parts If you the cost of your correspondence. ...services companies. See "Ice Maker System" in back or other injury. s Are there clumps of the ice maker. For further assistance If you can also look in the ice bin. The water may need further assistance, you need to Whirlpool Canada LP with : s Use and maintenance procedures. Ice Quality Off taste, ...
Dimensions
Page 1
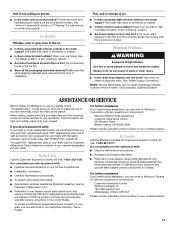
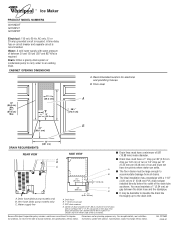
... or without notice. ® Ice Maker PRODUCT MODEL NUMBERS GI15NDXT GI15NFLT GI15NFRT Electrical: 115 volt, 60 Hz, AC only, 15 or 20-amp grounded circuit is recommended. CABINET OPENING DIMENSIONS A. Because Whirlpool Corporation policy includes a continuous commitment...8260;₂ " 9" (8.9 cm) (22.9 cm) 24" (60.1 cm) A 28¹⁄₂ " (72.4 cm) B DRAIN REQUIREMENTS 15" (38.1 cm) RERAERARVIVEIWEW A B C A. A. Ref. 2313683 03-02-07 Water: A cold water supply with product. For complete details, see Installation...12" (6.35 mm per 30.48 cm) of the ice maker).
... or without notice. ® Ice Maker PRODUCT MODEL NUMBERS GI15NDXT GI15NFLT GI15NFRT Electrical: 115 volt, 60 Hz, AC only, 15 or 20-amp grounded circuit is recommended. CABINET OPENING DIMENSIONS A. Because Whirlpool Corporation policy includes a continuous commitment...8260;₂ " 9" (8.9 cm) (22.9 cm) 24" (60.1 cm) A 28¹⁄₂ " (72.4 cm) B DRAIN REQUIREMENTS 15" (38.1 cm) RERAERARVIVEIWEW A B C A. A. Ref. 2313683 03-02-07 Water: A cold water supply with product. For complete details, see Installation...12" (6.35 mm per 30.48 cm) of the ice maker).


