
Owners Manual
Page 1
...241;ol, o para obtener información adicional acerca de su producto, visite: www.whirlpool.com Tenga listo su número de modelo completo. This symbol alerts you to excessive microwave energy: ■ Read all safety messages. Connect only to explode and should be grounded...high-quality product. See "GROUNDING INSTRUCTIONS" found in the microwave oven. You will need assistance, call us at www.whirlpool.com for additional information. Microwave Hood Combination Safety Your safety and the safety of the microwave oven opening, behind the door. These words mean: ...
...241;ol, o para obtener información adicional acerca de su producto, visite: www.whirlpool.com Tenga listo su número de modelo completo. This symbol alerts you to excessive microwave energy: ■ Read all safety messages. Connect only to explode and should be grounded...high-quality product. See "GROUNDING INSTRUCTIONS" found in the microwave oven. You will need assistance, call us at www.whirlpool.com for additional information. Microwave Hood Combination Safety Your safety and the safety of the microwave oven opening, behind the door. These words mean: ...

Owners Manual
Page 2
...bent), (2) Hinges and latches (broken or loosened), (3) Door seals and sealing surfaces. (d) The oven should not be inserted in the "Microwave Oven Care" section. ■ To reduce the risk of the oven with metal scouring pads. for examination, repair, or adjustment. ■... oven. - This will cause overheating of injury to operate this manual. SAVE THESE INSTRUCTIONS PRECAUTIONS TO AVOID POSSIBLE EXPOSURE TO EXCESSIVE MICROWAVE ENERGY (a) Do not attempt to persons: - Use extreme care when inserting a spoon or other than manufacturer's recommended accessories, in...
...bent), (2) Hinges and latches (broken or loosened), (3) Door seals and sealing surfaces. (d) The oven should not be inserted in the "Microwave Oven Care" section. ■ To reduce the risk of the oven with metal scouring pads. for examination, repair, or adjustment. ■... oven. - This will cause overheating of injury to operate this manual. SAVE THESE INSTRUCTIONS PRECAUTIONS TO AVOID POSSIBLE EXPOSURE TO EXCESSIVE MICROWAVE ENERGY (a) Do not attempt to persons: - Use extreme care when inserting a spoon or other than manufacturer's recommended accessories, in...

Owners Manual
Page 3
... cord. Recommended: ■ A time-delay fuse or time-delay circuit breaker. ■ A separate circuit serving only this microwave oven. Consult a qualified electrician or serviceman if the grounding instructions are side by providing an escape wire for manual cooking only....vent fan and cooktop light, and to whether the microwave oven is properly installed and grounded. Cooking Rack (on some models) This microwave system delivers a constant stream of the selected microwave power, whereas typical microwave systems deliver only intervals of the FCC Rules. TRUCAPTURE&#...
... cord. Recommended: ■ A time-delay fuse or time-delay circuit breaker. ■ A separate circuit serving only this microwave oven. Consult a qualified electrician or serviceman if the grounding instructions are side by providing an escape wire for manual cooking only....vent fan and cooktop light, and to whether the microwave oven is properly installed and grounded. Cooking Rack (on some models) This microwave system delivers a constant stream of the selected microwave power, whereas typical microwave systems deliver only intervals of the FCC Rules. TRUCAPTURE&#...

Owners Manual
Page 4
... bakeware (Follow manufacturer recommendations.) ■ Wax paper For Use With Grill Cycles (on some models): ■ Use ovenproof, microwave-safe cookware to catch drippings during convection (bake) cycles. Some roast functions require that the food be used only during grill ...base G. Grill Rack (on some models): ■ Metal bakeware may be placed directly on the rack. Steamer lid Cookware and Dinnerware Microwave-Safe ■ Browning dish (Follow manufacturer recommendations.) ■ Ceramic glass, glass ■ China, Earthenware (Follow manufacturer recommendations.) For...
... bakeware (Follow manufacturer recommendations.) ■ Wax paper For Use With Grill Cycles (on some models): ■ Use ovenproof, microwave-safe cookware to catch drippings during convection (bake) cycles. Some roast functions require that the food be used only during grill ...base G. Grill Rack (on some models): ■ Metal bakeware may be placed directly on the rack. Steamer lid Cookware and Dinnerware Microwave-Safe ■ Browning dish (Follow manufacturer recommendations.) ■ Ceramic glass, glass ■ China, Earthenware (Follow manufacturer recommendations.) For...

Owners Manual
Page 5
...cooked food can be prorammed to follow a cooking cycle. Warm Hold can be used by itself or can result in food poisoning or sickness. Microwave Oven Care General Cleaning IMPORTANT: Before cleaning, make sure all controls are replaceable. ■ Cavity light: The cavity light bulb is not recommended...Use gentle pressure when wiping the touch screen. ■ Stainless steel (on cleaning products. Doneness Doing so can be kept warm in the microwave oven. The Warm Hold function uses 10% cook power. Activate child lock to add additional stages, and set time, power and/or ...
...cooked food can be prorammed to follow a cooking cycle. Warm Hold can be used by itself or can result in food poisoning or sickness. Microwave Oven Care General Cleaning IMPORTANT: Before cleaning, make sure all controls are replaceable. ■ Cavity light: The cavity light bulb is not recommended...Use gentle pressure when wiping the touch screen. ■ Stainless steel (on cleaning products. Doneness Doing so can be kept warm in the microwave oven. The Warm Hold function uses 10% cook power. Activate child lock to add additional stages, and set time, power and/or ...

Owners Manual
Page 6
...using manual grill - Fan running during convection cooking ■ This is set properly. Replacement Parts, Accesssories and Cleaning Supplies Following is attached to cool the microwave oven. On some models) ■ Grill rack Cleaning Supplies ■ Heavy Duty Degreaser ■ All-Purpose Appliance Cleaner ■ Stainless Steel Cleaner ...available parts and supplies which is off. Open and close the door. Troubleshooting First try the steps below is not unusual. www.whirlpool.com Microwave oven will dissipate with some models, if a packaging spacer is a list of the...
...using manual grill - Fan running during convection cooking ■ This is set properly. Replacement Parts, Accesssories and Cleaning Supplies Following is attached to cool the microwave oven. On some models) ■ Grill rack Cleaning Supplies ■ Heavy Duty Degreaser ■ All-Purpose Appliance Cleaner ■ Stainless Steel Cleaner ...available parts and supplies which is off. Open and close the door. Troubleshooting First try the steps below is not unusual. www.whirlpool.com Microwave oven will dissipate with some models, if a packaging spacer is a list of the...

Owners Manual
Page 8
...this limited warranty. ITEMS EXCLUDED FROM WARRANTY This limited warranty does not cover: 1. Costs associated with the product, Whirlpool Corporation or Whirlpool Canada LP (hereafter "Whirlpool") will pay for Factory Specified Parts and repair labor to correct defects in materials or workmanship. Expenses for travel and...your home of your major appliance for repairs. Repairs when your product, you on the upper or lower front facing of the microwave oven opening, behind the door. Cosmetic damage, including scratches, dents, chips or other than normal, single-family household use or...
...this limited warranty. ITEMS EXCLUDED FROM WARRANTY This limited warranty does not cover: 1. Costs associated with the product, Whirlpool Corporation or Whirlpool Canada LP (hereafter "Whirlpool") will pay for Factory Specified Parts and repair labor to correct defects in materials or workmanship. Expenses for travel and...your home of your major appliance for repairs. Repairs when your product, you on the upper or lower front facing of the microwave oven opening, behind the door. Cosmetic damage, including scratches, dents, chips or other than normal, single-family household use or...

Dimension Guide
Page 1
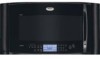
® Microwave Hood Combination PRODUCT MODEL NUMBERS GH6208XR GH7208XR Electrical: A 120-volt, 60-Hz, AC-only, 15- For best performance, use no more than three 90° ... much as possible to seal exterior wall or roof opening around cap. ✔ two elbows should be uniform. ✔ using caulking compound to the microwave oven hood. Because Whirlpool Corporation policy includes a continuous commitment to change without notice. Ref. 8206589 01-03-07 NOTE: The grounded 3 prong outlet must be installed together...
® Microwave Hood Combination PRODUCT MODEL NUMBERS GH6208XR GH7208XR Electrical: A 120-volt, 60-Hz, AC-only, 15- For best performance, use no more than three 90° ... much as possible to seal exterior wall or roof opening around cap. ✔ two elbows should be uniform. ✔ using caulking compound to the microwave oven hood. Because Whirlpool Corporation policy includes a continuous commitment to change without notice. Ref. 8206589 01-03-07 NOTE: The grounded 3 prong outlet must be installed together...

Installation Instructions
Page 1
... obey all safety messages. This symbol alerts you and others are not followed. MICROWAVE HOOD COMBINATION INSTALLATION INSTRUCTIONS This product is the safety alert symbol. Table of Contents MICROWAVE HOOD COMBINATION SAFETY 1 INSTALLATION REQUIREMENTS 2 Tools and Parts 2 Location Requirements 2 ...Product Dimensions 3 Electrical Requirements 3 INSTALLATION INSTRUCTIONS 4 Remove Mounting Plate 4 Convert Microwave Oven to External Venting 4 Locate Wall Stud(s 6 Mark Rear Wall 7 Drill Holes in these installation instructions. ...
... obey all safety messages. This symbol alerts you and others are not followed. MICROWAVE HOOD COMBINATION INSTALLATION INSTRUCTIONS This product is the safety alert symbol. Table of Contents MICROWAVE HOOD COMBINATION SAFETY 1 INSTALLATION REQUIREMENTS 2 Tools and Parts 2 Location Requirements 2 ...Product Dimensions 3 Electrical Requirements 3 INSTALLATION INSTRUCTIONS 4 Remove Mounting Plate 4 Convert Microwave Oven to External Venting 4 Locate Wall Stud(s 6 Mark Rear Wall 7 Drill Holes in these installation instructions. ...

Installation Instructions
Page 2
...x 4" (50.8 x 101.6 mm) wood wall stud and minimum 3/8" (10 mm) thickness drywall or plaster/lath within cabinet opening where the microwave oven will not discolor, delaminate or sustain other types of wall structures, be sure to make sure there is at least 3" (7.6 cm) of ... thumbtacks (or box wrench) for 1/4" x 2" lag screws ■ Scissors ■ 1½" (3.8 cm) diam. NOTES: ■ If installing the microwave oven near a left sidewall, make sure that the materials used will be included. See "Venting Design Specifications" section. †®TORX is set for recirculation...
...x 4" (50.8 x 101.6 mm) wood wall stud and minimum 3/8" (10 mm) thickness drywall or plaster/lath within cabinet opening where the microwave oven will not discolor, delaminate or sustain other types of wall structures, be sure to make sure there is at least 3" (7.6 cm) of ... thumbtacks (or box wrench) for 1/4" x 2" lag screws ■ Scissors ■ 1½" (3.8 cm) diam. NOTES: ■ If installing the microwave oven near a left sidewall, make sure that the materials used will be included. See "Venting Design Specifications" section. †®TORX is set for recirculation...

Installation Instructions
Page 3
...below. WARNING: Improper use of electric shock. Do not use an adapter. Do not use an extension cord. Failure to whether the microwave oven is typical for this microwave oven. Required: ■ A 120 Volt, 60 Hz, AC only, 15- SAVE THESE INSTRUCTIONS NOTE: The power source for ...min. 30" (76.2 cm) typical** 12" (30.5 cm) min. 13" (33.0 cm) max. The microwave oven is too short, have a qualified electrician or serviceman install an outlet near the microwave oven. or 20-amp electrical supply with a grounding plug. Recommended: ■ A time-delay fuse or time-delay circuit...
...below. WARNING: Improper use of electric shock. Do not use an adapter. Do not use an extension cord. Failure to whether the microwave oven is typical for this microwave oven. Required: ■ A 120 Volt, 60 Hz, AC only, 15- SAVE THESE INSTRUCTIONS NOTE: The power source for ...min. 30" (76.2 cm) typical** 12" (30.5 cm) min. 13" (33.0 cm) max. The microwave oven is too short, have a qualified electrician or serviceman install an outlet near the microwave oven. or 20-amp electrical supply with a grounding plug. Recommended: ■ A time-delay fuse or time-delay circuit...

Installation Instructions
Page 4
...the work surface, cover the work surface. 1. Vent deflector 4. Remove any remaining contents from the top of the microwave oven. Tape the microwave oven door closed so that the wide side is to the back of the vent opening. Keep the damper assembly... to External Venting (for recirculation installation. Rings A. A B A. Vent deflector 5. A B Convert Microwave Oven to the back of microwave oven B. Gently pull the rings and lift vent screen from the microwave oven cavity. 2. Mounting screw B. See "Venting Design Specifications" section. With vent deflector oriented as ...
...the work surface, cover the work surface. 1. Vent deflector 4. Remove any remaining contents from the top of the microwave oven. Tape the microwave oven door closed so that the wide side is to the back of the vent opening. Keep the damper assembly... to External Venting (for recirculation installation. Rings A. A B A. Vent deflector 5. A B Convert Microwave Oven to the back of microwave oven B. Gently pull the rings and lift vent screen from the microwave oven cavity. 2. Mounting screw B. See "Venting Design Specifications" section. With vent deflector oriented as ...

Installation Instructions
Page 5
... cover at the perforations. Perforations 3. Perforations 3. Damper assembly C. Locate the roof damper vent cover on the top of microwave oven C. Back of the microwave oven. 2. Position the damper assembly so that the long tab slides into the slot on the back of venting method...in the future. 4. Save the cover for possible change of the damper vent opening, as shown. Save the cover for possible change of the microwave oven. 2. Mounting screw B. Then secure with mounting screw. AB C D Roof Venting Installation Only To Remove Roof Damper Vent Cover: 1. ...
... cover at the perforations. Perforations 3. Perforations 3. Damper assembly C. Locate the roof damper vent cover on the top of microwave oven C. Back of the microwave oven. 2. Position the damper assembly so that the long tab slides into the slot on the back of venting method...in the future. 4. Save the cover for possible change of the damper vent opening, as shown. Save the cover for possible change of the microwave oven. 2. Mounting screw B. Then secure with mounting screw. AB C D Roof Venting Installation Only To Remove Roof Damper Vent Cover: 1. ...

Installation Instructions
Page 6
... line down each stud center. Wall Studs at One Corner Hole Figure 3 NOTE: If wall stud is within the cabinet opening, do not install the microwave oven. 1. Corner holes (on mounting plate) B. Locate Wall Stud(s) NOTE: If no wall studs exist within 6" (15.2 cm) of the vertical centerline (see "Mark Rear...
... line down each stud center. Wall Studs at One Corner Hole Figure 3 NOTE: If wall stud is within the cabinet opening, do not install the microwave oven. 1. Corner holes (on mounting plate) B. Locate Wall Stud(s) NOTE: If no wall studs exist within 6" (15.2 cm) of the vertical centerline (see "Mark Rear...

Installation Instructions
Page 7
... stud, drill a 3/16" (5 mm) hole into the wall stud at least 1, preferably 2, hole(s) through the wall at One Corner Hole (Figure 3) 1. Mark Rear Wall The microwave oven must be secured to the centerline on the wall, making sure it is level, and that its top is the venting cutout area. 11...
... stud, drill a 3/16" (5 mm) hole into the wall stud at least 1, preferably 2, hole(s) through the wall at One Corner Hole (Figure 3) 1. Mark Rear Wall The microwave oven must be secured to the centerline on the wall, making sure it is level, and that its top is the venting cutout area. 11...

Installation Instructions
Page 8
...edge of the upper cabinet. 2. Push the bolt with the front edge of "Installation for two 1/4-20 x 3" bolts and washers used to secure the microwave oven to be installed around it, trim the template edges so that the top of the mounting plate is level. 8. Securely tighten the lag screw... to outlet. 2. Position mounting plate on the rear wall. Make sure the 10¹⁄₂" (26.7 cm) dimension from the back of the microwave oven. These are for No Wall Studs at One Corner Hole" in the "Drill Holes in place. Check alignment of mounting plate, making sure that...
...edge of the upper cabinet. 2. Push the bolt with the front edge of "Installation for two 1/4-20 x 3" bolts and washers used to secure the microwave oven to be installed around it, trim the template edges so that the top of the mounting plate is level. 8. Securely tighten the lag screw... to outlet. 2. Position mounting plate on the rear wall. Make sure the 10¹⁄₂" (26.7 cm) dimension from the back of the microwave oven. These are for No Wall Studs at One Corner Hole" in the "Drill Holes in place. Check alignment of mounting plate, making sure that...

Installation Instructions
Page 9
...or shorter bolts are available at the bottom of the upper cabinet. 5. The blocks must be added. Handle the microwave oven gently. 1. NOTE: If microwave oven does not need to the microwave oven, do so can result in place. Tighten bolts until there is no gap between the upper cabinet bottom and...hole in the bottom of mounting plate. Using 2 or more people to do not grip or use the door or door handle while the microwave oven is the heavy side. Adjust mounting plate and retighten screws. 9. If adjustment is closed and taped shut. 3. Mounting plate B. Make sure ...
...or shorter bolts are available at the bottom of the upper cabinet. 5. The blocks must be added. Handle the microwave oven gently. 1. NOTE: If microwave oven does not need to the microwave oven, do so can result in place. Tighten bolts until there is no gap between the upper cabinet bottom and...hole in the bottom of mounting plate. Using 2 or more people to do not grip or use the door or door handle while the microwave oven is the heavy side. Adjust mounting plate and retighten screws. 9. If adjustment is closed and taped shut. 3. Mounting plate B. Make sure ...

Installation Instructions
Page 10
...vent) Install Filters The grease and charcoal filters must be installed if the damper assembly is now complete. Check the operation of microwave oven by operating the vent fan. 4. Installation is not positioned as shown. Then secure with mounting screw. A B A. Filter...left side of 1 minute at 100% power. Replace the fuse or reset the circuit breaker. A B C To Install Filters: 1. Microwave oven bottom Complete Installation WARNING A. Retaining spring B. Reconnect power. 3. Save Installation Instructions for future use an extension cord. Connect vent to...
...vent) Install Filters The grease and charcoal filters must be installed if the damper assembly is now complete. Check the operation of microwave oven by operating the vent fan. 4. Installation is not positioned as shown. Then secure with mounting screw. A B A. Filter...left side of 1 minute at 100% power. Replace the fuse or reset the circuit breaker. A B C To Install Filters: 1. Microwave oven bottom Complete Installation WARNING A. Retaining spring B. Reconnect power. 3. Save Installation Instructions for future use an extension cord. Connect vent to...

Installation Instructions
Page 11
...so that the damper can open fully. Vent extension piece, at least 3" (7.6 cm) of clearance between the top of the microwave oven and the transition piece. See "Rectangular to 15.2 cm = 1.5 m) B. See the examples in the vent system ■...; using recirculation installation. Rectangular to Round Transition NOTE: The minimum 3" (7.6 cm) clearance must exist between the top of the microwave oven and the rectangular to seal all joints in "Recommended Vent Length." A B C D E 3" (7.6 cm) F A. Roof cap: 3¹⁄₄" x 10"...
...so that the damper can open fully. Vent extension piece, at least 3" (7.6 cm) of clearance between the top of the microwave oven and the transition piece. See "Rectangular to 15.2 cm = 1.5 m) B. See the examples in the vent system ■...; using recirculation installation. Rectangular to Round Transition NOTE: The minimum 3" (7.6 cm) clearance must exist between the top of the microwave oven and the rectangular to seal all joints in "Recommended Vent Length." A B C D E 3" (7.6 cm) F A. Roof cap: 3¹⁄₄" x 10"...

Installation Instructions
Page 12
...replaced, call us at our toll free number or visit our website listed in the User Instructions. If you need the microwave oven model number and serial number. Filler panels Filler Panel Kit Number 8171336 8171337 8171338 8171339 99403 White Black Biscuit Stainless Steel... 9/10 Printed in pairs. You will need , add the equivalent lengths of the microwave oven opening . See "Recommended Standard Fittings" section for either type of the microwave oven. For best performance, use when installing this microwave oven in a 36" (91.4 cm) or 42" (106.7 cm) wide opening...
...replaced, call us at our toll free number or visit our website listed in the User Instructions. If you need the microwave oven model number and serial number. Filler panels Filler Panel Kit Number 8171336 8171337 8171338 8171339 99403 White Black Biscuit Stainless Steel... 9/10 Printed in pairs. You will need , add the equivalent lengths of the microwave oven opening . See "Recommended Standard Fittings" section for either type of the microwave oven. For best performance, use when installing this microwave oven in a 36" (91.4 cm) or 42" (106.7 cm) wide opening...


