
Use and Care Guide
Page 3
... the safety of others . We have provided many important safety messages in the vicinity of this or any other flammable vapors and liquids in this manual must not exceed 3 feet. 3 Always read and obey all occupants. • Immediately call the fire department. - This is , tell you what the potential...hazard is the safety alert symbol. All safety messages will tell you how to light any appliance. • Do not touch any phone in this manual and on your gas supplier, call your building. • Clear the room, building, or area of fire or explosion, or to potential hazards ...
... the safety of others . We have provided many important safety messages in the vicinity of this or any other flammable vapors and liquids in this manual must not exceed 3 feet. 3 Always read and obey all occupants. • Immediately call the fire department. - This is , tell you what the potential...hazard is the safety alert symbol. All safety messages will tell you how to light any appliance. • Do not touch any phone in this manual and on your gas supplier, call your building. • Clear the room, building, or area of fire or explosion, or to potential hazards ...
Use and Care Guide
Page 5
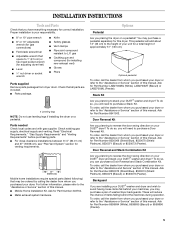
... or 10" adjustable wrench (for gas connections) s Flat-blade screwdriver s Adjustable wrench that opens to the "Assistance or Service" section of this manual. Check existing gas supply, electrical supply and venting. For further information, please refer to 1" (2.5 cm) or hex-head socket wrench (for Part...placing the dryer on your DUET® dryer and stack your dryer or refer to the "Assistance or Service" section of this manual. Parts needed Check local codes and with gas supplier. Read "Electrical Requirements," "Gas Supply Requirements" and "Venting Requirements" before ...
... or 10" adjustable wrench (for gas connections) s Flat-blade screwdriver s Adjustable wrench that opens to the "Assistance or Service" section of this manual. Check existing gas supply, electrical supply and venting. For further information, please refer to 1" (2.5 cm) or hex-head socket wrench (for Part...placing the dryer on your DUET® dryer and stack your dryer or refer to the "Assistance or Service" section of this manual. Parts needed Check local codes and with gas supplier. Read "Electrical Requirements," "Gas Supply Requirements" and "Venting Requirements" before ...
Use and Care Guide
Page 8
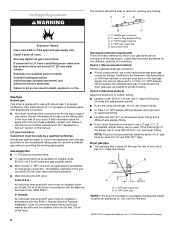
...or call the phone numbers referenced in accordance with a different gas without consulting the serving gas supplier. In Canada: An individual manual shutoff valve must be installed in accordance with the type of your dryer. Gas shutoff valve Gas supply connection requirements There are ... on the model/serial rating plate for the type of gas in the door well of E.I. L.P. s Must include a shutoff valve: In the U.S.A.: An individual manual shutoff valve must have a qualified person make sure gas pressure does not exceed 13" (33 cm) water column. B *6¼" (15.9 cm) A 1½...
...or call the phone numbers referenced in accordance with a different gas without consulting the serving gas supplier. In Canada: An individual manual shutoff valve must be installed in accordance with the type of your dryer. Gas shutoff valve Gas supply connection requirements There are ... on the model/serial rating plate for the type of gas in the door well of E.I. L.P. s Must include a shutoff valve: In the U.S.A.: An individual manual shutoff valve must have a qualified person make sure gas pressure does not exceed 13" (33 cm) water column. B *6¼" (15.9 cm) A 1½...
Use and Care Guide
Page 9
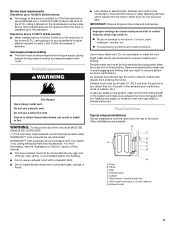
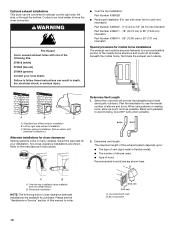
...pressure testing s The dryer must be purchased from the ground or any gas vent, chimney, wall, ceiling, or a concealed space of this manual. Venting Requirements WARNING Fire Hazard Use a heavy metal vent. For more information, see the "Assistance or Service" section of the system and make... sure exhaust hood is certified by calling Whirlpool Parts and Accessories. s Do not install flexible metal vent in its final position. If using an existing vent system, clean lint from ...
...pressure testing s The dryer must be purchased from the ground or any gas vent, chimney, wall, ceiling, or a concealed space of this manual. Venting Requirements WARNING Fire Hazard Use a heavy metal vent. For more information, see the "Assistance or Service" section of the system and make... sure exhaust hood is certified by calling Whirlpool Parts and Accessories. s Do not install flexible metal vent in its final position. If using an existing vent system, clean lint from ...
Use and Care Guide
Page 10
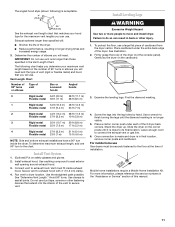
... see the "Assistance or Service" section of elbows used. When using elbows or making turns, allow as much room as possible. s The number of this manual to exhaust out the right side, left side, or through the bottom. s Over the top Installation: Part Number 4396028 s Periscope Installation (For use the fewest...
... see the "Assistance or Service" section of elbows used. When using elbows or making turns, allow as much room as possible. s The number of this manual to exhaust out the right side, left side, or through the bottom. s Over the top Installation: Part Number 4396028 s Periscope Installation (For use the fewest...
Use and Care Guide
Page 11
... Gas dryers must fit inside the dryer. Secure vent to do so can use vent runs longer than specified will: s Shorten the life of this manual. 11 Failure to exhaust hood with 4" (10.2 cm) clamp. 4. Once connection is made and dryer is acceptable. 4" (10.2 cm) 2½" (6.4 cm) See the exhaust vent...
... Gas dryers must fit inside the dryer. Secure vent to do so can use vent runs longer than specified will: s Shorten the life of this manual. 11 Failure to exhaust hood with 4" (10.2 cm) clamp. 4. Once connection is made and dryer is acceptable. 4" (10.2 cm) 2½" (6.4 cm) See the exhaust vent...
Use and Care Guide
Page 13
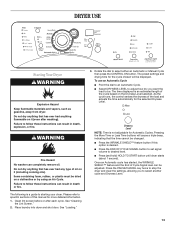
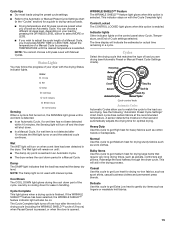
... and adjusts the time automatically for more detailed information. 1. Clean lint screen before or after washing). s Press the WRINKLE SHIELD™ feature button if this manual for the selected Dryness Level. Press the PAUSE/CANCEL key twice to stop the dryer and clear the settings, allowing you want the load to... preset settings and drying time for Automatic Cycles. s Press the END OF CYCLE SIGNAL button to set signal volume to select either an Automatic or Manual Cycle then press the CONTROL ON button.
... and adjusts the time automatically for more detailed information. 1. Clean lint screen before or after washing). s Press the WRINKLE SHIELD™ feature button if this manual for the selected Dryness Level. Press the PAUSE/CANCEL key twice to stop the dryer and clear the settings, allowing you want the load to... preset settings and drying time for Automatic Cycles. s Press the END OF CYCLE SIGNAL button to set signal volume to select either an Automatic or Manual Cycle then press the CONTROL ON button.
Use and Care Guide
Page 14
... tumbles the load without heat during dryer operation. Cool Down makes the loads easier to reduce wrinkling. s Avoid drying heavy work clothes with Manual Cycles. Press and hold the END OF CYCLE SIGNAL button for 3 seconds. Also, a Dryness Level is displayed. You can lower your utility... NOTE: Pressing the Dryness Level button will continue from the dryer as soon as tumbling stops to handle and reduces wrinkling. While a Manual Cycle is desired. If an Automatic Cycle is running and Control Locked is unlocked. This is automatically sensing the dryness level of the ...
... tumbles the load without heat during dryer operation. Cool Down makes the loads easier to reduce wrinkling. s Avoid drying heavy work clothes with Manual Cycles. Press and hold the END OF CYCLE SIGNAL button for 3 seconds. Also, a Dryness Level is displayed. You can lower your utility... NOTE: Pressing the Dryness Level button will continue from the dryer as soon as tumbling stops to handle and reduces wrinkling. While a Manual Cycle is desired. If an Automatic Cycle is running and Control Locked is unlocked. This is automatically sensing the dryness level of the ...
Use and Care Guide
Page 15
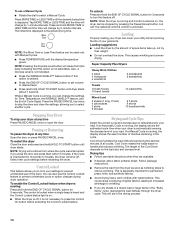
... you choose an Automatic Cycle. Each cycle dries certain fabrics at the recommended temperature. Wet The WET light will also be on with Manual Cycles. Cycle Complete This light glows when a drying cycle is not used with the drying Status indicator lights. See the following "Automatic... Preset Cycle Settings" chart. Adjust the temperature of Cycle settings selected. Heavy Duty Use this cycle to select MORE or LESS. s In a Manual Cycle, if a wet item is cooling down part of 2 hours), when Pause/Cancel is pressed, or when the door is selected. A sensor ...
... you choose an Automatic Cycle. Each cycle dries certain fabrics at the recommended temperature. Wet The WET light will also be on with Manual Cycles. Cycle Complete This light glows when a drying cycle is not used with the drying Status indicator lights. See the following "Automatic... Preset Cycle Settings" chart. Adjust the temperature of Cycle settings selected. Heavy Duty Use this cycle to select MORE or LESS. s In a Manual Cycle, if a wet item is cooling down part of 2 hours), when Pause/Cancel is pressed, or when the door is selected. A sensor ...
Use and Care Guide
Page 16
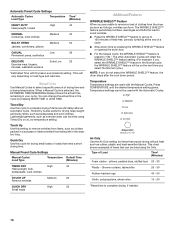
... setting. This chart shows examples of heat-free, periodic tumbling at any time by pressing MORE TIME or LESS TIME. When a Manual Cycle is preset to 120 minutes of items that can form. The WRINKLE SHIELD™ feature periodically tumbles, rearranges and fluffs the load...small loads or loads that require drying without heat such as exercise wear, can change the actual time in your cycle. Manual Preset Cycle Settings Manual Cycles Load Type Temperature Default Time (Minutes) TIMED DRY High 40 Heavyweight, bulk, bedspreads, work clothes TOUCH UP Remove ...
... setting. This chart shows examples of heat-free, periodic tumbling at any time by pressing MORE TIME or LESS TIME. When a Manual Cycle is preset to 120 minutes of items that can form. The WRINKLE SHIELD™ feature periodically tumbles, rearranges and fluffs the load...small loads or loads that require drying without heat such as exercise wear, can change the actual time in your cycle. Manual Preset Cycle Settings Manual Cycles Load Type Temperature Default Time (Minutes) TIMED DRY High 40 Heavyweight, bulk, bedspreads, work clothes TOUCH UP Remove ...


