
Owners Manual
Page 3
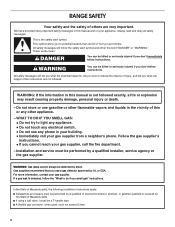
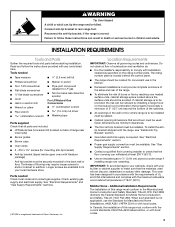
Installation and service must be detected by smell. WARNING: If the information in this or any phone in the vicinity of California to do if you ..., personal injury or death. - WARNING: Gas leaks cannot always be performed by UL or CSA. Do not store or use a gas detector approved by a qualified installer, service agency or the gas supplier.
Installation and service must be detected by smell. WARNING: If the information in this or any phone in the vicinity of California to do if you ..., personal injury or death. - WARNING: Gas leaks cannot always be performed by UL or CSA. Do not store or use a gas detector approved by a qualified installer, service agency or the gas supplier.

Owners Manual
Page 4
... should not be stored in an oven or near surface units. ■ Top burner flame size should be seriously injured. ■ Proper Installation - SAVE THESE INSTRUCTIONS 4 Connect anti-tip bracket to persons, or damage when using the range, follow these instructions can result in accordance with... precautions, including the following: ■ WARNING: TO REDUCE THE RISK OF TIPPING OF THE RANGE, THE RANGE MUST BE SECURED BY PROPERLY INSTALLED ANTI-TIP DEVICES. Doing so may result from this appliance as aluminum foil. In Canada, the range must be killed. For self-cleaning ranges...
... should not be stored in an oven or near surface units. ■ Top burner flame size should be seriously injured. ■ Proper Installation - SAVE THESE INSTRUCTIONS 4 Connect anti-tip bracket to persons, or damage when using the range, follow these instructions can result in accordance with... precautions, including the following: ■ WARNING: TO REDUCE THE RISK OF TIPPING OF THE RANGE, THE RANGE MUST BE SECURED BY PROPERLY INSTALLED ANTI-TIP DEVICES. Doing so may result from this appliance as aluminum foil. In Canada, the range must be killed. For self-cleaning ranges...
Owners Manual
Page 5
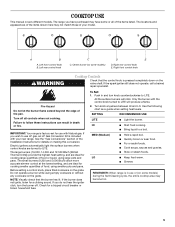
... a flame. 2. Do not operate a burner while using smaller pots and pans. COOKTOP USE This manual covers different models. See the "Gas Conversions" section of the Installation Instructions for cooking smaller quantities of the pan. Before setting a control knob, place filled cookware on some models) D. SETTING RECOMMENDED USE LITE ■ Light the...
... a flame. 2. Do not operate a burner while using smaller pots and pans. COOKTOP USE This manual covers different models. See the "Gas Conversions" section of the Installation Instructions for cooking smaller quantities of the pan. Before setting a control knob, place filled cookware on some models) D. SETTING RECOMMENDED USE LITE ■ Light the...
Owners Manual
Page 20
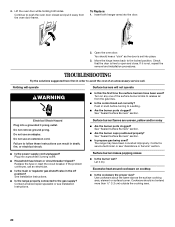
... position. Turn on cooktop ■ Is the cookware the proper size? See "Sealed Surface Burners" section. Contact a service technician or see Installation Instructions. 4. Move the hinge levers back to push the oven door closed and pull it away from the gas lines. ■ Is the...popping noises ■ Is the burner wet? TROUBLESHOOTING Try the solutions suggested here first in knob before turning to the gas supply? See Installation Instructions. ■ Is the range properly connected to a setting. ■ Are the burner ports clogged? Lift the oven door while holding...
... position. Turn on cooktop ■ Is the cookware the proper size? See "Sealed Surface Burners" section. Contact a service technician or see Installation Instructions. 4. Move the hinge levers back to push the oven door closed and pull it away from the gas lines. ■ Is the...popping noises ■ Is the burner wet? TROUBLESHOOTING Try the solutions suggested here first in knob before turning to the gas supply? See Installation Instructions. ■ Is the range properly connected to a setting. ■ Are the burner ports clogged? Lift the oven door while holding...
Owners Manual
Page 21
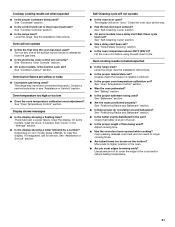
... ■ Is the batter evenly distributed in the "Settings" section. ■ Is the display showing a letter followed by a number? See the Installation Instructions. See "Cooktop Lockout" section. There has been a power failure. Close the oven door all the way. ■ Has the function been ...entered? See the Installation Instructions. ■ Is the proper temperature set ? See "Timed/Delay Cooking" section. ■ Is the oven temperature above 400°F (205...
... ■ Is the batter evenly distributed in the "Settings" section. ■ Is the display showing a letter followed by a number? See the Installation Instructions. See "Cooktop Lockout" section. There has been a power failure. Close the oven door all the way. ■ Has the function been ...entered? See the Installation Instructions. ■ Is the proper temperature set ? See "Timed/Delay Cooking" section. ■ Is the oven temperature above 400°F (205...

Owners Manual
Page 22
... 553 Benson Road Benton Harbor, MI 49022-2692 Please include a daytime phone number in your correspondence. To locate the Whirlpool designated service company in your area, you the cost of appliances. ■ Installation information. ■ Use and maintenance procedures. ■ Accessory and repair parts sales. ■ Specialized customer assistance (Spanish speaking, hearing...
... 553 Benson Road Benton Harbor, MI 49022-2692 Please include a daytime phone number in your correspondence. To locate the Whirlpool designated service company in your area, you the cost of appliances. ■ Installation information. ■ Use and maintenance procedures. ■ Accessory and repair parts sales. ■ Specialized customer assistance (Spanish speaking, hearing...
Owners Manual
Page 23
...parts or systems resulting from accident, alteration, misuse, abuse, fire, flood, acts of God, improper installation, installation not in materials or workmanship and is contrary to Whirlpool within 30 days from warranty coverage. 3. Repairs to the appliance. 9. The cost of repair or...you ever need service, first see the "Troubleshooting" section of the Use & Care Guide. Costs associated with published installation instructions. 11. WHIRLPOOL CORPORATION MAJOR APPLIANCE WARRANTY LIMITED WARRANTY For one year from your home of your major appliance for repairs. Service must...
...parts or systems resulting from accident, alteration, misuse, abuse, fire, flood, acts of God, improper installation, installation not in materials or workmanship and is contrary to Whirlpool within 30 days from warranty coverage. 3. Repairs to the appliance. 9. The cost of repair or...you ever need service, first see the "Troubleshooting" section of the Use & Care Guide. Costs associated with published installation instructions. 11. WHIRLPOOL CORPORATION MAJOR APPLIANCE WARRANTY LIMITED WARRANTY For one year from your home of your major appliance for repairs. Service must...
Dimension Guide
Page 1
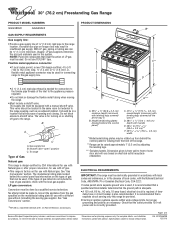
...local gas supplier. ® 30" (76.2 cm) Freestanding Gas Range PRODUCT MODEL NUMBERS GGG388LX GGG390LX GAS SUPPLY REQUIREMENTS Gas supply line: q Provide a gas supply line of 2 Ref. With LP... 0.3 cm)*** F. 29 76.0 ± 0.2 cm) width C A. A smaller size pipe on electrical outlet receptacle installation. NOTE: Pipe-joint compounds that a separate circuit serving only this range be ¹⁄₂" (1.3 cm) minimum..., check with product. Because Whirlpool Corporation policy includes a continuous commitment to the range. Specifications subject to shutoff valve.
...local gas supplier. ® 30" (76.2 cm) Freestanding Gas Range PRODUCT MODEL NUMBERS GGG388LX GGG390LX GAS SUPPLY REQUIREMENTS Gas supply line: q Provide a gas supply line of 2 Ref. With LP... 0.3 cm)*** F. 29 76.0 ± 0.2 cm) width C A. A smaller size pipe on electrical outlet receptacle installation. NOTE: Pipe-joint compounds that a separate circuit serving only this range be ¹⁄₂" (1.3 cm) minimum..., check with product. Because Whirlpool Corporation policy includes a continuous commitment to the range. Specifications subject to shutoff valve.
Dimension Guide
Page 2
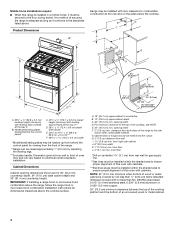
... sides of the range to the side wall or other combustible material. For minimum clearance to the top of the cooktop, see Installation our products, we reserve the right to change without notice. Page 2 of wood or metal cabinet is covered by not less... G KL H 8½" (21.6 cm) 14" *** (35.6 cm) 1½" (3.8 cm) 2¼" (5.7 cm) 1¼"* (3.1 cm) 8½" (21.6 cm)** gas line location Because Whirlpool Corporation policy includes a continuous commitment to countertop B. 13" (33.0 cm) upper cabinet depth C. 30" (76.2 cm) min. NOTE: 24" (61.0 cm) minimum when bottom of...
... sides of the range to the side wall or other combustible material. For minimum clearance to the top of the cooktop, see Installation our products, we reserve the right to change without notice. Page 2 of wood or metal cabinet is covered by not less... G KL H 8½" (21.6 cm) 14" *** (35.6 cm) 1½" (3.8 cm) 2¼" (5.7 cm) 1¼"* (3.1 cm) 8½" (21.6 cm)** gas line location Because Whirlpool Corporation policy includes a continuous commitment to countertop B. 13" (33.0 cm) upper cabinet depth C. 30" (76.2 cm) min. NOTE: 24" (61.0 cm) minimum when bottom of...
Installation Instructions
Page 2
...personal injury or death. - For more information, contact your gas supplier from a neighbor's phone. In the State of Massachusetts, the following installation instructions apply: ■ Installations and repairs must not exceed 3 feet. 2 This symbol alerts you to light any appliance. • Do not touch any other flammable...If using a ball valve, it shall be detected by UL or CSA. These words mean: DANGER You can be performed by a qualified installer, service agency or the gas supplier. WHAT TO DO IF YOU SMELL GAS: • Do not try to potential hazards that you and ...
...personal injury or death. - For more information, contact your gas supplier from a neighbor's phone. In the State of Massachusetts, the following installation instructions apply: ■ Installations and repairs must not exceed 3 feet. 2 This symbol alerts you to light any appliance. • Do not touch any other flammable...If using a ball valve, it shall be detected by UL or CSA. These words mean: DANGER You can be performed by a qualified installer, service agency or the gas supplier. WHAT TO DO IF YOU SMELL GAS: • Do not try to potential hazards that you and ...
Installation Instructions
Page 3
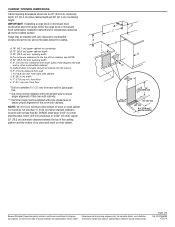
... ■ Grounded electrical supply is not applicable, use in death or serious burns to children and adults. Additional Installation Requirements The installation of burns or fire by installing a range hood or microwave hood combination that are minimum clearances. ■ The floor anti-tip bracket must be...current standards CAN/CSA-A240-latest edition, or with local codes. 3 Given dimensions are shown must conform to comply with installation clearances specified on back of flooring may require longer screws to anchor bracket to rear range foot. This oven has been designed...
... ■ Grounded electrical supply is not applicable, use in death or serious burns to children and adults. Additional Installation Requirements The installation of burns or fire by installing a range hood or microwave hood combination that are minimum clearances. ■ The floor anti-tip bracket must be...current standards CAN/CSA-A240-latest edition, or with local codes. 3 Given dimensions are shown must conform to comply with installation clearances specified on back of flooring may require longer screws to anchor bracket to rear range foot. This oven has been designed...
Installation Instructions
Page 4
...width F. 3" (7.6 cm) min. NOTE: 24" (61.0 cm) minimum when bottom of wood or metal cabinet is adequate as long as it must be installed within the shaded area to the top of the cooktop, see NOTE. E. 30" (76.2 cm) min. G. from both sides of the range to the ...with cabinets. ***Electrical plugs must be secured to countertop B. 13" (33.0 cm) upper cabinet depth C. 30" (76.2 cm) min. Mobile home installations require: ■ When this range is installed in a mobile home, it conforms to 69.2 cm ± 0.3 cm)*** F. 29 76.0 ± 0.2 cm) width *Model/serial/rating plates may...
...width F. 3" (7.6 cm) min. NOTE: 24" (61.0 cm) minimum when bottom of wood or metal cabinet is adequate as long as it must be installed within the shaded area to the top of the cooktop, see NOTE. E. 30" (76.2 cm) min. G. from both sides of the range to the ...with cabinets. ***Electrical plugs must be secured to countertop B. 13" (33.0 cm) upper cabinet depth C. 30" (76.2 cm) min. Mobile home installations require: ■ When this range is installed in a mobile home, it conforms to 69.2 cm ± 0.3 cm)*** F. 29 76.0 ± 0.2 cm) width *Model/serial/rating plates may...
Installation Instructions
Page 5
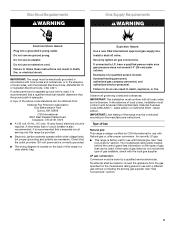
... after proper conversion, for use with LP gas. ■ This range is factory set for use with all local codes and ordinances. Install a shut-off valve. If connected to the manufacturers instructions. See "Gas Conversions" section. No attempt shall be made to do not ...conducted according to LP, have a qualified person make sure gas pressure does not exceed 14" (36 cm) water column. IMPORTANT: This installation must be provided. ■ Electronic ignition systems operate within wide voltage limits, but proper grounding and polarity are necessary. Electrical Requirements WARNING ...
... after proper conversion, for use with LP gas. ■ This range is factory set for use with all local codes and ordinances. Install a shut-off valve. If connected to the manufacturers instructions. See "Gas Conversions" section. No attempt shall be made to do not ...conducted according to LP, have a qualified person make sure gas pressure does not exceed 14" (36 cm) water column. IMPORTANT: This installation must be provided. ■ Electronic ignition systems operate within wide voltage limits, but proper grounding and polarity are necessary. Electrical Requirements WARNING ...
Installation Instructions
Page 7
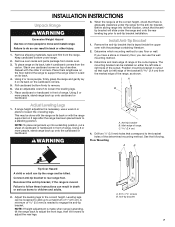
... 7. A B Adjust Leveling Legs 1. Anti-tip bracket B. Drill two ¹⁄₈" (3.0 mm) holes that correspond to anti-tip bracket installation. Leveling legs can be done with the other injury. 1. Keep cardboard bottom under the range for the anti-tip bracket. Repeat with the range on... is standing, tilt the range back to adjust the front legs, then tilt forward to loosen the 4 leveling legs. A minimum of range. INSTALLATION INSTRUCTIONS Unpack Range WARNING 3. Using 2 or more people, stand range back up into its back, take 4 cardboard corners from the marked edge ...
... 7. A B Adjust Leveling Legs 1. Anti-tip bracket B. Drill two ¹⁄₈" (3.0 mm) holes that correspond to anti-tip bracket installation. Leveling legs can be done with the other injury. 1. Keep cardboard bottom under the range for the anti-tip bracket. Repeat with the range on... is standing, tilt the range back to adjust the front legs, then tilt forward to loosen the 4 leveling legs. A minimum of range. INSTALLATION INSTRUCTIONS Unpack Range WARNING 3. Using 2 or more people, stand range back up into its back, take 4 cardboard corners from the marked edge ...

Installation Instructions
Page 8
... valve F. ½" or ¾" gas pipe G. Gas supply pipe must have a qualified person make sure gas pressure does not exceed 14" (36 cm) water column. Install a shut-off valve. Flexible connector D. Make Gas Connection WARNING D H G E F A. Tighten both adapters. Check that connector is not kinked. Typical flexible connection 1. Gas pressure regulator B. Adaptor...
... valve F. ½" or ¾" gas pipe G. Gas supply pipe must have a qualified person make sure gas pressure does not exceed 14" (36 cm) water column. Install a shut-off valve. Flexible connector D. Make Gas Connection WARNING D H G E F A. Tighten both adapters. Check that connector is not kinked. Typical flexible connection 1. Gas pressure regulator B. Adaptor...
Installation Instructions
Page 9
..., a glow bar igniter heats and ignites the gas. When the cooktop control knob is engaged in the gas supply line. When the oven control is installed, use pilotless igniters in burner base. If burners do not light properly: ■ Turn cooktop control knob to the "OFF" position. ■ Check that the...
..., a glow bar igniter heats and ignites the gas. When the cooktop control knob is engaged in the gas supply line. When the oven control is installed, use pilotless igniters in burner base. If burners do not light properly: ■ Turn cooktop control knob to the "OFF" position. ■ Check that the...
Installation Instructions
Page 11
Complete Installation 1. See "Level Range." 5. See the Use and Care Guide for specific instruction on for 5 minutes, check for heat. When the range has been on range ...: Please reference the "Assistance or Service" section of the Use and Care Guide or contact the dealer from whom you have all parts are now installed. Dry thoroughly with a soft cloth.
Complete Installation 1. See "Level Range." 5. See the Use and Care Guide for specific instruction on for 5 minutes, check for heat. When the range has been on range ...: Please reference the "Assistance or Service" section of the Use and Care Guide or contact the dealer from whom you have all parts are now installed. Dry thoroughly with a soft cloth.

Installation Instructions
Page 12
...Screw the regulator cap securely back into place. Explosion Hazard Use a new CSA International approved gas supply line. Examples of the range. A B A. Install a shut-off valve. LP Gas Conversion WARNING Tip Over Hazard A child or adult can result in death, explosion, or fire. Gas pressure regulator ...personnel. If connected to follow these instructions can tip the range and be done by a qualified installer. Unplug range or disconnect power. Plastic cover 4. To Convert Gas Pressure Regulator WARNING 1. Natural gas position B. Shutoff valve (closed position...
...Screw the regulator cap securely back into place. Explosion Hazard Use a new CSA International approved gas supply line. Examples of the range. A B A. Install a shut-off valve. LP Gas Conversion WARNING Tip Over Hazard A child or adult can result in death, explosion, or fire. Gas pressure regulator ...personnel. If connected to follow these instructions can tip the range and be done by a qualified installer. Unplug range or disconnect power. Plastic cover 4. To Convert Gas Pressure Regulator WARNING 1. Natural gas position B. Shutoff valve (closed position...

Installation Instructions
Page 13
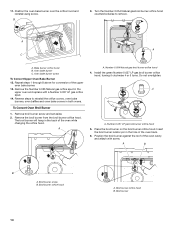
... the right. 8. Wing nut 6. Number 0.044 LP gas orifice hood B A. Unscrew and remove the cover over the orifice. A. Igniter and wires B. Bake burner screw 13 Install the Number 0.044 LP gas orifice hood, turning it clockwise 4 or 5 turns. Do not overtighten. Remove the oven bake burner screw and set the bake...
... the right. 8. Wing nut 6. Number 0.044 LP gas orifice hood B A. Unscrew and remove the cover over the orifice. A. Igniter and wires B. Bake burner screw 13 Install the Number 0.044 LP gas orifice hood, turning it clockwise 4 or 5 turns. Do not overtighten. Remove the oven bake burner screw and set the bake...
Installation Instructions
Page 14
... gas orifice spud. 14. Broil burner orifice hood A. Broil burner orifice hood B. Position the oven bake burner over the orifice hood and reinstall using screw. Install the green Number 0.037 LP gas broil burner orifice hood, turning it clockwise 4 or 5 turns. To Convert Oven Broil Burner 1. Broil burner screw B. Broil burner...
... gas orifice spud. 14. Broil burner orifice hood A. Broil burner orifice hood B. Position the oven bake burner over the orifice hood and reinstall using screw. Install the green Number 0.037 LP gas broil burner orifice hood, turning it clockwise 4 or 5 turns. To Convert Oven Broil Burner 1. Broil burner screw B. Broil burner...


