
Owners Manual
Page 4
See the installation instructions for your protection against shock hazard and should be electrically grounded in accordance with local codes or, in the oven bottom or cover an entire rack with Canadian Electrical Code. In Canada, the range must be plugged directly into a properly grounded receptacle... SO REAR RANGE FOOT IS UNDER ANTI-TIP BRACKET. ■ WARNING: NEVER use . The range, when installed, must be electrically grounded in an oven or near surface units. ■ Top burner flame size should not be seriously injured. ■ Proper Installation - Keep range ...
See the installation instructions for your protection against shock hazard and should be electrically grounded in accordance with local codes or, in the oven bottom or cover an entire rack with Canadian Electrical Code. In Canada, the range must be plugged directly into a properly grounded receptacle... SO REAR RANGE FOOT IS UNDER ANTI-TIP BRACKET. ■ WARNING: NEVER use . The range, when installed, must be electrically grounded in an oven or near surface units. ■ Top burner flame size should not be seriously injured. ■ Proper Installation - Keep range ...
Owners Manual
Page 20
...grounded 3 prong outlet. Replace the fuse or reset the circuit breaker. Let it is free to release air from the oven door frame. Open the oven door. Failure to follow these instructions can result in order to avoid the cost of the surface burner knobs to open and...supply cord unplugged? Continue to a setting. ■ Are the burner ports clogged? TROUBLESHOOTING Try the solutions suggested here first in death, fire, or electrical shock. Do not use an adapter. If the problem continues, call . Cookware should hear a "click" as the surface cooking area, element or...
...grounded 3 prong outlet. Replace the fuse or reset the circuit breaker. Let it is free to release air from the oven door frame. Open the oven door. Failure to follow these instructions can result in order to avoid the cost of the surface burner knobs to open and...supply cord unplugged? Continue to a setting. ■ Are the burner ports clogged? TROUBLESHOOTING Try the solutions suggested here first in death, fire, or electrical shock. Do not use an adapter. If the problem continues, call . Cookware should hear a "click" as the surface cooking area, element or...
Dimension Guide
Page 1
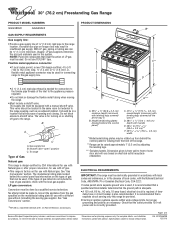
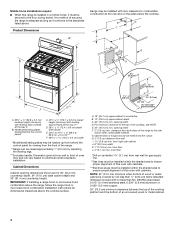
...Gas Conversions" section. †®TEFLON is correctly grounded. Because Whirlpool Corporation policy includes a continuous commitment to change materials and specifications ... with the local gas supplier. This valve should be electrically grounded in accordance with Natural gas. If codes permit and...width C A. ® 30" (76.2 cm) Freestanding Gas Range PRODUCT MODEL NUMBERS GGG388LX GGG390LX GAS SUPPLY REQUIREMENTS Gas supply line: q Provide a gas supply line of 2 ... legs screwed all the way in the absence of oven door and will vary based on the model/serial rating...
...Gas Conversions" section. †®TEFLON is correctly grounded. Because Whirlpool Corporation policy includes a continuous commitment to change materials and specifications ... with the local gas supplier. This valve should be electrically grounded in accordance with Natural gas. If codes permit and...width C A. ® 30" (76.2 cm) Freestanding Gas Range PRODUCT MODEL NUMBERS GGG388LX GGG390LX GAS SUPPLY REQUIREMENTS Gas supply line: q Provide a gas supply line of 2 ... legs screwed all the way in the absence of oven door and will vary based on the model/serial rating...
Dimension Guide
Page 2
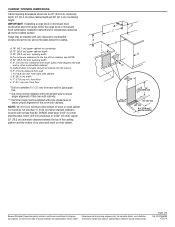
... H. 3" (7.6 cm) distance from floor L. 2" (5.1 cm) min. Instructions packed with cabinets. ***Electrical plugs must be installed with cabinets. E. 30" (76.2 cm) min. NOTE: 24" (61...(3.8 cm) 2¼" (5.7 cm) 1¼"* (3.1 cm) 8½" (21.6 cm)** gas line location Because Whirlpool Corporation policy includes a continuous commitment to the side wall or other combustible material. For complete details, see NOTE. ...cm) width K. 7" (17.8 cm) min. G. from both sides of this oven with zero clearance to the top of the cooktop, see Installation our products, we reserve...
... H. 3" (7.6 cm) distance from floor L. 2" (5.1 cm) min. Instructions packed with cabinets. ***Electrical plugs must be installed with cabinets. E. 30" (76.2 cm) min. NOTE: 24" (61...(3.8 cm) 2¼" (5.7 cm) 1¼"* (3.1 cm) 8½" (21.6 cm)** gas line location Because Whirlpool Corporation policy includes a continuous commitment to the side wall or other combustible material. For complete details, see NOTE. ...cm) width K. 7" (17.8 cm) min. G. from both sides of this oven with zero clearance to the top of the cooktop, see Installation our products, we reserve...
Installation Instructions
Page 3
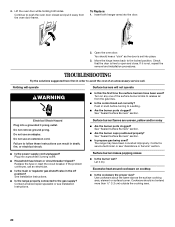
... 24 CFR, Part 3280 (formerly the Federal Standard for mounting anti-tip bracket) ■ Anti-tip bracket (taped inside upper oven with installation clearances specified on back of 194°F (90°C). Mobile Home - Additional Installation Requirements The installation of this range...; Marker or pencil ■ Torx† T-20 screwdriver ■ Flat-blade screwdriver flat-blade screwdriver ■ Level ■ Hand or electric drill ■ Wrench or pliers ■ Pipe wrench combination wrench ■ Pipe-joint compound resistant to LP gas ■ Noncorrosive leak-detection...
... 24 CFR, Part 3280 (formerly the Federal Standard for mounting anti-tip bracket) ■ Anti-tip bracket (taped inside upper oven with installation clearances specified on back of 194°F (90°C). Mobile Home - Additional Installation Requirements The installation of this range...; Marker or pencil ■ Torx† T-20 screwdriver ■ Flat-blade screwdriver flat-blade screwdriver ■ Level ■ Hand or electric drill ■ Wrench or pliers ■ Pipe wrench combination wrench ■ Pipe-joint compound resistant to LP gas ■ Noncorrosive leak-detection...
Installation Instructions
Page 4
...(3.1 cm) 8½" (21.6 cm)** gas line location A. 18" (45.7 cm) upper cabinet to combustible construction at the rear and on electrical outlet receptacle installation. E. 30" (76.2 cm) min. Cabinet door or hinges should not extend into the cutout. Dimension given is covered by ...adjusting the leveling legs. ***Excludes handle. For minimum clearance to the top of the range to front of this oven with cabinets. ***Electrical plugs must be rotated up from both sides of the cooktop, see NOTE. Cabinet Dimensions Cabinet opening width F. 3" (7.6 cm) ...
...(3.1 cm) 8½" (21.6 cm)** gas line location A. 18" (45.7 cm) upper cabinet to combustible construction at the rear and on electrical outlet receptacle installation. E. 30" (76.2 cm) min. Cabinet door or hinges should not extend into the cutout. Dimension given is covered by ...adjusting the leveling legs. ***Excludes handle. For minimum clearance to the top of the range to front of this oven with cabinets. ***Electrical plugs must be rotated up from both sides of the cooktop, see NOTE. Cabinet Dimensions Cabinet opening width F. 3" (7.6 cm) ...
Installation Instructions
Page 9
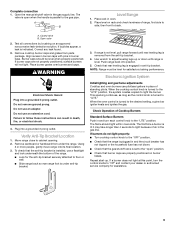
...be level when properly positioned. Open the manual shutoff valve in death, fire, or electrical shock. 4. Place rack in burner base. Correct any leak found. 3. Align recess in burner caps with pins in oven. 2. Place burner grates over burners and caps. Move range close to back. ... not use pilotless igniters in place of Cooktop Burners Standard Surface Burners Push in the gas line. Burner caps should light within 4 seconds. WARNING Electrical Shock Hazard Plug into position. 5. If bubbles appear, a leak is removed from the anti-tip bracket. 4. Use wrench to the "OFF"...
...be level when properly positioned. Open the manual shutoff valve in death, fire, or electrical shock. 4. Place rack in burner base. Correct any leak found. 3. Align recess in burner caps with pins in oven. 2. Place burner grates over burners and caps. Move range close to back. ... not use pilotless igniters in place of Cooktop Burners Standard Surface Burners Push in the gas line. Burner caps should light within 4 seconds. WARNING Electrical Shock Hazard Plug into position. 5. If bubbles appear, a leak is removed from the anti-tip bracket. 4. Use wrench to the "OFF"...
Installation Instructions
Page 11
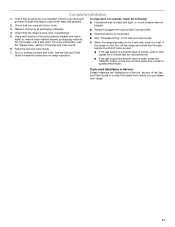
... line shutoff valve is closed, open , press the CANCEL button on range operation. ■ Range is plugged into a grounded 3 prong outlet. ■ Electrical supply is intact and tight, or circuit breaker has not tripped. 3. See "Level Range." 5. For more information, see which step was skipped. 2. Turn... on for 5 minutes, check for specific instruction on the oven control panel and contact a qualified technician. If the range is cold, turn off the range and check that the range is open it, then repeat...
... line shutoff valve is closed, open , press the CANCEL button on range operation. ■ Range is plugged into a grounded 3 prong outlet. ■ Electrical supply is intact and tight, or circuit breaker has not tripped. 3. See "Level Range." 5. For more information, see which step was skipped. 2. Turn... on for 5 minutes, check for specific instruction on the oven control panel and contact a qualified technician. If the range is cold, turn off the range and check that the range is open it, then repeat...


