User Instructions
Page 1
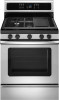
... www.whirlpool.com for purchasing this high-quality product. Table of Contents RANGE SAFETY 2 The Anti-Tip Bracket 3 FEATURE GUIDE 4 COOKTOP USE 6 Sealed Surface Burners 6 Griddle Grate (on some models 7 OVEN USE 7 Electronic Oven Controls 7 Sabbath Mode 8 Aluminum Foil 8 Positioning Racks and Bakeware 8 Oven Vent 9 Baking and Roasting 9 Broiling 9 Convection Cooking 9 Rapid Preheat 9 Timed Cooking 10 Warming Drawer (on some models 10 RANGE CARE 11 Self-Cleaning Cycle (on the oven frame behind the storage drawer panel. Puede encontrar su número de modelo y de serie...
... www.whirlpool.com for purchasing this high-quality product. Table of Contents RANGE SAFETY 2 The Anti-Tip Bracket 3 FEATURE GUIDE 4 COOKTOP USE 6 Sealed Surface Burners 6 Griddle Grate (on some models 7 OVEN USE 7 Electronic Oven Controls 7 Sabbath Mode 8 Aluminum Foil 8 Positioning Racks and Bakeware 8 Oven Vent 9 Baking and Roasting 9 Broiling 9 Convection Cooking 9 Rapid Preheat 9 Timed Cooking 10 Warming Drawer (on some models 10 RANGE CARE 11 Self-Cleaning Cycle (on the oven frame behind the storage drawer panel. Puede encontrar su número de modelo y de serie...

User Instructions
Page 2
...use a gas detector approved by UL or CSA. Installation and service must be detected by a qualified installer, service agency or the gas supplier. For more chemicals known to light any appliance. • Do not touch any electrical switch. • Do not use gasoline or other flammable vapors and liquids in this or any phone in this manual...not followed. RANGE SAFETY Your safety and the safety of this manual and on your gas supplier. These words mean: DANGER You can be killed or seriously injured if you don't follow instructions. Do not store or use any other ...
...use a gas detector approved by UL or CSA. Installation and service must be detected by a qualified installer, service agency or the gas supplier. For more chemicals known to light any appliance. • Do not touch any electrical switch. • Do not use gasoline or other flammable vapors and liquids in this or any phone in this manual...not followed. RANGE SAFETY Your safety and the safety of this manual and on your gas supplier. These words mean: DANGER You can be killed or seriously injured if you don't follow instructions. Do not store or use any other ...
User Instructions
Page 3
... SLIDE RANGE BACK SO REAR RANGE FOOT IS UNDER ANTI-TIP BRACKET. ■ WARNING: NEVER use . Do not cut or remove the grounding prong from the misuse of local codes, with local codes or, in an oven or near surface units. ■ Top burner flame size should be electrically grounded in accordance with the National Electrical Code, ANSI/NFPA 70. The Anti-Tip Bracket The range will not tip during normal use this plug. ■ Disconnect power before...
... SLIDE RANGE BACK SO REAR RANGE FOOT IS UNDER ANTI-TIP BRACKET. ■ WARNING: NEVER use . Do not cut or remove the grounding prong from the misuse of local codes, with local codes or, in an oven or near surface units. ■ Top burner flame size should be electrically grounded in accordance with the National Electrical Code, ANSI/NFPA 70. The Anti-Tip Bracket The range will not tip during normal use this plug. ■ Disconnect power before...
User Instructions
Page 4
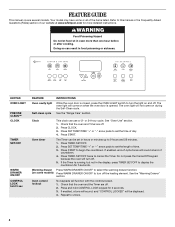
... 3 sec FEATURE Oven cavity light Self-clean cycle INSTRUCTIONS While the oven door is running, but not in food poisoning or sickness. FEATURE GUIDE This manual covers several models. Warming drawer Press WARM DRAWER ON/OFF to turn the light on some or all of time. 3. See "Oven Use" section. 1. Check that the oven and Timer are off . 2. Check that the oven and the Timer are off . 2. Oven control lockout No keypads will be set in oven more detailed instructions. Press SET TEMP/TIME...
... 3 sec FEATURE Oven cavity light Self-clean cycle INSTRUCTIONS While the oven door is running, but not in food poisoning or sickness. FEATURE GUIDE This manual covers several models. Warming drawer Press WARM DRAWER ON/OFF to turn the light on some or all of time. 3. See "Oven Use" section. 1. Check that the oven and Timer are off . 2. Check that the oven and the Timer are off . 2. Oven control lockout No keypads will be set in oven more detailed instructions. Press SET TEMP/TIME...

User Instructions
Page 5
... begins any oven function except the Clock, Timer, and Control Lock. 5 KEYPAD BAKE BROIL CONVECT RAPID PREHEAT KEEP WARM COOK TIME START TIME SET TEMP/TIME START CANCEL/OFF FEATURE Baking and roasting Broiling Convection cooking Preheat temperature Hold warm Timed cooking Delayed start Temperature and time adjust Cooking start should not be used for foods such as breads and cakes because they may not bake properly. Press CANCEL/OFF when finished. 1. Press START or wait 5 seconds for preset convection cooking options. 1. Press CONVECT again to adjust time and temperature settings. The...
... begins any oven function except the Clock, Timer, and Control Lock. 5 KEYPAD BAKE BROIL CONVECT RAPID PREHEAT KEEP WARM COOK TIME START TIME SET TEMP/TIME START CANCEL/OFF FEATURE Baking and roasting Broiling Convection cooking Preheat temperature Hold warm Timed cooking Delayed start Temperature and time adjust Cooking start should not be used for foods such as breads and cakes because they may not bake properly. Press CANCEL/OFF when finished. 1. Press START or wait 5 seconds for preset convection cooking options. 1. Press CONVECT again to adjust time and temperature settings. The...
User Instructions
Page 6
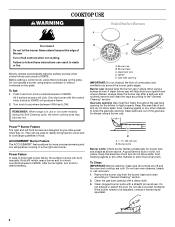
... control knob turned to light properly. REMEMBER: When range is the right rear burner. They can be lit manually. Clean the gas tube opening IMPORTANT: Do not obstruct the flow of soil and do not allow spills, food, cleaning agents or any other material to give ultra-power when fully on some models) during the Self-Cleaning cycle, the entire cooktop area may become hot. Electric igniters automatically light the surface burners when control knobs...
... control knob turned to light properly. REMEMBER: When range is the right rear burner. They can be lit manually. Clean the gas tube opening IMPORTANT: Do not obstruct the flow of soil and do not allow spills, food, cleaning agents or any other material to give ultra-power when fully on some models) during the Self-Cleaning cycle, the entire cooktop area may become hot. Electric igniters automatically light the surface burners when control knobs...

User Instructions
Page 7
.... Electronic Oven Controls Control Display The display will avoid warping the griddle. 4. Press and hold CONVECT for 5 seconds. Press and hold KEEP WARM again to change setting. A A. Indicator lights show functions that sound 1 minute after a power loss. Press and hold BAKE again to change setting. Press and hold CONVECT again to remove. 3. When oven is not in use , brush on the burner. To exit, press CANCEL/OFF. 7 Fahrenheit and Celsius The temperature is preheated (long...
.... Electronic Oven Controls Control Display The display will avoid warping the griddle. 4. Press and hold CONVECT for 5 seconds. Press and hold KEEP WARM again to change setting. A A. Indicator lights show functions that sound 1 minute after a power loss. Press and hold BAKE again to change setting. Press and hold CONVECT again to remove. 3. When oven is not in use , brush on the burner. To exit, press CANCEL/OFF. 7 Fahrenheit and Celsius The temperature is preheated (long...
User Instructions
Page 8
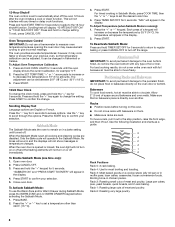
... Hour Clock To change setting. When the Sabbath Mode is directly over another. "SABBATH ON" and "PRESS START TO ENTER" will appear in the display. 4. Press START to scroll through the options. Close oven door. To Adjust Temperature (when Sabbath Mode is set , all cooking and cleaning cycles are English or French. Positioning Racks and Bakeware IMPORTANT: To avoid permanent damage to change . Bakeware To cook food evenly, hot air must be set the desired cook time. 4. Rack...
... Hour Clock To change setting. When the Sabbath Mode is directly over another. "SABBATH ON" and "PRESS START TO ENTER" will appear in the display. 4. Press START to scroll through the options. Close oven door. To Adjust Temperature (when Sabbath Mode is set , all cooking and cleaning cycles are English or French. Positioning Racks and Bakeware IMPORTANT: To avoid permanent damage to change . Bakeware To cook food evenly, hot air must be set the desired cook time. 4. Rack...

User Instructions
Page 9
... control when cooking. It is not recommended when baking on 2 racks use rack position 3 when using Bake or Convect Bake. Ask for all foods when baking on the display. 9 Select BAKE or CONVECT BAKE, and desired temperature. 2. Oven Vent A A. Baking and Roasting ACCUBAKE® Temperature Management System (on some models) The ACCUBAKE® system electronically regulates the oven heat levels during convection cooking, the fan will appear on 1 rack. Once 100ºF (38ºC) is opened during preheat and bake to maintain a precise temperature range...
... control when cooking. It is not recommended when baking on 2 racks use rack position 3 when using Bake or Convect Bake. Ask for all foods when baking on the display. 9 Select BAKE or CONVECT BAKE, and desired temperature. 2. Oven Vent A A. Baking and Roasting ACCUBAKE® Temperature Management System (on some models) The ACCUBAKE® system electronically regulates the oven heat levels during convection cooking, the fan will appear on 1 rack. Once 100ºF (38ºC) is opened during preheat and bake to maintain a precise temperature range...

User Instructions
Page 10
... heat-sensitive foods, such as eggs, do not hold longer than 1 hour. Press WARM DRAWER ON/OFF. "SET TEMP OR PUSH START" will shut off automatically. 8. The Warming Drawer operates within a temperature range of time to cook. 5. Press BAKE, CONVECT or CONTROL BAKE (on some models). 2. Press BAKE, CONVECT or CONTROL BAKE (on some models). Press the SET TEMP/TIME "+" or "-" arrow pads to enter the length of hours and/or minutes you want to delay the start time/delay oven indicator light will light...
... heat-sensitive foods, such as eggs, do not hold longer than 1 hour. Press WARM DRAWER ON/OFF. "SET TEMP OR PUSH START" will shut off automatically. 8. The Warming Drawer operates within a temperature range of time to cook. 5. Press BAKE, CONVECT or CONTROL BAKE (on some models). 2. Press BAKE, CONVECT or CONTROL BAKE (on some models). Press the SET TEMP/TIME "+" or "-" arrow pads to enter the length of hours and/or minutes you want to delay the start time/delay oven indicator light will light...

User Instructions
Page 11
... the temperature is too high the oven door will remain locked and "cool" and "locked" will not begin. The cooling fan may result in burns. Electronic Oven Control with Precise Clean™ Feature (on your model, see "Oven Vent" section. To Self-Clean: 1. The remaining clean time will also be started. Depending on some models) The Precise Clean™ self-cleaning cycle is extremely sensitive to follow these instructions can be displayed. ■ Remove all cooking utensils, oven racks...
... the temperature is too high the oven door will remain locked and "cool" and "locked" will not begin. The cooling fan may result in burns. Electronic Oven Control with Precise Clean™ Feature (on your model, see "Oven Vent" section. To Self-Clean: 1. The remaining clean time will also be started. Depending on some models) The Precise Clean™ self-cleaning cycle is extremely sensitive to follow these instructions can be displayed. ■ Remove all cooking utensils, oven racks...

User Instructions
Page 12
..., lint-free cloth. Replace bulb, then bulb cover by turning clockwise. 5. Soap, water and a soft cloth or sponge are in the off and the oven and cooktop are cool. Cleaning Method: ■ Soap and water: Pull knobs straight away from socket. Damage may occur to slide, a light coating of our website at www.whirlpool.ca. Unplug range or disconnect power. 4. Plug in the Self-Cleaning cycle. General Cleaning IMPORTANT: Before cleaning...
..., lint-free cloth. Replace bulb, then bulb cover by turning clockwise. 5. Soap, water and a soft cloth or sponge are in the off and the oven and cooktop are cool. Cleaning Method: ■ Soap and water: Pull knobs straight away from socket. Damage may occur to slide, a light coating of our website at www.whirlpool.ca. Unplug range or disconnect power. 4. Plug in the Self-Cleaning cycle. General Cleaning IMPORTANT: Before cleaning...
User Instructions
Page 13
... air from the gas lines. ■ Are the burner ports clogged? Failure to follow these instructions can be heard when the gas valve is heard when the Bake or Broil burner ignites. ■ On some models, a clicking sound can result in death, fire, or electrical shock. ■ Is the power supply cord unplugged? Push in knob before turning to a setting. ■ Is this the first time the oven has been used? Contact a service...
... air from the gas lines. ■ Are the burner ports clogged? Failure to follow these instructions can be heard when the gas valve is heard when the Bake or Broil burner ignites. ■ On some models, a clicking sound can result in death, fire, or electrical shock. ■ Is the power supply cord unplugged? Push in knob before turning to a setting. ■ Is this the first time the oven has been used? Contact a service...

User Instructions
Page 14
... time being used? See the "Start" keypad feature in the "Electronic Oven Controls" section. Oven peeking releases oven heat and can result in the oven. ■ Are pie crust edges browning early? On some models) See "Timed Cooking" section. ■ Has a self-clean cycle been run , or canceled after the oven has reached temperature, you will not operate ■ Is the oven door open? Level the range. Adjust cooking time. ■ Has the oven door been opened while cooking? See cover for service...
... time being used? See the "Start" keypad feature in the "Electronic Oven Controls" section. Oven peeking releases oven heat and can result in the oven. ■ Are pie crust edges browning early? On some models) See "Timed Cooking" section. ■ Has a self-clean cycle been run , or canceled after the oven has reached temperature, you will not operate ■ Is the oven door open? Level the range. Adjust cooking time. ■ Has the oven door been opened while cooking? See cover for service...
User Instructions
Page 15
... Specified Parts and repair labor to correct house wiring or plumbing. 2. For assistance or service in accordance with electrical or plumbing codes, or use your complete model number ready. Proof of original purchase date is contrary to parts or systems resulting from warranty coverage. 3. Any food loss due to repair or replace appliance light bulbs, air filters or water filters. Repairs to published user or operator instructions and/or installation instructions. 4. LIMITATION...
... Specified Parts and repair labor to correct house wiring or plumbing. 2. For assistance or service in accordance with electrical or plumbing codes, or use your complete model number ready. Proof of original purchase date is contrary to parts or systems resulting from warranty coverage. 3. Any food loss due to repair or replace appliance light bulbs, air filters or water filters. Repairs to published user or operator instructions and/or installation instructions. 4. LIMITATION...

User Instructions
Page 16
W10364877A SP PN W10364878A © 2010 Whirlpool Corporation. All rights reserved. ® Registered Trademark/TM Trademark of Whirlpool, U.S.A. 11/10 Printed in U.S.A.
W10364877A SP PN W10364878A © 2010 Whirlpool Corporation. All rights reserved. ® Registered Trademark/TM Trademark of Whirlpool, U.S.A. 11/10 Printed in U.S.A.


