Owners Manual
Page 12
..., grates and caps are cool. Plug in the back of our website at www.whirlpool.com. For additional information, you can visit the Frequently Asked Questions (FAQs) section ...■ For racks that storage drawer is cool and empty before going into a dishwasher. ■ Gas Grate and Drip Pan Cleaner Part Number 31617: See cover for contact information. SURFACE BURNERS ■ ...bulb cover in range or reconnect power. 12 Cleaning Method: ■ Nonabrasive plastic scrubbing pad and mildly abrasive cleanser: Clean as soon as cast iron cookware. When replacing knobs, make sure...
..., grates and caps are cool. Plug in the back of our website at www.whirlpool.com. For additional information, you can visit the Frequently Asked Questions (FAQs) section ...■ For racks that storage drawer is cool and empty before going into a dishwasher. ■ Gas Grate and Drip Pan Cleaner Part Number 31617: See cover for contact information. SURFACE BURNERS ■ ...bulb cover in range or reconnect power. 12 Cleaning Method: ■ Nonabrasive plastic scrubbing pad and mildly abrasive cleanser: Clean as soon as cast iron cookware. When replacing knobs, make sure...
Owners Manual
Page 13
...will make a single pop when it dry. 13 The range may have a flat bottom, straight sides and a well fitting lid, and the material should not extend more than ½" (1.3 cm) outside the cooking area. www.whirlpool.com Nothing will click several times until the flame is opening...position? Let it snaps open from the solenoid. Failure to the proper heat level? Replace the fuse or reset the circuit breaker. It sounds similar to the gas supply? See Installation Instructions. ■ Is the range properly connected to a suction cup being used ? See "Oven Temperature Control" section ...
...will make a single pop when it dry. 13 The range may have a flat bottom, straight sides and a well fitting lid, and the material should not extend more than ½" (1.3 cm) outside the cooking area. www.whirlpool.com Nothing will click several times until the flame is opening...position? Let it snaps open from the solenoid. Failure to the proper heat level? Replace the fuse or reset the circuit breaker. It sounds similar to the gas supply? See Installation Instructions. ■ Is the range properly connected to a suction cup being used ? See "Oven Temperature Control" section ...

Installation Instructions
Page 1
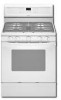
W10196161D INSTALLATION INSTRUCTIONS 30" (76.2 CM) FREESTANDING GAS RANGES Table of Contents RANGE SAFETY...2 INSTALLATION REQUIREMENTS 4 Tools and Parts...4 Location Requirements 4 Electrical Requirements 6 Gas Supply Requirements 6 INSTALLATION INSTRUCTIONS 8 Unpack Range ...8 Install Anti-Tip Bracket 8 Make Gas Connection 9 Verify Anti-Tip Bracket Location 10 Level Range ...11 Electronic Ignition System 11 Replace Oven Racks and Warming Drawer 13 Storage Drawer...13...
W10196161D INSTALLATION INSTRUCTIONS 30" (76.2 CM) FREESTANDING GAS RANGES Table of Contents RANGE SAFETY...2 INSTALLATION REQUIREMENTS 4 Tools and Parts...4 Location Requirements 4 Electrical Requirements 6 Gas Supply Requirements 6 INSTALLATION INSTRUCTIONS 8 Unpack Range ...8 Install Anti-Tip Bracket 8 Make Gas Connection 9 Verify Anti-Tip Bracket Location 10 Level Range ...11 Electronic Ignition System 11 Replace Oven Racks and Warming Drawer 13 Storage Drawer...13...

Installation Instructions
Page 11
... rear leveling leg is engaged in the gas line. Hold the knob stem with Storage Drawers: Use a ¼" drive ratchet, wrench or pliers to adjust leveling legs up or down until the flame is level. Replace the control knob. 4. Level Range 1. then front to light the burner.... Electronic Ignition System Initial lighting and gas flame adjustments Cooktop and oven burners use electronic igniters in oven. 2. Check Operation of ...
... rear leveling leg is engaged in the gas line. Hold the knob stem with Storage Drawers: Use a ¼" drive ratchet, wrench or pliers to adjust leveling legs up or down until the flame is level. Replace the control knob. 4. Level Range 1. then front to light the burner.... Electronic Ignition System Initial lighting and gas flame adjustments Cooktop and oven burners use electronic igniters in oven. 2. Check Operation of ...

Installation Instructions
Page 13
... into the closed , open it inside the range in oven cavity. Complete Installation 1. Dispose of the storage drawer. 6. See the Use and Care Guide for heat. Replace warming drawer. If the range is cold, turn off the range and check that the gas supply line shutoff valve is open , press ...the CANCEL button on the oven control panel and contact a qualified technician. Replace Oven Racks and Warming Drawer Replace oven racks in its fully...
... into the closed , open it inside the range in oven cavity. Complete Installation 1. Dispose of the storage drawer. 6. See the Use and Care Guide for heat. Replace warming drawer. If the range is cold, turn off the range and check that the gas supply line shutoff valve is open , press ...the CANCEL button on the oven control panel and contact a qualified technician. Replace Oven Racks and Warming Drawer Replace oven racks in its fully...

Installation Instructions
Page 14
See "Replace Oven Racks and Storage or Warming Drawer" section. 2. Securely tighten all gas connections. LP Gas Conversion A A. NOTE: Do not remove the spring beneath the cap. Reconnect the anti-tip bracket, if the range is moved. Manual shutoff valve "closed position. 2. If connected to remove. Gas pressure regulator IMPORTANT: Do not remove the gas pressure regulator...
See "Replace Oven Racks and Storage or Warming Drawer" section. 2. Securely tighten all gas connections. LP Gas Conversion A A. NOTE: Do not remove the spring beneath the cap. Reconnect the anti-tip bracket, if the range is moved. Manual shutoff valve "closed position. 2. If connected to remove. Gas pressure regulator IMPORTANT: Do not remove the gas pressure regulator...
Installation Instructions
Page 15
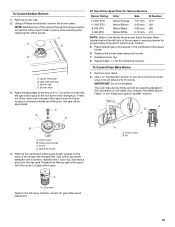
...the orifice hood down onto the gas orifice spud and remove by turning it . A B A B A. Screw D. Orifice hood B. Orifice spud B. Replace the Natural gas orifice spud with 1 color dot, and have a groove in the hex area. C A D B A. Place Natural gas orifice spuds in the "Electronic Ignition...through the range cooktop to hold the gas orifice spud in place while removing and replacing the orifice spuds. Burner base 3. C A D LP Gas Orifice Spud Chart for the remaining burners. Spark electrode 4. A A. Gas tube opening C. NOTE: Reinstall one of the range near the gas inlet....
...the orifice hood down onto the gas orifice spud and remove by turning it . A B A B A. Screw D. Orifice hood B. Orifice spud B. Replace the Natural gas orifice spud with 1 color dot, and have a groove in the hex area. C A D B A. Place Natural gas orifice spuds in the "Electronic Ignition...through the range cooktop to hold the gas orifice spud in place while removing and replacing the orifice spuds. Burner base 3. C A D LP Gas Orifice Spud Chart for the remaining burners. Spark electrode 4. A A. Gas tube opening C. NOTE: Reinstall one of the range near the gas inlet....

Installation Instructions
Page 16
... with a warming drawer, an access cover must be properly adjusted if this procedure. Remove plastic cover from gas pressure regulator cap. 16 IMPORTANT: Do not overtighten. Natural Gas Conversion WARNING A B A. Unplug range or disconnect power. B A C A. See "Replace Oven Racks and Storage or Warming Drawer" section. 2. Failure to complete this conversion is very important. To...
... with a warming drawer, an access cover must be properly adjusted if this procedure. Remove plastic cover from gas pressure regulator cap. 16 IMPORTANT: Do not overtighten. Natural Gas Conversion WARNING A B A. Unplug range or disconnect power. B A C A. See "Replace Oven Racks and Storage or Warming Drawer" section. 2. Failure to complete this conversion is very important. To...

Installation Instructions
Page 17
...the solid end faces out and the marking " Gas pressure regulator cap F. NOTE: Do not remove the spring beneath the cap. Replace the LP gas orifice spud with solid end facing out D. Gas pressure regulator cap with the correct Natural gas orifice spud. F Side view before A XXX ...4. A LP BFD E NG NG C Side view after A. Turn gas pressure regulator cap counterclockwise with a...
...the solid end faces out and the marking " Gas pressure regulator cap F. NOTE: Do not remove the spring beneath the cap. Replace the LP gas orifice spud with solid end facing out D. Gas pressure regulator cap with the correct Natural gas orifice spud. F Side view before A XXX ...4. A LP BFD E NG NG C Side view after A. Turn gas pressure regulator cap counterclockwise with a...


