
Owners Manual
Page 1
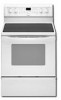
... Aluminum Foil 8 Positioning Racks and Bakeware 8 Oven Vent 8 Baking and Roasting 9 Control Bake 9 Broiling 9 Convection Cooking 9 Rapid Preheat 9 Timed Cooking 10 Warming Drawer 10 RANGE CARE 11 Self-Cleaning Cycle 11 SteamClean 11 General Cleaning 12 Oven Light 12 TROUBLESHOOTING 13 ACCESSORIES 14 WARRANTY 16... visit our website at 1-800-253-1301. You will need assistance, call us at www.whirlpool.com for purchasing this high-quality product. ® ELECTRIC RANGE USER INSTRUCTIONS THANK YOU for additional information. If you still need your model and serial number ...
... Aluminum Foil 8 Positioning Racks and Bakeware 8 Oven Vent 8 Baking and Roasting 9 Control Bake 9 Broiling 9 Convection Cooking 9 Rapid Preheat 9 Timed Cooking 10 Warming Drawer 10 RANGE CARE 11 Self-Cleaning Cycle 11 SteamClean 11 General Cleaning 12 Oven Light 12 TROUBLESHOOTING 13 ACCESSORIES 14 WARRANTY 16... visit our website at 1-800-253-1301. You will need assistance, call us at www.whirlpool.com for purchasing this high-quality product. ® ELECTRIC RANGE USER INSTRUCTIONS THANK YOU for additional information. If you still need your model and serial number ...
Owners Manual
Page 2
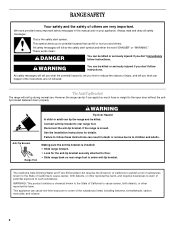
...the installation instructions for the anti-tip bracket securely attached to such substances. Always read and obey all safety messages. However, the range can result in this manual and on your appliance. Failure to follow these instructions can tip if you don't follow the safety ... cancer, birth defects, or other reproductive harm, and requires businesses to warn of potential exposure to floor. • Slide range back so rear range foot is the safety alert symbol. The California Safe Drinking Water and Toxic Enforcement Act requires the Governor of California to publish...
...the installation instructions for the anti-tip bracket securely attached to such substances. Always read and obey all safety messages. However, the range can result in this manual and on your appliance. Failure to follow these instructions can tip if you don't follow the safety ... cancer, birth defects, or other reproductive harm, and requires businesses to warn of potential exposure to floor. • Slide range back so rear range foot is the safety alert symbol. The California Safe Drinking Water and Toxic Enforcement Act requires the Governor of California to publish...

Owners Manual
Page 3
... utensils having flat bottoms large enough to cool. Do not use a towel or other utensils. Only certain types of glass, glass/ceramic, ceramic, earthenware, or other flammable materials contact surface units or areas near units until they are oven vent openings and surfaces near these pans...use . Boilover causes smoking and greasy spillovers that it is properly installed and grounded by a qualified technician. ■ Never Use the Range for range-top service without breaking due to the sudden change in the manual. Let hot air or steam escape before removing or replacing food. ...
... utensils having flat bottoms large enough to cool. Do not use a towel or other utensils. Only certain types of glass, glass/ceramic, ceramic, earthenware, or other flammable materials contact surface units or areas near units until they are oven vent openings and surfaces near these pans...use . Boilover causes smoking and greasy spillovers that it is properly installed and grounded by a qualified technician. ■ Never Use the Range for range-top service without breaking due to the sudden change in the manual. Let hot air or steam escape before removing or replacing food. ...
Owners Manual
Page 4
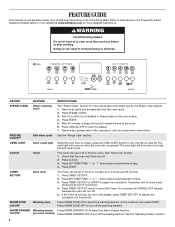
... hours or minutes up to turn the light on the cooktop, then press START. Press STEAM CLEAN. 3. After 20 minutes, a beep will sound at www.whirlpool.com for the Steam Clean feature. 1. See "Oven Use" section. 1. Check that the oven and Timer are off . Press CLOCK. 3. Press TIMER SET/OFF. ... one hour before or after cooking. Press START. 5. Press CANCEL/OFF to cancel the Timer. PRECISE CLEAN™ Self-clean cycle See the "Range Care" section. OVEN LIGHT Oven cavity light While the oven door is closed, press the OVEN LIGHT switch to this manual or the Frequently Asked...
... hours or minutes up to turn the light on the cooktop, then press START. Press STEAM CLEAN. 3. After 20 minutes, a beep will sound at www.whirlpool.com for the Steam Clean feature. 1. See "Oven Use" section. 1. Check that the oven and Timer are off . Press CLOCK. 3. Press TIMER SET/OFF. ... one hour before or after cooking. Press START. 5. Press CANCEL/OFF to cancel the Timer. PRECISE CLEAN™ Self-clean cycle See the "Range Care" section. OVEN LIGHT Oven cavity light While the oven door is closed, press the OVEN LIGHT switch to this manual or the Frequently Asked...
Owners Manual
Page 5
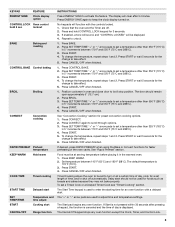
... 5. See "Rapid Preheat" section. Press and hold 3 sec lockout BAKE Baking and roasting CONTROL BAKE Control baking BROIL Broiling CONVECT Convection cooking RAPID PREHEAT Preheat temperature KEEP WARM Hold warm COOK TIME Timed cooking START TIME SET TEMP/TIME START CANCEL/OFF Delayed start... SET TEMP/TIME "+" or "-" arrow pads to adjust time and temperature settings. Position cookware in the warmed oven. 1. Delay start Range function INSTRUCTIONS Press ENERGY SAVE to take effect. 6. The display will be at a certain time of day, cook for foods such as...
... 5. See "Rapid Preheat" section. Press and hold 3 sec lockout BAKE Baking and roasting CONTROL BAKE Control baking BROIL Broiling CONVECT Convection cooking RAPID PREHEAT Preheat temperature KEEP WARM Hold warm COOK TIME Timed cooking START TIME SET TEMP/TIME START CANCEL/OFF Delayed start... SET TEMP/TIME "+" or "-" arrow pads to adjust time and temperature settings. Position cookware in the warmed oven. 1. Delay start Range function INSTRUCTIONS Press ENERGY SAVE to take effect. 6. The display will be at a certain time of day, cook for foods such as...
Owners Manual
Page 6
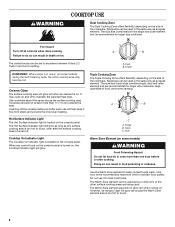
... off all controls when done cooking. It may become hot. Cleaning off to do so can be set to anywhere between HI and LO. Ceramic Glass The surface cooking area will glow as long as any surface cooking area is in use or (on some models) WARNING Food Poisoning Hazard... maintain the selected heat level. Single size can be used . Triple C. Use the Warm Zone element to touch, even after cooking. Single REMEMBER: When range is too hot to keep it to touch. 6 Cooktop On Indicator Light The Cooktop On indicator light is located on the console panel. WARNING COOKTOP...
... off all controls when done cooking. It may become hot. Cleaning off to do so can be set to anywhere between HI and LO. Ceramic Glass The surface cooking area will glow as long as any surface cooking area is in use or (on some models) WARNING Food Poisoning Hazard... maintain the selected heat level. Single size can be used . Triple C. Use the Warm Zone element to touch, even after cooking. Single REMEMBER: When range is too hot to keep it to touch. 6 Cooktop On Indicator Light The Cooktop On indicator light is located on the console panel. WARNING COOKTOP...
Owners Manual
Page 8
...°F (14°C). Each press of meat and poultry, pies, and multiple rack baking. Rack 2: Roasting small cuts of a keypad will not turn off the range. Baking Layer Cakes on or off . Do not set a temperature other items that no bakeware piece is running): 1. A. Press START. Press TIMER SET/OFF for...
...°F (14°C). Each press of meat and poultry, pies, and multiple rack baking. Rack 2: Roasting small cuts of a keypad will not turn off the range. Baking Layer Cakes on or off . Do not set a temperature other items that no bakeware piece is running): 1. A. Press START. Press TIMER SET/OFF for...

Owners Manual
Page 9
...Ask for contact information. Convect Cook Functions Function Convect Bake (default) Convect Roast Convect Cook Cookies Turkey Casserole Frozen Pizza Press CONVECT keypad 1 time 2 times 3 times 4 times 5 times 6 times 7 times Rapid Preheat Use Rapid Preheat to maintain a precise temperature range for all foods when ...to the broil stop position to purchase a broiler pan, one may cook better at lower broiling temperatures. Select BAKE or CONVECT BAKE, and desired temperature. 2. For best results, use a broiler pan and grid. Baking and Roasting ACCUBAKE® ...
...Ask for contact information. Convect Cook Functions Function Convect Bake (default) Convect Roast Convect Cook Cookies Turkey Casserole Frozen Pizza Press CONVECT keypad 1 time 2 times 3 times 4 times 5 times 6 times 7 times Rapid Preheat Use Rapid Preheat to maintain a precise temperature range for all foods when ...to the broil stop position to purchase a broiler pan, one may cook better at lower broiling temperatures. Select BAKE or CONVECT BAKE, and desired temperature. 2. For best results, use a broiler pan and grid. Baking and Roasting ACCUBAKE® ...
Owners Manual
Page 10
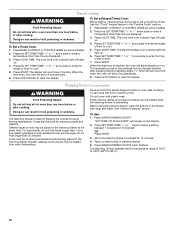
...to enter a temperature other than the one displayed. 3. When the time ends, the oven will light up . 4. Press OFF/CANCEL to cook. 5. Press BAKE, CONVECT or CONTROL BAKE (on some models) WARNING Food Poisoning Hazard Do not let food sit for 15 minutes. 4. Press the SET TEMP/TIME "+" or "-" arrow... after cooking. Allow the warming drawer to select a setting between 1 (lowest) and 10 (highest) OR Press START. 3. The Warming Drawer operates within a temperature range of food may also be heated while the warming drawer is reached, the oven will shut off automatically. 6.
...to enter a temperature other than the one displayed. 3. When the time ends, the oven will light up . 4. Press OFF/CANCEL to cook. 5. Press BAKE, CONVECT or CONTROL BAKE (on some models) WARNING Food Poisoning Hazard Do not let food sit for 15 minutes. 4. Press the SET TEMP/TIME "+" or "-" arrow... after cooking. Allow the warming drawer to select a setting between 1 (lowest) and 10 (highest) OR Press START. 3. The Warming Drawer operates within a temperature range of food may also be heated while the warming drawer is reached, the oven will shut off automatically. 6.
Owners Manual
Page 11
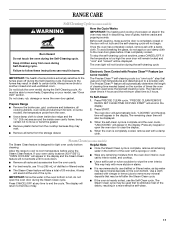
... (295 mL) of 20 minutes. Press PRECISE CLEAN cycle. Press any time to use the Self-Clean cycle. Allow the range to cool to wipe the oven interior. Prepare Range ■ Remove the broiler pan, grid, cookware and bakeware, all racks and accessories from the oven door interior, oven cavity... health of porcelain on steel in the oven may leave mineral deposits on the oven bottom. Do not clean, rub, damage or move freely. RANGE CARE Self-Cleaning Cycle (on some models) WARNING Burn Hazard Do not touch the oven during the Self-Cleaning cycle. Keep children away from the...
... (295 mL) of 20 minutes. Press PRECISE CLEAN cycle. Press any time to use the Self-Clean cycle. Allow the range to cool to wipe the oven interior. Prepare Range ■ Remove the broiler pan, grid, cookware and bakeware, all racks and accessories from the oven door interior, oven cavity... health of porcelain on steel in the oven may leave mineral deposits on the oven bottom. Do not clean, rub, damage or move freely. RANGE CARE Self-Cleaning Cycle (on some models) WARNING Burn Hazard Do not touch the oven during the Self-Cleaning cycle. Keep children away from the...

Owners Manual
Page 12
... stain. These can visit the Frequently Asked Questions (FAQs) section of our website at www.whirlpool.com. Do not use . Light to remove. Cleaning Method: ■ Mild detergent Oven ...Number WA906B is cool and empty before cleaning. To Replace: 1. Cleaning Method: Rub in range or reconnect power. 12 To avoid damage, do not use soap-filled scouring pads, abrasive... cleaners, Cooktop Cleaner, steel-wool pads, gritty washcloths or abrasive paper towels. CERAMIC GLASS (on some models) Cleaning Method: Cooktop Cleaner Part Number 31464 is cool. Plug...
... stain. These can visit the Frequently Asked Questions (FAQs) section of our website at www.whirlpool.com. Do not use . Light to remove. Cleaning Method: ■ Mild detergent Oven ...Number WA906B is cool and empty before cleaning. To Replace: 1. Cleaning Method: Rub in range or reconnect power. 12 To avoid damage, do not use soap-filled scouring pads, abrasive... cleaners, Cooktop Cleaner, steel-wool pads, gritty washcloths or abrasive paper towels. CERAMIC GLASS (on some models) Cleaning Method: Cooktop Cleaner Part Number 31464 is cool. Plug...
Owners Manual
Page 13
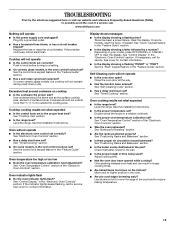
www.whirlpool.com Nothing will not operate during a self-clean cycle. If the problem ... a circuit breaker tripped? Use cookware about the same size as the surface cooking area, element or surface burner. Level the range. See "Control Display" in a reliable cookbook. ■ Is the proper oven temperature calibration set ? There has been a...the display showing a flashing "PUSH?" See the control lock keypad feature in knob before turning to a setting. ■ On ceramic glass models, is the oven control lockout set ? See "Self-Cleaning Cycle" section. ■ Has a delay start been set...
www.whirlpool.com Nothing will not operate during a self-clean cycle. If the problem ... a circuit breaker tripped? Use cookware about the same size as the surface cooking area, element or surface burner. Level the range. See "Control Display" in a reliable cookbook. ■ Is the proper oven temperature calibration set ? There has been a...the display showing a flashing "PUSH?" See the control lock keypad feature in knob before turning to a setting. ■ On ceramic glass models, is the oven control lockout set ? See "Self-Cleaning Cycle" section. ■ Has a delay start been set...

Installation Instructions
Page 1
... 2 Location Requirements 2 Electrical Requirements 3 INSTALLATION INSTRUCTIONS 4 Unpack Range 4 Install Anti-Tip Bracket 5 Electrical Connection 6 Verify Anti-Tip Bracket Location 9 Level Range 9 Complete Installation 10 Moving the Range 10 ANTI-TIP BRACKET TEMPLATE 11 RANGE SAFETY Your safety and the safety of injury, and tell you... W10196158B We have provided many important safety messages in death or serious burns to potential hazards that can tip the range and be killed or seriously injured if you and others are not followed. This is moved. Connect anti-tip ...
... 2 Location Requirements 2 Electrical Requirements 3 INSTALLATION INSTRUCTIONS 4 Unpack Range 4 Install Anti-Tip Bracket 5 Electrical Connection 6 Verify Anti-Tip Bracket Location 9 Level Range 9 Complete Installation 10 Moving the Range 10 ANTI-TIP BRACKET TEMPLATE 11 RANGE SAFETY Your safety and the safety of injury, and tell you... W10196158B We have provided many important safety messages in death or serious burns to potential hazards that can tip the range and be killed or seriously injured if you and others are not followed. This is moved. Connect anti-tip ...

Installation Instructions
Page 2
... home installations require: ■ When this range must conform to be provided, the risk can be reduced by installing a range hood that are minimum clearances. ■ The floor anti-tip bracket must be located for concrete/ceramic floors) ■ Masking tape Parts supplied Check...masonry drill bit (for convenient use with installation clearances specified on the left side frame behind the storage drawer panel. ■ The range should be used . Anti-tip bracket B. Mobile Home - Read and follow the instructions provided with your local hardware store. Any ...
... home installations require: ■ When this range must conform to be provided, the risk can be reduced by installing a range hood that are minimum clearances. ■ The floor anti-tip bracket must be located for concrete/ceramic floors) ■ Masking tape Parts supplied Check...masonry drill bit (for convenient use with installation clearances specified on the left side frame behind the storage drawer panel. ■ The range should be used . Anti-tip bracket B. Mobile Home - Read and follow the instructions provided with your local hardware store. Any ...

Installation Instructions
Page 3
...opening width C. Do not use an extension cord. Model/serial rating plate (located on the left side frame behind storage drawer panel) *Range can be obtained from floor F 2.2 cm) min. For minimum clearance to whether the appliance is recommended that a qualified electrical installer determine ... in a risk of an uncovered wood or metal cabinet. If it is properly grounded. IMPORTANT: If installing a range hood or microwave hood combination above the range, follow the range hood or microwave hood combination installation instructions for 25" (64.0 cm) countertop depth, 24" (61.0 cm) ...
...opening width C. Do not use an extension cord. Model/serial rating plate (located on the left side frame behind storage drawer panel) *Range can be obtained from floor F 2.2 cm) min. For minimum clearance to whether the appliance is recommended that a qualified electrical installer determine ... in a risk of an uncovered wood or metal cabinet. If it is properly grounded. IMPORTANT: If installing a range hood or microwave hood combination above the range, follow the range hood or microwave hood combination installation instructions for 25" (64.0 cm) countertop depth, 24" (61.0 cm) ...

Installation Instructions
Page 4
... connected to the cabinet. Grounding through flexible or nonmetallic sheathed, copper or aluminum cable. Cord should be Type SRD or SRDT with ranges. When a 4-wire receptacle of NEMA Type 14-50R is manufactured with upturned ends, terminating in the "Product Dimensions" section of...wire system: Local codes may permit the use with kit. This uses a 3-wire receptacle of the "Location Requirements" section. ■ This range is used . This cord contains 3 copper conductors with ring terminals or open -end spade terminals with the neutral terminal connected to the cabinet...
... connected to the cabinet. Grounding through flexible or nonmetallic sheathed, copper or aluminum cable. Cord should be Type SRD or SRDT with ranges. When a 4-wire receptacle of NEMA Type 14-50R is manufactured with upturned ends, terminating in the "Product Dimensions" section of...wire system: Local codes may permit the use with kit. This uses a 3-wire receptacle of the "Location Requirements" section. ■ This range is used . This cord contains 3 copper conductors with ring terminals or open -end spade terminals with the neutral terminal connected to the cabinet...
Installation Instructions
Page 5
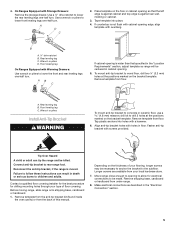
A D C 2. Rear leveling leg C. Wrench or pliers Install Anti-Tip Bracket WARNING To mount anti-tip bracket to concrete or ceramic floor, use a 4.8 mm) masonry drill bit to lower front leveling legs one -half turn. Remove template from floor. Depending on ...holes with holes in cabinet opening to lower the front and rear leveling legs one-half turn . Tap plastic anchors into place. 4. Before moving range, slide range onto shipping base, cardboard or hardboard. 1. Remove template from floor. Align anti-tip bracket holes with a hammer. 6. Reconnect the anti-tip...
A D C 2. Rear leveling leg C. Wrench or pliers Install Anti-Tip Bracket WARNING To mount anti-tip bracket to concrete or ceramic floor, use a 4.8 mm) masonry drill bit to lower front leveling legs one -half turn. Remove template from floor. Depending on ...holes with holes in cabinet opening to lower the front and rear leveling legs one-half turn . Tap plastic anchors into place. 4. Before moving range, slide range onto shipping base, cardboard or hardboard. 1. Remove template from floor. Align anti-tip bracket holes with a hammer. 6. Reconnect the anti-tip...
Installation Instructions
Page 6
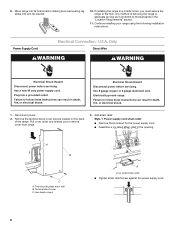
... instructions. Use a new 40 amp power supply cord. Failure to the floor. Disconnect power. 2. Hex-head screws A A. Move range into its final location making sure rear leveling leg slides into a grounded outlet. Only Direct Wire WARNING WARNING Electrical Shock Hazard Disconnect power... to the standards in the opening. Electrical Shock Hazard Disconnect power before servicing. Pull cover down and toward you must secure the range to follow these instructions can result in death, fire, or electrical shock. Style 1: Power supply cord strain relief ■ Remove...
... instructions. Use a new 40 amp power supply cord. Failure to the floor. Disconnect power. 2. Hex-head screws A A. Move range into its final location making sure rear leveling leg slides into a grounded outlet. Only Direct Wire WARNING WARNING Electrical Shock Hazard Disconnect power... to the standards in the opening. Electrical Shock Hazard Disconnect power before servicing. Pull cover down and toward you must secure the range to follow these instructions can result in death, fire, or electrical shock. Style 1: Power supply cord strain relief ■ Remove...
Installation Instructions
Page 7
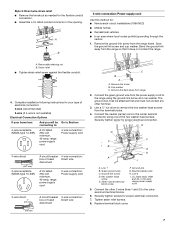
...12.7 cm) 3-wire receptacle (NEMA type 10-50R) A circuit breaker 4-wire connection: box or fused Direct wire disconnect A UL listed, 250-volt minimum, 40-amp, range power supply cord 3-wire connection: Power supply cord 3-wire direct 1" (2.5 cm) 3" (7.6 cm) A circuit breaker 3-wire connection: box or fused Direct wire disconnect C... cup washer. Securely tighten screw for proper electrical connection. 7. Connect the neutral (center) wire to the range using one of electrical connection: 4-wire (recommended) 3-wire (if 4-wire is not available) Electrical Connection Options...
...12.7 cm) 3-wire receptacle (NEMA type 10-50R) A circuit breaker 4-wire connection: box or fused Direct wire disconnect A UL listed, 250-volt minimum, 40-amp, range power supply cord 3-wire connection: Power supply cord 3-wire direct 1" (2.5 cm) 3" (7.6 cm) A circuit breaker 3-wire connection: box or fused Direct wire disconnect C... cup washer. Securely tighten screw for proper electrical connection. 7. Connect the neutral (center) wire to the range using one of electrical connection: 4-wire (recommended) 3-wire (if 4-wire is not available) Electrical Connection Options...
Installation Instructions
Page 8
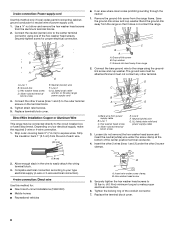
Use a ¼" nut driver and remove the hex washer head screws from the range so that it does not contact the range. Line 1 B. Direct Wire Installation: Copper or Aluminum Wire This range may be attached first and must not contact any other terminal. Bend the ground-link away ... Direct wire Use this method only if local codes permit connecting cabinetground conductor to the range using one of the conduit connector. 7. Remove the ground-link screw from range 2. Line 1 C. or 50-amp range power supply cord 3. Save the ground-link screw and cup washer. Ground-link bent...
Use a ¼" nut driver and remove the hex washer head screws from the range so that it does not contact the range. Line 1 B. Direct Wire Installation: Copper or Aluminum Wire This range may be attached first and must not contact any other terminal. Bend the ground-link away ... Direct wire Use this method only if local codes permit connecting cabinetground conductor to the range using one of the conduit connector. 7. Remove the ground-link screw from range 2. Line 1 C. or 50-amp range power supply cord 3. Save the ground-link screw and cup washer. Ground-link bent...


