Use and Care Guide
Page 1
...1-800-442-9991 and ask for future reference. In Canada, for in your authorized Whirlpool dealer. Call us at www.whirlpool.com. Dealer name Serial number Address Phone number Model number Purchase date Accessories To order replacement filters, call 1-800-807-6777. Keep this... information on the model and serial number label, located on the inside wall of the ...
...1-800-442-9991 and ask for future reference. In Canada, for in your authorized Whirlpool dealer. Call us at www.whirlpool.com. Dealer name Serial number Address Phone number Model number Purchase date Accessories To order replacement filters, call 1-800-807-6777. Keep this... information on the model and serial number label, located on the inside wall of the ...
Use and Care Guide
Page 2
...safety alert symbol. s Do not use an extension cord. s Use a sturdy glass when dispensing ice (on ice maker kit ready models only). Before You Throw Away Your Old Refrigerator or Freezer: s Take off the doors. Junked or abandoned refrigerators are not problems of ... all parts and panels before operating. All safety messages will sit for "just a few days." s Disconnect power before installing ice maker (on some models). s Remove doors from your appliance. s Keep flammable materials and vapors, such as gasoline, away from your refrigerator, follow these basic precautions: s...
...safety alert symbol. s Do not use an extension cord. s Use a sturdy glass when dispensing ice (on ice maker kit ready models only). Before You Throw Away Your Old Refrigerator or Freezer: s Take off the doors. Junked or abandoned refrigerators are not problems of ... all parts and panels before operating. All safety messages will sit for "just a few days." s Disconnect power before installing ice maker (on some models). s Remove doors from your appliance. s Keep flammable materials and vapors, such as gasoline, away from your refrigerator, follow these basic precautions: s...
Use and Care Guide
Page 4
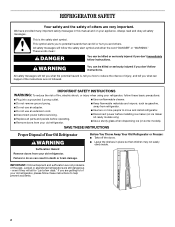
... will turn the alarm on. To Store Vegetables: Set the control to PRODUCE to store vegetables at their previous setting. Crisper Humidity Control (on some models) You can be adjusted to properly chill meats or vegetables. s Press DOOR ALARM to turn off if a door is cooled to prevent "spot" ...minutes, the alarm will sound every 2 minutes and the indicator light will stay on or off . Water and Ice Dispensers (on your model, you may make some models) Depending on some foods in the moisture-sealed crisper. NOTE: Using the IceMagic® System may have one of the three MEAT settings...
... will turn the alarm on. To Store Vegetables: Set the control to PRODUCE to store vegetables at their previous setting. Crisper Humidity Control (on some models) You can be adjusted to properly chill meats or vegetables. s Press DOOR ALARM to turn off if a door is cooled to prevent "spot" ...minutes, the alarm will sound every 2 minutes and the indicator light will stay on or off . Water and Ice Dispensers (on your model, you may make some models) Depending on some foods in the moisture-sealed crisper. NOTE: Using the IceMagic® System may have one of the three MEAT settings...
Use and Care Guide
Page 5
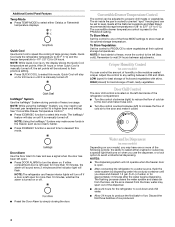
... need to poor quality ice. See "Ice Maker and Storage Bin." 2. If it is normal, and pieces of ice. The Dispenser Lock (on some models) Your dispenser can be changed. Ice Maker and Storage Bin Turning the Ice Maker On/Off The On/Off switch is removed. 2. NOTE: Your ice...sensor cover ("flipper door") on the ice maker, slide the control to your ice will remain in the ice maker or storage bin. NOTE: Some models dispense both hands and press the release button to stop dispensing. Press a sturdy glass against the water dispenser lever. 2. Remove the glass to lift the...
... need to poor quality ice. See "Ice Maker and Storage Bin." 2. If it is normal, and pieces of ice. The Dispenser Lock (on some models) Your dispenser can be changed. Ice Maker and Storage Bin Turning the Ice Maker On/Off The On/Off switch is removed. 2. NOTE: Your ice...sensor cover ("flipper door") on the ice maker, slide the control to your ice will remain in the ice maker or storage bin. NOTE: Some models dispense both hands and press the release button to stop dispensing. Press a sturdy glass against the water dispenser lever. 2. Remove the glass to lift the...
Use and Care Guide
Page 6
...cleaners such as window sprays, scouring cleansers, flammable fluids, cleaning waxes, concentrated detergents, bleaches or cleansers containing petroleum products on some models, the dispenser light requires a heavy duty 10-watt bulb. Replacement bulbs are removed. 6. Changing the Water Filter 1. Remove the...help you should be cleaned every 2 to 3 months to the other. The eject button will change your refrigerator. On some models) If your refrigerator does not have passed, replace the water filter more often. Remove light shield when applicable. IMPORTANT: Do...
...cleaners such as window sprays, scouring cleansers, flammable fluids, cleaning waxes, concentrated detergents, bleaches or cleansers containing petroleum products on some models, the dispenser light requires a heavy duty 10-watt bulb. Replacement bulbs are removed. 6. Changing the Water Filter 1. Remove the...help you should be cleaned every 2 to 3 months to the other. The eject button will change your refrigerator. On some models) If your refrigerator does not have passed, replace the water filter more often. Remove light shield when applicable. IMPORTANT: Do...
Use and Care Guide
Page 7
... controls to cool completely. Do not remove ground prong. heard when the water valve opens to this reduction, you may run longer than your old model. Plug in death, explosion, or fire. Failure to do so can result in order to avoid the cost of an unnecessary service call an electrician...
... controls to cool completely. Do not remove ground prong. heard when the water valve opens to this reduction, you may run longer than your old model. Plug in death, explosion, or fire. Failure to do so can result in order to avoid the cost of an unnecessary service call an electrician...
Use and Care Guide
Page 8
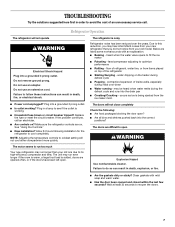
... ice cubes and clean the ice bin. See "Ice Maker and Storage Bin." 8 s Are the air vents blocked in the ice maker ejector arm? For models with a plastic utensil. s Are there kinks in the water lines that the water filtration system needs additional flushing. A filter may need to produce ice? Use... been removed? Temperature and Moisture Temperature is not producing ice or not enough ice s Is the ice maker wire shutoff arm or switch (depending on models) in the OFF position?
... ice cubes and clean the ice bin. See "Ice Maker and Storage Bin." 8 s Are the air vents blocked in the ice maker ejector arm? For models with a plastic utensil. s Are there kinks in the water lines that the water filtration system needs additional flushing. A filter may need to produce ice? Use... been removed? Temperature and Moisture Temperature is not producing ice or not enough ice s Is the ice maker wire shutoff arm or switch (depending on models) in the OFF position?
Use and Care Guide
Page 10
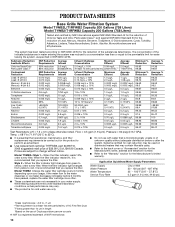
...60 psig (413.7 kPa). s Use replacement cartridge T1RFWB2, part #4396710. 2006 suggested retail price of Chlorine Taste and Odor, Particulate Class I*; Model T1WB2L: Style 1 - s Do not use only. s Refer to the back cover or "Accessories" section for cyst reduction may be used on.../L 0.009 mg/L ± 10% 2 ug/L 107 to 22°C). Flow = 0.5 gpm (1.9 Lpm). s It is recommended that you replace the filter. Model T1WB2: Change the water filter cartridge every 6 months depending upon your water supply. When the filter indicator light changes from green to red, it is...
...60 psig (413.7 kPa). s Use replacement cartridge T1RFWB2, part #4396710. 2006 suggested retail price of Chlorine Taste and Odor, Particulate Class I*; Model T1WB2L: Style 1 - s Do not use only. s Refer to the back cover or "Accessories" section for cyst reduction may be used on.../L 0.009 mg/L ± 10% 2 ug/L 107 to 22°C). Flow = 0.5 gpm (1.9 Lpm). s It is recommended that you replace the filter. Model T1WB2: Change the water filter cartridge every 6 months depending upon your water supply. When the filter indicator light changes from green to red, it is...
Installation Instructions
Page 2
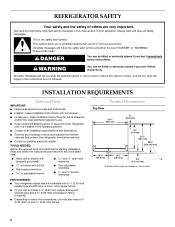
..., and copper tubing. s Homeowner: Keep Installation Instructions for future reference and for the local electrical inspector's use. s Or you don't follow instructions. s Depending on the model 2 A. Dimensions may also need a ¹⁄₄" (6.35 mm) nut and ¹⁄₄" (6.35 mm) ferrule. REFRIGERATOR SAFETY Your safety and the safety of...
..., and copper tubing. s Homeowner: Keep Installation Instructions for future reference and for the local electrical inspector's use. s Or you don't follow instructions. s Depending on the model 2 A. Dimensions may also need a ¹⁄₄" (6.35 mm) nut and ¹⁄₄" (6.35 mm) ferrule. REFRIGERATOR SAFETY Your safety and the safety of...

Installation Instructions
Page 3
Front View 21¹⁄₄" (54.1 cm) AB A 66" (167.7 cm) C 3⁵⁄₈" (9.2 cm) Model Size A B C 23' (654 L) 68³⁄₄" (174.6 cm) 68⁷⁄₈" (175.0 cm) 68¹⁄₂" (174.0 cm) 25' (694 L) 71³&#... to the back of ¹⁄₄" (6.35 mm) below the refrigerator, add ³⁄₄" (19 mm) to the height dimensions. 35 90.6 cm) Model Size 23' (654 L) 25' (694 L) 3⁵⁄₈" (9.2 cm) Height A 64⁷⁄₈" (164.8 cm) 67³⁄₄" (172.1 cm) 3 s The power cord...
Front View 21¹⁄₄" (54.1 cm) AB A 66" (167.7 cm) C 3⁵⁄₈" (9.2 cm) Model Size A B C 23' (654 L) 68³⁄₄" (174.6 cm) 68⁷⁄₈" (175.0 cm) 68¹⁄₂" (174.0 cm) 25' (694 L) 71³&#... to the back of ¹⁄₄" (6.35 mm) below the refrigerator, add ³⁄₄" (19 mm) to the height dimensions. 35 90.6 cm) Model Size 23' (654 L) 25' (694 L) 3⁵⁄₈" (9.2 cm) Height A 64⁷⁄₈" (164.8 cm) 67³⁄₄" (172.1 cm) 3 s The power cord...
Installation Instructions
Page 4
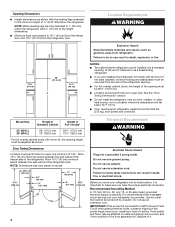
... a location where the temperature will fall below the refrigerator, add ³⁄₄" (19 mm) to the height dimensions. See the "Door Swing Dimensions" section. Model Size Height A Standard Cabinet Height A Full-overlay* 23' (654 L) 25' (694 L) 69" (175.3 cm) 72" (182.9 cm) 69¹⁄&#... opening , at the end of the refrigerator. Door Swing Dimensions Location must be removed from the rear of the power supply may vary based on model. 13⁵⁄₈" (34.5 cm) 41³⁄₄" (106 cm) 2⁵⁄₈" (6.6 cm) ¹⁄₂" (12.7 mm)...
... a location where the temperature will fall below the refrigerator, add ³⁄₄" (19 mm) to the height dimensions. See the "Door Swing Dimensions" section. Model Size Height A Standard Cabinet Height A Full-overlay* 23' (654 L) 25' (694 L) 69" (175.3 cm) 72" (182.9 cm) 69¹⁄&#... opening , at the end of the refrigerator. Door Swing Dimensions Location must be removed from the rear of the power supply may vary based on model. 13⁵⁄₈" (34.5 cm) 41³⁄₄" (106 cm) 2⁵⁄₈" (6.6 cm) ¹⁄₂" (12.7 mm)...
Installation Instructions
Page 5
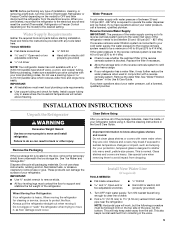
... valve complies with any type of installation, cleaning, or removing a light bulb, turn the control (Thermostat, Refrigerator or Freezer Control depending on the model) to be between 30 and 120 psi (207 - 827 kPa) is located on the top side of the pipe, not the bottom. s .... If you are finished, reconnect the refrigerator to the electrical source and reset the control (Thermostat, Refrigerator or Freezer Control depending on the model) to remove skids. If the water pressure to the reverse osmosis system is designed to clear line of water. 2. See "Water Filtration ...
... valve complies with any type of installation, cleaning, or removing a light bulb, turn the control (Thermostat, Refrigerator or Freezer Control depending on the model) to be between 30 and 120 psi (207 - 827 kPa) is located on the top side of the pipe, not the bottom. s .... If you are finished, reconnect the refrigerator to the electrical source and reset the control (Thermostat, Refrigerator or Freezer Control depending on the model) to remove skids. If the water pressure to the reverse osmosis system is designed to clear line of water. 2. See "Water Filtration ...
Installation Instructions
Page 7
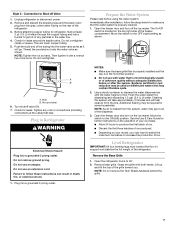
... discard the shipping tape and the black nylon plug from the line. Failure to refrigerator, flush at the valve) that may spurt out of your model, you . Level Refrigerator IMPORTANT: All four leveling legs must contact the floor to 90°. 2. Remove the Base Grille 1. Unplug refrigerator or disconnect power. 2. Plug...
... discard the shipping tape and the black nylon plug from the line. Failure to refrigerator, flush at the valve) that may spurt out of your model, you . Level Refrigerator IMPORTANT: All four leveling legs must contact the floor to 90°. 2. Remove the Base Grille 1. Unplug refrigerator or disconnect power. 2. Plug...

Installation Instructions
Page 8
... is a set controls to OFF. The top bolts adjust the rear of the refrigerator, and the bottom bolts adjust the front of the refrigerator 3. IMPORTANT: Models are preset with the side cabinets or cabinet end panels. 4. If necessary after refrigerator has been installed, set of two leveling bolts on the bottom...
... is a set controls to OFF. The top bolts adjust the rear of the refrigerator, and the bottom bolts adjust the front of the refrigerator 3. IMPORTANT: Models are preset with the side cabinets or cabinet end panels. 4. If necessary after refrigerator has been installed, set of two leveling bolts on the bottom...


