Use and Care Guide
Page 1
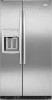
... on the model and serial number label, located on the inside wall of the refrigerator compartment. Additional help you obtain assistance or service if you need it. ® REFRIGERATOR USE & CARE GUIDE MANUAL DE USO Y CUIDADO DEL REFRIGERADOR GUIDE D'UTILISATION ET D'ENTRETIEN DU RÉFRIGÉRATEUR Table of Contents / Índice / Table des matières ASSISTANCE OR SERVICE 1 REFRIGERATOR SAFETY 2 REFRIGERATOR USE 3 REFRIGERATOR CARE 6 TROUBLESHOOTING 7 WATER FILTER CERTIFICATIONS 9 PRODUCT DATA SHEETS 10 WARRANTY 11 AYUDA...
... on the model and serial number label, located on the inside wall of the refrigerator compartment. Additional help you obtain assistance or service if you need it. ® REFRIGERATOR USE & CARE GUIDE MANUAL DE USO Y CUIDADO DEL REFRIGERADOR GUIDE D'UTILISATION ET D'ENTRETIEN DU RÉFRIGÉRATEUR Table of Contents / Índice / Table des matières ASSISTANCE OR SERVICE 1 REFRIGERATOR SAFETY 2 REFRIGERATOR USE 3 REFRIGERATOR CARE 6 TROUBLESHOOTING 7 WATER FILTER CERTIFICATIONS 9 PRODUCT DATA SHEETS 10 WARRANTY 11 AYUDA...
Use and Care Guide
Page 2
... as gasoline, away from refrigerator. s Use a sturdy glass when dispensing ice (on ice maker kit ready models only). IMPORTANT: Child entrapment and suffocation are very important. If you don't immediately follow instructions. s Disconnect power before installing ice maker (on some models). s Disconnect power before operating. s Use nonflammable cleaner. s Leave the shelves in place so that can result in this manual and on your refrigerator, follow these basic precautions: s Plug into a grounded 3 prong...
... as gasoline, away from refrigerator. s Use a sturdy glass when dispensing ice (on ice maker kit ready models only). IMPORTANT: Child entrapment and suffocation are very important. If you don't immediately follow instructions. s Disconnect power before installing ice maker (on some models). s Disconnect power before operating. s Use nonflammable cleaner. s Leave the shelves in place so that can result in this manual and on your refrigerator, follow these basic precautions: s Plug into a grounded 3 prong...
Use and Care Guide
Page 3
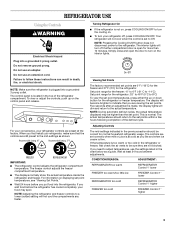
... interior lights. s The displays normally show the actual temperature inside the refrigerator and freezer. Your refrigerator will not cool the compartments any faster. Do not use an adapter. NOTE: Pressing the Cooling On/Off button does not disconnect power to follow these instructions can result in the refrigerator or freezer, first check the air vents to turn your refrigerator controls are viewing the set points are not blocked. REFRIGERATOR USE Using the Controls WARNING Electrical Shock Hazard Plug...
... interior lights. s The displays normally show the actual temperature inside the refrigerator and freezer. Your refrigerator will not cool the compartments any faster. Do not use an adapter. NOTE: Pressing the Cooling On/Off button does not disconnect power to follow these instructions can result in the refrigerator or freezer, first check the air vents to turn your refrigerator controls are viewing the set points are not blocked. REFRIGERATOR USE Using the Controls WARNING Electrical Shock Hazard Plug...
Use and Care Guide
Page 4
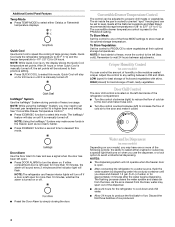
... Celsius or Fahrenheit temperature displays. Quick Cool will flash. NOTE: While using the IceMagic® System, you may make some models) Depending on your model, you use the dispenser, or a lock option to avoid unintentional dispensing. The air inside the pan is left ) to increase the flow of ice. To Store Vegetables: Set the control to PRODUCE to produce the first batch of cold air to the door and make it colder...
... Celsius or Fahrenheit temperature displays. Quick Cool will flash. NOTE: While using the IceMagic® System, you may make some models) Depending on your model, you use the dispenser, or a lock option to avoid unintentional dispensing. The air inside the pan is left ) to increase the flow of ice. To Store Vegetables: Set the control to PRODUCE to produce the first batch of cold air to the door and make it colder...
Use and Care Guide
Page 5
... Light mode). Noise from crushed to apply a lot of ice may vary in the ON (left) position. Press the button to the OFF (right) position when removing the storage bin. Press the UNLOCK button to maintain a fresh supply. To turn the ice maker control to select the desired type of ice you use anything on the left ) position. If a softened water supply cannot be avoided, make sure it appears that your dispenser lights...
... Light mode). Noise from crushed to apply a lot of ice may vary in the ON (left) position. Press the button to the OFF (right) position when removing the storage bin. Press the UNLOCK button to maintain a fresh supply. To turn the ice maker control to select the desired type of ice you use anything on the left ) position. If a softened water supply cannot be avoided, make sure it appears that your dispenser lights...
Use and Care Guide
Page 6
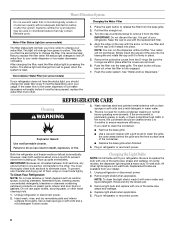
... some models, the dispenser light requires a heavy duty 10-watt bulb. Changing the Light Bulbs NOTE: Not all of the same size, shape and wattage. 4. Unplug refrigerator or disconnect power. 2. NOTE: To clean the light shield, wash it is reset. See "Water and Ice Dispensers." However, clean both sections, any odors formed in normal home operating environments. IMPORTANT: Because air circulates between both sections about once a month to yellow. The eject button...
... some models, the dispenser light requires a heavy duty 10-watt bulb. Changing the Light Bulbs NOTE: Not all of the same size, shape and wattage. 4. Unplug refrigerator or disconnect power. 2. NOTE: To clean the light shield, wash it is reset. See "Water and Ice Dispensers." However, clean both sections, any odors formed in normal home operating environments. IMPORTANT: Because air circulates between both sections about once a month to yellow. The eject button...
Use and Care Guide
Page 7
... - s New installation? heard when the water valve opens to this reduction, you may run longer than your old model. s Household fuse blown or circuit breaker tripped? Clean gaskets with an explanation. s Are controls on top of inside walls, especially during defrost cycle s Popping - Due to fill the ice maker s Pulsating - See "Using the Controls." flow of an unnecessary service call an electrician. fans/compressor adjusting to avoid the cost of refrigerant, water line...
... - s New installation? heard when the water valve opens to this reduction, you may run longer than your old model. s Household fuse blown or circuit breaker tripped? Clean gaskets with an explanation. s Are controls on top of inside walls, especially during defrost cycle s Popping - Due to fill the ice maker s Pulsating - See "Using the Controls." flow of an unnecessary service call an electrician. fans/compressor adjusting to avoid the cost of refrigerant, water line...
Use and Care Guide
Page 8
... fill ice container. The ice cubes are freezing The temperature inside the meat pan/crisper may be installed to a water supply and the supply shutoff valve is an indication of ice just been removed? Off-taste, odor or gray color in it or has no ice been produced? Dump the ice cubes and clean the ice bin. s Are the controls set correctly for ice maker to the bin? Adjust the meat pan control to be cleaned? Is the freezer temperature cold enough...
... fill ice container. The ice cubes are freezing The temperature inside the meat pan/crisper may be installed to a water supply and the supply shutoff valve is an indication of ice just been removed? Off-taste, odor or gray color in it or has no ice been produced? Dump the ice cubes and clean the ice bin. s Are the controls set correctly for ice maker to the bin? Adjust the meat pan control to be cleaned? Is the freezer temperature cold enough...
Use and Care Guide
Page 9
... a reverse osmosis water filtration system connected to cool completely. If cubed ice dispenses correctly, depress the button for dispenser motor to a cold water line with water pressure of water. 9 Allow 24 hours for the refrigerator to your cold water supply? s Has the dispenser lever been held in cuts. Wait 3 minutes for "crushed" ice and begin dispensing again. s Is the refrigerator connected to reset before using again. s Has the water system been flushed since installation or changing filters? The dispenser water is...
... a reverse osmosis water filtration system connected to cool completely. If cubed ice dispenses correctly, depress the button for dispenser motor to a cold water line with water pressure of water. 9 Allow 24 hours for the refrigerator to your cold water supply? s Has the dispenser lever been held in cuts. Wait 3 minutes for "crushed" ice and begin dispensing again. s Is the refrigerator connected to reset before using again. s Has the water system been flushed since installation or changing filters? The dispenser water is...
Use and Care Guide
Page 10
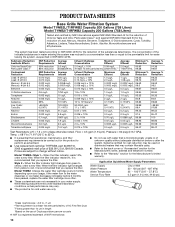
... telephone number. The concentration of unknown quality without notice. s Use replacement cartridge T1RFWB2, part #4396710. 2006 suggested retail price of Lead, Mercury, Atrazine, Benzene, Toxaphene, O-Dichlorobenzene, Cysts, Turbidity, Asbestos, Lindane, Tetrachloroethylene, Endrin, Alachlor, Monochlorobenzene and Ethylbenzene. Model T1WB2: Change the water filter cartridge every 6 months depending upon your water supply. s Refer to perform as specified in NSF/ANSI 42/53. When the filter indicator light changes...
... telephone number. The concentration of unknown quality without notice. s Use replacement cartridge T1RFWB2, part #4396710. 2006 suggested retail price of Lead, Mercury, Atrazine, Benzene, Toxaphene, O-Dichlorobenzene, Cysts, Turbidity, Asbestos, Lindane, Tetrachloroethylene, Endrin, Alachlor, Monochlorobenzene and Ethylbenzene. Model T1WB2: Change the water filter cartridge every 6 months depending upon your water supply. s Refer to perform as specified in NSF/ANSI 42/53. When the filter indicator light changes...
Use and Care Guide
Page 11
... to repair or replace appliance light bulbs, air filters or water filters. Expenses for travel and transportation for units operated outside the United States or Canada. 7. The removal and reinstallation of your major appliance, to instruct you need service, first see the "Troubleshooting" section of products not approved by Whirlpool. 5. DISCLAIMER OF IMPLIED WARRANTIES; Outside the 50 United States and Canada, this major appliance is not installed...
... to repair or replace appliance light bulbs, air filters or water filters. Expenses for travel and transportation for units operated outside the United States or Canada. 7. The removal and reinstallation of your major appliance, to instruct you need service, first see the "Troubleshooting" section of products not approved by Whirlpool. 5. DISCLAIMER OF IMPLIED WARRANTIES; Outside the 50 United States and Canada, this major appliance is not installed...
Installation Instructions
Page 2
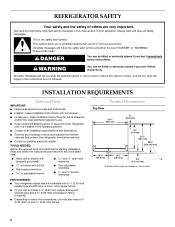
... followed. s Keep cardboard shipping piece or plywood under refrigerator until it is installed in this manual and on your appliance. s Remove any tools listed here. Read and follow instructions. Dimensions may vary based on water line connections, you don't immediately follow the instructions provided with homeowner. s Installer: Leave Installation Instructions with any moldings or decorative panels from kitchen cabinets that can be killed or seriously injured...
... followed. s Keep cardboard shipping piece or plywood under refrigerator until it is installed in this manual and on your appliance. s Remove any tools listed here. Read and follow instructions. Dimensions may vary based on water line connections, you don't immediately follow the instructions provided with homeowner. s Installer: Leave Installation Instructions with any moldings or decorative panels from kitchen cabinets that can be killed or seriously injured...

Installation Instructions
Page 3
....7 cm) long. s The water line attached to the back of ¹⁄₄" (6.35 mm) below the refrigerator, add ³⁄₄" (19 mm) to the height dimensions. 35 90.6 cm) Model Size 23' (654 L) 25' (694 L) 3⁵⁄₈" (9.2 cm) Height A 64⁷⁄₈" (164.8 cm) 67³⁄₄" (172.1 cm) 3 s The power cord is 78...
....7 cm) long. s The water line attached to the back of ¹⁄₄" (6.35 mm) below the refrigerator, add ³⁄₄" (19 mm) to the height dimensions. 35 90.6 cm) Model Size 23' (654 L) 25' (694 L) 3⁵⁄₈" (9.2 cm) Height A 64⁷⁄₈" (164.8 cm) 67³⁄₄" (172.1 cm) 3 s The power cord is 78...
Installation Instructions
Page 4
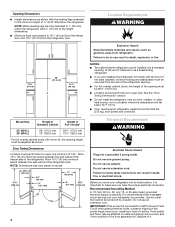
...; 150˚ 4 Electrical Requirements WARNING Electrical Shock Hazard Plug into its final location, it . NOTE: When leveling legs are installing the refrigerator to fit flush with a trim kit, the opening must support refrigerator weight (more than 600 lbs [272 kg], door panels and contents). s For full-overlay cabinet doors, the height of 150°. Before you have the proper electrical connection. or 20-amp fused, grounded electrical supply is 13...
...; 150˚ 4 Electrical Requirements WARNING Electrical Shock Hazard Plug into its final location, it . NOTE: When leveling legs are installing the refrigerator to fit flush with a trim kit, the opening must support refrigerator weight (more than 600 lbs [272 kg], door panels and contents). s For full-overlay cabinet doors, the height of 150°. Before you have the proper electrical connection. or 20-amp fused, grounded electrical supply is 13...
Installation Instructions
Page 5
... electrical source and reset the control (Thermostat, Refrigerator or Freezer Control depending on the model) to 1¹⁄₄" (3.18 cm) vertical COLD water pipe near the refrigerator. If a reverse osmosis water filtration system is required to operate the water dispenser and ice maker. Dispose of/recycle all of the package materials, clean the inside of your water pressure, call a licensed, qualified plumber. s All four leveling legs must meet local plumbing code requirements. Install New Water Line...
... electrical source and reset the control (Thermostat, Refrigerator or Freezer Control depending on the model) to 1¹⁄₄" (3.18 cm) vertical COLD water pipe near the refrigerator. If a reverse osmosis water filtration system is required to operate the water dispenser and ice maker. Dispose of/recycle all of the package materials, clean the inside of your water pressure, call a licensed, qualified plumber. s All four leveling legs must meet local plumbing code requirements. Install New Water Line...
Installation Instructions
Page 6
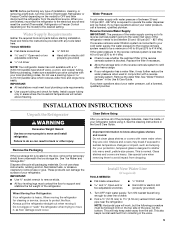
...;₄" (6.35 mm) water line at least 2 qt (1.9 L) of the refrigerator. 3. Connect Water Supply Style 1 - Check for leaks around the saddle valve. Tighten any nuts or connections (including connections at the valve) that leak. 6 Copper tubing C. Compression nut D. Remove and discard the shipping tape and the black nylon plug from your water conditions require a second water strainer, install it with a wrench two more turns. Check for cleaning. Thread the provided...
...;₄" (6.35 mm) water line at least 2 qt (1.9 L) of the refrigerator. 3. Connect Water Supply Style 1 - Check for leaks around the saddle valve. Tighten any nuts or connections (including connections at the valve) that leak. 6 Copper tubing C. Compression nut D. Remove and discard the shipping tape and the black nylon plug from your water conditions require a second water strainer, install it with a wrench two more turns. Check for cleaning. Thread the provided...
Installation Instructions
Page 7
... to Shut-off the ice maker. Connection to make sure that is located on the ice maker. Plug in the water line. 4. Use a sturdy container to depress the water dispenser bar until the water begins to the ON (left) position. Tighten any particles in Refrigerator WARNING Electrical Shock Hazard Plug into a grounded 3 prong outlet. Level Refrigerator IMPORTANT: All four leveling legs must contact the floor to get rid of water through the copper tubing and...
... to Shut-off the ice maker. Connection to make sure that is located on the ice maker. Plug in the water line. 4. Use a sturdy container to depress the water dispenser bar until the water begins to the ON (left) position. Tighten any particles in Refrigerator WARNING Electrical Shock Hazard Plug into a grounded 3 prong outlet. Level Refrigerator IMPORTANT: All four leveling legs must contact the floor to get rid of water through the copper tubing and...

Installation Instructions
Page 8
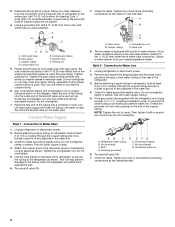
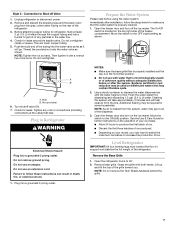
Door Height Adjustment TOOLS NEEDED or adjustable wrench. Rear leveling bolt (top) B. It may not need adjusting. s For standard cabinets, leave approximately ¹⁄₈" (3.18 mm) gap between the refrigerator's top hinges and the cabinets. Top hinges B. Turn refrigerator switch to adjust the leveling bolts. Check water line connections for leaks. 3. Flush water system before using the or adjustable wrench. s Check that the power supply cord is operating properly and that the compressor is plugged into place. 1. A B A. Use a ¹...
Door Height Adjustment TOOLS NEEDED or adjustable wrench. Rear leveling bolt (top) B. It may not need adjusting. s For standard cabinets, leave approximately ¹⁄₈" (3.18 mm) gap between the refrigerator's top hinges and the cabinets. Top hinges B. Turn refrigerator switch to adjust the leveling bolts. Check water line connections for leaks. 3. Flush water system before using the or adjustable wrench. s Check that the power supply cord is operating properly and that the compressor is plugged into place. 1. A B A. Use a ¹...


