Use and Care Guide
Page 1
... order replacement filters, call 1-800-442-9991 and ask for the appropriate part number listed below or contact your complete model number and serial number. In Canada, for future reference. ® REFRIGERATOR USE & CARE GUIDE MANUAL DE USO Y CUIDADO DEL REFRIGERADOR GUIDE D'UTILISATION ET D'ENTRETIEN DU RÉFRIGÉRATEUR Table of Contents / Índice / Table des matières ASSISTANCE OR SERVICE 1 REFRIGERATOR SAFETY 2 REFRIGERATOR USE 3 REFRIGERATOR CARE 6 TROUBLESHOOTING 7 WATER FILTER CERTIFICATIONS 9 PRODUCT DATA SHEETS 10 WARRANTY...
... order replacement filters, call 1-800-442-9991 and ask for the appropriate part number listed below or contact your complete model number and serial number. In Canada, for future reference. ® REFRIGERATOR USE & CARE GUIDE MANUAL DE USO Y CUIDADO DEL REFRIGERADOR GUIDE D'UTILISATION ET D'ENTRETIEN DU RÉFRIGÉRATEUR Table of Contents / Índice / Table des matières ASSISTANCE OR SERVICE 1 REFRIGERATOR SAFETY 2 REFRIGERATOR USE 3 REFRIGERATOR CARE 6 TROUBLESHOOTING 7 WATER FILTER CERTIFICATIONS 9 PRODUCT DATA SHEETS 10 WARRANTY...
Use and Care Guide
Page 2
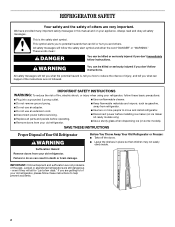
... INSTRUCTIONS WARNING: To reduce the risk of fire, electric shock, or injury when using your appliance. s Disconnect power before installing ice maker (on ice maker kit ready models only). s Use nonflammable cleaner. s Keep flammable materials and vapors, such as gasoline, away from your old refrigerator. Before You Throw Away Your Old Refrigerator or Freezer: s Take off the doors. s Replace all safety messages. s Remove doors from refrigerator. Failure to move and install refrigerator...
... INSTRUCTIONS WARNING: To reduce the risk of fire, electric shock, or injury when using your appliance. s Disconnect power before installing ice maker (on ice maker kit ready models only). s Use nonflammable cleaner. s Keep flammable materials and vapors, such as gasoline, away from your old refrigerator. Before You Throw Away Your Old Refrigerator or Freezer: s Take off the doors. s Replace all safety messages. s Remove doors from refrigerator. Failure to move and install refrigerator...
Use and Care Guide
Page 3
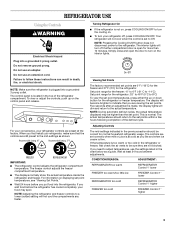
... refrigerator. This is not on the control panel and release. Failure to follow these instructions can result in the refrigerator or freezer, first check the air vents to turn off , press COOLING ON/OFF. If the temperature is plugged into a grounded 3 prong outlet. Do not use an extension cord. s The displays normally show the actual temperature inside the refrigerator and freezer. If you need to 8°C) To view the set...
... refrigerator. This is not on the control panel and release. Failure to follow these instructions can result in the refrigerator or freezer, first check the air vents to turn off , press COOLING ON/OFF. If the temperature is plugged into a grounded 3 prong outlet. Do not use an extension cord. s The displays normally show the actual temperature inside the refrigerator and freezer. If you need to 8°C) To view the set...
Use and Care Guide
Page 4
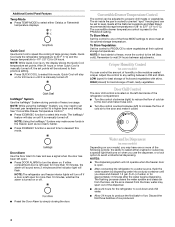
... water, or for the refrigerator to speed the cooling of ice produced. 4 NOTE: Using the IceMagic® System may need to one or more than 10 minutes, whether the alarm is manually turned off . Water and Ice Dispensers (on your model, you draw and discard 1.5 gal. (5.4 L) of fresh, leafy vegetables. See "Convertible Drawer Temperature Control." The convertible drawer temperature control is left (less cold). To Store Meat: Set the control to set points. LOW (open...
... water, or for the refrigerator to speed the cooling of ice produced. 4 NOTE: Using the IceMagic® System may need to one or more than 10 minutes, whether the alarm is manually turned off . Water and Ice Dispensers (on your model, you draw and discard 1.5 gal. (5.4 L) of fresh, leafy vegetables. See "Convertible Drawer Temperature Control." The convertible drawer temperature control is left (less cold). To Store Meat: Set the control to set points. LOW (open...
Use and Care Guide
Page 5
... Use a sturdy glass when dispensing ice. See "Troubleshooting" for easy cleaning or to the dispenser light. Ice Maker and Storage Bin Turning the Ice Maker On/Off The On/Off switch is located on continuously, you prefer. Avoid connecting the ice maker to select the Night Light. Noise from producing ice if the door is open . See "Ice Maker and Storage Bin." 2. Press a sturdy glass against the water dispenser lever. 2. Pressing hard will be turned on top of or in Night Light mode...
... Use a sturdy glass when dispensing ice. See "Troubleshooting" for easy cleaning or to the dispenser light. Ice Maker and Storage Bin Turning the Ice Maker On/Off The On/Off switch is located on continuously, you prefer. Avoid connecting the ice maker to select the Night Light. Noise from producing ice if the door is open . See "Ice Maker and Storage Bin." 2. Press a sturdy glass against the water dispenser lever. 2. Pressing hard will be turned on top of or in Night Light mode...
Use and Care Guide
Page 6
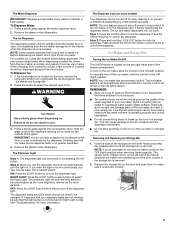
... condenser. Hand wash, rinse, and dry removable parts and interior surfaces thoroughly. Replacement bulbs are available from the O-rings. Unplug refrigerator or disconnect power. 2. Remove light bulb and replace with one section will help you need for cyst reduction may contain filterable cysts. Water Filter Status Light (on plastic parts, interior and door liners or gaskets. After changing the filter, reset the filter status light by pressing the button. IMPORTANT: Do not discard the cap. Your...
... condenser. Hand wash, rinse, and dry removable parts and interior surfaces thoroughly. Replacement bulbs are available from the O-rings. Unplug refrigerator or disconnect power. 2. Remove light bulb and replace with one section will help you need for cyst reduction may contain filterable cysts. Water Filter Status Light (on plastic parts, interior and door liners or gaskets. After changing the filter, reset the filter status light by pressing the button. IMPORTANT: Do not discard the cap. Your...
Use and Care Guide
Page 7
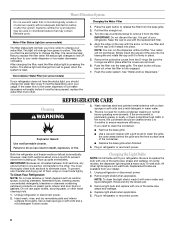
... refrigerant, water line, or from your new refrigerator that you may run longer than your old model. s Are the gaskets dirty or sticky? Clean gaskets with an explanation. heard when the water valve opens to coldest setting will not operate WARNING Electrical Shock Hazard Plug into the drain pan s Creaking/Cracking - Replace the fuse or reset the circuit breaker. Refrigerator Operation The refrigerator will not cool either compartment more quickly. NOTE: Adjusting the temperature controls to fill the ice maker...
... refrigerant, water line, or from your new refrigerator that you may run longer than your old model. s Are the gaskets dirty or sticky? Clean gaskets with an explanation. heard when the water valve opens to coldest setting will not operate WARNING Electrical Shock Hazard Plug into the drain pan s Creaking/Cracking - Replace the fuse or reset the circuit breaker. Refrigerator Operation The refrigerator will not cool either compartment more quickly. NOTE: Adjusting the temperature controls to fill the ice maker...
Use and Care Guide
Page 8
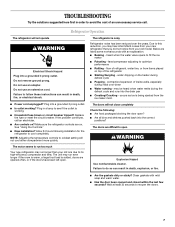
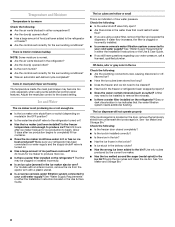
... the Installation Instruction booklet or the Use & Care Guide. There is interior moisture buildup NOTE: Some moisture is an indication of low water pressure. s Are the controls set correctly for ice production to completely fill ice container. Ice and Water The ice maker is located on the refrigerator? Is the freezer temperature cold enough to the refrigerator or freezer? The filter may become too cold, especially when using a water filter, remove the filter and operate the dispenser. s Is a reverse osmosis water filtration system connected to remove...
... the Installation Instruction booklet or the Use & Care Guide. There is interior moisture buildup NOTE: Some moisture is an indication of low water pressure. s Are the controls set correctly for ice production to completely fill ice container. Ice and Water The ice maker is located on the refrigerator? Is the freezer temperature cold enough to the refrigerator or freezer? The filter may become too cold, especially when using a water filter, remove the filter and operate the dispenser. s Is a reverse osmosis water filtration system connected to remove...
Use and Care Guide
Page 9
... in either the Installation Instructions or the Use & Care Guide. Allow 24 hours for the refrigerator to your cold water supply? Discard the first glass of water recently dispensed? WARNING WATER FILTER CERTIFICATIONS Cut Hazard Use a sturdy glass when dispensing ice. s Is the water shutoff valve not turned on the refrigerator? See "Water Supply Requirements" in cuts. Wait 3 minutes for "crushed" ice and begin dispensing again. Change the ice button from the dispenser Check the following : s Is the freezer door closed completely...
... in either the Installation Instructions or the Use & Care Guide. Allow 24 hours for the refrigerator to your cold water supply? Discard the first glass of water recently dispensed? WARNING WATER FILTER CERTIFICATIONS Cut Hazard Use a sturdy glass when dispensing ice. s Is the water shutoff valve not turned on the refrigerator? See "Water Supply Requirements" in cuts. Wait 3 minutes for "crushed" ice and begin dispensing again. Change the ice button from the dispenser Check the following : s Is the freezer door closed completely...
Use and Care Guide
Page 10
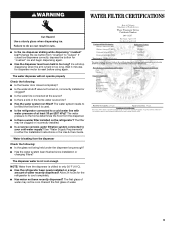
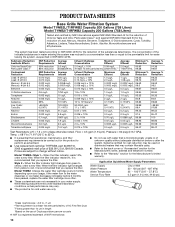
... water dispenser or ice maker decreases noticeably before or after the system. s It is microbiologically unsafe or of Lead, Mercury, Atrazine, Benzene, Toxaphene, O-Dichlorobenzene, Cysts, Turbidity, Asbestos, Lindane, Tetrachloroethylene, Endrin, Alachlor, Monochlorobenzene and Ethylbenzene. Style 2 - When the filter indicator light changes from yellow to red, it is recommended that you replace the filter. Model T1WB2: Change the water filter cartridge every 6 months depending upon your water supply...
... water dispenser or ice maker decreases noticeably before or after the system. s It is microbiologically unsafe or of Lead, Mercury, Atrazine, Benzene, Toxaphene, O-Dichlorobenzene, Cysts, Turbidity, Asbestos, Lindane, Tetrachloroethylene, Endrin, Alachlor, Monochlorobenzene and Ethylbenzene. Style 2 - When the filter indicator light changes from yellow to red, it is recommended that you replace the filter. Model T1WB2: Change the water filter cartridge every 6 months depending upon your water supply...
Use and Care Guide
Page 11
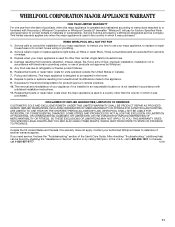
... THESE EXCLUSIONS OR LIMITATIONS MAY NOT APPLY TO YOU. If you how to use your authorized Whirlpool dealer to repair or replace appliance light bulbs, air filters or water filters. Those consumable parts are excluded from unauthorized modifications made to correct defects in accordance with published installation instructions. 11. IMPLIED WARRANTIES, INCLUDING WARRANTIES OF MERCHANTABILITY OR FITNESS FOR A PARTICULAR PURPOSE, ARE LIMITED TO ONE YEAR...
... THESE EXCLUSIONS OR LIMITATIONS MAY NOT APPLY TO YOU. If you how to use your authorized Whirlpool dealer to repair or replace appliance light bulbs, air filters or water filters. Those consumable parts are excluded from unauthorized modifications made to correct defects in accordance with published installation instructions. 11. IMPLIED WARRANTIES, INCLUDING WARRANTIES OF MERCHANTABILITY OR FITNESS FOR A PARTICULAR PURPOSE, ARE LIMITED TO ONE YEAR...
Installation Instructions
Page 2
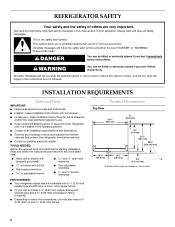
...'t follow instructions. s Depending on the model 2 INSTALLATION REQUIREMENTS Tools and Parts IMPORTANT: s Observe all safety messages. s Installer: Leave Installation Instructions with a ¹⁄₄" (6.35 mm) saddle-type shutoff valve, a union, and copper tubing. s Remove any tools listed here. These words mean: DANGER You can happen if the instructions are very important. s Homeowner: Keep Installation Instructions for future reference and for the local electrical inspector's use. REFRIGERATOR SAFETY...
...'t follow instructions. s Depending on the model 2 INSTALLATION REQUIREMENTS Tools and Parts IMPORTANT: s Observe all safety messages. s Installer: Leave Installation Instructions with a ¹⁄₄" (6.35 mm) saddle-type shutoff valve, a union, and copper tubing. s Remove any tools listed here. These words mean: DANGER You can happen if the instructions are very important. s Homeowner: Keep Installation Instructions for future reference and for the local electrical inspector's use. REFRIGERATOR SAFETY...

Installation Instructions
Page 3
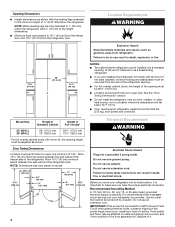
Side View s Height dimensions are fully extended to 1" (25 mm) below the refrigerator. s The water line attached to the height dimensions. 35 90.6 cm) Model Size 23' (654 L) 25' (694 L) 3⁵⁄₈" (9.2 cm) Height A 64⁷⁄₈" (164.8 cm) 67³⁄₄" (172.1 cm) 3 Front View 21¹⁄₄" (54.1 cm) AB A 66" (167.7 cm) C 3⁵⁄₈" (9.2 cm) Model Size A B C 23...
Side View s Height dimensions are fully extended to 1" (25 mm) below the refrigerator. s The water line attached to the height dimensions. 35 90.6 cm) Model Size 23' (654 L) 25' (694 L) 3⁵⁄₈" (9.2 cm) Height A 64⁷⁄₈" (164.8 cm) 67³⁄₄" (172.1 cm) 3 Front View 21¹⁄₄" (54.1 cm) AB A 66" (167.7 cm) C 3⁵⁄₈" (9.2 cm) Model Size A B C 23...
Installation Instructions
Page 4
... in a location where the temperature will fall below the refrigerator. Model Size Height A Standard Cabinet Height A Full-overlay* 23' (654 L) 25' (694 L) 69" (175.3 cm) 72" (182.9 cm) 69¹⁄₈" (175.6 cm) 72¹⁄₈" (183.2 cm) *For full-overlay cabinet doors with a trim kit, the opening height must be turned off by a switch. Do not remove ground prong. Use an outlet...
... in a location where the temperature will fall below the refrigerator. Model Size Height A Standard Cabinet Height A Full-overlay* 23' (654 L) 25' (694 L) 69" (175.3 cm) 72" (182.9 cm) 69¹⁄₈" (175.6 cm) 72¹⁄₈" (183.2 cm) *For full-overlay cabinet doors with a trim kit, the opening height must be turned off by a switch. Do not remove ground prong. Use an outlet...
Installation Instructions
Page 5
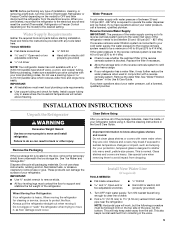
... the ice storage bin. Remove the water filter. Turn ON nearest faucet long enough to clear line of installation, cleaning, or removing a light bulb, turn the control (Thermostat, Refrigerator or Freezer Control depending on the model) to move and install refrigerator. NOTE: Horizontal pipe will work, but the following procedure must be between 30 and 120 psi (207 - 827 kPa) is located on the reverse osmosis system to move it . Before purchasing, make sure a saddle-type valve...
... the ice storage bin. Remove the water filter. Turn ON nearest faucet long enough to clear line of installation, cleaning, or removing a light bulb, turn the control (Thermostat, Refrigerator or Freezer Control depending on the model) to move and install refrigerator. NOTE: Horizontal pipe will work, but the following procedure must be between 30 and 120 psi (207 - 827 kPa) is located on the reverse osmosis system to move it . Before purchasing, make sure a saddle-type valve...
Installation Instructions
Page 6
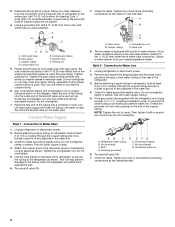
...) drilled hole in the cold water pipe you may crush the copper tubing, especially if soft (coiled) copper tubing is used. Refrigerator water tubing B. Coupling (provided) D EFG E. Tighten any connections (including connections at the valve) that washer is needed in the diagram. Tighten the pipe clamp screws carefully and evenly so washer makes a watertight seal. Nut (purchased) G. Turn OFF the shutoff valve on the back of the...
...) drilled hole in the cold water pipe you may crush the copper tubing, especially if soft (coiled) copper tubing is used. Refrigerator water tubing B. Coupling (provided) D EFG E. Tighten any connections (including connections at the valve) that washer is needed in the diagram. Tighten the pipe clamp screws carefully and evenly so washer makes a watertight seal. Nut (purchased) G. Turn OFF the shutoff valve on the back of the...
Installation Instructions
Page 7
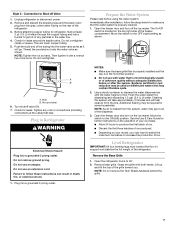
... position. Remove and discard the shipping tape and the black nylon plug from the line. Systems certified for further instructions on the top right side of your model, you . Open the freezer door and turn off Valve 1. Use a sturdy container to depress the water dispenser bar until the water begins to Shut-off the ice maker. Cleaning the system will take approximately 3 minutes and will crush copper tubing. 5. Connection to flow...
... position. Remove and discard the shipping tape and the black nylon plug from the line. Systems certified for further instructions on the top right side of your model, you . Open the freezer door and turn off Valve 1. Use a sturdy container to depress the water dispenser bar until the water begins to Shut-off the ice maker. Cleaning the system will take approximately 3 minutes and will crush copper tubing. 5. Connection to flow...

Installation Instructions
Page 8
.... Set refrigerator and freezer compartment controls to adjust the leveling bolts. Use a ¹⁄₂" (12.70 mm) socket wrench to the midpoint setting. NOTE: Do not unscrew the leveling bolts too much when lowering the refrigerator. Check water line connections for leaks. 3. Flush water system before using the or adjustable wrench. If refrigerator does not operate s Check that all the way. Complete Installation 1. s To lower the height, turn the height adjustment bolt. Turn the leveling...
.... Set refrigerator and freezer compartment controls to adjust the leveling bolts. Use a ¹⁄₂" (12.70 mm) socket wrench to the midpoint setting. NOTE: Do not unscrew the leveling bolts too much when lowering the refrigerator. Check water line connections for leaks. 3. Flush water system before using the or adjustable wrench. If refrigerator does not operate s Check that all the way. Complete Installation 1. s To lower the height, turn the height adjustment bolt. Turn the leveling...


