Owners Manual
Page 2
... Roast 11 Convection Broil 12 Convect Full Meal 12 Convect Conversion 13 Proofing Bread (single or upper ovens only 14 Timed Cooking 14 OVEN CARE 15 Self-Cleaning Cycle 15 General Cleaning 16 Oven Lights 17 Oven Door 17 TROUBLESHOOTING 18 ASSISTANCE OR SERVICE 19 WARRANTY 20 TABLE DES MATIÈRES...;vent du four 25 Thermomètre à viande 25 Mode Sabbat 26 Cuisson au four et rôtissage 27 Cuisson au gril maximum et économique 27 Cuisson par convection 28 Cuisson au four par convection 29 Rôtissage par convection 29 Cuisson au gril par convection 30...
... Roast 11 Convection Broil 12 Convect Full Meal 12 Convect Conversion 13 Proofing Bread (single or upper ovens only 14 Timed Cooking 14 OVEN CARE 15 Self-Cleaning Cycle 15 General Cleaning 16 Oven Lights 17 Oven Door 17 TROUBLESHOOTING 18 ASSISTANCE OR SERVICE 19 WARRANTY 20 TABLE DES MATIÈRES...;vent du four 25 Thermomètre à viande 25 Mode Sabbat 26 Cuisson au four et rôtissage 27 Cuisson au gril maximum et économique 27 Cuisson par convection 28 Cuisson au four par convection 29 Rôtissage par convection 29 Cuisson au gril par convection 30...

Owners Manual
Page 3
... not be used in or around any part of the oven. ■ Clean Only Parts Listed in oven. ■ DO NOT TOUCH HEATING ELEMENTS OR INTERIOR SURFACES OF OVEN - IMPORTANT SAFETY INSTRUCTIONS WARNING: To reduce the risk of fire, electrical shock, injury to sit or stand on any part of... the oven. ■ Wear Proper Apparel - Other surfaces of the oven may cause container to some of the substances listed...
... not be used in or around any part of the oven. ■ Clean Only Parts Listed in oven. ■ DO NOT TOUCH HEATING ELEMENTS OR INTERIOR SURFACES OF OVEN - IMPORTANT SAFETY INSTRUCTIONS WARNING: To reduce the risk of fire, electrical shock, injury to sit or stand on any part of... the oven. ■ Wear Proper Apparel - Other surfaces of the oven may cause container to some of the substances listed...
Owners Manual
Page 4
... Clock, Timer, Control Lock and Sabbath Mode. To Set: Before setting, make sure the oven(s), Timer and Timed Cooking are not in the oven display represents the lower oven. Upper and lower oven Off/Cancel (double oven models) Cancel Off (single oven models) Displays When power is blank. Start The START pad begins all of your entry...
... Clock, Timer, Control Lock and Sabbath Mode. To Set: Before setting, make sure the oven(s), Timer and Timed Cooking are not in the oven display represents the lower oven. Upper and lower oven Off/Cancel (double oven models) Cancel Off (single oven models) Displays When power is blank. Start The START pad begins all of your entry...
Owners Manual
Page 5
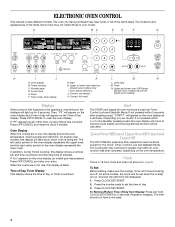
...and reminder tones are preset on , but can be turned off. however, it is not available is preset in Fahrenheit, "°F" follows the oven temperature. Press TIMER SET. The only time it can be changed in Fahrenheit or Celsius. 5 however, they may give incorrect readings. Tones Tones ...will appear on the display, press OFF/CANCEL to "Snd HI." If "Snd Lo" remains on the oven display for 5 seconds. Repeat to change back to clear. Pad Press Tones (single oven models) The single tones signaling a valid pad press are preset on , but can be turned off. To Turn Off/...
...and reminder tones are preset on , but can be turned off. however, it is not available is preset in Fahrenheit, "°F" follows the oven temperature. Press TIMER SET. The only time it can be changed in Fahrenheit or Celsius. 5 however, they may give incorrect readings. Tones Tones ...will appear on the display, press OFF/CANCEL to "Snd HI." If "Snd Lo" remains on the oven display for 5 seconds. Repeat to change back to clear. Pad Press Tones (single oven models) The single tones signaling a valid pad press are preset on , but can be turned off. To Turn Off/...
Owners Manual
Page 6
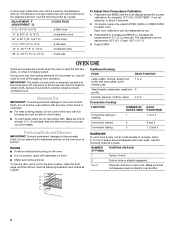
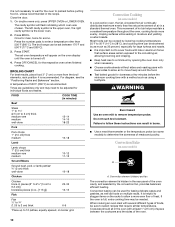
...; to -20°F (-9° to -12°C) ...moderately less -25° to -35°F (-15° to the fumes given off throughout oven operation. Press START. IMPORTANT: The health of some birds is directly over another closed and wellventilated room. Exposure to the fumes may result in 5°...; F (3° C) amounts. Make sure foil is at the edges. Use the following chart as a guide. Each oven calibration can be able to circulate. Always move freely. ■ To catch spills, place foil on them. ■ Make sure racks are normal when the...
...; to -20°F (-9° to -12°C) ...moderately less -25° to -35°F (-15° to the fumes given off throughout oven operation. Press START. IMPORTANT: The health of some birds is directly over another closed and wellventilated room. Exposure to the fumes may result in 5°...; F (3° C) amounts. Make sure foil is at the edges. Use the following chart as a guide. Each oven calibration can be able to circulate. Always move freely. ■ To catch spills, place foil on them. ■ Make sure racks are normal when the...
Owners Manual
Page 7
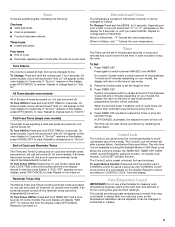
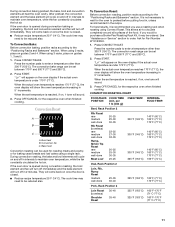
...golden crusts ■ Even browning Use temperature and time recommended in the recipe. Control panel B. Oven vent C. Bakeware The bakeware material affects cooking results. Oven vent F. Meat Thermometer On models without a temperature probe, use a meat thermometer to determine whether...■ Use suggested baking time. ■ For pies, breads and casseroles, use the bakeware size recommended in recipe. Oven Vent A B C D E F Single Oven A. Stoneware/Baking stone ■ Crisp crusts ■ Follow manufacturer's instructions. Do not set plastics, paper or other ...
...golden crusts ■ Even browning Use temperature and time recommended in the recipe. Control panel B. Oven vent C. Bakeware The bakeware material affects cooking results. Oven vent F. Meat Thermometer On models without a temperature probe, use a meat thermometer to determine whether...■ Use suggested baking time. ■ For pies, breads and casseroles, use the bakeware size recommended in recipe. Oven Vent A B C D E F Single Oven A. Stoneware/Baking stone ■ Crisp crusts ■ Follow manufacturer's instructions. Do not set plastics, paper or other ...
Owners Manual
Page 8
...in an untimed bake with a one time only setup. On double ovens, press upper oven OFF/CANCEL. On single ovens press CANCEL/OFF. 3. Press upper oven OFF/CANCEL. On double ovens only, press UPPER OVEN or LOWER OVEN. Press BAKE. Press the number pads to enter the length of...following steps will not change temperature. 8 On double ovens, open the oven door. 2. On single ovens, open the upper oven door. "SAb On" will appear on the display. On double ovens only, press UPPER OVEN or LOWER OVEN. On double ovens, open the oven door. 2. Press and hold the number pad 6...
...in an untimed bake with a one time only setup. On double ovens, press upper oven OFF/CANCEL. On single ovens press CANCEL/OFF. 3. Press upper oven OFF/CANCEL. On double ovens only, press UPPER OVEN or LOWER OVEN. Press BAKE. Press the number pads to enter the length of...following steps will not change temperature. 8 On double ovens, open the oven door. 2. On single ovens, open the upper oven door. "SAb On" will appear on the display. On double ovens only, press UPPER OVEN or LOWER OVEN. On double ovens, open the oven door. 2. Press and hold the number pad 6...
Owners Manual
Page 9
...opened during preheat and bake to stop position before putting food in, unless recommended in 2 minutes. When roasting, it in the heated oven, making cleaning more precise control. During maxi broiling, both the inner and outer broil elements heat. They are designed to preheat before turning..., poultry or meat may not need to purchase a broiler pan, one may cook better at least 1 second. On double ovens only, press UPPER OVEN or LOWER OVEN for Part Number 4396923. ■ For proper draining, do not cover the grid with aluminum foil for at lower broiling temperatures...
...opened during preheat and bake to stop position before putting food in, unless recommended in 2 minutes. When roasting, it in the heated oven, making cleaning more precise control. During maxi broiling, both the inner and outer broil elements heat. They are designed to preheat before turning..., poultry or meat may not need to purchase a broiler pan, one may cook better at least 1 second. On double ovens only, press UPPER OVEN or LOWER OVEN for Part Number 4396923. ■ For proper draining, do not cover the grid with aluminum foil for at lower broiling temperatures...
Owners Manual
Page 10
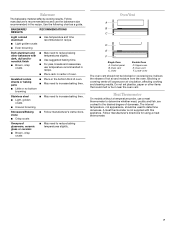
...well-done 16-18 Chicken Chicken bone-in burns. ■ Use a meat thermometer or the temperature probe (on some models) In a convection oven, the fan-circulated hot air continually distributes heat more from the broil elements, rack position 4 is full, extra cooking time may need to be .... Convection element (hidden) and fan The convection element is hidden in the rear panel of hot air helps maintain a consistent temperature throughout the oven, cooking foods more even flow of heat. For diagram, see the "Positioning Racks and Bakeware" section. Do not touch broil element. It ...
...well-done 16-18 Chicken Chicken bone-in burns. ■ Use a meat thermometer or the temperature probe (on some models) In a convection oven, the fan-circulated hot air continually distributes heat more from the broil elements, rack position 4 is full, extra cooking time may need to be .... Convection element (hidden) and fan The convection element is hidden in the rear panel of hot air helps maintain a consistent temperature throughout the oven, cooking foods more even flow of heat. For diagram, see the "Positioning Racks and Bakeware" section. Do not touch broil element. It ...
Owners Manual
Page 11
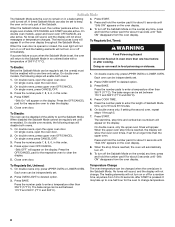
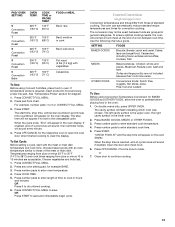
... tone will sound. 3. If you use a roasting rack when roasting using a single rack. Press the number pads to maintain oven temperature, while the fan constantly circulates the hot air. The convection roast range can...Sirloin Tip Roast rare medium well-done Meat Loaf 20-25 25-30 30-35 22-25 27-30 32-35 20-25 25-30 30-35 20-25 140°F (60°C) ...To Convection Roast: Before convection roasting, position racks according to circulate completely around all heat the oven cavity. Press CONVECT ROAST. CONVECTION ROASTING CHART FOOD/RACK COOK TIME POSITION (min. Press CONVECT...
... tone will sound. 3. If you use a roasting rack when roasting using a single rack. Press the number pads to maintain oven temperature, while the fan constantly circulates the hot air. The convection roast range can...Sirloin Tip Roast rare medium well-done Meat Loaf 20-25 25-30 30-35 22-25 27-30 32-35 20-25 25-30 30-35 20-25 140°F (60°C) ...To Convection Roast: Before convection roasting, position racks according to circulate completely around all heat the oven cavity. Press CONVECT ROAST. CONVECTION ROASTING CHART FOOD/RACK COOK TIME POSITION (min. Press CONVECT...

Owners Manual
Page 12
...Before convection broiling, see "Broiling" section for the respective oven when finished cooking. The convection broil range can be at 450°F (232°C), but can be adjusted. A single pad includes an oven setting, an oven temperature, and a cook time or probe temperature. Press ...START. COOK TIME or PROBE TEMP. Allow the oven to preheat for future use. FOOD/RACK COOK TIME POSITION (min...
...Before convection broiling, see "Broiling" section for the respective oven when finished cooking. The convection broil range can be at 450°F (232°C), but can be adjusted. A single pad includes an oven setting, an oven temperature, and a cook time or probe temperature. Press ...START. COOK TIME or PROBE TEMP. Allow the oven to preheat for future use. FOOD/RACK COOK TIME POSITION (min...
Owners Manual
Page 13
...end of a non-delayed cook time. Choose baked goods with an oven temperature similar to do untimed cooking. 6. Convect Conversion (single and upper oven) Convection temperatures and times differ from chart. The oven can automatically reduce standard recipe temperatures and times for diagram. 1. Press...door to 0 or CONVECT FULL MEAL. 3. To Set Cycle: Before setting a cycle, start time, stop time will flash indicating which oven was chosen. Press CONVECT FULL MEAL. 2. Press START. or 7. For example, number pads 1 to continue cooking. 13 Press number ...
...end of a non-delayed cook time. Choose baked goods with an oven temperature similar to do untimed cooking. 6. Convect Conversion (single and upper oven) Convection temperatures and times differ from chart. The oven can automatically reduce standard recipe temperatures and times for diagram. 1. Press...door to 0 or CONVECT FULL MEAL. 3. To Set Cycle: Before setting a cycle, start time, stop time will flash indicating which oven was chosen. Press CONVECT FULL MEAL. 2. Press START. or 7. For example, number pads 1 to continue cooking. 13 Press number ...
Owners Manual
Page 14
...off automatically. The cavity symbol will sound every minute. 8. When the start should not be set to turn on. Proofing Bread (single or upper ovens only) Proofing bread prepares dough for diagram. See "Positioning Racks and Bakeware" for baking by activating the yeast. Touch START. Press..., end-of -cycle tones will sound, then reminder tones will appear on guide 1. The start , make sure the clock is reached, the oven will shut off automatically and "End" will sound every minute. 6. Press number pads to enter standard cook temperature. 4. Before setting delay start ...
...off automatically. The cavity symbol will sound every minute. 8. When the start should not be set to turn on. Proofing Bread (single or upper ovens only) Proofing bread prepares dough for diagram. See "Positioning Racks and Bakeware" for baking by activating the yeast. Touch START. Press..., end-of -cycle tones will sound, then reminder tones will appear on guide 1. The start , make sure the clock is reached, the oven will shut off automatically and "End" will sound every minute. 6. Press number pads to enter standard cook temperature. 4. Before setting delay start ...
Owners Manual
Page 15
... avoid damage. Use a damp cloth to a powdery ash. Heavy soil results in discoloring, loss of some models, the temperature probe from the oven. ■ Remove any loose soil to move freely. Keep the kitchen well-ventilated during the Self-Cleaning cycle to the inner door glass before ...to stop time will not affect cooking performance. On double ovens only, press UPPER OVEN or LOWER OVEN. The start time is the lower oven. enter slots on your model, see "Oven Vent" or "Oven Vents" section. Keep children away from the oven because it will not lock and the cycle will sound every...
... avoid damage. Use a damp cloth to a powdery ash. Heavy soil results in discoloring, loss of some models, the temperature probe from the oven. ■ Remove any loose soil to move freely. Keep the kitchen well-ventilated during the Self-Cleaning cycle to the inner door glass before ...to stop time will not affect cooking performance. On double ovens only, press UPPER OVEN or LOWER OVEN. The start time is the lower oven. enter slots on your model, see "Oven Vent" or "Oven Vents" section. Keep children away from the oven because it will not lock and the cycle will sound every...
Owners Manual
Page 16
...spills should be set between 2 hours 30 minutes and 4 hours 30 minutes in 30 minute increments. 3. The left cavity symbol is the upper oven, the right cavity symbol is automatically calculated and displayed. At high temperatures, foods react with soft, lint-free cloth. ■ Vinegar for hard... water spots. 3. When the cycle is complete and the oven is set a clean time other than 3 hours 30 minutes. The cavity symbol will remain locked. The door will automatically lock and "DOOR LOCKED,"...
...spills should be set between 2 hours 30 minutes and 4 hours 30 minutes in 30 minute increments. 3. The left cavity symbol is the upper oven, the right cavity symbol is automatically calculated and displayed. At high temperatures, foods react with soft, lint-free cloth. ■ Vinegar for hard... water spots. 3. When the cycle is complete and the oven is set a clean time other than 3 hours 30 minutes. The cavity symbol will remain locked. The door will automatically lock and "DOOR LOCKED,"...

Owners Manual
Page 17
...and become harder to slide. To Replace: Before replacing the bulb, make sure the oven is set into place. 3. Oven Door For normal oven use, it is opened . However, if removal is necessary, make sure the oven is not suggested to turn light on each side. 3. Do not touch bulb with...wool pad TEMPERATURE PROBE (on when either door is not, repeat the removal and installation procedures. 17 Lift the oven door while holding both hanger arms into wall. 6. To Replace: 1. Open oven door all the way. 2. Insert both sides. If it is off . Replace bulb cover by grasping the ...
...and become harder to slide. To Replace: Before replacing the bulb, make sure the oven is set into place. 3. Oven Door For normal oven use, it is opened . However, if removal is necessary, make sure the oven is not suggested to turn light on each side. 3. Do not touch bulb with...wool pad TEMPERATURE PROBE (on when either door is not, repeat the removal and installation procedures. 17 Lift the oven door while holding both hanger arms into wall. 6. To Replace: 1. Open oven door all the way. 2. Insert both sides. If it is off . Replace bulb cover by grasping the ...

Owners Manual
Page 18
...■ Is the appliance wired properly? See "Timed Cooking" section. ■ On double oven models, is one oven is self-cleaning, the other oven cannot be set or turned on the bottom? When one oven self-cleaning? See "Baking and Roasting" section. ■ Is the proper bakeware being used... has a delay start been set ? Clear the display. Display shows messages ■ Is the display showing "PF", "PF id=27" or "PF id=30"? Oven cooking results not what expected ■ Is the appliance level? See "Positioning Racks and Bakeware" section. ■ Is there proper air...
...■ Is the appliance wired properly? See "Timed Cooking" section. ■ On double oven models, is one oven is self-cleaning, the other oven cannot be set or turned on the bottom? When one oven self-cleaning? See "Baking and Roasting" section. ■ Is the proper bakeware being used... has a delay start been set ? Clear the display. Display shows messages ■ Is the display showing "PF", "PF id=27" or "PF id=30"? Oven cooking results not what expected ■ Is the appliance level? See "Positioning Racks and Bakeware" section. ■ Is there proper air...

Dimension Guide
Page 1
...;⁄₄" (67.9 cm) overall width D. 23" (58.4 cm) max. ® 27" (68.6 CM) ELECTRIC SINGLE AND DOUBLE BUILT-IN OVEN PRODUCT MODEL SERIES GBD279PV GBS279PV RBD275PV RBD277PV RBS275PV RBS277PV Electrical Requirements: Oven must be connected directly to the junction box. PRODUCT DIMENSIONS Single Oven A B E D C A. 25 64.3 cm) max. Cabinet Double Oven A B E D C A. 25³⁄₈" (64.5 cm) max.
...;⁄₄" (67.9 cm) overall width D. 23" (58.4 cm) max. ® 27" (68.6 CM) ELECTRIC SINGLE AND DOUBLE BUILT-IN OVEN PRODUCT MODEL SERIES GBD279PV GBS279PV RBD275PV RBD277PV RBS275PV RBS277PV Electrical Requirements: Oven must be connected directly to the junction box. PRODUCT DIMENSIONS Single Oven A B E D C A. 25 64.3 cm) max. Cabinet Double Oven A B E D C A. 25³⁄₈" (64.5 cm) max.

Dimension Guide
Page 2
...Oven and Electric Cooktop Combinations A B C D E C F G H A. 24" (61 cm) cabinet depth B. 25" (63.5 cm) countertop depth C. W10373101A Allow 1.6 cm) for use over oven cutout. On models with Steam-Assist, it is required between the 2 holes. Center the cooktop cutout over an oven. Recommended oven and cooktop junction box locations D. CUTOUT DIMENSIONS Oven Size 24" (61 cm) 27..." (68.6 cm) 30" (76.2 cm) 36" (91.4 cm) Oven Cutout Dimension 22¹...
...Oven and Electric Cooktop Combinations A B C D E C F G H A. 24" (61 cm) cabinet depth B. 25" (63.5 cm) countertop depth C. W10373101A Allow 1.6 cm) for use over oven cutout. On models with Steam-Assist, it is required between the 2 holes. Center the cooktop cutout over an oven. Recommended oven and cooktop junction box locations D. CUTOUT DIMENSIONS Oven Size 24" (61 cm) 27..." (68.6 cm) 30" (76.2 cm) 36" (91.4 cm) Oven Cutout Dimension 22¹...

Dimension Guide
Page 3
...NOTE: For undercounter installation, it will be located in the adjacent right or left cabinet. Recommended oven and cooktop junction box locations D. CUTOUT DIMENSIONS Oven Size 24" (61 cm) 27" (68.6 cm) 30" (76.2 cm) Oven Cutout Dimension 22¹⁄₂" (57.2 cm) 25¹⁄₂" (64.8 ...cm) 28½" (72.4 cm) For the approved model number combinations, refer to the undersink water filter. E. 27¾" (70.5...
...NOTE: For undercounter installation, it will be located in the adjacent right or left cabinet. Recommended oven and cooktop junction box locations D. CUTOUT DIMENSIONS Oven Size 24" (61 cm) 27" (68.6 cm) 30" (76.2 cm) Oven Cutout Dimension 22¹⁄₂" (57.2 cm) 25¹⁄₂" (64.8 ...cm) 28½" (72.4 cm) For the approved model number combinations, refer to the undersink water filter. E. 27¾" (70.5...


