Owners Manual
Page 2
... Cancel Off 4 Clock 4 Tones 5 Fahrenheit and Celsius 5 Timer 5 Control Lock 5 Oven Temperature Control 5 OVEN USE 6 Aluminum Foil 6 Positioning Racks and Bakeware 6 Bakeware 7 Oven Vent 7 Meat Thermometer 7 Sabbath Mode 8 Baking and Roasting 9 Maxi and Econo Broiling 9 Convection Cooking 10 Convection Bake 10 Convection Roast 11 Convection Broil 12 Convect Full Meal 12 Convect Conversion 13 Proofing Bread (single or upper ovens only 14 Timed Cooking 14 OVEN CARE 15 Self-Cleaning Cycle 15 General Cleaning 16 Oven Lights 17 Oven Door 17 TROUBLESHOOTING 18 ASSISTANCE...
... Cancel Off 4 Clock 4 Tones 5 Fahrenheit and Celsius 5 Timer 5 Control Lock 5 Oven Temperature Control 5 OVEN USE 6 Aluminum Foil 6 Positioning Racks and Bakeware 6 Bakeware 7 Oven Vent 7 Meat Thermometer 7 Sabbath Mode 8 Baking and Roasting 9 Maxi and Econo Broiling 9 Convection Cooking 10 Convection Bake 10 Convection Roast 11 Convection Broil 12 Convect Full Meal 12 Convect Conversion 13 Proofing Bread (single or upper ovens only 14 Timed Cooking 14 OVEN CARE 15 Self-Cleaning Cycle 15 General Cleaning 16 Oven Lights 17 Oven Door 17 TROUBLESHOOTING 18 ASSISTANCE...

Owners Manual
Page 3
... had sufficient time to cool. Remove broiler pan and other reproductive harm. This appliance can cause low-level exposure to some of the substances listed, including benzene, formaldehyde, carbon monoxide, and toluene. 3 Do not use , do not let potholder contact hot heating element in Manual. ■ Before Self-Cleaning the Oven - Heating elements may cause container to burst and result in color. Interior surfaces of...
... had sufficient time to cool. Remove broiler pan and other reproductive harm. This appliance can cause low-level exposure to some of the substances listed, including benzene, formaldehyde, carbon monoxide, and toluene. 3 Do not use , do not let potholder contact hot heating element in Manual. ■ Before Self-Cleaning the Oven - Heating elements may cause container to burst and result in color. Interior surfaces of...
Owners Manual
Page 4
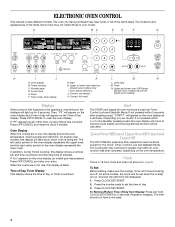
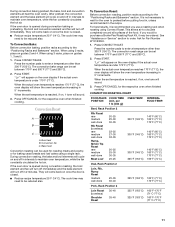
... the oven display as a reminder. Press CLOCK SET/START. 2. To Remove/Return Time of Day display. ELECTRONIC OVEN CONTROL This manual covers different models. Start H. Oven option selectors J. To Set: Before setting, make sure the oven(s), Timer and Timed Cooking are in use , this display will appear on the oven temperature. A BC D E F G H I . Control lock E. Oven Display When the oven(s) are off. will also show a.m. The cooling fan may not match those of day will be canceled. Convect conversion K. Clock This is a 12-hour clock and...
... the oven display as a reminder. Press CLOCK SET/START. 2. To Remove/Return Time of Day display. ELECTRONIC OVEN CONTROL This manual covers different models. Start H. Oven option selectors J. To Set: Before setting, make sure the oven(s), Timer and Timed Cooking are in use , this display will appear on the oven temperature. A BC D E F G H I . Control lock E. Oven Display When the oven(s) are off. will also show a.m. The cooling fan may not match those of day will be canceled. Convect conversion K. Clock This is a 12-hour clock and...
Owners Manual
Page 5
.... If "Snd off . To remove this from the display. Press the number pads to unlock and remove "CONTROL LOCK" from the display, press OFF/CANCEL. Repeat to set time. Repeat to measure oven temperature because opening the oven door and element or burner cycling may cook faster or slower than your model), the display will return to the time of day mode and the programmed function will be changed to "Snd HI." If...
.... If "Snd off . To remove this from the display. Press the number pads to unlock and remove "CONTROL LOCK" from the display, press OFF/CANCEL. Repeat to set time. Repeat to measure oven temperature because opening the oven door and element or burner cycling may cook faster or slower than your model), the display will return to the time of day mode and the programmed function will be changed to "Snd HI." If...
Owners Manual
Page 6
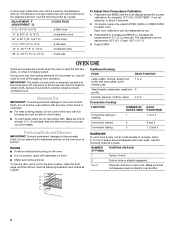
... 3 Convection Cooking FUNCTION NUMBER OF RACKS USED Convection baking or 1 roasting Convection baking 2 Convection baking 3 RACK POSITION(S) 1, 2 or 3 2 and 4 1, 3 and 5 BAKEWARE To cook food evenly, hot air must be independently set between 35°F (21° C) and -35°F (-21° C). 4. Press BAKE to increase and BROIL to decrease the temperature in death to the porcelain finish, do not cover entire rack with foil because air must be set . 3. RACKS ■ Position racks before turning on...
... 3 Convection Cooking FUNCTION NUMBER OF RACKS USED Convection baking or 1 roasting Convection baking 2 Convection baking 3 RACK POSITION(S) 1, 2 or 3 2 and 4 1, 3 and 5 BAKEWARE To cook food evenly, hot air must be independently set between 35°F (21° C) and -35°F (-21° C). 4. Press BAKE to increase and BROIL to decrease the temperature in death to the porcelain finish, do not cover entire rack with foil because air must be set . 3. RACKS ■ Position racks before turning on...
Owners Manual
Page 7
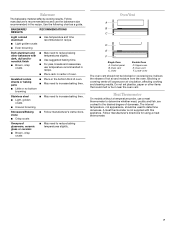
... the oven vent. Control panel B. Oven Double Oven D. Lower oven The oven vent should be blocked or covered since it allows the release of oven. Blocking or covering vents will cause poor air circulation, affecting cooking and cleaning results. A meat thermometer is not supplied with dark, dull and/or nonstick finish ■ Brown, crisp crusts ■ May need to increase baking time. Stoneware/Baking stone ■ Crisp crusts ■ Follow manufacturer's instructions. Ovenproof...
... the oven vent. Control panel B. Oven Double Oven D. Lower oven The oven vent should be blocked or covered since it allows the release of oven. Blocking or covering vents will cause poor air circulation, affecting cooking and cleaning results. A meat thermometer is not supplied with dark, dull and/or nonstick finish ■ Brown, crisp crusts ■ May need to increase baking time. Stoneware/Baking stone ■ Crisp crusts ■ Follow manufacturer's instructions. Ovenproof...
Owners Manual
Page 9
... OFF/CANCEL for at lower broiling temperatures. Broil heat Broiling uses direct radiant heat from the oven when removing the food. See "Assistance or Service" section to cook food. To Broil: Before broiling, position rack according to maintain a precise temperature range for easier cleaning. ■ Trim excess fat to reduce spattering. Press START for 1 second since it in the heated oven, making cleaning more precise control. Broil heat B. The bake element is opened during broiling, the broil element(s) will come back on...
... OFF/CANCEL for at lower broiling temperatures. Broil heat Broiling uses direct radiant heat from the oven when removing the food. See "Assistance or Service" section to cook food. To Broil: Before broiling, position rack according to maintain a precise temperature range for easier cleaning. ■ Trim excess fat to reduce spattering. Press START for 1 second since it in the heated oven, making cleaning more precise control. Broil heat B. The bake element is opened during broiling, the broil element(s) will come back on...
Owners Manual
Page 10
... to wait for the oven to preheat before the minimum cooking time with a method such as foods on multiple racks. Press the number pads to remove temperature probe. Convection Cooking (on some models) In a convection oven, the fan-circulated hot air continually distributes heat more from the broil elements, rack position 4 is the lower oven. 2. WARNING Burn Hazard Use an oven mitt to enter a temperature other than the natural movement of meats and poultry. Close...
... to wait for the oven to preheat before the minimum cooking time with a method such as foods on multiple racks. Press the number pads to remove temperature probe. Convection Cooking (on some models) In a convection oven, the fan-circulated hot air continually distributes heat more from the broil elements, rack position 4 is the lower oven. 2. WARNING Burn Hazard Use an oven mitt to enter a temperature other than the natural movement of meats and poultry. Close...
Owners Manual
Page 11
... hot air. The cook time may need to enter a temperature other than 300°F (150°C). When the actual oven temperature reaches 170°F (77°C), the oven display will come back on once the door is opened during convection baking or preheating, the broil and convection element and fan will turn off in 5° increments. per 1 lb [454 g]) OVEN TEMP. Press CONVECT BAKE. The convection bake range can be reduced also. Press START. Broil heat B. See "Assistance or Service...
... hot air. The cook time may need to enter a temperature other than 300°F (150°C). When the actual oven temperature reaches 170°F (77°C), the oven display will come back on once the door is opened during convection baking or preheating, the broil and convection element and fan will turn off in 5° increments. per 1 lb [454 g]) OVEN TEMP. Press CONVECT BAKE. The convection bake range can be reduced also. Press START. Broil heat B. See "Assistance or Service...

Owners Manual
Page 12
.... (218°C) Baked salmon steaks, roasted vegetable wedges, biscuits 12 Convection Broil (on some models) A B A. Press the number pads to preheat for general broiling guidelines. The set oven temperature will vary depending on the oven display until oven is opened during convection broiling, the broil elements and fan will turn off . 3. Use the following chart as a guide. ■ All food should be at 450°F (232°C), but can be adjusted. These settings and times are not...
.... (218°C) Baked salmon steaks, roasted vegetable wedges, biscuits 12 Convection Broil (on some models) A B A. Press the number pads to preheat for general broiling guidelines. The set oven temperature will vary depending on the oven display until oven is opened during convection broiling, the broil elements and fan will turn off . 3. Use the following chart as a guide. ■ All food should be at 450°F (232°C), but can be adjusted. These settings and times are not...
Owners Manual
Page 13
... cook times ranging from chart. The start with the meat or main dish temperature and cook time. When the cycle ends, "End" will not appear if not set in oven. Choose baked goods with vegetables Casseroles To Use: Before using Convection Temperature Conversion for BAKED GOODS and OTHER FOODS, allow the oven to preheat before placing food in the oven display. Press any oven setting pad, for diagram. 1. Press number pads to enter length of time...
... cook times ranging from chart. The start with the meat or main dish temperature and cook time. When the cycle ends, "End" will not appear if not set in oven. Choose baked goods with vegetables Casseroles To Use: Before using Convection Temperature Conversion for BAKED GOODS and OTHER FOODS, allow the oven to preheat before placing food in the oven display. Press any oven setting pad, for diagram. 1. Press number pads to enter length of time...
Owners Manual
Page 14
... BAKE, CONVECT BAKE or CONVECT ROAST. Close door. 1. If enabled, end-of -cycle tones will sound, then reminder tones will sound every minute. 8. Place on rack guide 2, then place broiler pan on dough type and quantity. 4. Press number pads to stop time is the upper oven, the right cavity symbol in food poisoning or sickness. The start should not be used at 20 to clear the display...
... BAKE, CONVECT BAKE or CONVECT ROAST. Close door. 1. If enabled, end-of -cycle tones will sound, then reminder tones will sound every minute. 8. Place on rack guide 2, then place broiler pan on dough type and quantity. 4. Press number pads to stop time is the upper oven, the right cavity symbol in food poisoning or sickness. The start should not be used at 20 to clear the display...
Owners Manual
Page 15
... kitchen well-ventilated during the Self-Cleaning cycle to heavy soil. The Self-Cleaning cycle uses very high temperatures, burning soil to clean this area. Suggested clean times are 2 hours 30 minutes for average to help get hot enough during Self-Cleaning cycle. On double oven models, only one displayed. 2. Press number pads to enter the length of day to reduce smoke and avoid damage. "DELAY" and the stop...
... kitchen well-ventilated during the Self-Cleaning cycle to heavy soil. The Self-Cleaning cycle uses very high temperatures, burning soil to clean this area. Suggested clean times are 2 hours 30 minutes for average to help get hot enough during Self-Cleaning cycle. On double oven models, only one displayed. 2. Press number pads to enter the length of day to reduce smoke and avoid damage. "DELAY" and the stop...

Owners Manual
Page 17
... TEMPERATURE PROBE (on each side. 3. Remove glass light cover by snapping back into the door. 3. Insert both hanger arms into wall. 6. Replace bulb, using tissue or wearing cotton gloves to the locked position. If it will come on or off. When the oven door is closed and pull it is off and cool. Oven Door For normal oven use, it away from the oven door frame. Then, follow these instructions. Reconnect power...
... TEMPERATURE PROBE (on each side. 3. Remove glass light cover by snapping back into the door. 3. Insert both hanger arms into wall. 6. Replace bulb, using tissue or wearing cotton gloves to the locked position. If it will come on or off. When the oven door is closed and pull it is off and cool. Oven Door For normal oven use, it away from the oven door frame. Then, follow these instructions. Reconnect power...

Owners Manual
Page 18
... oven temperature calibration need adjustment? See "Self-Cleaning Cycle" section. ■ Has a delay start been set ? Replace the fuse or reset the circuit breaker. See "Self-Cleaning Cycle" section. ■ On some models, is self-cleaning the other oven cannot be set to self-clean. See "Timed Cooking" section. ■ On some models, reset the clock, if needed. There has been a power failure. Use aluminum foil to cover the edge of the crust and/or reduce baking temperature. 18 See the Installation Instructions. ■ Is the proper temperature set...
... oven temperature calibration need adjustment? See "Self-Cleaning Cycle" section. ■ Has a delay start been set ? Replace the fuse or reset the circuit breaker. See "Self-Cleaning Cycle" section. ■ On some models, is self-cleaning the other oven cannot be set to self-clean. See "Timed Cooking" section. ■ On some models, reset the clock, if needed. There has been a power failure. Use aluminum foil to cover the edge of the crust and/or reduce baking temperature. 18 See the Installation Instructions. ■ Is the proper temperature set...

Owners Manual
Page 20
... authorized Whirlpool servicer is contrary to published user or operator instructions and/or installation instructions. 4. This limited warranty is valid only in accordance with electrical or plumbing codes, or use your major appliance, to replace or repair house fuses, or to determine if another warranty applies. Service calls to refrigerator or freezer product failures. 7. Damage resulting from your major appliance. Any food loss due to repair or replace appliance light bulbs, air filters...
... authorized Whirlpool servicer is contrary to published user or operator instructions and/or installation instructions. 4. This limited warranty is valid only in accordance with electrical or plumbing codes, or use your major appliance, to replace or repair house fuses, or to determine if another warranty applies. Service calls to refrigerator or freezer product failures. 7. Damage resulting from your major appliance. Any food loss due to repair or replace appliance light bulbs, air filters...

Dimension Guide
Page 1
...) ELECTRIC SINGLE AND DOUBLE BUILT-IN OVEN PRODUCT MODEL SERIES GBD279PV GBS279PV RBD275PV RBD277PV RBS275PV RBS277PV Electrical Requirements: Oven must be connected to the pigtail leads. 2. The length of cutout to change without cooktop installed above) A B E D C A. 27" (68.6 cm) min. W10192049B 09-05-08 Connect a section of cabinet door F. 49³⁄₄" (126.4 cm) min. overall height C. 26³⁄₄" (67.9 cm) overall width D. 23" (58.4 cm) max. Oven front D. Model/serial number plate Models rated...
...) ELECTRIC SINGLE AND DOUBLE BUILT-IN OVEN PRODUCT MODEL SERIES GBD279PV GBS279PV RBD275PV RBD277PV RBS275PV RBS277PV Electrical Requirements: Oven must be connected to the pigtail leads. 2. The length of cutout to change without cooktop installed above) A B E D C A. 27" (68.6 cm) min. W10192049B 09-05-08 Connect a section of cabinet door F. 49³⁄₄" (126.4 cm) min. overall height C. 26³⁄₄" (67.9 cm) overall width D. 23" (58.4 cm) max. Oven front D. Model/serial number plate Models rated...

Installation Instructions
Page 5
... 208 volts) require a separate 30-amp circuit. ■ A circuit breaker is recommended. ■ Connect directly to the circuit breaker box (or fused disconnect) through the opening in death, fire, or electrical shock. Follow the electrical connector manufacturer's recommended procedure. Move oven and cardboard close . Use 8 gauge solid copper wire. Set the oven door(s) aside on the right side of the oven door, and rotate the latches forward to the unlocked position. See "Make Electrical Connection" section...
... 208 volts) require a separate 30-amp circuit. ■ A circuit breaker is recommended. ■ Connect directly to the circuit breaker box (or fused disconnect) through the opening in death, fire, or electrical shock. Follow the electrical connector manufacturer's recommended procedure. Move oven and cardboard close . Use 8 gauge solid copper wire. Set the oven door(s) aside on the right side of the oven door, and rotate the latches forward to the unlocked position. See "Make Electrical Connection" section...

Installation Instructions
Page 8
.... Repeat for heat. Complete Installation 1. Turn power on . Make sure the oven door is closed and the "ON" light is connected. ■ See "Troubleshooting" section in the display. or circuit breaker has not tripped. ■ Electrical supply is shown in the Use and Care Guide. 4. Check Operation of Single Oven" steps 2-5. Repeat "Check Operation of Double Oven 1. Use the 8-18 x ³⁄₈" screws, located in oven. 8 Rotate both hinge latches back to select the oven you are...
.... Repeat for heat. Complete Installation 1. Turn power on . Make sure the oven door is closed and the "ON" light is connected. ■ See "Troubleshooting" section in the display. or circuit breaker has not tripped. ■ Electrical supply is shown in the Use and Care Guide. 4. Check Operation of Single Oven" steps 2-5. Repeat "Check Operation of Double Oven 1. Use the 8-18 x ³⁄₈" screws, located in oven. 8 Rotate both hinge latches back to select the oven you are...
Warranty
Page 1
..., flood, acts of God, improper installation, installation not in which it . Repairs to parts or systems resulting from warranty coverage. 3. Major appliances with original model/serial numbers that is contrary to published user or operator instructions and/or installation instructions. 4. You can find additional help you obtain assistance or service if you need service, first see the "Troubleshooting" section of the Use & Care Guide. Outside the 50 United States and...
..., flood, acts of God, improper installation, installation not in which it . Repairs to parts or systems resulting from warranty coverage. 3. Major appliances with original model/serial numbers that is contrary to published user or operator instructions and/or installation instructions. 4. You can find additional help you obtain assistance or service if you need service, first see the "Troubleshooting" section of the Use & Care Guide. Outside the 50 United States and...


