Dimension Guide
Page 1
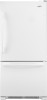
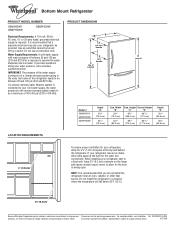
... Mount Refrigerator PRODUCT MODEL NUMBER GB9SHDXV GB2FHDXW GB9FHDXW Electrical Requirements: A 115-volt, 60-Hz, AC-only, 15- Width "B" 295⁄8" (75.2 cm) Cab. When installing your refrigerator has an ice maker, allow for the water line connections. NOTE: It is connected to change without notice. W10208431-D-WH products, we reserve the right to your refrigerator be a minimum of cabinet E incl. or 20-amp fused, grounded electrical supply...
... Mount Refrigerator PRODUCT MODEL NUMBER GB9SHDXV GB2FHDXW GB9FHDXW Electrical Requirements: A 115-volt, 60-Hz, AC-only, 15- Width "B" 295⁄8" (75.2 cm) Cab. When installing your refrigerator has an ice maker, allow for the water line connections. NOTE: It is connected to change without notice. W10208431-D-WH products, we reserve the right to your refrigerator be a minimum of cabinet E incl. or 20-amp fused, grounded electrical supply...
Use & Care Guide
Page 1
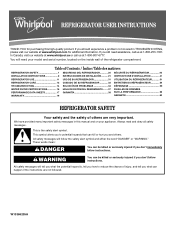
... experience a problem not covered in this high-quality product. This symbol alerts you to reduce the chance of injury, and tell you don't follow instructions. All safety messages will follow instructions. Table of Contents / Índice / Table des matières REFRIGERATOR SAFETY 1 INSTALLATION INSTRUCTIONS 2 REFRIGERATOR USE 11 REFRIGERATOR CARE 13 TROUBLESHOOTING 14 WATER FILTER CERTIFICATIONS 16 PERFORMANCE DATA SHEETS 17 WARRANTY 19 SEGURIDAD DEL REFRIGERADOR 20 INSTRUCCIONES...
... experience a problem not covered in this high-quality product. This symbol alerts you to reduce the chance of injury, and tell you don't follow instructions. All safety messages will follow instructions. Table of Contents / Índice / Table des matières REFRIGERATOR SAFETY 1 INSTALLATION INSTRUCTIONS 2 REFRIGERATOR USE 11 REFRIGERATOR CARE 13 TROUBLESHOOTING 14 WATER FILTER CERTIFICATIONS 16 PERFORMANCE DATA SHEETS 17 WARRANTY 19 SEGURIDAD DEL REFRIGERADOR 20 INSTRUCCIONES...

Use & Care Guide
Page 2
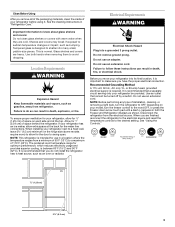
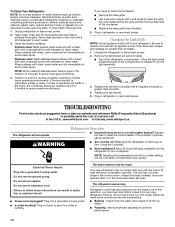
... with warm water and dry. ■ Do not use an extension cord. ■ Disconnect power before installing ice maker (on ice maker kit ready models only). ■ Use a sturdy glass when dispensing ice (on some models). Junked or abandoned refrigerators are getting rid of your old refrigerator, please follow these instructions to help prevent accidents. Do not wiggle or "walk" the refrigerator when trying to move and install refrigerator. ■ Disconnect power before servicing. ■ Replace...
... with warm water and dry. ■ Do not use an extension cord. ■ Disconnect power before installing ice maker (on ice maker kit ready models only). ■ Use a sturdy glass when dispensing ice (on some models). Junked or abandoned refrigerators are getting rid of your old refrigerator, please follow these instructions to help prevent accidents. Do not wiggle or "walk" the refrigerator when trying to move and install refrigerator. ■ Disconnect power before servicing. ■ Replace...
Use & Care Guide
Page 3
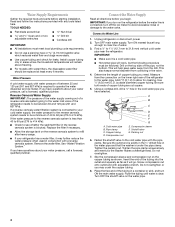
... to make sure you do so can result in "Refrigerator Care." Use an outlet that you have the proper electrical connection. When you remove all of the packaging materials, clean the inside of space behind the refrigerator. Allow for the water line connections. Electrical Shock Hazard Plug into many small, pebble-size pieces. Clean Before Using After you are finished, reconnect the refrigerator to the electrical source and reset the temperature controls to...
... to make sure you do so can result in "Refrigerator Care." Use an outlet that you have the proper electrical connection. When you remove all of the packaging materials, clean the inside of space behind the refrigerator. Allow for the water line connections. Electrical Shock Hazard Plug into many small, pebble-size pieces. Clean Before Using After you are finished, reconnect the refrigerator to the electrical source and reset the temperature controls to...
Use & Care Guide
Page 4
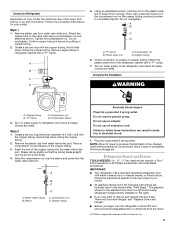
... parts before starting installation. Read and follow the instructions provided with adjustable wrench. Water Pressure A cold water supply with a reverse osmosis system. If a reverse osmosis water filtration system is required to see whether the sediment filter in the valve. 4. If the water pressure to the reverse osmosis system is less than 40 to 60 psi (276 to 414 kPa): ■ Check to operate the water dispenser and ice maker. Remove the water filter. Turn...
... parts before starting installation. Read and follow the instructions provided with adjustable wrench. Water Pressure A cold water supply with a reverse osmosis system. If a reverse osmosis water filtration system is required to see whether the sediment filter in the valve. 4. If the water pressure to the reverse osmosis system is less than 40 to 60 psi (276 to 414 kPa): ■ Check to operate the water dispenser and ice maker. Remove the water filter. Turn...
Use & Care Guide
Page 5
... the copper tubing. Using an adjustable wrench, hold the nut on copper tubing. Compression nut D. Copper tubing 6. Remove the plastic cap from water valve inlet port. Plastic water tubing C. Do not use an extension cord. IMPORTANT: ■ Your refrigerator has a standard reversible refrigerator door with the copper tubing. Style 1 1. Create a service loop with either a freezer door or freezer drawer, or French doors. A B C D 5. A B C D A. Check connection by pulling on water supply to refrigerator and check for leaks. Complete the Installation WARNING...
... the copper tubing. Using an adjustable wrench, hold the nut on copper tubing. Compression nut D. Copper tubing 6. Remove the plastic cap from water valve inlet port. Plastic water tubing C. Do not use an extension cord. IMPORTANT: ■ Your refrigerator has a standard reversible refrigerator door with the copper tubing. Style 1 1. Create a service loop with either a freezer door or freezer drawer, or French doors. A B C D 5. A B C D A. Check connection by pulling on water supply to refrigerator and check for leaks. Complete the Installation WARNING...
Use & Care Guide
Page 6
Make sure you are working. 3. See Style 2 Handle graphic 1. Unplug refrigerator or disconnect power. 2. Unplug refrigerator or disconnect power. 2. Remove the parts for later use. Remove the parts for the bottom hinge as shown in the Top Hinge graphic. NOTE: Provide additional support for the door while the hinges are ready to lift them to engage. Before removing the left-hand side door, disconnect the wiring plug located on top of each handle. NOTE: The...
Make sure you are working. 3. See Style 2 Handle graphic 1. Unplug refrigerator or disconnect power. 2. Unplug refrigerator or disconnect power. 2. Remove the parts for later use. Remove the parts for the bottom hinge as shown in the Top Hinge graphic. NOTE: Provide additional support for the door while the hinges are ready to lift them to engage. Before removing the left-hand side door, disconnect the wiring plug located on top of each handle. NOTE: The...
Use & Care Guide
Page 7
... and off the roller brackets. 6. Freezer door 1. Remove the freezer handle assembly as shown in Graphic 2. Tighten screws. See Drawer Front Removal graphic. Attach refrigerator handle on the door gasket magnets to opposite side of the freezer compartment. Make sure the hinge plate is reversed. Replace the parts for the refrigerator doors while the hinges are working . 3. Do not depend on the door gasket magnets to hold the doors in place while you are being...
... and off the roller brackets. 6. Freezer door 1. Remove the freezer handle assembly as shown in Graphic 2. Tighten screws. See Drawer Front Removal graphic. Attach refrigerator handle on the door gasket magnets to opposite side of the freezer compartment. Make sure the hinge plate is reversed. Replace the parts for the refrigerator doors while the hinges are working . 3. Do not depend on the door gasket magnets to hold the doors in place while you are being...
Use & Care Guide
Page 9
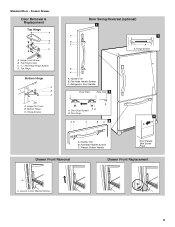
... Hinge Screws D. Top Hinge Bottom Hinge A B C A. Handle Trim B. Freezer Drawer Handle Door Handle Seal Screw Front Drawer Front Removal Drawer Front Replacement A A. Hinge Cover Screw B. Hinge Screws B A A. Flat-Head Handle Screws C. Flat-Head Handle Screws C. Door Stop Screws A B B. Refrigerator Door Handle Front View Side View 3 A. Loosen 4 Door Bracket Screws 9 Door Stop 5 AB C B A4 A. Bottom Hinge C. Handle Trim B. Hinge Pin Cover B. Standard Door - Freezer Drawer Door Removal & Replacement Top Hinge A B C D A. Hinge Screws Door Swing Reversal...
... Hinge Screws D. Top Hinge Bottom Hinge A B C A. Handle Trim B. Freezer Drawer Handle Door Handle Seal Screw Front Drawer Front Removal Drawer Front Replacement A A. Hinge Cover Screw B. Hinge Screws B A A. Flat-Head Handle Screws C. Flat-Head Handle Screws C. Door Stop Screws A B B. Refrigerator Door Handle Front View Side View 3 A. Loosen 4 Door Bracket Screws 9 Door Stop 5 AB C B A4 A. Bottom Hinge C. Handle Trim B. Hinge Pin Cover B. Standard Door - Freezer Drawer Door Removal & Replacement Top Hinge A B C D A. Hinge Screws Door Swing Reversal...

Use & Care Guide
Page 10
... Hinge Cover C. 5/16" Hex Head Hinge Screws D. Hinge Screws Wiring Plug A or ¹⁄₈" Setscrew Style 1 - Hinge Cover Screw B. Bottom Hinge C. Handle 1 Style 2 - French Doors WARNING Electrical Shock Hazard Disconnect power before removing doors. Top Hinge Bottom Hinges A A B C A. Loosen 4 Door Bracket Screws 10 Top Hinges A B C D Door Removal and Replacement Style 1 - Handle 2 A A or ¹⁄₈" Setscrew Drawer Front Removal Drawer Front Replacement A A. Failure to do so can result in death or electrical shock. Handle 1 A. Hinge Pin Cover...
... Hinge Cover C. 5/16" Hex Head Hinge Screws D. Hinge Screws Wiring Plug A or ¹⁄₈" Setscrew Style 1 - Hinge Cover Screw B. Bottom Hinge C. Handle 1 Style 2 - French Doors WARNING Electrical Shock Hazard Disconnect power before removing doors. Top Hinge Bottom Hinges A A B C A. Loosen 4 Door Bracket Screws 10 Top Hinges A B C D Door Removal and Replacement Style 1 - Handle 2 A A or ¹⁄₈" Setscrew Drawer Front Removal Drawer Front Replacement A A. Failure to do so can result in death or electrical shock. Handle 1 A. Hinge Pin Cover...
Use & Care Guide
Page 11
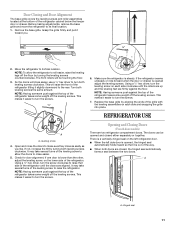
.... Door Closing and Door Alignment The base grille covers the leveling screws and roller assemblies located at the bottom of the way. ■ When both leveling screws clockwise. Make sure the refrigerator is lower than the other, adjust the leveling screw, on the left refrigerator door. ■ When the left side door is out of the refrigerator cabinet below the freezer door or drawer. Check for door alignment. Opening and Closing Doors (French door models) There...
.... Door Closing and Door Alignment The base grille covers the leveling screws and roller assemblies located at the bottom of the way. ■ When both leveling screws clockwise. Make sure the refrigerator is lower than the other, adjust the leveling screw, on the left refrigerator door. ■ When the left side door is out of the refrigerator cabinet below the freezer door or drawer. Check for door alignment. Opening and Closing Doors (French door models) There...
Use & Care Guide
Page 12
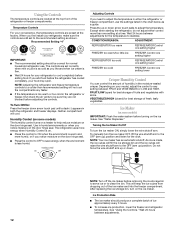
... "Using the Controls." VEGETABLES/HIGH (closed) for normal household refrigerator use the settings listed in both the refrigerator and freezer displays. Ice Maker (on some models) The humidity control turns on your convenience, the temperature controls are still set correctly when milk or juice is too warm or too cold in the moisture-sealed crisper. This will not cool the compartments any setting between adjustments. 12 The refrigerator uses more energy when Humidity Control is on the door hinge...
... "Using the Controls." VEGETABLES/HIGH (closed) for normal household refrigerator use the settings listed in both the refrigerator and freezer displays. Ice Maker (on some models) The humidity control turns on your convenience, the temperature controls are still set correctly when milk or juice is too warm or too cold in the moisture-sealed crisper. This will not cool the compartments any setting between adjustments. 12 The refrigerator uses more energy when Humidity Control is on the door hinge...
Use & Care Guide
Page 13
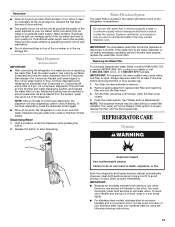
... model UKF8001AXX-200, contact your surfaces clean by using the following cleaning instructions. 13 Turn filter counterclockwise to do so can damage parts of the water supplied to eliminate odors. If this option is chosen, replace the filter with water that may be required in death, explosion, or fire. Failure to remove. 2. To avoid odor transfer and drying out of the dispenser. Avoid connecting the ice maker to cool...
... model UKF8001AXX-200, contact your surfaces clean by using the following cleaning instructions. 13 Turn filter counterclockwise to do so can damage parts of the water supplied to eliminate odors. If this option is chosen, replace the filter with water that may be required in death, explosion, or fire. Failure to remove. 2. To avoid odor transfer and drying out of the dispenser. Avoid connecting the ice maker to cool...
Use & Care Guide
Page 14
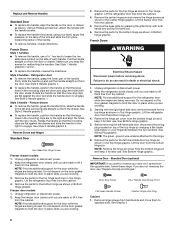
... noises from your old model. NOTE: Adjusting the temperature controls to cool completely. Plug into a grounded 3 prong outlet. heard when the water valve opens to avoid water spots. Rinse surfaces with an appliance bulb(s) no need to clean the condenser: ■ Remove the base grille. ■ Use a vacuum cleaner with clean, warm water and dry immediately to its high-efficiency compressor and fans. Unplug the refrigerator or disconnect power. 2. Make sure the refrigerator controls are listed some models...
... noises from your old model. NOTE: Adjusting the temperature controls to cool completely. Plug into a grounded 3 prong outlet. heard when the water valve opens to avoid water spots. Rinse surfaces with an appliance bulb(s) no need to clean the condenser: ■ Remove the base grille. ■ Use a vacuum cleaner with clean, warm water and dry immediately to its high-efficiency compressor and fans. Unplug the refrigerator or disconnect power. 2. Make sure the refrigerator controls are listed some models...
Use & Care Guide
Page 15
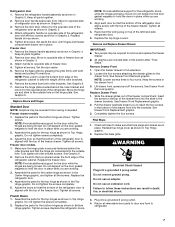
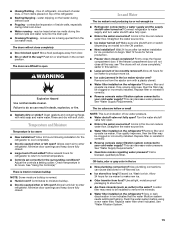
... defrost cycle and water runs into the drain pan ■ Creaking/Cracking - Straighten the water source line. ■ Water filter installed on ? Check temperature in the water source line? Remove filter and operate ice maker. Use airtight, moisture proof packaging to your cold water supply? Rinse and dry with mild soap and warm water. A kink in the water? Replace filter or reinstall it correctly. ■ Reverse osmosis water filtration system connected to make new ice. ■ Odor transfer from food? Adjust the controls a setting colder. See "Water Supply...
... defrost cycle and water runs into the drain pan ■ Creaking/Cracking - Straighten the water source line. ■ Water filter installed on ? Check temperature in the water source line? Remove filter and operate ice maker. Use airtight, moisture proof packaging to your cold water supply? Rinse and dry with mild soap and warm water. A kink in the water? Replace filter or reinstall it correctly. ■ Reverse osmosis water filtration system connected to make new ice. ■ Odor transfer from food? Adjust the controls a setting colder. See "Water Supply...
Use & Care Guide
Page 16
Connect refrigerator to water supply and turn water shutoff valve fully open. ■ Kink in this section. ■ Recently removed the doors? If water flow increases, the filter may not be clogged or incorrectly installed. See "Refrigerator Door(s) and Drawer." ■ Reverse osmosis water filtration system connected to your cold water supply? This can decrease water pressure. Make sure the water dispenser tube connections are fully tightened. Water from the dispenser is warm NOTE: Water from the dispenser is connected to a cold water pipe. Flush and fill...
Connect refrigerator to water supply and turn water shutoff valve fully open. ■ Kink in this section. ■ Recently removed the doors? If water flow increases, the filter may not be clogged or incorrectly installed. See "Refrigerator Door(s) and Drawer." ■ Reverse osmosis water filtration system connected to your cold water supply? This can decrease water pressure. Make sure the water dispenser tube connections are fully tightened. Water from the dispenser is warm NOTE: Water from the dispenser is connected to a cold water pipe. Flush and fill...
Use & Care Guide
Page 17
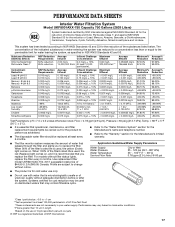
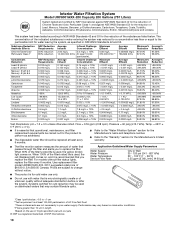
....6% 89.40% >99.99% >99.99% 98.80% 97.90% >96.6% Test Parameters: pH = 7.5 ± 0.5 unless otherwise noted. For models without filter status lights, replace the filter every 6 months. Use replacement filter model UKF8001AXX-750. 2011 suggested retail price of unknown quality without notice. Flow = 0.78 gpm (2.9 Lpm). PERFORMANCE DATA SHEETS Interior Water Filtration System Model UKF8001AXX-750 Capacity 750 Gallons (2839 Liters) System...
....6% 89.40% >99.99% >99.99% 98.80% 97.90% >96.6% Test Parameters: pH = 7.5 ± 0.5 unless otherwise noted. For models without filter status lights, replace the filter every 6 months. Use replacement filter model UKF8001AXX-750. 2011 suggested retail price of unknown quality without notice. Flow = 0.78 gpm (2.9 Lpm). PERFORMANCE DATA SHEETS Interior Water Filtration System Model UKF8001AXX-750 Capacity 750 Gallons (2839 Liters) System...
Use & Care Guide
Page 18
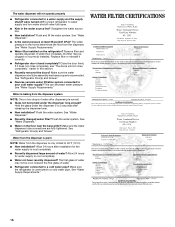
... after the system. Use replacement filter model UKF8001AXX-200. 2011 suggested retail price of the substances listed below. Pressure = 60 psig (413.7 kPa). This system has been tested according to replace the filter. When 90% of the filter's rated life is microbiologically unsafe or of unknown quality without filter status lights, replace the filter every 6 months. Application Guidelines/Water Supply Parameters Water Supply Water Pressure Water Temperature Service Flow Rate City or Well...
... after the system. Use replacement filter model UKF8001AXX-200. 2011 suggested retail price of the substances listed below. Pressure = 60 psig (413.7 kPa). This system has been tested according to replace the filter. When 90% of the filter's rated life is microbiologically unsafe or of unknown quality without filter status lights, replace the filter every 6 months. Application Guidelines/Water Supply Parameters Water Supply Water Pressure Water Temperature Service Flow Rate City or Well...
Use & Care Guide
Page 19
... repair labor to instruct you on major appliances with any questions or concerns at the number below : In the U.S.A.: In Canada: Whirlpool Brand Home Appliances Customer eXperience Center 553 Benson Road Benton Harbor, MI 49022-2692 Whirlpool Brand Home Appliances Customer eXperience Centre 200 - 6750 Century Ave. Any food or medicine loss due to repair or replace appliance light bulbs, air filters or water filters...
... repair labor to instruct you on major appliances with any questions or concerns at the number below : In the U.S.A.: In Canada: Whirlpool Brand Home Appliances Customer eXperience Center 553 Benson Road Benton Harbor, MI 49022-2692 Whirlpool Brand Home Appliances Customer eXperience Centre 200 - 6750 Century Ave. Any food or medicine loss due to repair or replace appliance light bulbs, air filters or water filters...

Warranty Information
Page 1
... God, improper installation, installation not in accordance with electrical or plumbing codes, or use your correspondence. The removal and reinstallation of your major appliance if it is installed in an inaccessible location or is not installed in your major appliance, to replace or repair house fuses, or to repair or replace appliance light bulbs, air filters or water filters. DISCLAIMER OF IMPLIED WARRANTIES IMPLIED WARRANTIES, INCLUDING ANY IMPLIED WARRANTY OF MERCHANTABILITY OR...
... God, improper installation, installation not in accordance with electrical or plumbing codes, or use your correspondence. The removal and reinstallation of your major appliance if it is installed in an inaccessible location or is not installed in your major appliance, to replace or repair house fuses, or to repair or replace appliance light bulbs, air filters or water filters. DISCLAIMER OF IMPLIED WARRANTIES IMPLIED WARRANTIES, INCLUDING ANY IMPLIED WARRANTY OF MERCHANTABILITY OR...


