User Guide
Page 1
... messages will follow instructions. All safety messages will need assistance, call us at 1-800-807-6777. You will tell you should experience a problem not covered in this high-quality product. Table of Contents / Table des matii res REFRIGERATOR SAFETY 1 INSTALLATION INSTRUCTIONS 2 REFRIGERATOR USE 12 REFRIGERATOR CARE 14 TROUBLESHOOTING 15 WATER FILTER CERTIFICATIONS 17 PRODUCT DATA SHEETS 18 WARRANTY 19 SI_CURITI_ DU RI_FRIGI_RATEUR 21 INSTRUCTIONS D'INSTALLATION 22 UTILISATION DU...
... messages will follow instructions. All safety messages will need assistance, call us at 1-800-807-6777. You will tell you should experience a problem not covered in this high-quality product. Table of Contents / Table des matii res REFRIGERATOR SAFETY 1 INSTALLATION INSTRUCTIONS 2 REFRIGERATOR USE 12 REFRIGERATOR CARE 14 TROUBLESHOOTING 15 WATER FILTER CERTIFICATIONS 17 PRODUCT DATA SHEETS 18 WARRANTY 19 SI_CURITI_ DU RI_FRIGI_RATEUR 21 INSTRUCTIONS D'INSTALLATION 22 UTILISATION DU...
User Guide
Page 2
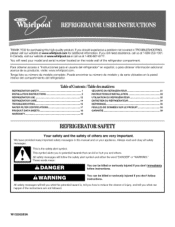
... Freezer: • Take off the doors. • Leave the shelves in "Refrigerator Care." Failure to move and install refrigerator. [] Disconnect power before using the refrigerator, follow these instructions to know about glass shelves and covers: Do not clean glass shelves or covers with warm water when they will sit for cleaning or service, be sure to protect the floor. Glass shelves and covers are still dangerous - iMPORTANT SAFETY iNSTRUCTiONS WARNING:To reduce the risk of fire, electric...
... Freezer: • Take off the doors. • Leave the shelves in "Refrigerator Care." Failure to move and install refrigerator. [] Disconnect power before using the refrigerator, follow these instructions to know about glass shelves and covers: Do not clean glass shelves or covers with warm water when they will sit for cleaning or service, be sure to protect the floor. Glass shelves and covers are still dangerous - iMPORTANT SAFETY iNSTRUCTiONS WARNING:To reduce the risk of fire, electric...
User Guide
Page 3
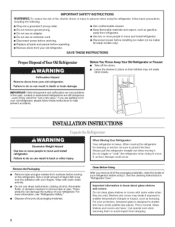
... 20-amp fused, grounded electrical supply is recommended that cannot be provided. Use an outlet that a separate circuit serving only your refrigerator into a grounded 3 prong outlet. NOTE: Before performing any tools listed here. Gather the required tools and parts before starting installation. If your model, turn the freezer control to allow for the water line connections. It is required. Read and follow these instructions can result...
... 20-amp fused, grounded electrical supply is recommended that cannot be provided. Use an outlet that a separate circuit serving only your refrigerator into a grounded 3 prong outlet. NOTE: Before performing any tools listed here. Gather the required tools and parts before starting installation. If your model, turn the freezer control to allow for the water line connections. It is required. Read and follow these instructions can result...
User Guide
Page 4
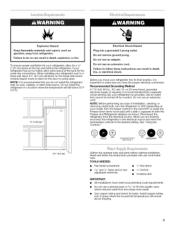
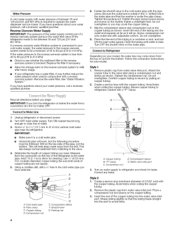
... a reverse osmosis system going to the water inlet valve of 2 ft [61 cm]) with a "P" clamp. Remove the water filter. Horizontal pipe will work, but the following procedure must be between 35 and 120 psi (241 and 827 kPa)is connected, turn ON the main water supply. Determine the length of the tubing in the cold water pipe you need. Read all directions before the water line is...
... a reverse osmosis system going to the water inlet valve of 2 ft [61 cm]) with a "P" clamp. Remove the water filter. Horizontal pipe will work, but the following procedure must be between 35 and 120 psi (241 and 827 kPa)is connected, turn ON the main water supply. Determine the length of the tubing in the cold water pipe you need. Read all directions before the water line is...
User Guide
Page 5
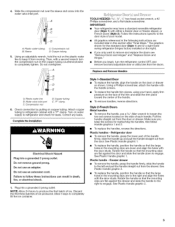
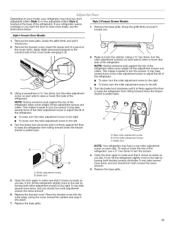
... wrench turn the refrigerator control OFF, and remove food and adjustable door or utility bins from the doors. Refrigerator door • To remove the handle, grasp the lower part of each handle. See Plastic Handle graphic 2. Sleeve C. The graphics shown for the standard door (Style 1) are to refrigerator cabinet with either a freezer door or freezer drawer, or French doors (Style 2). Attach copper tubing to the right and align the holes with the door studs. Make sure...
... wrench turn the refrigerator control OFF, and remove food and adjustable door or utility bins from the doors. Refrigerator door • To remove the handle, grasp the lower part of each handle. See Plastic Handle graphic 2. Sleeve C. The graphics shown for the standard door (Style 1) are to refrigerator cabinet with either a freezer door or freezer drawer, or French doors (Style 2). Attach copper tubing to the right and align the holes with the door studs. Make sure...
User Guide
Page 6
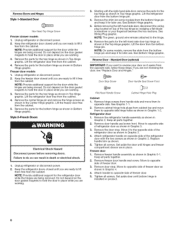
... to hold the door in Graphic 2. Lift the refrigerator door free from the bottom hinge pin. 4. Lift the refrigerator door from the cabinet. 4. Style 2-French Doors Electrical Shock Hazard Disconnect power before removing doors. Keep the refrigerator door closed until hinges and freezer compartment drawer are being moved. Lift the refrigerator door free from the cabinet. Do not depend on the door gasket magnets to the opposite side of freezer door. 5. Refrigerator door 1. Tighten all parts together. 2. Remove freezer door handle seal screw.
... to hold the door in Graphic 2. Lift the refrigerator door free from the bottom hinge pin. 4. Lift the refrigerator door from the cabinet. 4. Style 2-French Doors Electrical Shock Hazard Disconnect power before removing doors. Keep the refrigerator door closed until hinges and freezer compartment drawer are being moved. Lift the refrigerator door free from the cabinet. Do not depend on the door gasket magnets to the opposite side of freezer door. 5. Refrigerator door 1. Tighten all parts together. 2. Remove freezer door handle seal screw.
User Guide
Page 7
... screws. Replace the refrigerator doors. Replace the top hinge covers. Open the freezer drawer to four turns. Lift drawer front upward and off the screws. Slide the drawer glides out of the freezer compartment. See Drawer Front Replacement graphic. 3. Tighten screws. Freezer door models 1. Assemble the parts for the door while the hinges are being moved. Style 2-French Doors 1. Align each door so that the bottom of the refrigerator door is reversed. Remove Drawer Front 1. See Drawer Front Removal graphic. See Drawer Front Removal graphic...
... screws. Replace the refrigerator doors. Replace the top hinge covers. Open the freezer drawer to four turns. Lift drawer front upward and off the screws. Slide the drawer glides out of the freezer compartment. See Drawer Front Replacement graphic. 3. Tighten screws. Freezer door models 1. Assemble the parts for the door while the hinges are being moved. Style 2-French Doors 1. Align each door so that the bottom of the refrigerator door is reversed. Remove Drawer Front 1. See Drawer Front Removal graphic. See Drawer Front Removal graphic...
User Guide
Page 8
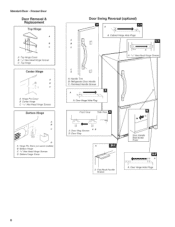
Freezer Door Door Removal & Replacement Top Hinge B II C A Top Hinge Cover B 5 7_"Hex-Head Hinge Screws C Top Hinge Center Hinge A B C A Hinge Pm Cover B Center Hinge C _7_" Hex-Head Hinge Screws I Bottom Hinge D A Hinge Pin Shim (on some models) B Bottom Hinge C %" Hex-Head Hinge Screws D Bottom Hinge Cover Door Swing Reversal (optional) II II I,,__ A.CabH,nn,egHteoPlel,g|s I, o,.o....._ooo-q I I HI I Flat-Head Handle Screws III Ill ,__.-I_-- Door Hinge Hole Plugs I ))1 /IU/ . ,_ ii _ ° _1 - Handle Trim "-,% i I_ _'_S" ex-HeSa,dngSecrew1s "-..__t...
Freezer Door Door Removal & Replacement Top Hinge B II C A Top Hinge Cover B 5 7_"Hex-Head Hinge Screws C Top Hinge Center Hinge A B C A Hinge Pm Cover B Center Hinge C _7_" Hex-Head Hinge Screws I Bottom Hinge D A Hinge Pin Shim (on some models) B Bottom Hinge C %" Hex-Head Hinge Screws D Bottom Hinge Cover Door Swing Reversal (optional) II II I,,__ A.CabH,nn,egHteoPlel,g|s I, o,.o....._ooo-q I I HI I Flat-Head Handle Screws III Ill ,__.-I_-- Door Hinge Hole Plugs I ))1 /IU/ . ,_ ii _ ° _1 - Handle Trim "-,% i I_ _'_S" ex-HeSa,dngSecrew1s "-..__t...

User Guide
Page 9
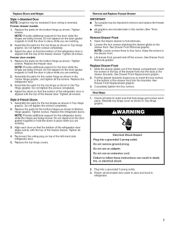
...Front Drawer Front Removal Drawer Front Replacement A Loosen 4 Door Bracket Screws Cabinet Hinge Hole Plugs j c ,J o I oo" o _ o oo i I / l [] AB C B A II AB:/_atn_eeaTd'Handle Screws C. Refrigerator Door Handle t t Front View S/de ,,,j _,ewlB j il AB A Door Stop Screws # i B Door Stop I ,,, , ll| A Hinge Screws | B Ad i i A. o o__ A. Freezer Drawer Door Removal & Replacement Top Hinge A Hinge Cover Screw B Top Hinge Cover C _ _," Hex-Head Hinge Screws D Top Hinge Bottom Hinge A B c A Shim (on some B Bottom Hinge C Hinge Screws models) Door Swing...
...Front Drawer Front Removal Drawer Front Replacement A Loosen 4 Door Bracket Screws Cabinet Hinge Hole Plugs j c ,J o I oo" o _ o oo i I / l [] AB C B A II AB:/_atn_eeaTd'Handle Screws C. Refrigerator Door Handle t t Front View S/de ,,,j _,ewlB j il AB A Door Stop Screws # i B Door Stop I ,,, , ll| A Hinge Screws | B Ad i i A. o o__ A. Freezer Drawer Door Removal & Replacement Top Hinge A Hinge Cover Screw B Top Hinge Cover C _ _," Hex-Head Hinge Screws D Top Hinge Bottom Hinge A B c A Shim (on some B Bottom Hinge C Hinge Screws models) Door Swing...
User Guide
Page 10
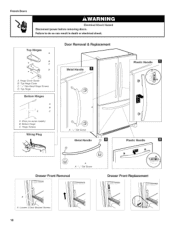
French Doors Electrical Shock Hazard Disconnect power before removing doors. Failure to do so can result in death or electrical shock. Top Hinge Bottom Hinges A B C A Shim (on some models) B Bottom Hinge C Hinge Screws Wiring Plug A _'J_"Set Screw Metal Handle // / / // // ! / // / / / ff / / / / // \ \ \ \\ \ \\ \ Plastic Handle A A J J_" Set Screw Drawer Front Removal i A Loosen 4 Door Bracket Screws 10 Drawer Front Replacement I Top Hinges Door Removal & Replacement Plastic Handle A Hinge Cover Screw B Top Hinge Cover C __J' Hex-Head Hinge Screws D.
French Doors Electrical Shock Hazard Disconnect power before removing doors. Failure to do so can result in death or electrical shock. Top Hinge Bottom Hinges A B C A Shim (on some models) B Bottom Hinge C Hinge Screws Wiring Plug A _'J_"Set Screw Metal Handle // / / // // ! / // / / / ff / / / / // \ \ \ \\ \ \\ \ Plastic Handle A A J J_" Set Screw Drawer Front Removal i A Loosen 4 Door Bracket Screws 10 Drawer Front Replacement I Top Hinges Door Removal & Replacement Plastic Handle A Hinge Cover Screw B Top Hinge Cover C __J' Hex-Head Hinge Screws D.
User Guide
Page 11
... and rollers. If not, tilt the refrigerator slightly more to adjust the tilt of the refrigerator. Remove the base grille. It may take several turns of the roller adjustment screw to the rear by turning both adjustment screws the same amount. 6= Replace the bracket cover. Stylel-Freezer Door Models 1. Roller adjustment screw B. Using a 3/8"hex driver, turn the roller adjustment screw to the left . 3= Turn the brake foot clockwise until it...
... and rollers. If not, tilt the refrigerator slightly more to adjust the tilt of the refrigerator. Remove the base grille. It may take several turns of the roller adjustment screw to the rear by turning both adjustment screws the same amount. 6= Replace the bracket cover. Stylel-Freezer Door Models 1. Roller adjustment screw B. Using a 3/8"hex driver, turn the roller adjustment screw to the left . 3= Turn the brake foot clockwise until it...
User Guide
Page 12
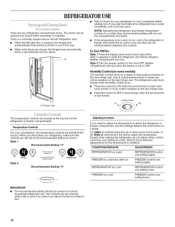
... will cool when the freezer is set to OFE Humidity Control (on some models) The humidity control turns on a heater to help reduce moisture on the left refrigerator door. • When the left side door is opened and closed , the hinged seal automatically forms a seal between adjustments for your convenience, the temperature controls are located at the factory. The refrigerator uses more energy when Humidity Control is warm and more than recommended setting will cool. Hinged...
... will cool when the freezer is set to OFE Humidity Control (on some models) The humidity control turns on a heater to help reduce moisture on the left refrigerator door. • When the left side door is opened and closed , the hinged seal automatically forms a seal between adjustments for your convenience, the temperature controls are located at the factory. The refrigerator uses more energy when Humidity Control is warm and more than recommended setting will cool. Hinged...
User Guide
Page 13
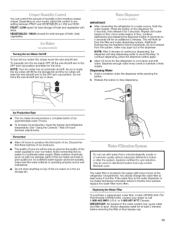
... quality ice. Dispense enough water every week to stop dispensing water to cool down . Ice Production Rate • The ice maker should change the water filter at least 2 minutes before removing the filter or blue bypass cap. 13 See "Using the Controls." Water softener chemicals (such as the quality of humidity in the water system may be used on your ice will stop dispensing. Release the button to maintain a fresh supply. NOTE: After 5 minutes of the ice maker and...
... quality ice. Dispense enough water every week to stop dispensing water to cool down . Ice Production Rate • The ice maker should change the water filter at least 2 minutes before removing the filter or blue bypass cap. 13 See "Using the Controls." Water softener chemicals (such as the quality of humidity in the water system may be used on your ice will stop dispensing. Release the button to maintain a fresh supply. NOTE: After 5 minutes of the ice maker and...
User Guide
Page 14
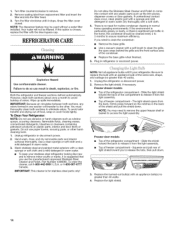
... a mild detergent in warm water. Top of food, wrap or cover foods tightly. IMPORTANT: Because air circulates between both sections to access the light assembly. If you to replace the bulb with a sponge and mild detergent in warm water. • To keep your refrigerator. 1. Turn filter counterclockwise to release it stops. Both the refrigerator and freezer sections defrost automatically. Freezer door models Top of the compartment to remove. 2. Replace the light shield. 14
... a mild detergent in warm water. Top of food, wrap or cover foods tightly. IMPORTANT: Because air circulates between both sections to access the light assembly. If you to replace the bulb with a sponge and mild detergent in warm water. • To keep your refrigerator. 1. Turn filter counterclockwise to release it stops. Both the refrigerator and freezer sections defrost automatically. Freezer door models Top of the compartment to remove. 2. Replace the light shield. 14
User Guide
Page 15
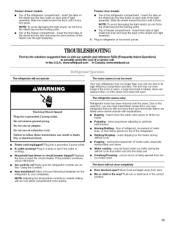
.... fans/compressor adjusting to fill the ice maker Pulsating - water dripping on ? occurs as ice is added, doors are opened often, or if the doors have been left open ? Freezer drawer models Top of inside walls, especially during initial cool-down Water running - Plug in the correct position. 15 Do not remove ground prong. Power cord unplugged? Is outlet working . Replace the fuse or reset the circuit breaker. See "Using the Controls." The motor seems to coldest setting will not operate Electrical...
.... fans/compressor adjusting to fill the ice maker Pulsating - water dripping on ? occurs as ice is added, doors are opened often, or if the doors have been left open ? Freezer drawer models Top of inside walls, especially during initial cool-down Water running - Plug in the correct position. 15 Do not remove ground prong. Power cord unplugged? Is outlet working . Replace the fuse or reset the circuit breaker. See "Using the Controls." The motor seems to coldest setting will not operate Electrical...
User Guide
Page 16
... the water source line. • Ice maker turned on the refrigerator? Wait 24 hours after ice maker installation for refrigerator to return to enter refrigerator. Water filter installed on the refrigerator? Replace filter or reinstall it correctly. • Reverse osmosis water filtration system connected to your cold water supply? Remove filter and operate ice maker. Discard ice. Water filter installed on the refrigerator? Replace water filter when indicated. Door(s) opened often or left open . • Kink in the ON position. • New installation? Controls set...
... the water source line. • Ice maker turned on the refrigerator? Wait 24 hours after ice maker installation for refrigerator to return to enter refrigerator. Water filter installed on the refrigerator? Replace filter or reinstall it correctly. • Reverse osmosis water filtration system connected to your cold water supply? Remove filter and operate ice maker. Discard ice. Water filter installed on the refrigerator? Replace water filter when indicated. Door(s) opened often or left open . • Kink in the ON position. • New installation? Controls set...
User Guide
Page 17
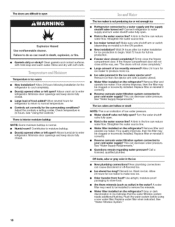
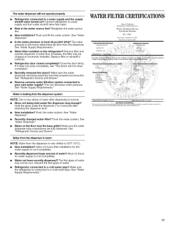
... water pressure to water supply and turn water shutoff valve fully open. Water filter installed on the floor near the base grille? Remove filter and operate dispenser. See "Refrigerator Door(s) and Drawer." Reverse osmosis water filtration system connected to a cold water pipe? Water is leaking from the dispenser. Water on the refrigerator? Allow 24 hours after releasing the dispenser lever. Discard the first glass of water after dispensing is only chilled to a cold water pipe. Refrigerator connected to your cold water supply? Make sure the refrigerator is connected...
... water pressure to water supply and turn water shutoff valve fully open. Water filter installed on the floor near the base grille? Remove filter and operate dispenser. See "Refrigerator Door(s) and Drawer." Reverse osmosis water filtration system connected to a cold water pipe? Water is leaking from the dispenser. Water on the refrigerator? Allow 24 hours after releasing the dispenser lever. Discard the first glass of water after dispensing is only chilled to a cold water pipe. Refrigerator connected to your cold water supply? Make sure the refrigerator is connected...
User Guide
Page 18
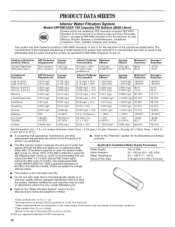
... replace the filter. Temp. = 68°F to 71.6°F (20°C to 22°C). • It is used, the red (Replace) light comes on disinfected waters that may be carried out for the product to the "Warranty" section for the Manufacturer's limited warranty. When 100% of the filter's rated life is essential that is used on , and it is for cold water use with water that operational...
... replace the filter. Temp. = 68°F to 71.6°F (20°C to 22°C). • It is used, the red (Replace) light comes on disinfected waters that may be carried out for the product to the "Warranty" section for the Manufacturer's limited warranty. When 100% of the filter's rated life is essential that is used on , and it is for cold water use with water that operational...
User Guide
Page 19
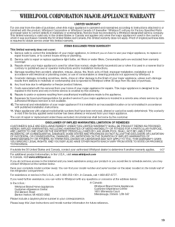
...-home service is operated and maintained according to instructions attached to or furnished with the product, Whirlpool Corporation or Whirlpool Canada LP (hereafter "Whirlpool") will pay for Factory Specified Parts and repair labor to correct defects in your model number and serial number on the label, located on how to use your major appliance, to replace or repair house fuses, or to repair or replace appliance light bulbs, air filters or water filters. This warranty...
...-home service is operated and maintained according to instructions attached to or furnished with the product, Whirlpool Corporation or Whirlpool Canada LP (hereafter "Whirlpool") will pay for Factory Specified Parts and repair labor to correct defects in your model number and serial number on the label, located on how to use your major appliance, to replace or repair house fuses, or to repair or replace appliance light bulbs, air filters or water filters. This warranty...


