
Use and Care Guide
Page 3
... to potential hazards that children may not easily climb inside. 3 SAVE THESE INSTRUCTIONS Proper Disposal of Your Old Refrigerator WARNING Suffocation Hazard Remove doors from your old refrigerator. Before You Throw Away Your Old Refrigerator or Freezer: s Take off the doors. We have provided many important safety messages in place so that can be...
... to potential hazards that children may not easily climb inside. 3 SAVE THESE INSTRUCTIONS Proper Disposal of Your Old Refrigerator WARNING Suffocation Hazard Remove doors from your old refrigerator. Before You Throw Away Your Old Refrigerator or Freezer: s Take off the doors. We have provided many important safety messages in place so that can be...

Use and Care Guide
Page 4
...surfaces before using it , as floor damage could occur. Wipe with your protection, tempered glass is heavy. When Moving Your Refrigerator: Your refrigerator is designed to allow for the water line connections. Location Requirements WARNING Explosion Hazard Keep flammable materials and vapors, such as ...bumping. s To ensure proper ventilation for your refrigerator next to know about glass shelves and covers: Do not clean glass shelves or covers with warm water when they are heavy...
...surfaces before using it , as floor damage could occur. Wipe with your protection, tempered glass is heavy. When Moving Your Refrigerator: Your refrigerator is designed to allow for the water line connections. Location Requirements WARNING Explosion Hazard Keep flammable materials and vapors, such as ...bumping. s To ensure proper ventilation for your refrigerator next to know about glass shelves and covers: Do not clean glass shelves or covers with warm water when they are heavy...
Use and Care Guide
Page 5
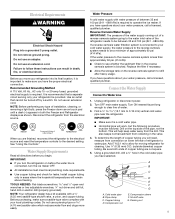
...type of installation, cleaning, or removing a light bulb, press the Freezer down arrow touch pad until a dash (-) appears in the cold water pipe you turn the refrigerator on lower left rear of the pipe, not the bottom. IMPORTANT: s If you have the proper electrical connection. s All ...end wrenches or two adjustable wrenches, ¹⁄₄" nut driver and drill bit, hand drill or electric drill (properly grounded). Add 7 ft (2.1 m) to make sure a saddle-type valve complies with water pressure of water. 3. Electrical Requirements WARNING Electrical Shock Hazard Plug into its ...
...type of installation, cleaning, or removing a light bulb, press the Freezer down arrow touch pad until a dash (-) appears in the cold water pipe you turn the refrigerator on lower left rear of the pipe, not the bottom. IMPORTANT: s If you have the proper electrical connection. s All ...end wrenches or two adjustable wrenches, ¹⁄₄" nut driver and drill bit, hand drill or electric drill (properly grounded). Add 7 ft (2.1 m) to make sure a saddle-type valve complies with water pressure of water. 3. Electrical Requirements WARNING Electrical Shock Hazard Plug into its ...

Use and Care Guide
Page 6
... Fasten shutoff valve to cold water pipe with both hands. 2. Confirm copper tubing is under the pipe clamp. Secure copper tubing to refrigerator and check for leaks. Do not remove ground prong. Water valve inlet port 3. Remove plastic cap from water valve inlet port. Tighten... proper placement. 2. Place the free end of the tubing into a grounded 3 prong outlet. Turn OFF shutoff valve on water supply to refrigerator cabinet with adjustable wrench. Attach the copper tube to the valve inlet using extreme care to connect the copper tubing. 7. Create a service ...
... Fasten shutoff valve to cold water pipe with both hands. 2. Confirm copper tubing is under the pipe clamp. Secure copper tubing to refrigerator and check for leaks. Do not remove ground prong. Water valve inlet port 3. Remove plastic cap from water valve inlet port. Tighten... proper placement. 2. Place the free end of the tubing into a grounded 3 prong outlet. Turn OFF shutoff valve on water supply to refrigerator cabinet with adjustable wrench. Attach the copper tube to the valve inlet using extreme care to connect the copper tubing. 7. Create a service ...

Use and Care Guide
Page 7
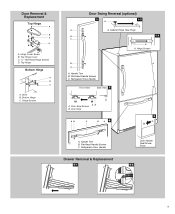
...or utility bins from the drawer rails. Remove the basket cradles from doors. Keep the refrigerator door closed until it free from the cabinet. Do not depend on the inside of the freezer drawer front to the door with the slots on the handle ends as shown in place... and press each drawer rail. To remove handles, reverse directions. Slide the upper basket into its final position. NOTE: Provide additional support for the bottom hinge as shown. 2. Remove all articles from the cabinet. 3. Align the snap attachments with the handle screws. 3. Lift lower basket straight up ...
...or utility bins from the drawer rails. Remove the basket cradles from doors. Keep the refrigerator door closed until it free from the cabinet. Do not depend on the inside of the freezer drawer front to the door with the slots on the handle ends as shown in place... and press each drawer rail. To remove handles, reverse directions. Slide the upper basket into its final position. NOTE: Provide additional support for the bottom hinge as shown. 2. Remove all articles from the cabinet. 3. Align the snap attachments with the handle screws. 3. Lift lower basket straight up ...
Use and Care Guide
Page 9
... B. Handle Trim B. Top Hinge Bottom Hinge A B C A. Hinge Screws B A A. Door Stop 5 AB C B A4 A. Top Hinge Cover C. 5/16" Hex-Head Hinge Screws D. Cabinet Hinge Hole Plugs B 1-1 C A A A. Refrigerator Door Handle Drawer Removal & Replacement 6-1 Door Handle Seal Screw Front 6-2 9 Shim B. Flat-Head Handle Screws C. Hinge Cover Screw B. Flat-Head Handle Screws C. Refrigerator Door Handle Front View Side...
... B. Handle Trim B. Top Hinge Bottom Hinge A B C A. Hinge Screws B A A. Door Stop 5 AB C B A4 A. Top Hinge Cover C. 5/16" Hex-Head Hinge Screws D. Cabinet Hinge Hole Plugs B 1-1 C A A A. Refrigerator Door Handle Drawer Removal & Replacement 6-1 Door Handle Seal Screw Front 6-2 9 Shim B. Flat-Head Handle Screws C. Hinge Cover Screw B. Flat-Head Handle Screws C. Refrigerator Door Handle Front View Side...
Use and Care Guide
Page 11
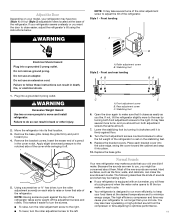
... makes it into a grounded 3 prong outlet. Stabilizing foot 6. Turn the front adjustment screws counterclockwise to allow the full weight of the refrigerator. Replace the bracket covers. Do not use an extension cord. WARNING Excessive Weight Hazard Use two or more turns, and you want the...pitched sound from the compressor or fans adjusting to rest on the stabilizing feet. 9. Hard surfaces, such as you . 4. s If your refrigerator is equipped with an ice maker, you might be making them . Failure to follow these instructions can result in death, fire, or electrical ...
... makes it into a grounded 3 prong outlet. Stabilizing foot 6. Turn the front adjustment screws counterclockwise to allow the full weight of the refrigerator. Replace the bracket covers. Do not use an extension cord. WARNING Excessive Weight Hazard Use two or more turns, and you want the...pitched sound from the compressor or fans adjusting to rest on the stabilizing feet. 9. Hard surfaces, such as you . 4. s If your refrigerator is equipped with an ice maker, you might be making them . Failure to follow these instructions can result in death, fire, or electrical ...

Use and Care Guide
Page 12
... may hear a gurgling sound due to ensure proper temperatures, you first install your refrigerator off, press the freezer down arrow touch pad until a dash (-) appears in one setting at the bottom. Heavy ice usage Adjust FREEZER or TEMPERATURE Control one setting higher FREEZER too warm/ice not made fast enough - s You may cause a popping noise...
... may hear a gurgling sound due to ensure proper temperatures, you first install your refrigerator off, press the freezer down arrow touch pad until a dash (-) appears in one setting at the bottom. Heavy ice usage Adjust FREEZER or TEMPERATURE Control one setting higher FREEZER too warm/ice not made fast enough - s You may cause a popping noise...

Use and Care Guide
Page 14
... moist air in center of the cover to use same day as it . HIGH LOW Utility or Egg Bin Depending on side walls of the refrigerator and lower the front of glass insert into cover frame and lower front into the shelf supports. Eggs may have an egg storage bin, store... foil, or plastic containers with other hand. Adjust the control to the stop. Lift the front of meat drawer with one hand while supporting the bottom of fruits and vegetables with skins: Place in plastic bags or plastic container and store in plastic bag or crisper. Remove the meat drawer. Meat...
... moist air in center of the cover to use same day as it . HIGH LOW Utility or Egg Bin Depending on side walls of the refrigerator and lower the front of glass insert into cover frame and lower front into the shelf supports. Eggs may have an egg storage bin, store... foil, or plastic containers with other hand. Adjust the control to the stop. Lift the front of meat drawer with one hand while supporting the bottom of fruits and vegetables with skins: Place in plastic bags or plastic container and store in plastic bag or crisper. Remove the meat drawer. Meat...

Use and Care Guide
Page 17
... disconnect power. 2. Lower basket 1. A Door Bins To Remove and Replace the Bins: 1. Replace the bin by lifting it straight out. 2. Both the refrigerator and freezer sections defrost automatically. Remove the basket by sliding it prevents ice from frozen food storage and it in the basket. Replace the utility compartment by ...
... disconnect power. 2. Lower basket 1. A Door Bins To Remove and Replace the Bins: 1. Replace the bin by lifting it straight out. 2. Both the refrigerator and freezer sections defrost automatically. Remove the basket by sliding it prevents ice from frozen food storage and it in the basket. Replace the utility compartment by ...

Use and Care Guide
Page 18
...from the back. NOTE: You may damage the light cover. 5. If you can scratch or damage materials. Unplug the refrigerator or disconnect power. 2. Hand wash, rinse, and dry removable parts and interior surfaces thoroughly. IMPORTANT: This cleaner is ...metal, brushed aluminum or stainless steel and choose the appropriate cleaning method. Unplug refrigerator or disconnect power. Do not use the manufacturer's approved Stainless Steel Cleaner & Polish. 3. Changing the Freezer Light Bulb 1. Dry thoroughly with a soft cloth. Firmly press forward on ...
...from the back. NOTE: You may damage the light cover. 5. If you can scratch or damage materials. Unplug the refrigerator or disconnect power. 2. Hand wash, rinse, and dry removable parts and interior surfaces thoroughly. IMPORTANT: This cleaner is ...metal, brushed aluminum or stainless steel and choose the appropriate cleaning method. Unplug refrigerator or disconnect power. Do not use the manufacturer's approved Stainless Steel Cleaner & Polish. 3. Changing the Freezer Light Bulb 1. Dry thoroughly with a soft cloth. Firmly press forward on ...

Use and Care Guide
Page 19
...ice bin. This stops odor and mold from the back of it , and dry well. 5. When you get in the freezer for the move . 8. If you are moving your refrigerator has an automatic ice maker: s Raise wire shutoff arm to OFF (up ) position. 2. Moving When you see that ... all frozen food in the leveling legs so they don't shift and rattle during the move . 1. A freezer full of meat stays cold longer than a partially filled one of the refrigerator. Depending on your refrigerator has an automatic ice maker: s Turn off . Vacation and Moving Care Vacations If You Choose to 4 ...
...ice bin. This stops odor and mold from the back of it , and dry well. 5. When you get in the freezer for the move . 8. If you are moving your refrigerator has an automatic ice maker: s Raise wire shutoff arm to OFF (up ) position. 2. Moving When you see that ... all frozen food in the leveling legs so they don't shift and rattle during the move . 1. A freezer full of meat stays cold longer than a partially filled one of the refrigerator. Depending on your refrigerator has an automatic ice maker: s Turn off . Vacation and Moving Care Vacations If You Choose to 4 ...

Use and Care Guide
Page 24
...or installation date for product service in accordance with electrical or plumbing codes, or use of products not approved by calling Whirlpool. Those consumable parts are excluded from warranty coverage. 3. The removal and reinstallation of your appliance if it . THIS WARRANTY... house fuses or to correct house wiring or plumbing. 2. Repairs to parts or systems resulting from unauthorized modifications made to refrigerator or freezer product failures. 6. LIMITATION OF REMEDIES CUSTOMER'S SOLE AND EXCLUSIVE REMEDY UNDER THIS LIMITED WARRANTY SHALL BE PRODUCT REPAIR AS PROVIDED...
...or installation date for product service in accordance with electrical or plumbing codes, or use of products not approved by calling Whirlpool. Those consumable parts are excluded from warranty coverage. 3. The removal and reinstallation of your appliance if it . THIS WARRANTY... house fuses or to correct house wiring or plumbing. 2. Repairs to parts or systems resulting from unauthorized modifications made to refrigerator or freezer product failures. 6. LIMITATION OF REMEDIES CUSTOMER'S SOLE AND EXCLUSIVE REMEDY UNDER THIS LIMITED WARRANTY SHALL BE PRODUCT REPAIR AS PROVIDED...


