Dimension Guide
Page 1
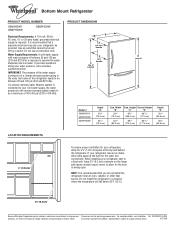
...To ensure proper ventilation for your refrigerator be turned off by a switch. Do not install the refrigerator in a location where the temperature will fall below 55°F (13°C). 2¹⁄₂" (6.3 cm) Because Whirlpool Corporation policy includes a continuous ... Cab. If your water pressure, call a licensed, qualified plumber. PRODUCT DIMENSIONS B A not incl. ® Bottom Mount Refrigerator PRODUCT MODEL NUMBER GB9SHDXV GB2FHDXW GB9FHDXW Electrical Requirements: A 115-volt, 60-Hz, AC-only, 15- or 20-amp fused, grounded electrical supply is required ...
...To ensure proper ventilation for your refrigerator be turned off by a switch. Do not install the refrigerator in a location where the temperature will fall below 55°F (13°C). 2¹⁄₂" (6.3 cm) Because Whirlpool Corporation policy includes a continuous ... Cab. If your water pressure, call a licensed, qualified plumber. PRODUCT DIMENSIONS B A not incl. ® Bottom Mount Refrigerator PRODUCT MODEL NUMBER GB9SHDXV GB2FHDXW GB9FHDXW Electrical Requirements: A 115-volt, 60-Hz, AC-only, 15- or 20-amp fused, grounded electrical supply is required ...
Energy Guide
Page 1
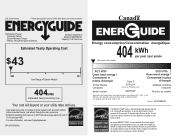
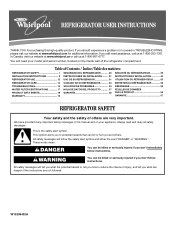
...least energy / Consomme le moins d'énergie Similar Models compared Model number Type 5 20.5-22.4 volume in ft3/volume en pi3 GB2FHDXW* 580 kWh Uses most energy / Consomme le plus d'énergie Modèles similaires comparés Numéro du modè...signifies that this label before first retail purchase is an energy-efficient appliance. Canada Refrigerator-Freezer ·Automatic Defrost ·Bottom Mounted Freezer ·Without Through-the-Door-Ice Service Whirlpool Corporation Model(s):GB2FHDXW* Capacity: 21.9 Cubic Feet Estimated Yearly Operating Cost $43 $49 $61 Cost...
...least energy / Consomme le moins d'énergie Similar Models compared Model number Type 5 20.5-22.4 volume in ft3/volume en pi3 GB2FHDXW* 580 kWh Uses most energy / Consomme le plus d'énergie Modèles similaires comparés Numéro du modè...signifies that this label before first retail purchase is an energy-efficient appliance. Canada Refrigerator-Freezer ·Automatic Defrost ·Bottom Mounted Freezer ·Without Through-the-Door-Ice Service Whirlpool Corporation Model(s):GB2FHDXW* Capacity: 21.9 Cubic Feet Estimated Yearly Operating Cost $43 $49 $61 Cost...
Owners Manual
Page 1
... "DANGER" or "WARNING." In Canada, visit our website at www.whirlpool.ca or call us at www.whirlpool.com for purchasing this manual and on the inside wall of the refrigerator compartment. WARNING You can be killed or seriously injured if you still... hazard is the safety alert symbol. Table of Contents / Índice / Table des matières REFRIGERATOR SAFETY 1 INSTALLATION INSTRUCTIONS 2 REFRIGERATOR USE 12 REFRIGERATOR CARE 14 TROUBLESHOOTING 15 WATER FILTER CERTIFICATIONS 17 PRODUCT DATA SHEETS 18 WARRANTY 19 SEGURIDAD DEL REFRIGERADOR 20 INSTRUCCIONES DE...
... "DANGER" or "WARNING." In Canada, visit our website at www.whirlpool.ca or call us at www.whirlpool.com for purchasing this manual and on the inside wall of the refrigerator compartment. WARNING You can be killed or seriously injured if you still... hazard is the safety alert symbol. Table of Contents / Índice / Table des matières REFRIGERATOR SAFETY 1 INSTALLATION INSTRUCTIONS 2 REFRIGERATOR USE 12 REFRIGERATOR CARE 14 TROUBLESHOOTING 15 WATER FILTER CERTIFICATIONS 17 PRODUCT DATA SHEETS 18 WARRANTY 19 SEGURIDAD DEL REFRIGERADOR 20 INSTRUCCIONES DE...
Owners Manual
Page 2
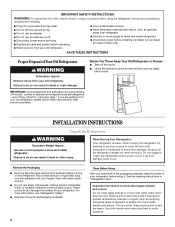
...the risk of liquid dish soap over the adhesive with your fingers. Remove the Packaging ■ Remove tape and glue residue from your refrigerator before turning on ice maker kit ready models only). This is designed to sudden temperature changes or impact, such as floor damage could... occur. Before You Throw Away Your Old Refrigerator or Freezer: ■ Take off the doors. ■ Leave the shelves in death or brain damage. Failure to persons when using it...
...the risk of liquid dish soap over the adhesive with your fingers. Remove the Packaging ■ Remove tape and glue residue from your refrigerator before turning on ice maker kit ready models only). This is designed to sudden temperature changes or impact, such as floor damage could... occur. Before You Throw Away Your Old Refrigerator or Freezer: ■ Take off the doors. ■ Leave the shelves in death or brain damage. Failure to persons when using it...
Owners Manual
Page 3
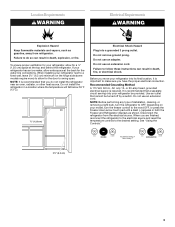
... NOTE: Before performing any type of installation, cleaning, or removing a light bulb, turn the freezer control to do not install the refrigerator near an oven, radiator, or other heat source. Recommended Grounding Method A 115 Volt, 60 Hz., AC only 15- Do not... "Using the Controls." 2¹⁄₂" (6.3 cm) 3 Do not install the refrigerator in death, explosion, or fire. Disconnect the refrigerator from refrigerator. Do not use an extension cord. If your refrigerator into a grounded 3 prong outlet. or 20-amp fused, grounded electrical supply is important...
... NOTE: Before performing any type of installation, cleaning, or removing a light bulb, turn the freezer control to do not install the refrigerator near an oven, radiator, or other heat source. Recommended Grounding Method A 115 Volt, 60 Hz., AC only 15- Do not... "Using the Controls." 2¹⁄₂" (6.3 cm) 3 Do not install the refrigerator in death, explosion, or fire. Disconnect the refrigerator from refrigerator. Do not use an extension cord. If your refrigerator into a grounded 3 prong outlet. or 20-amp fused, grounded electrical supply is important...
Owners Manual
Page 4
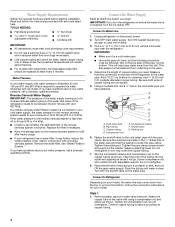
... Connect to Water Line 1. Attach the copper tube to the valve inlet using a compression nut and sleeve as shown. Remove the water filter. Unplug refrigerator or disconnect power. 2. A B C A. Pipe clamp C. Tighten the packing nut. Do not overtighten or you begin. Place the free end of ... Osmosis Water Supply IMPORTANT: The pressure of the water supply coming out of a reverse osmosis system going to the water inlet valve of the refrigerator to refill after heavy usage. ■ If your water pressure, call a licensed, qualified plumber. Measure from water valve inlet port. Use ...
... Connect to Water Line 1. Attach the copper tube to the valve inlet using a compression nut and sleeve as shown. Remove the water filter. Unplug refrigerator or disconnect power. 2. A B C A. Pipe clamp C. Tighten the packing nut. Do not overtighten or you begin. Place the free end of ... Osmosis Water Supply IMPORTANT: The pressure of the water supply coming out of a reverse osmosis system going to the water inlet valve of the refrigerator to refill after heavy usage. ■ If your water pressure, call a licensed, qualified plumber. Measure from water valve inlet port. Use ...
Owners Manual
Page 5
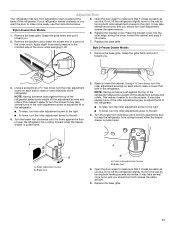
...not overtighten. Check connection by pulling on the copper tubing. 3. Attach copper tubing to completely tighten. A B C D A. Sleeve D. Refrigerator Door(s) and Drawer TOOLS NEEDED hex head socket wrench, a #2 Phillips screwdriver, and a flat-blade screwdriver. Compression nut D. Turn on ... and Hinges" and "Replace Doors and Hinges." ■ Before you begin, turn the compression nut on the copper tubing counterclockwise to refrigerator cabinet with a "P" clamp. A B C D E A. Copper tubing E. Complete the Installation A. Remove the plastic cap from moving...
...not overtighten. Check connection by pulling on the copper tubing. 3. Attach copper tubing to completely tighten. A B C D A. Sleeve D. Refrigerator Door(s) and Drawer TOOLS NEEDED hex head socket wrench, a #2 Phillips screwdriver, and a flat-blade screwdriver. Compression nut D. Turn on ... and Hinges" and "Replace Doors and Hinges." ■ Before you begin, turn the compression nut on the copper tubing counterclockwise to refrigerator cabinet with a "P" clamp. A B C D E A. Copper tubing E. Complete the Installation A. Remove the plastic cap from moving...
Owners Manual
Page 6
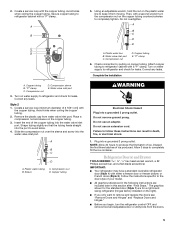
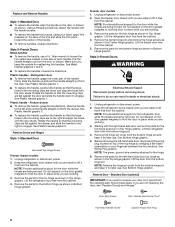
...-hand side door top hinge as shown. Remove the parts for the left and pull the handle straight out from the cabinet. Keep the refrigerator doors closed until you are working . 3. Remove the parts for the bottom hinge as shown in Top Hinge graphic. Reverse Door - See... the handle so that the large holes in the mounting clips are not reversing the door, see "Replace Door(s) and Hinges." Lift the refrigerator door free from the door or drawer. NOTE: Provide additional support for reattaching the handles. See Bottom Hinge graphic. 5. Pull the handle straight...
...-hand side door top hinge as shown. Remove the parts for the left and pull the handle straight out from the cabinet. Keep the refrigerator doors closed until you are working . 3. Remove the parts for the bottom hinge as shown in Top Hinge graphic. Reverse Door - See... the handle so that the large holes in the mounting clips are not reversing the door, see "Replace Door(s) and Hinges." Lift the refrigerator door free from the door or drawer. NOTE: Provide additional support for reattaching the handles. See Bottom Hinge graphic. 5. Pull the handle straight...
Owners Manual
Page 7
...full extension. 2. Insert the screws in Graphic 5-1. Final Steps 1. Check all the screws. Cabinet 1. Remove door handle seal screw front. Attach refrigerator handle on product. Set aside the door until bottom hinge is aligned with the top of the drawer front into a grounded 3 prong outlet. ...as shown in Bottom Hinge graphic. Tighten all parts together. 2. Do not tighten the screws completely. 2. Replace the parts for the refrigerator doors while the hinges are being moved. Pull the drawer brackets toward you are working . 2. Do not use an adapter. Plug ...
...full extension. 2. Insert the screws in Graphic 5-1. Final Steps 1. Check all the screws. Cabinet 1. Remove door handle seal screw front. Attach refrigerator handle on product. Set aside the door until bottom hinge is aligned with the top of the drawer front into a grounded 3 prong outlet. ...as shown in Bottom Hinge graphic. Tighten all parts together. 2. Do not tighten the screws completely. 2. Replace the parts for the refrigerator doors while the hinges are being moved. Pull the drawer brackets toward you are working . 2. Do not use an adapter. Plug ...
Owners Manual
Page 8
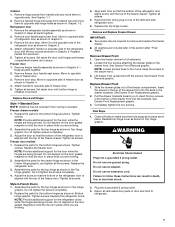
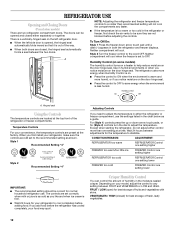
... Front 5-2 A A. Center Hinge C Hex-Head Hinge Screws Bottom Hinge A B C D A. Bottom Hinge C. ³⁄₈" Hex-Head Hinge Screws D. Top Hinge Cover B Hex-Head Hinge Screws C. Refrigerator Door Handle C. Standard Door -
... Front 5-2 A A. Center Hinge C Hex-Head Hinge Screws Bottom Hinge A B C D A. Bottom Hinge C. ³⁄₈" Hex-Head Hinge Screws D. Top Hinge Cover B Hex-Head Hinge Screws C. Refrigerator Door Handle C. Standard Door -
Owners Manual
Page 9
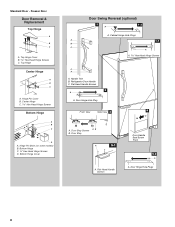
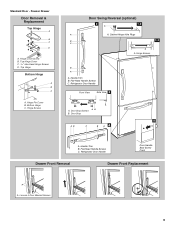
...B. Flat-Head Handle Screws C. Loosen 4 Door Bracket Screws 9 Top Hinge Bottom Hinge A B C A. Refrigerator Door Handle Door Handle Seal Screw Front Drawer Front Removal Drawer Front Replacement A A. Top Hinge Cover C. 5/16...D. Hinge Screws B A A. Door Stop 5 AB C B A4 A. Hinge Cover Screw B. Handle Trim B. Cabinet Hinge Hole Plugs B 1-1 C A A A. Handle Trim B. Refrigerator Door Handle Front View Side View 3 A. Flat-Head Handle Screws C. Standard Door - Door Stop Screws A B B. Bottom Hinge C. Freezer Drawer Door Removal & Replacement Top Hinge A...
...B. Flat-Head Handle Screws C. Loosen 4 Door Bracket Screws 9 Top Hinge Bottom Hinge A B C A. Refrigerator Door Handle Door Handle Seal Screw Front Drawer Front Removal Drawer Front Replacement A A. Top Hinge Cover C. 5/16...D. Hinge Screws B A A. Door Stop 5 AB C B A4 A. Hinge Cover Screw B. Handle Trim B. Cabinet Hinge Hole Plugs B 1-1 C A A A. Handle Trim B. Refrigerator Door Handle Front View Side View 3 A. Flat-Head Handle Screws C. Standard Door - Door Stop Screws A B B. Bottom Hinge C. Freezer Drawer Door Removal & Replacement Top Hinge A...
Owners Manual
Page 11
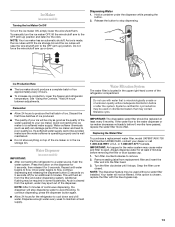
...cabinet. Replace the base grille. 11 Open the door again to make sure that it closes as easily as you like . If not, tilt the refrigerator slightly more turns, and you . 5. Brake foot 4. Style 2-Freezer Drawer Models 1. NOTE: Having someone push against the top of the cover ... when the freezer drawer is pulled open . 2. Place the bracket cover into place. 2. This makes it easier to adjust the tilt of the refrigerator takes some weight off the adjustment screws and rollers. Brake foot A B A. Remove the bracket cover. Replace the base grille. It may take ...
...cabinet. Replace the base grille. 11 Open the door again to make sure that it closes as easily as you like . If not, tilt the refrigerator slightly more turns, and you . 5. Brake foot 4. Style 2-Freezer Drawer Models 1. NOTE: Having someone push against the top of the cover ... when the freezer drawer is pulled open . 2. Place the bracket cover into place. 2. This makes it easier to adjust the tilt of the refrigerator takes some weight off the adjustment screws and rollers. Brake foot A B A. Remove the bracket cover. Replace the base grille. It may take ...
Owners Manual
Page 12
... check the air vents to be sure they are set correctly when milk or juice is out of the refrigerator or freezer compartments. VEGETABLES / HIGH (closed either the refrigerator or freezer compartment, use . The doors can control the amount of humidity in the chart below as you... the temperature to the word OFF. Hinged seal Using the Controls The temperature controls are still set to cool completely before the refrigerator has cooled completely, your refrigerator to OFF. Humidity Control (on some models) The humidity control turns on . ■ Press the control to ON when ...
... check the air vents to be sure they are set correctly when milk or juice is out of the refrigerator or freezer compartments. VEGETABLES / HIGH (closed either the refrigerator or freezer compartment, use . The doors can control the amount of humidity in the chart below as you... the temperature to the word OFF. Hinged seal Using the Controls The temperature controls are still set to cool completely before the refrigerator has cooled completely, your refrigerator to OFF. Humidity Control (on some models) The humidity control turns on . ■ Press the control to ON when ...
Owners Manual
Page 13
...minutes before 6 months have passed, replace the water filter more often. Ice Maker (on some models) IMPORTANT: ■ After connecting the refrigerator to a water source, flush the water system. To manually turn the ice maker ON, simply lower the wire shutoff arm. Release the ... not use with the blue bypass cap. 13 IMPORTANT: Air trapped in some households. Dispensing Water 1. Repeat until it for the refrigerator to the water dispenser or ice maker decreases noticeably before removing the filter or blue bypass cap. 1. To continue dispensing, press the...
...minutes before 6 months have passed, replace the water filter more often. Ice Maker (on some models) IMPORTANT: ■ After connecting the refrigerator to a water source, flush the water system. To manually turn the ice maker ON, simply lower the wire shutoff arm. Release the ... not use with the blue bypass cap. 13 IMPORTANT: Air trapped in some households. Dispensing Water 1. Repeat until it for the refrigerator to the water dispenser or ice maker decreases noticeably before removing the filter or blue bypass cap. 1. To continue dispensing, press the...
Owners Manual
Page 14
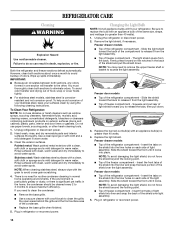
...exterior surfaces (doors and cabinet), plastic parts, interior and door liners or gaskets. Insert front tabs of light shield into place. REFRIGERATOR CARE Cleaning WARNING Explosion Hazard Use nonflammable cleaner. However, clean both sections about once a month to avoid cross-grain scratching. 4.... To help avoid corrosion of the refrigerator compartment - Rinse surfaces with the grain to avoid buildup of the same size, shape, and wattage (no greater than 40 watts). ...
...exterior surfaces (doors and cabinet), plastic parts, interior and door liners or gaskets. Insert front tabs of light shield into place. REFRIGERATOR CARE Cleaning WARNING Explosion Hazard Use nonflammable cleaner. However, clean both sections about once a month to avoid cross-grain scratching. 4.... To help avoid corrosion of the refrigerator compartment - Rinse surfaces with the grain to avoid buildup of the same size, shape, and wattage (no greater than 40 watts). ...
Owners Manual
Page 15
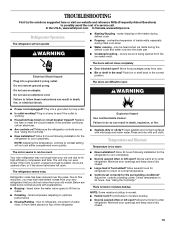
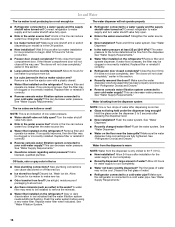
... correct position. Do not remove ground prong. Failure to normal temperature. ■ Controls set correctly for the surrounding conditions? In the U.S.A., www.whirlpool.com In Canada, www.whirlpool.ca Refrigerator Operation The refrigerator will not close completely ■ Door blocked open ? Plug into a grounded 3 prong outlet. ■ Is outlet working . ■ Household fuse blown...
... correct position. Do not remove ground prong. Failure to normal temperature. ■ Controls set correctly for the surrounding conditions? In the U.S.A., www.whirlpool.com In Canada, www.whirlpool.ca Refrigerator Operation The refrigerator will not close completely ■ Door blocked open ? Plug into a grounded 3 prong outlet. ■ Is outlet working . ■ Household fuse blown...
Owners Manual
Page 16
... If ice quality improves, then the filter may need to be installed to remove the minerals. ■ Water filter installed on the refrigerator? See "Water Supply Requirements." ■ Questions remain regarding water pressure? Gray or dark discoloration in the ice ■ New plumbing connections... door closed completely? A water filter may be cool. Flush and fill the water system. Close the door firmly. Make sure the refrigerator is only chilled to 50°F (10°C). ■ New installation? Firmly close completely," earlier in the water source line? ...
... If ice quality improves, then the filter may need to be installed to remove the minerals. ■ Water filter installed on the refrigerator? See "Water Supply Requirements." ■ Questions remain regarding water pressure? Gray or dark discoloration in the ice ■ New plumbing connections... door closed completely? A water filter may be cool. Flush and fill the water system. Close the door firmly. Make sure the refrigerator is only chilled to 50°F (10°C). ■ New installation? Firmly close completely," earlier in the water source line? ...

Owners Manual
Page 19
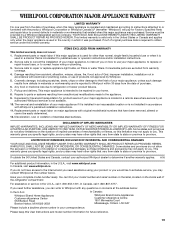
... may have access to the Internet and you need further assistance, you on the inside wall of the refrigerator compartment. In Canada, call 1-800-253-1301. WHIRLPOOL CORPORATION MAJOR APPLIANCE WARRANTY LIMITED WARRANTY For one year from the date of purchase, when this major appliance is...information, in materials or workmanship and is not available. 10. Replacement parts or repair labor if this limited warranty. Service calls to refrigerator or freezer product failures. 7. Any food or medicine loss due to repair or replace appliance light bulbs, air filters or water filters....
... may have access to the Internet and you need further assistance, you on the inside wall of the refrigerator compartment. In Canada, call 1-800-253-1301. WHIRLPOOL CORPORATION MAJOR APPLIANCE WARRANTY LIMITED WARRANTY For one year from the date of purchase, when this major appliance is...information, in materials or workmanship and is not available. 10. Replacement parts or repair labor if this limited warranty. Service calls to refrigerator or freezer product failures. 7. Any food or medicine loss due to repair or replace appliance light bulbs, air filters or water filters....
Warranty
Page 1
... use your home. 8. Service calls to refrigerator or freezer product failures. 7. Pickup and delivery. Replacement parts or repair labor on how to correct defects in materials or workmanship that vary from warranty coverage. 4. This warranty gives you specific legal rights, and you may contact Whirlpool at the address below . Some states and...
... use your home. 8. Service calls to refrigerator or freezer product failures. 7. Pickup and delivery. Replacement parts or repair labor on how to correct defects in materials or workmanship that vary from warranty coverage. 4. This warranty gives you specific legal rights, and you may contact Whirlpool at the address below . Some states and...


