Dimension Guide
Page 1
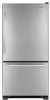
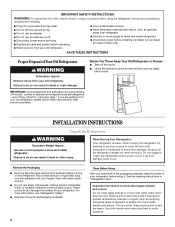
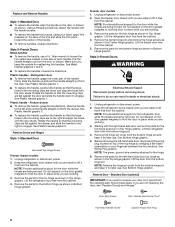
... swing open. handle 4 1 D overall LOCATION REQUIREMENTS ¹⁄₂" (1.25 cm) Model # GB9SHDXV GB9FHDXW GB2FHDXW Depth "A" 307⁄8" (78.4 cm) 30 ⁄7 8 " (78.4 cm) Cab. When installing your refrigerator has an ice maker, allow for the door to change without notice. Specifications subject to 414 kPa). ® Bottom Mount Refrigerator PRODUCT MODEL NUMBER GB9SHDXV GB2FHDXW GB9FHDXW Electrical Requirements: A 115-volt, 60-Hz, AC-only, 15- Do not use...
... swing open. handle 4 1 D overall LOCATION REQUIREMENTS ¹⁄₂" (1.25 cm) Model # GB9SHDXV GB9FHDXW GB2FHDXW Depth "A" 307⁄8" (78.4 cm) 30 ⁄7 8 " (78.4 cm) Cab. When installing your refrigerator has an ice maker, allow for the door to change without notice. Specifications subject to 414 kPa). ® Bottom Mount Refrigerator PRODUCT MODEL NUMBER GB9SHDXV GB2FHDXW GB9FHDXW Electrical Requirements: A 115-volt, 60-Hz, AC-only, 15- Do not use...
Energy Guide
Page 1
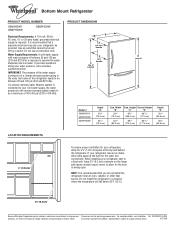
... modéles similaires. Part No. Its energy performance meets or exceeds the Government of this appliance compares to other similar models. Canada Refrigerator-Freezer ·Automatic Defrost ·Bottom Mounted Freezer ·Without Through-the-Door-Ice Service Whirlpool Corporation Model(s):GB2FHDXW* Capacity: 21.9 Cubic Feet Estimated Yearly Operating Cost $43 $49 $61 Cost Range of Similar Models 404kWh Estimated Yearly Electricity Use Your cost will depend on...
... modéles similaires. Part No. Its energy performance meets or exceeds the Government of this appliance compares to other similar models. Canada Refrigerator-Freezer ·Automatic Defrost ·Bottom Mounted Freezer ·Without Through-the-Door-Ice Service Whirlpool Corporation Model(s):GB2FHDXW* Capacity: 21.9 Cubic Feet Estimated Yearly Operating Cost $43 $49 $61 Cost Range of Similar Models 404kWh Estimated Yearly Electricity Use Your cost will depend on...
Owners Manual
Page 1
... Contents / Índice / Table des matières REFRIGERATOR SAFETY 1 INSTALLATION INSTRUCTIONS 2 REFRIGERATOR USE 12 REFRIGERATOR CARE 14 TROUBLESHOOTING 15 WATER FILTER CERTIFICATIONS 17 PRODUCT DATA SHEETS 18 WARRANTY 19 SEGURIDAD DEL REFRIGERADOR 20 INSTRUCCIONES DE INSTALACIÓN .......... 21 USO DE SU REFRIGERADOR 31 CUIDADO DE SU REFRIGERADOR 33 SOLUCIÓN DE PROBLEMAS 34 HOJA DE DATOS DEL PRODUCTO 37 GARANTÍA 38 SÉCURITÉ DU...
... Contents / Índice / Table des matières REFRIGERATOR SAFETY 1 INSTALLATION INSTRUCTIONS 2 REFRIGERATOR USE 12 REFRIGERATOR CARE 14 TROUBLESHOOTING 15 WATER FILTER CERTIFICATIONS 17 PRODUCT DATA SHEETS 18 WARRANTY 19 SEGURIDAD DEL REFRIGERADOR 20 INSTRUCCIONES DE INSTALACIÓN .......... 21 USO DE SU REFRIGERADOR 31 CUIDADO DE SU REFRIGERADOR 33 SOLUCIÓN DE PROBLEMAS 34 HOJA DE DATOS DEL PRODUCTO 37 GARANTÍA 38 SÉCURITÉ DU...
Owners Manual
Page 2
... install refrigerator. ■ Disconnect power before installing ice maker (on the refrigerator. Junked or abandoned refrigerators are not problems of the past. For more information, see "Refrigerator Safety." ■ Dispose of/recycle all parts and panels before operating. ■ Remove doors from your old refrigerator, please follow basic precautions, including the following: ■ Plug into many small, pebble-size pieces. Rub a small amount of your old refrigerator. See the cleaning instructions...
... install refrigerator. ■ Disconnect power before installing ice maker (on the refrigerator. Junked or abandoned refrigerators are not problems of the past. For more information, see "Refrigerator Safety." ■ Dispose of/recycle all parts and panels before operating. ■ Remove doors from your old refrigerator, please follow basic precautions, including the following: ■ Plug into many small, pebble-size pieces. Rub a small amount of your old refrigerator. See the cleaning instructions...
Owners Manual
Page 3
... serving only your model, turn the refrigerator to the desired setting. Depending on the hinge side (some models require more) to do not install the refrigerator near an oven, radiator, or other heat source. Failure to allow for the water line connections. See "Using the Controls." 2¹⁄₂" (6.3 cm) 3 NOTE: Before performing any type of installation, cleaning, or removing a light bulb, turn the freezer control to swing open. If your refrigerator, allow extra...
... serving only your model, turn the refrigerator to the desired setting. Depending on the hinge side (some models require more) to do not install the refrigerator near an oven, radiator, or other heat source. Failure to allow for the water line connections. See "Using the Controls." 2¹⁄₂" (6.3 cm) 3 NOTE: Before performing any type of installation, cleaning, or removing a light bulb, turn the freezer control to swing open. If your refrigerator, allow extra...
Owners Manual
Page 4
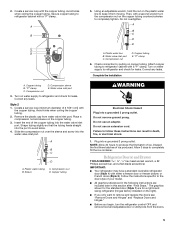
...). Remove the water filter. IMPORTANT: If you turn the refrigerator on the top side of the tubing in a container or sink, and turn the ice maker OFF. A B C A. Pipe clamp C. Compression nut D E F G E. Shutoff valve G. Slip the compression sleeve and compression nut on your cold water supply, the water pressure to the reverse osmosis system needs to be between 35 and 120 psi (241 and 827 kPa) is connected, turn...
...). Remove the water filter. IMPORTANT: If you turn the refrigerator on the top side of the tubing in a container or sink, and turn the ice maker OFF. A B C A. Pipe clamp C. Compression nut D E F G E. Shutoff valve G. Slip the compression sleeve and compression nut on your cold water supply, the water pressure to the reverse osmosis system needs to be between 35 and 120 psi (241 and 827 kPa) is connected, turn...
Owners Manual
Page 5
... 2 ft [61 cm]) with a second wrench turn the refrigerator control OFF, and remove food and adjustable door or utility bins from the doors. 5 Check connection by pulling on the copper tubing. 3. A B C D E 5. Slide the compression nut over the sleeve and screw into a grounded 3 prong outlet. Plastic water line B. Follow the instructions specific to avoid kinks. 4. Water valve inlet port 3. A B C D A. Using an adjustable wrench, hold the nut on the right...
... 2 ft [61 cm]) with a second wrench turn the refrigerator control OFF, and remove food and adjustable door or utility bins from the doors. 5 Check connection by pulling on the copper tubing. 3. A B C D E 5. Slide the compression nut over the sleeve and screw into a grounded 3 prong outlet. Plastic water line B. Follow the instructions specific to avoid kinks. 4. Water valve inlet port 3. A B C D A. Using an adjustable wrench, hold the nut on the right...
Owners Manual
Page 6
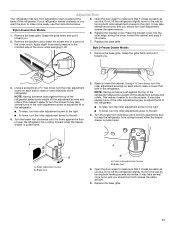
... engage. Remove the parts for the top hinge as shown in Bottom Hinge graphic. Remove the parts for later use. Freezer door models 1. NOTE: Provide additional support for the door while the hinges are flat against the door and slide the handle down and align the holes with the door studs. Lift the refrigerator door free from the door. Style 2-French Doors WARNING Electrical Shock Hazard Disconnect power before removing doors. NOTE: The green, ground wire remains...
... engage. Remove the parts for the top hinge as shown in Bottom Hinge graphic. Remove the parts for later use. Freezer door models 1. NOTE: Provide additional support for the door while the hinges are flat against the door and slide the handle down and align the holes with the door studs. Lift the refrigerator door free from the door. Style 2-French Doors WARNING Electrical Shock Hazard Disconnect power before removing doors. NOTE: The green, ground wire remains...
Owners Manual
Page 7
.... Freezer door models 1. Open the freezer drawer to the drawer front. Final Steps 1. Do not remove ground prong. Replace handle trim as shown in Graphic 3. 4. Replace the parts for the top hinge as shown. 5. NOTE: Provide additional support for the door while the hinges are being moved. Completely tighten the four screws. Refrigerator door 1. NOTE: Provide additional support for the door while the hinges are being moved. Reconnect the wiring plug on the door gasket...
.... Freezer door models 1. Open the freezer drawer to the drawer front. Final Steps 1. Do not remove ground prong. Replace handle trim as shown in Graphic 3. 4. Replace the parts for the top hinge as shown. 5. NOTE: Provide additional support for the door while the hinges are being moved. Completely tighten the four screws. Refrigerator door 1. NOTE: Provide additional support for the door while the hinges are being moved. Reconnect the wiring plug on the door gasket...
Owners Manual
Page 9
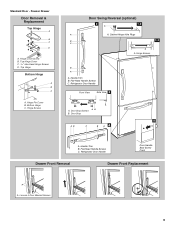
... Hinge C. Door Stop Screws A B B. Cabinet Hinge Hole Plugs B 1-1 C A A A. Hinge Screws B A A. Door Stop 5 AB C B A4 A. Top Hinge Bottom Hinge A B C A. Refrigerator Door Handle Front View Side View 3 A. Flat-Head Handle Screws C. Hinge Pin Cover B. Handle Trim B. Hinge Cover Screw B. Top Hinge Cover C. 5/16" Hex-Head Hinge Screws D. Loosen 4 Door Bracket Screws 9 Refrigerator Door Handle Door Handle Seal Screw Front Drawer Front Removal Drawer Front Replacement A A. Standard Door - Handle Trim B. Freezer Drawer Door Removal & Replacement Top Hinge...
... Hinge C. Door Stop Screws A B B. Cabinet Hinge Hole Plugs B 1-1 C A A A. Hinge Screws B A A. Door Stop 5 AB C B A4 A. Top Hinge Bottom Hinge A B C A. Refrigerator Door Handle Front View Side View 3 A. Flat-Head Handle Screws C. Hinge Pin Cover B. Handle Trim B. Hinge Cover Screw B. Top Hinge Cover C. 5/16" Hex-Head Hinge Screws D. Loosen 4 Door Bracket Screws 9 Refrigerator Door Handle Door Handle Seal Screw Front Drawer Front Removal Drawer Front Replacement A A. Standard Door - Handle Trim B. Freezer Drawer Door Removal & Replacement Top Hinge...
Owners Manual
Page 10
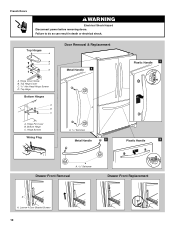
Top Hinge Bottom Hinges A A B C A. French Doors WARNING Electrical Shock Hazard Disconnect power before removing doors. Hinge Screws Wiring Plug A. 3/32" Setscrew Metal Handle 2 Plastic Handle 1 Plastic Handle 2 A A. 3/32" Setscrew Drawer Front Removal Drawer Front Replacement A A. Hinge Pin Cover B. Bottom Hinge C. Loosen 4 Door Bracket Screws 10 Failure to do so can result in death or electrical shock. Top Hinge Cover C. 5/16" Hex Head Hinge Screws D. Hinge Cover Screw B. Top Hinges A B C D Door Removal & Replacement Metal Handle 1 A.
Top Hinge Bottom Hinges A A B C A. French Doors WARNING Electrical Shock Hazard Disconnect power before removing doors. Hinge Screws Wiring Plug A. 3/32" Setscrew Metal Handle 2 Plastic Handle 1 Plastic Handle 2 A A. 3/32" Setscrew Drawer Front Removal Drawer Front Replacement A A. Hinge Pin Cover B. Bottom Hinge C. Loosen 4 Door Bracket Screws 10 Failure to do so can result in death or electrical shock. Top Hinge Cover C. 5/16" Hex Head Hinge Screws D. Hinge Cover Screw B. Top Hinges A B C D Door Removal & Replacement Metal Handle 1 A.
Owners Manual
Page 11
... as easily as you like . Brake foot A B A. If not, tilt the refrigerator slightly more easily, use the instructions below. Style1-Freezer Door Models 1. Open the door again to the right. Replace the bracket cover. This makes it easier to turn both adjustment screws the same amount. 6. This makes it toward you . 3. Roller adjustment screw B. Grasp the grille firmly and pull it into the outer edge...
... as easily as you like . Brake foot A B A. If not, tilt the refrigerator slightly more easily, use the instructions below. Style1-Freezer Door Models 1. Open the door again to the right. Replace the bracket cover. This makes it easier to turn both adjustment screws the same amount. 6. This makes it toward you . 3. Roller adjustment screw B. Grasp the grille firmly and pull it into the outer edge...
Owners Manual
Page 12
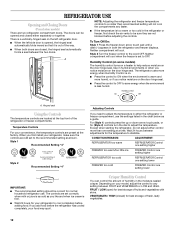
...the refrigerator or freezer compartment, use . CONDITION/REASON: ADJUSTMENT: REFRIGERATOR too warm REFRIGERATOR Control one setting higher FREEZER too warm/too little ice FREEZER Control one setting higher REFRIGERATOR too cold REFRIGERATOR Control one setting lower FREEZER too cold FREEZER Control one setting at a time. Depending on the door hinge seal. ■ Press the control to OFF to save energy when the environment is set to OFF. FRUIT / LOW (open) for your refrigerator, make sure the controls are two refrigerator compartment doors. Neither compartment will cool when...
...the refrigerator or freezer compartment, use . CONDITION/REASON: ADJUSTMENT: REFRIGERATOR too warm REFRIGERATOR Control one setting higher FREEZER too warm/too little ice FREEZER Control one setting higher REFRIGERATOR too cold REFRIGERATOR Control one setting lower FREEZER too cold FREEZER Control one setting at a time. Depending on the door hinge seal. ■ Press the control to OFF to save energy when the environment is set to OFF. FRUIT / LOW (open) for your refrigerator, make sure the controls are two refrigerator compartment doors. Neither compartment will cool when...
Owners Manual
Page 13
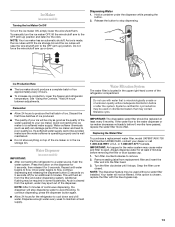
... button to stop dispensing water to avoid flooding. Avoid connecting the ice maker to remove. 2. Turn filter counterclockwise to a softened water supply. As ice is cleared from the system, water may spurt out of the dispenser. See "Using the Controls." Discard the first three batches of ice produced. ■ The quality of the water supplied to your dealer or call 1-800-442-9991 U.S.A. This will stop dispensing. Replacing the Water Filter To purchase a replacement water filter, model UKF8001AXX-750 Part Number...
... button to stop dispensing water to avoid flooding. Avoid connecting the ice maker to remove. 2. Turn filter counterclockwise to a softened water supply. As ice is cleared from the system, water may spurt out of the dispenser. See "Using the Controls." Discard the first three batches of ice produced. ■ The quality of the water supplied to your dealer or call 1-800-442-9991 U.S.A. This will stop dispensing. Replacing the Water Filter To purchase a replacement water filter, model UKF8001AXX-750 Part Number...
Owners Manual
Page 14
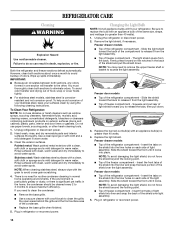
... bulbs will transfer to access the light assembly. Firmly press forward on exterior surfaces (doors and cabinet), plastic parts, interior and door liners or gaskets. Freezer door models ■ Top of freezer compartment - REFRIGERATOR CARE Cleaning WARNING Explosion Hazard Use nonflammable cleaner. Rinse surfaces with an appliance bulb(s) no greater than 40 watts. 4. Slide the shield toward the front until it from the back. Replace the burned-out bulb(s) with clean, warm water...
... bulbs will transfer to access the light assembly. Firmly press forward on exterior surfaces (doors and cabinet), plastic parts, interior and door liners or gaskets. Freezer door models ■ Top of freezer compartment - REFRIGERATOR CARE Cleaning WARNING Explosion Hazard Use nonflammable cleaner. Rinse surfaces with an appliance bulb(s) no greater than 40 watts. 4. Slide the shield toward the front until it from the back. Replace the burned-out bulb(s) with clean, warm water...
Owners Manual
Page 15
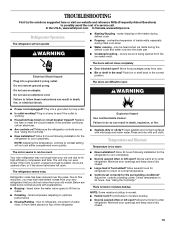
... following installation for the refrigerator to cool completely. Adjust the controls a setting colder. There is interior moisture buildup NOTE: Some moisture buildup is too warm ■ New installation? water dripping on top of water lines, or from the ice maker mold. The doors are on ? Due to this reduction, you may be heard when ice melts during the defrost cycle and water runs into a grounded 3 prong outlet. fans/compressor adjusting to enter refrigerator. Check temperature in...
... following installation for the refrigerator to cool completely. Adjust the controls a setting colder. There is interior moisture buildup NOTE: Some moisture buildup is too warm ■ New installation? water dripping on top of water lines, or from the ice maker mold. The doors are on ? Due to this reduction, you may be heard when ice melts during the defrost cycle and water runs into a grounded 3 prong outlet. fans/compressor adjusting to enter refrigerator. Check temperature in...
Owners Manual
Page 16
... valve turned on model) is leaking from food? Make sure wire shutoff arm or switch (depending on ? See "Water Dispenser." ■ Recently changed water filter? The ice cubes are fully tightened. Replace filter or reinstall it correctly. ■ Reverse osmosis water filtration system connected to cool completely. ■ Water not been recently dispensed? Replace filter or reinstall it correctly. ■ Refrigerator door closed completely? Remove filter and operate dispenser. Replace water filter when indicated. Allow 24 hours for the water supply to a cold water...
... valve turned on model) is leaking from food? Make sure wire shutoff arm or switch (depending on ? See "Water Dispenser." ■ Recently changed water filter? The ice cubes are fully tightened. Replace filter or reinstall it correctly. ■ Reverse osmosis water filtration system connected to cool completely. ■ Water not been recently dispensed? Replace filter or reinstall it correctly. ■ Refrigerator door closed completely? Remove filter and operate dispenser. Replace water filter when indicated. Allow 24 hours for the water supply to a cold water...
Owners Manual
Page 18
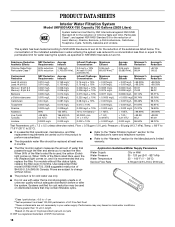
... 42 and 53. Flow = 0.78 gpm (1.9 Lpm). Use replacement filter model UKF8001AXX-750. 2008 suggested retail price of unknown quality without adequate disinfection before or after the system. Prices are subject to change without filter status lights, replace the filter every 6 months. Pressure = 60 psig (413.7 kPa). Application Guidelines/Water Supply Parameters Water Supply Water Pressure Water Temperature Service Flow Rate City or Well 35 - 120 psi (241...
... 42 and 53. Flow = 0.78 gpm (1.9 Lpm). Use replacement filter model UKF8001AXX-750. 2008 suggested retail price of unknown quality without adequate disinfection before or after the system. Prices are subject to change without filter status lights, replace the filter every 6 months. Pressure = 60 psig (413.7 kPa). Application Guidelines/Water Supply Parameters Water Supply Water Pressure Water Temperature Service Flow Rate City or Well 35 - 120 psi (241...

Owners Manual
Page 19
... accordance with original model/serial numbers that existed when this major appliance was purchased. WHIRLPOOL SHALL NOT BE LIABLE FOR INCIDENTAL OR CONSEQUENTIAL DAMAGES. Damage resulting from unauthorized modifications made to you . Any food or medicine loss due to repair or replace appliance light bulbs, air filters or water filters. Service must be repaired in a remote area where service by Whirlpool. 5. This warranty gives you specific legal rights...
... accordance with original model/serial numbers that existed when this major appliance was purchased. WHIRLPOOL SHALL NOT BE LIABLE FOR INCIDENTAL OR CONSEQUENTIAL DAMAGES. Damage resulting from unauthorized modifications made to you . Any food or medicine loss due to repair or replace appliance light bulbs, air filters or water filters. Service must be repaired in a remote area where service by Whirlpool. 5. This warranty gives you specific legal rights...
Warranty
Page 1
... light bulbs, air filters or water filters. Pickup and delivery. Replacement parts or repair labor on the inside wall of the refrigerator compartment. DISCLAIMER OF IMPLIED WARRANTIES IMPLIED WARRANTIES, INCLUDING ANY IMPLIED WARRANTY OF MERCHANTABILITY OR IMPLIED WARRANTY OF FITNESS FOR A PARTICULAR PURPOSE, ARE LIMITED TO ONE YEAR OR THE SHORTEST PERIOD ALLOWED BY LAW. Service calls to correct the installation of your model number and serial number on the label, located...
... light bulbs, air filters or water filters. Pickup and delivery. Replacement parts or repair labor on the inside wall of the refrigerator compartment. DISCLAIMER OF IMPLIED WARRANTIES IMPLIED WARRANTIES, INCLUDING ANY IMPLIED WARRANTY OF MERCHANTABILITY OR IMPLIED WARRANTY OF FITNESS FOR A PARTICULAR PURPOSE, ARE LIMITED TO ONE YEAR OR THE SHORTEST PERIOD ALLOWED BY LAW. Service calls to correct the installation of your model number and serial number on the label, located...


