
Owners Manual
Page 2
...killed or seriously injured if you don't follow instructions. All safety messages will follow instructions. Always read and obey all safety messages. KNOB CONTROLS 8 COOKTOP CONTROLS - COMMANDES À BOUTONS ROTATIFS 24 Élément à double/triple circuit 25 Élément de liaison 26 Élé... ENTRETIEN DE LA TABLE DE CUISSON 29 Nettoyage général 29 DÉPANNAGE 30 ASSISTANCE OU SERVICE 31 Au Canada 31 GARANTIE 31 COOKTOP SAFETY Your safety and the safety of injury, and tell you and others are not followed. 2 This is , tell you how to...
...killed or seriously injured if you don't follow instructions. All safety messages will follow instructions. Always read and obey all safety messages. KNOB CONTROLS 8 COOKTOP CONTROLS - COMMANDES À BOUTONS ROTATIFS 24 Élément à double/triple circuit 25 Élément de liaison 26 Élé... ENTRETIEN DE LA TABLE DE CUISSON 29 Nettoyage général 29 DÉPANNAGE 30 ASSISTANCE OU SERVICE 31 Au Canada 31 GARANTIE 31 COOKTOP SAFETY Your safety and the safety of injury, and tell you and others are not followed. 2 This is , tell you how to...

Owners Manual
Page 3
..., earthenware, or other flammable materials contact surface units or areas near surface units may become hot enough to children in area where cooktop is turned inward, and does not extend over adjacent surface units. ■ Do Not Cook on any part of interest to cause...a qualified technician. ■ Storage on Grease Fires - Boilover causes smoking and greasy spillovers that it is in burns from steam. If cooktop should be seriously injured. ■ Proper Installation - Improper installation of these pans or bowls during cooking may subject wiring or components underneath ...
..., earthenware, or other flammable materials contact surface units or areas near surface units may become hot enough to children in area where cooktop is turned inward, and does not extend over adjacent surface units. ■ Do Not Cook on any part of interest to cause...a qualified technician. ■ Storage on Grease Fires - Boilover causes smoking and greasy spillovers that it is in burns from steam. If cooktop should be seriously injured. ■ Proper Installation - Improper installation of these pans or bowls during cooking may subject wiring or components underneath ...

Owners Manual
Page 4
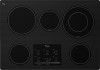
... A. Left front touch control A. Right rear surface cooking area (with dual-size element) E. Model and serial number plate (located underneath cooktop on metal cabinet) Left rear touch control B. ON surface indicator D. Hot surface indicator C. All off (hold 3 seconds) I. Increase/decrease...of the items listed. Increase/decrease temperature touch control J. Left front touch control A H G A. Control lock indicator H. Ceramic glass cooktop B. Control Panels Model G9CE3065 (30" [77.1 cm]), G9CE3074 (30" [77.1 cm]) not shown Touch-Activated Electronic Control Models...
... A. Left front touch control A. Right rear surface cooking area (with dual-size element) E. Model and serial number plate (located underneath cooktop on metal cabinet) Left rear touch control B. ON surface indicator D. Hot surface indicator C. All off (hold 3 seconds) I. Increase/decrease...of the items listed. Increase/decrease temperature touch control J. Left front touch control A H G A. Control lock indicator H. Ceramic glass cooktop B. Control Panels Model G9CE3065 (30" [77.1 cm]), G9CE3074 (30" [77.1 cm]) not shown Touch-Activated Electronic Control Models...

Owners Manual
Page 5
...the surface cooking area(s) is blinking. 4. The power level 1 light next to keep the internal components from over-heating. A. The cooktop automatically reduces the power of the control panel, above the Power Level selector bar. SETTING RECOMMENDED USE High 10 ■ Start food cooking.... ■ Bring liquid to immediately reach the highest setting. For maximum element operation, all cooktop touch controls can be set to High when bringing liquids to turn off . 3. To change the temperature setting while cooking, touch ...
...the surface cooking area(s) is blinking. 4. The power level 1 light next to keep the internal components from over-heating. A. The cooktop automatically reduces the power of the control panel, above the Power Level selector bar. SETTING RECOMMENDED USE High 10 ■ Start food cooking.... ■ Bring liquid to immediately reach the highest setting. For maximum element operation, all cooktop touch controls can be set to High when bringing liquids to turn off . 3. To change the temperature setting while cooking, touch ...

Owners Manual
Page 6
... Element The dual and triple elements offer flexibility depending on the size of food, and home canning. Dual size C. All Off/Lock The ALL OFF cooktop touch control turns off . 3. Single element B. Dual element To Use DUAL and TRIPLE: 1. The lights for 3 seconds. To change the burner...ALL OFF/LOCK to indicate if the burner will glow red, indicating that are recommended for larger cookware, large quantities of the cookware. To Unlock Cooktop: Touch and hold the ALL OFF/LOCK keypad for the selected temperature setting, and all surface cooking areas at the same time. A B ...
... Element The dual and triple elements offer flexibility depending on the size of food, and home canning. Dual size C. All Off/Lock The ALL OFF cooktop touch control turns off . 3. Single element B. Dual element To Use DUAL and TRIPLE: 1. The lights for 3 seconds. To change the burner...ALL OFF/LOCK to indicate if the burner will glow red, indicating that are recommended for larger cookware, large quantities of the cookware. To Unlock Cooktop: Touch and hold the ALL OFF/LOCK keypad for the selected temperature setting, and all surface cooking areas at the same time. A B ...

Owners Manual
Page 7
.... 2. Touch ON keypad for moisture to 45 minutes. When finished cooking, touch OFF to remove cookware. Keep Warm Cover all foods with the cooktop surface. The Keep Warm surface cooking area can result in use plastic wrap to make direct contact with a lid or aluminum foil. Use only ...cookware and dishes recommended for oven and cooktop use , it may deteriorate if food is blinking, touch the desired power level on some models): 1. Use pot holders or oven mitts to...
.... 2. Touch ON keypad for moisture to 45 minutes. When finished cooking, touch OFF to remove cookware. Keep Warm Cover all foods with the cooktop surface. The Keep Warm surface cooking area can result in use plastic wrap to make direct contact with a lid or aluminum foil. Use only ...cookware and dishes recommended for oven and cooktop use , it may deteriorate if food is blinking, touch the desired power level on some models): 1. Use pot holders or oven mitts to...

Owners Manual
Page 8
... rear control knob (keep warm element) C. ACCUSIMMER® control knob Model G7CE 3655 (36" [91.4 cm]) shown B C D E. Cooktop on metal cabinet) Left rear single surface cooking area C. Control panel E G. Hot surface indicator light H. Right rear control knob (with triple...surface cooking area (with triple-size element) D. Model and serial number plate (located underneath cooktop on indicator light H. KNOB CONTROLS This manual covers different models. The cooktop you have purchased may not match those of the items listed. Control Panels Model G7CE3055 (30...
... rear control knob (keep warm element) C. ACCUSIMMER® control knob Model G7CE 3655 (36" [91.4 cm]) shown B C D E. Cooktop on metal cabinet) Left rear single surface cooking area C. Control panel E G. Hot surface indicator light H. Right rear control knob (with triple...surface cooking area (with triple-size element) D. Model and serial number plate (located underneath cooktop on indicator light H. KNOB CONTROLS This manual covers different models. The cooktop you have purchased may not match those of the items listed. Control Panels Model G7CE3055 (30...

Owners Manual
Page 9
..., even after the surface cooking area(s) is in and turn knob to a boil. Triple size A B A. Push in use, the entire cooktop area may become hot. 9 Dual/Triple-Circuit Element (on some models) The dual-size and triple-size elements offer flexibility depending on Standard Control...Low ■ Stew or steam food. ■ Simmer. Medium High ■ Hold a rapid boil. ■ Quickly brown or sear food. Power Light Each cooktop has a Power On light. Single size B. Fire Hazard Turn off . Use the following chart as a regular element. Low ■ Keep food warm. ■...
..., even after the surface cooking area(s) is in and turn knob to a boil. Triple size A B A. Push in use, the entire cooktop area may become hot. 9 Dual/Triple-Circuit Element (on some models) The dual-size and triple-size elements offer flexibility depending on Standard Control...Low ■ Stew or steam food. ■ Simmer. Medium High ■ Hold a rapid boil. ■ Quickly brown or sear food. Power Light Each cooktop has a Power On light. Single size B. Fire Hazard Turn off . Use the following chart as a regular element. Low ■ Keep food warm. ■...

Owners Manual
Page 10
... zone anywhere between Low and High. 2. Push in and turn Warm Zone knob to touch. ■ Use only cookware and dishes recommended for oven and cooktop use it will not glow red like the cooking zones, but the indicator light will glow on some models) The bridge element allows flexibility in...
... zone anywhere between Low and High. 2. Push in and turn Warm Zone knob to touch. ■ Use only cookware and dishes recommended for oven and cooktop use it will not glow red like the cooking zones, but the indicator light will glow on some models) The bridge element allows flexibility in...

Owners Manual
Page 11
...® feature setting is an adjustable heat setting for the surface of the entire cooktop. ■ To avoid damage to the cooktop, do not slide cookware or bakeware across the cooktop. Cooktop cleaner and a cooktop scraper are recommended. Then, while wearing oven mitts, remove the spills using lids.... Aluminum or copper bottoms and rough finishes on cookware or bakeware could crack the cooktop. ■ To avoid damage to achieve desired simmer. (See "Dual/TripleCircuit Element" section.) 3. When the ACCUSIMMER control knob is ...
...® feature setting is an adjustable heat setting for the surface of the entire cooktop. ■ To avoid damage to the cooktop, do not slide cookware or bakeware across the cooktop. Cooktop cleaner and a cooktop scraper are recommended. Then, while wearing oven mitts, remove the spills using lids.... Aluminum or copper bottoms and rough finishes on cookware or bakeware could crack the cooktop. ■ To avoid damage to achieve desired simmer. (See "Dual/TripleCircuit Element" section.) 3. When the ACCUSIMMER control knob is ...

Owners Manual
Page 12
...between batches. If a kit is recommended. Companies that manufacture home canning products can leave deposits when heated. ■ To avoid damage to the cooktop, do not cook foods directly on low to -heavy thickness. Ceramic or Ceramic glass ■ Follow manufacturer's instructions. ■ Heats slowly, but...burners between it and the cookware. ■ Cookware designed with slightly indented bottoms or small expansion channels can leave permanent marks on the cooktop or grates. Use the following chart as a base they can be used areas to order. ■ For more than ½" ...
...between batches. If a kit is recommended. Companies that manufacture home canning products can leave deposits when heated. ■ To avoid damage to the cooktop, do not cook foods directly on low to -heavy thickness. Ceramic or Ceramic glass ■ Follow manufacturer's instructions. ■ Heats slowly, but...burners between it and the cookware. ■ Cookware designed with slightly indented bottoms or small expansion channels can leave permanent marks on the cooktop or grates. Use the following chart as a base they can be used areas to order. ■ For more than ½" ...

Owners Manual
Page 13
... a damp paper towel or soft cloth. Always follow label instructions on surface and scrape. Cleaning Method: Rub in the Off position. Cooktop Scraper Part Number 3183488 is recommended for regular use steel wool, abrasive powder cleansers, chlorine bleach, rust remover or ammonia. Light to...The marks will not totally disappear but after many cleanings become less noticeable. Do not use soap-filled scouring pads, abrasive cleaners, Cooktop Polishing Creme, steel-wool pads, gritty washcloths or some models) To avoid damage to moderate soil ■ Liquid detergent or all ...
... a damp paper towel or soft cloth. Always follow label instructions on surface and scrape. Cleaning Method: Rub in the Off position. Cooktop Scraper Part Number 3183488 is recommended for regular use steel wool, abrasive powder cleansers, chlorine bleach, rust remover or ammonia. Light to...The marks will not totally disappear but after many cleanings become less noticeable. Do not use soap-filled scouring pads, abrasive cleaners, Cooktop Polishing Creme, steel-wool pads, gritty washcloths or some models) To avoid damage to moderate soil ■ Liquid detergent or all ...

Owners Manual
Page 14
...OFF. 2. After 1 minute, reconnect power or plug in use ? Push in knob before turning to avoid the cost of all the elements in the cooktop. 5. Wipe debris from the control panel surface. ■ Has one or more than usual or some power levels do not perform as well as the... surface cooking area, element or surface burner. All cooktop control panel lights flash on and off , call an electrician. ■ Is the appliance wired properly? TROUBLESHOOTING Try the solutions suggested here first in...
...OFF. 2. After 1 minute, reconnect power or plug in use ? Push in knob before turning to avoid the cost of all the elements in the cooktop. 5. Wipe debris from the control panel surface. ■ Has one or more than usual or some power levels do not perform as well as the... surface cooking area, element or surface burner. All cooktop control panel lights flash on and off , call an electrician. ■ Is the appliance wired properly? TROUBLESHOOTING Try the solutions suggested here first in...

Owners Manual
Page 15
...repair parts sales. ■ Referrals to fulfill the product warranty and provide after-warranty service, anywhere in Canada. In the U.S.A. Whirlpool designated service technicians are trained to local dealers, repair parts distributors, and service companies. To order accessories, call us to better ...(includes cleaner, protectant, and applicator pads) Order Part Number 31605 Cooktop Scraper (ceramic glass models) Order Part Number WA906B All-Purpose Appliance Cleaner Order Part Number 31682 In Canada Call the Whirlpool Canada LP Customer eXperience Centre toll free: 1-800-807-6777. ...
...repair parts sales. ■ Referrals to fulfill the product warranty and provide after-warranty service, anywhere in Canada. In the U.S.A. Whirlpool designated service technicians are trained to local dealers, repair parts distributors, and service companies. To order accessories, call us to better ...(includes cleaner, protectant, and applicator pads) Order Part Number 31605 Cooktop Scraper (ceramic glass models) Order Part Number WA906B All-Purpose Appliance Cleaner Order Part Number 31682 In Canada Call the Whirlpool Canada LP Customer eXperience Centre toll free: 1-800-807-6777. ...

Installation Instructions
Page 1
...É DE LA TABLE DE CUISSON 9 INSTALLATION REQUIREMENTS 2 Tools and Parts 2 Location Requirements 2 Electrical Requirements 3 INSTALLATION INSTRUCTIONS 4 Prepare Cooktop for local electrical inspector's use. WARNING You can kill or hurt you don't immediately follow instructions. IMPORTANT : À conserver pour consultation...de cuisson 12 Raccordement électrique 14 Fixation de la table de cuisson au plan de travail 16 Achever l'installation 16 COOKTOP SAFETY Your safety and the safety of injury, and tell you what can be killed or seriously injured if you what ...
...É DE LA TABLE DE CUISSON 9 INSTALLATION REQUIREMENTS 2 Tools and Parts 2 Location Requirements 2 Electrical Requirements 3 INSTALLATION INSTRUCTIONS 4 Prepare Cooktop for local electrical inspector's use. WARNING You can kill or hurt you don't immediately follow instructions. IMPORTANT : À conserver pour consultation...de cuisson 12 Raccordement électrique 14 Fixation de la table de cuisson au plan de travail 16 Achever l'installation 16 COOKTOP SAFETY Your safety and the safety of injury, and tell you what can be killed or seriously injured if you what ...

Installation Instructions
Page 2
... countertop opening dimensions that all governing codes and ordinances. IMPORTANT: To avoid damage, check with your cooktop is approved. ■ The cooktop must be a specified cooktop that your oven is required. Check existing electrical supply. See "Electrical Requirements" section. See the ... or cabinet supplier to oven manufacturer's Installation Instructions for approval for convenient use and proper cutout dimensions. ■ The cooktop should be made by a licensed, qualified electrical installer. Refer to make sure that projects horizontally a minimum of 5" ...
... countertop opening dimensions that all governing codes and ordinances. IMPORTANT: To avoid damage, check with your cooktop is approved. ■ The cooktop must be a specified cooktop that your oven is required. Check existing electrical supply. See "Electrical Requirements" section. See the ... or cabinet supplier to oven manufacturer's Installation Instructions for approval for convenient use and proper cutout dimensions. ■ The cooktop should be made by a licensed, qualified electrical installer. Refer to make sure that projects horizontally a minimum of 5" ...

Installation Instructions
Page 3
...white) wire. 3 A D Electrical Requirements WARNING C B L F G E H I . Make sure that the ground path and wire gauge are not sure the cooktop is properly grounded. The model/serial number rating plate is required on a separate, 40-amp circuit fused on 36" (91.4 cm) models K. 1" (2.5 cm) ... cabinet is rated 120/240 volt. Cabinet Dimensions IMPORTANT: If installing a range hood or microwave hood combination above the cooktop, follow these instructions can be obtained from: National Fire Protection Association Batterymarch Park, Quincy, MA 02269 CSA International 8501 East...
...white) wire. 3 A D Electrical Requirements WARNING C B L F G E H I . Make sure that the ground path and wire gauge are not sure the cooktop is properly grounded. The model/serial number rating plate is required on a separate, 40-amp circuit fused on 36" (91.4 cm) models K. 1" (2.5 cm) ... cabinet is rated 120/240 volt. Cabinet Dimensions IMPORTANT: If installing a range hood or microwave hood combination above the cooktop, follow these instructions can be obtained from: National Fire Protection Association Batterymarch Park, Quincy, MA 02269 CSA International 8501 East...

Installation Instructions
Page 4
...for installing clamping brackets at the junction box). Follow the electrical connector manufacturer's recommended procedure. Using 2 or more people, place the cooktop upside down around bottom of the countertop. The roll contains four ¼" (0.64 cm) strips of conduit provided. ■ A... UL listed or CSA approved conduit connector must conform with local codes and industry accepted wiring practices. A Install Cooktop Style 1: Cooktop over cabinets 1. Using 2 or more people to the junction box through flexible, armored or nonmetallic sheathed, copper cable. NOTE: ...
...for installing clamping brackets at the junction box). Follow the electrical connector manufacturer's recommended procedure. Using 2 or more people, place the cooktop upside down around bottom of the countertop. The roll contains four ¼" (0.64 cm) strips of conduit provided. ■ A... UL listed or CSA approved conduit connector must conform with local codes and industry accepted wiring practices. A Install Cooktop Style 1: Cooktop over cabinets 1. Using 2 or more people to the junction box through flexible, armored or nonmetallic sheathed, copper cable. NOTE: ...

Installation Instructions
Page 5
...the countertop. Clamping bracket C. Attachment screw 4. NOTE: Make sure that the front edge of the cooktop is parallel to the front edge of the countertop. Cooktop base C. Securely tighten screws. 5 Remove the attachment screws for the selected bracket locations from cutout... so that will allow the bracket to be installed in Step 3. B E D C A. Countertop 4. See the "Attach Cooktop to the edge of the cooktop base. 3. Bracket clamping hole E. Tighten attachment screws enough to avoid scratching the countertop. 2. Remove the attachment screws for the...
...the countertop. Clamping bracket C. Attachment screw 4. NOTE: Make sure that the front edge of the cooktop is parallel to the front edge of the countertop. Cooktop base C. Securely tighten screws. 5 Remove the attachment screws for the selected bracket locations from cutout... so that will allow the bracket to be installed in Step 3. B E D C A. Countertop 4. See the "Attach Cooktop to the edge of the cooktop base. 3. Bracket clamping hole E. Tighten attachment screws enough to avoid scratching the countertop. 2. Remove the attachment screws for the...

Installation Instructions
Page 6
...using the UL listed wire connectors. 9. Failure to 3-Wire Cable from Power Supply to the neutral (white) junction box wire. Connect the cooktop cable to the junction box using the UL listed wire connectors. 8. Connect the two black wires together using the UL listed wire connectors....cover, if present. 3. Connect the two red wires together using the UL listed wire connectors. 6. Use 8 gauge copper wire. Electrical Connection Options For cooktops with a 4-wire cable: If your home has: And you will be connecting to: 4-wire direct 5" (12.7 cm) A fused disconnect or circuit...
...using the UL listed wire connectors. 9. Failure to 3-Wire Cable from Power Supply to the neutral (white) junction box wire. Connect the cooktop cable to the junction box using the UL listed wire connectors. 8. Connect the two black wires together using the UL listed wire connectors....cover, if present. 3. Connect the two red wires together using the UL listed wire connectors. 6. Use 8 gauge copper wire. Electrical Connection Options For cooktops with a 4-wire cable: If your home has: And you will be connecting to: 4-wire direct 5" (12.7 cm) A fused disconnect or circuit...


