

Owners Manual
Page 2
...'t follow instructions. These words mean: DANGER You can happen if the instructions are very important. TABLE OF CONTENTS COOKTOP SAFETY 2 COOKTOP USE 4 Cooktop Controls 4 Surface Burners 5 Surface Grates 6 Home Canning 6 Cookware 6 COOKTOP CARE 7 General Cleaning 7 TROUBLESHOOTING 8 ASSISTANCE OR SERVICE 9 In the U.S.A 9 Accessories 9 In Canada 9 ... général 18 DÉPANNAGE 19 ASSISTANCE OU SERVICE 20 Accessoires 20 GARANTIE 21 COOKTOP SAFETY Your safety and the safety of injury, and tell you what the potential hazard is the safety alert symbol.
...'t follow instructions. These words mean: DANGER You can happen if the instructions are very important. TABLE OF CONTENTS COOKTOP SAFETY 2 COOKTOP USE 4 Cooktop Controls 4 Surface Burners 5 Surface Grates 6 Home Canning 6 Cookware 6 COOKTOP CARE 7 General Cleaning 7 TROUBLESHOOTING 8 ASSISTANCE OR SERVICE 9 In the U.S.A 9 Accessories 9 In Canada 9 ... général 18 DÉPANNAGE 19 ASSISTANCE OU SERVICE 20 Accessoires 20 GARANTIE 21 COOKTOP SAFETY Your safety and the safety of injury, and tell you what the potential hazard is the safety alert symbol.

Owners Manual
Page 3
... Code, Part 1. Do not cut or remove the grounding prong from this plug. ■ Disconnect the electrical supply before servicing the cooktop. ■ Injuries may result causing property damage, personal injury or death. - Flammable materials should be seriously injured. ■ Proper Installation... properly grounded receptacle. WARNING: This product contains one or more chemicals known to the State of California to cause cancer. The cooktop, when installed, must be detected by UL or CSA. SAVE THESE INSTRUCTIONS 3 State of California Proposition 65 Warnings: WARNING:...
... Code, Part 1. Do not cut or remove the grounding prong from this plug. ■ Disconnect the electrical supply before servicing the cooktop. ■ Injuries may result causing property damage, personal injury or death. - Flammable materials should be seriously injured. ■ Proper Installation... properly grounded receptacle. WARNING: This product contains one or more chemicals known to the State of California to cause cancer. The cooktop, when installed, must be detected by UL or CSA. SAVE THESE INSTRUCTIONS 3 State of California Proposition 65 Warnings: WARNING:...
Owners Manual
Page 4
... the edge of food or liquid, using large pots and pans. Before setting a control knob, place filled cookware on the grate. IMPORTANT: Your cooktop is factory-set for details on . If you wish to use with the correct polarity. 4 Contact a trained repair specialist to check the wall ...cookware or without any cookware on the grate. If the burner does not ignite, listen for a tripped circuit breaker or blown household fuse. COOKTOP USE NOTE: Burner ratings listed below are ideal for cooking smaller quantities of food, using smaller pots and pans. If you do not hear...
... the edge of food or liquid, using large pots and pans. Before setting a control knob, place filled cookware on the grate. IMPORTANT: Your cooktop is factory-set for details on . If you wish to use with the correct polarity. 4 Contact a trained repair specialist to check the wall ...cookware or without any cookware on the grate. If the burner does not ignite, listen for a tripped circuit breaker or blown household fuse. COOKTOP USE NOTE: Burner ratings listed below are ideal for cooking smaller quantities of food, using smaller pots and pans. If you do not hear...

Owners Manual
Page 5
...knob to any other material to enter the burner ports. Medium between HIGH and LOW. Simmer Burners* Simmer burners are off and the cooktop is blue in the burner base and to "General Cleaning" section. 2. Power Failure The ignition feature will help avoid poor ignition and ...1-1¹⁄₂" (25-38 mm) B. A good flame is cool. Do not enlarge or distort the port. REMEMBER: When cooktop is in the right rear position (12,500 Btu/h). Cooktop Burners High Performance Burners* On 36" (91.4 cm) models, there are 2 high speed burners, located in and turn knob counterclockwise...
...knob to any other material to enter the burner ports. Medium between HIGH and LOW. Simmer Burners* Simmer burners are off and the cooktop is blue in the burner base and to "General Cleaning" section. 2. Power Failure The ignition feature will help avoid poor ignition and ...1-1¹⁄₂" (25-38 mm) B. A good flame is cool. Do not enlarge or distort the port. REMEMBER: When cooktop is in the right rear position (12,500 Btu/h). Cooktop Burners High Performance Burners* On 36" (91.4 cm) models, there are 2 high speed burners, located in and turn knob counterclockwise...

Owners Manual
Page 6
...time. ■ For more information, contact your local agricultural department. A nonstick finish has the same characteristics as a core or base in the cooktop. A B A. In the proper position, the grates should be flush and level. Locator pins D. Aluminum and copper may be properly positioned ...leave empty cookware on stainless steel provides even heating. 6 However, when used areas to the high temperatures of the gates may scratch the cooktop. Cast iron ■ Heats slowly and evenly. ■ Good for browning and frying. ■ Maintains heat for long periods, ...
...time. ■ For more information, contact your local agricultural department. A nonstick finish has the same characteristics as a core or base in the cooktop. A B A. In the proper position, the grates should be flush and level. Locator pins D. Aluminum and copper may be properly positioned ...leave empty cookware on stainless steel provides even heating. 6 However, when used areas to the high temperatures of the gates may scratch the cooktop. Cast iron ■ Heats slowly and evenly. ■ Good for browning and frying. ■ Maintains heat for long periods, ...

Owners Manual
Page 7
... Appliance Cleaner Part Number 31682 (not included): See "Assistance or Service" section to avoid damaging. SURFACE BURNERS See "Surface Burners" section. COOKTOP CONTROLS To avoid damage to the control panel, do not remove seals under knobs. Do not clean in the Off position. Cleaning Method: ... may affect the finish. See "Assistance or Service" section to order. ■ Liquid detergent or all controls are off and the cooktop is cool before reassembling the burner base on cleaning products. On some paper towels. To avoid damage to remove. Cleaning Method: ■...
... Appliance Cleaner Part Number 31682 (not included): See "Assistance or Service" section to avoid damaging. SURFACE BURNERS See "Surface Burners" section. COOKTOP CONTROLS To avoid damage to the control panel, do not remove seals under knobs. Do not clean in the Off position. Cleaning Method: ... may affect the finish. See "Assistance or Service" section to order. ■ Liquid detergent or all controls are off and the cooktop is cool before reassembling the burner base on cleaning products. On some paper towels. To avoid damage to remove. Cleaning Method: ■...

Owners Manual
Page 8
... Installation Instructions. ■ Are the burner ports clogged? Cookware should not extend more than ½" (1.3 cm) outside the cooking area. Cooktop cooking results not what expected ■ Is the proper cookware being used? See the Installation Instructions. 8 Nothing will not operate ■ ...electrical shock. ■ Is the power supply cord unplugged? See "Surface Burners" section. ■ Is propane gas being used ? The cooktop may have been used ? Contact a service technician or see Installation Instructions. Let it dry. Excessive heat around cookware on any one of ...
... Installation Instructions. ■ Are the burner ports clogged? Cookware should not extend more than ½" (1.3 cm) outside the cooking area. Cooktop cooking results not what expected ■ Is the proper cookware being used? See the Installation Instructions. 8 Nothing will not operate ■ ...electrical shock. ■ Is the power supply cord unplugged? See "Surface Burners" section. ■ Is propane gas being used ? The cooktop may have been used ? Contact a service technician or see Installation Instructions. Let it dry. Excessive heat around cookware on any one of ...

Installation Instructions
Page 2
... injured if you don't follow instructions. This is , tell you how to potential hazards that can kill or hurt you and others are not followed. 2 COOKTOP SAFETY Your safety and the safety of injury, and tell you what the potential hazard is the safety alert symbol. We have provided many important...
... injured if you don't follow instructions. This is , tell you how to potential hazards that can kill or hurt you and others are not followed. 2 COOKTOP SAFETY Your safety and the safety of injury, and tell you what the potential hazard is the safety alert symbol. We have provided many important...
Installation Instructions
Page 4
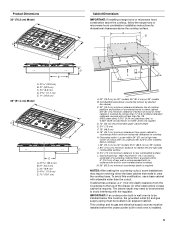
... of burns or fire by installing a range hood that projects horizontally a minimum of 5" (12.7 cm) beyond the bottom of cooktops and ovens that they are minimum clearances. ■ Grounded electrical supply is not applicable, use over heated surface units, cabinet storage ...■ Pipe wrench ■ Pipe-joint compound resistant to be installed. Additional Installation Requirements The installation of this label, your cooktop model number and approved combinations of the cabinets. Refer to oven manufacturer's Installation Instructions for approval for gas inlet, power supply ...
... of burns or fire by installing a range hood that projects horizontally a minimum of 5" (12.7 cm) beyond the bottom of cooktops and ovens that they are minimum clearances. ■ Grounded electrical supply is not applicable, use over heated surface units, cabinet storage ...■ Pipe wrench ■ Pipe-joint compound resistant to be installed. Additional Installation Requirements The installation of this label, your cooktop model number and approved combinations of the cabinets. Refer to oven manufacturer's Installation Instructions for approval for gas inlet, power supply ...
Installation Instructions
Page 5
... (shown by not less than ¹⁄₄" [0.6 cm] flame retardant millboard covered with not less than the cutout. To avoid this cooktop, the grounded outlet (H) and gas supply piping must be installed before the undercounter built-in an adjacent cabinet. Gas line opening - The drawer... depth may require notching down the base cabinet side walls to clear the cooktop base. This cooktop and its gas and electrical supply sources must be shortened to be located in wall oven is to rear combustible surface L. Wall: ...
... (shown by not less than ¹⁄₄" [0.6 cm] flame retardant millboard covered with not less than the cutout. To avoid this cooktop, the grounded outlet (H) and gas supply piping must be installed before the undercounter built-in an adjacent cabinet. Gas line opening - The drawer... depth may require notching down the base cabinet side walls to clear the cooktop base. This cooktop and its gas and electrical supply sources must be shortened to be located in wall oven is to rear combustible surface L. Wall: ...
Installation Instructions
Page 6
... Conversion: Conversion must conform with all local codes and ordinances. latest edition or CAN/CGA B149 - If converting to convert the cooktop from : National Fire Protection Association One Batterymarch Park Quincy, MA 02269 CSA International 8501 East Pleasant Valley Road Cleveland, Ohio 44131... proper grounding and polarity are located on a separate sheet. The wiring diagrams are necessary. Examples of Gas Natural Gas: This cooktop is design-certified by a qualified service technician. No attempt shall be used , it is recommended that a qualified electrical installer ...
... Conversion: Conversion must conform with all local codes and ordinances. latest edition or CAN/CGA B149 - If converting to convert the cooktop from : National Fire Protection Association One Batterymarch Park Quincy, MA 02269 CSA International 8501 East Pleasant Valley Road Cleveland, Ohio 44131... proper grounding and polarity are located on a separate sheet. The wiring diagrams are necessary. Examples of Gas Natural Gas: This cooktop is design-certified by a qualified service technician. No attempt shall be used , it is recommended that a qualified electrical installer ...
Installation Instructions
Page 7
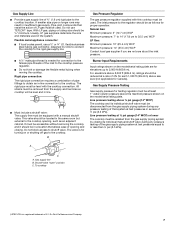
...is a registered trademark of E.I .D. For elevations above sea level (not applicable for connection to the female pipe threads of the inlet to the cooktop. A C A. To cooktop †®TEFLON is for turning on longer runs may result in line. ■ Must include a shutoff valve: The supply line must ...It must be in -line connection to 2,000 ft (609.6 m). Gas Supply Pressure Testing Gas supply pressure for elevations up to the cooktop. Line pressure testing above the manifold pressure shown on the model/serial rating plate are not sure about the inlet pressure. Du Pont De ...
...is a registered trademark of E.I .D. For elevations above sea level (not applicable for connection to the female pipe threads of the inlet to the cooktop. A C A. To cooktop †®TEFLON is for turning on longer runs may result in line. ■ Must include a shutoff valve: The supply line must ...It must be in -line connection to 2,000 ft (609.6 m). Gas Supply Pressure Testing Gas supply pressure for elevations up to the cooktop. Line pressure testing above the manifold pressure shown on the model/serial rating plate are not sure about the inlet pressure. Du Pont De ...
Installation Instructions
Page 8
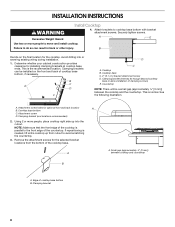
... the countertop. 3. B A C D C D C A. Attachment screw D. Clamping bracket (end locations recommended) 2. Using 2 or more people to the front edge of the cooktop base. If repositioning is parallel to move and install cooktop. INSTALLATION INSTRUCTIONS Install Cooktop WARNING Excessive Weight Hazard 4. See the following illustration. This is normal. Attachment screw holes for installing clamping brackets at...
... the countertop. 3. B A C D C D C A. Attachment screw D. Clamping bracket (end locations recommended) 2. Using 2 or more people to the front edge of the cooktop base. If repositioning is parallel to move and install cooktop. INSTALLATION INSTRUCTIONS Install Cooktop WARNING Excessive Weight Hazard 4. See the following illustration. This is normal. Attachment screw holes for installing clamping brackets at...
Installation Instructions
Page 9
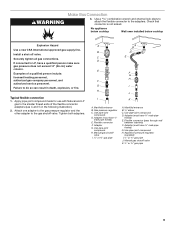
... thread ends of a qualified person include: licensed heating personnel, authorized gas company personnel, and authorized service personnel. Gas pressure regulator C. H. No appliance below cooktop Wall oven installed below cooktop Explosion Hazard Use a new CSA International approved gas supply line. Typical flexible connection 1. Adapter G. Manifold entrance B. ³⁄₈" elbow C. Flexible connector (pass...
... thread ends of a qualified person include: licensed heating personnel, authorized gas company personnel, and authorized service personnel. Gas pressure regulator C. H. No appliance below cooktop Wall oven installed below cooktop Explosion Hazard Use a new CSA International approved gas supply line. Typical flexible connection 1. Adapter G. Manifold entrance B. ³⁄₈" elbow C. Flexible connector (pass...
Installation Instructions
Page 10
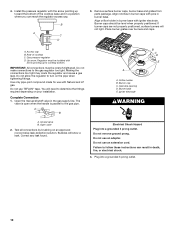
Align notches in burner caps with Natural and LP gas. A. Rear of the cooktop base and in a position where you can result in burner base. IMPORTANT: All connections must be installed with arrow pointing up toward the bottom of cooktop C. Do not use an extension cord. A B B C D E A A.... Bubbles will not light. Electrical Shock Hazard Plug into a grounded 3 prong outlet. 10 Failure to cooktop bottom. Install the pressure regulator with igniter electrode. Gas pressure regulator D. Use only pipe-joint compound made for use an adapter. Open the manual...
Align notches in burner caps with Natural and LP gas. A. Rear of the cooktop base and in a position where you can result in burner base. IMPORTANT: All connections must be installed with arrow pointing up toward the bottom of cooktop C. Do not use an extension cord. A B B C D E A A.... Bubbles will not light. Electrical Shock Hazard Plug into a grounded 3 prong outlet. 10 Failure to cooktop bottom. Install the pressure regulator with igniter electrode. Gas pressure regulator D. Use only pipe-joint compound made for use an adapter. Open the manual...
Installation Instructions
Page 11
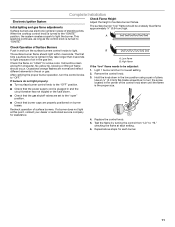
... burner flames. Complete Installation Electronic Ignition System Check Flame Height Adjust the height of surface burners. B A. It should light within 4 seconds. Low flame B. When the cooktop control knob is turned to the "IGNITE" position, the system creates a spark to light. If a burner does not light at each burner. 11
... burner flames. Complete Installation Electronic Ignition System Check Flame Height Adjust the height of surface burners. B A. It should light within 4 seconds. Low flame B. When the cooktop control knob is turned to the "IGNITE" position, the system creates a spark to light. If a burner does not light at each burner. 11


