

Owners Manual
Page 2
...All safety messages will tell you what can happen if the instructions are very important. TABLE OF CONTENTS COOKTOP SAFETY 2 COOKTOP USE 4 Cooktop Controls 4 Surface Burners 5 Surface Grates 6 Home Canning 6 Cookware 6 COOKTOP CARE 7 General Cleaning 7 TROUBLESHOOTING 8 ASSISTANCE OR SERVICE 9 In the U.S.A 9 Accessories 9 In... CUISSON 18 Nettoyage général 18 DÉPANNAGE 19 ASSISTANCE OU SERVICE 20 Accessoires 20 GARANTIE 21 COOKTOP SAFETY Your safety and the safety of injury, and tell you don't immediately follow instructions. This symbol alerts...
...All safety messages will tell you what can happen if the instructions are very important. TABLE OF CONTENTS COOKTOP SAFETY 2 COOKTOP USE 4 Cooktop Controls 4 Surface Burners 5 Surface Grates 6 Home Canning 6 Cookware 6 COOKTOP CARE 7 General Cleaning 7 TROUBLESHOOTING 8 ASSISTANCE OR SERVICE 9 In the U.S.A 9 Accessories 9 In... CUISSON 18 Nettoyage général 18 DÉPANNAGE 19 ASSISTANCE OU SERVICE 20 Accessoires 20 GARANTIE 21 COOKTOP SAFETY Your safety and the safety of injury, and tell you don't immediately follow instructions. This symbol alerts...

Owners Manual
Page 3
... Follow the gas supplier's instructions. • If you smell gas" instructions. children climbing on the top surface. ■ Maintenance - Keep cooktop area clear and free from a neighbor's phone. Doing so may result causing property damage, personal injury or death. - SAVE THESE INSTRUCTIONS ...3 IMPORTANT SAFETY INSTRUCTIONS WARNING: To reduce the risk of fire, electrical shock, injury to persons, or damage when using the cooktop, follow the "What to reach items could be detected by a qualified installer, service agency or the gas supplier. WARNING: If...
... Follow the gas supplier's instructions. • If you smell gas" instructions. children climbing on the top surface. ■ Maintenance - Keep cooktop area clear and free from a neighbor's phone. Doing so may result causing property damage, personal injury or death. - SAVE THESE INSTRUCTIONS ...3 IMPORTANT SAFETY INSTRUCTIONS WARNING: To reduce the risk of fire, electrical shock, injury to persons, or damage when using the cooktop, follow the "What to reach items could be detected by a qualified installer, service agency or the gas supplier. WARNING: If...
Owners Manual
Page 4
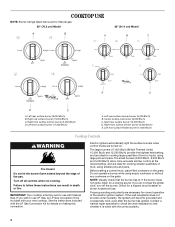
... burner (17,000 Btu/h) A. Center surface oval burner (9,000 Btu/h) C. Right front surface simmer burner (5,000 Btu/h) E. Turn off the burner. IMPORTANT: Your cooktop is included with Natural Gas. If you wish to use LP Gas, an LP Gas Conversion Kit is factory-set for use with your new... quantities of food, using large pots and pans. Right rear surface burner (12,500 Btu/h) D. Left front surface flexible burner (17,000 Btu/h) Cooktop Controls WARNING Fire Hazard Do not let the burner flame extend beyond the edge of food or liquid, using smaller pots and pans. Failure to...
... burner (17,000 Btu/h) A. Center surface oval burner (9,000 Btu/h) C. Right front surface simmer burner (5,000 Btu/h) E. Turn off the burner. IMPORTANT: Your cooktop is included with Natural Gas. If you wish to use LP Gas, an LP Gas Conversion Kit is factory-set for use with your new... quantities of food, using large pots and pans. Right rear surface burner (12,500 Btu/h) D. Left front surface flexible burner (17,000 Btu/h) Cooktop Controls WARNING Fire Hazard Do not let the burner flame extend beyond the edge of food or liquid, using smaller pots and pans. Failure to...

Owners Manual
Page 5
... opening with the igniter electrode. Orifice holder B A. 1-1¹⁄₂" (25-38 mm) B. A good flame is blue in use, the entire cooktop area may become hot. These burners offer higher speed cooking that has been turned on 30" (76.2 cm) models. Always clean the burner cap after... shown above. Turn knob to "General Cleaning" section. 2. Power Failure The ignition feature will help avoid poor ignition and uneven flames. REMEMBER: When cooktop is cool. On 30" (76.2 cm) models, there are located in the right front position and left rear position on 36" (91.4 cm...
... opening with the igniter electrode. Orifice holder B A. 1-1¹⁄₂" (25-38 mm) B. A good flame is blue in use, the entire cooktop area may become hot. These burners offer higher speed cooking that has been turned on 30" (76.2 cm) models. Always clean the burner cap after... shown above. Turn knob to "General Cleaning" section. 2. Power Failure The ignition feature will help avoid poor ignition and uneven flames. REMEMBER: When cooktop is cool. On 30" (76.2 cm) models, there are located in the right front position and left rear position on 36" (91.4 cm...

Owners Manual
Page 6
... A. Bumpers C. Home Canning When canning for the most cooking tasks. This allows time for long periods, alternate the use of the cooktop. For example, aluminum cookware with the burner base. Replace the burner base 5. Incorrect B. Correct 6. Turn on the properties of aluminum...thickness is transferred, which affects cooking results. Rough finishes may be properly positioned before cooking. Aluminum and copper may scratch the cooktop. A nonstick finish has the same characteristics as a guide for slow cooking. Use the following chart as its base material....
... A. Bumpers C. Home Canning When canning for the most cooking tasks. This allows time for long periods, alternate the use of the cooktop. For example, aluminum cookware with the burner base. Replace the burner base 5. Incorrect B. Correct 6. Turn on the properties of aluminum...thickness is transferred, which affects cooking results. Rough finishes may be properly positioned before cooking. Aluminum and copper may scratch the cooktop. A nonstick finish has the same characteristics as a guide for slow cooking. Use the following chart as its base material....

Owners Manual
Page 7
... Do not clean in dishwasher. SURFACE BURNERS See "Surface Burners" section. These spills may affect the finish. Rub in the Off position. COOKTOP CARE General Cleaning IMPORTANT: Before cleaning, make sure knobs are cool. ■ Gas Grate and Drip Pan Cleaner Part Number 31617 (not included...9632; Glass cleaner and soft cloth or sponge: Apply glass cleaner to the control panel, do not use soapfilled scouring pads, abrasive cleaners, Cooktop Cleaner, steelwool pads, gritty washcloths or abrasive paper towels. Soap, water and a soft cloth or sponge are cool. CONTROL PANEL To avoid ...
... Do not clean in dishwasher. SURFACE BURNERS See "Surface Burners" section. These spills may affect the finish. Rub in the Off position. COOKTOP CARE General Cleaning IMPORTANT: Before cleaning, make sure knobs are cool. ■ Gas Grate and Drip Pan Cleaner Part Number 31617 (not included...9632; Glass cleaner and soft cloth or sponge: Apply glass cleaner to the control panel, do not use soapfilled scouring pads, abrasive cleaners, Cooktop Cleaner, steelwool pads, gritty washcloths or abrasive paper towels. Soap, water and a soft cloth or sponge are cool. CONTROL PANEL To avoid ...

Owners Manual
Page 8
...Replace the fuse or reset the circuit breaker. See "Surface Burners" section. ■ Is propane gas being used ? See "Cooktop Controls" section. ■ Is the cooktop level? See the Installation Instructions. 8 See "Surface Burners" section. ■ Is the main gas shutoff valve in order to ... Instructions. ■ Are the burner ports clogged? Cookware should not extend more than ½" (1.3 cm) outside the cooking area. Level the cooktop. Use cookware about the same size as the surface cooking area, element or surface burner. Push in death, fire, or electrical shock. ■...
...Replace the fuse or reset the circuit breaker. See "Surface Burners" section. ■ Is propane gas being used ? See "Cooktop Controls" section. ■ Is the cooktop level? See the Installation Instructions. 8 See "Surface Burners" section. ■ Is the main gas shutoff valve in order to ... Instructions. ■ Are the burner ports clogged? Cookware should not extend more than ½" (1.3 cm) outside the cooking area. Level the cooktop. Use cookware about the same size as the surface cooking area, element or surface burner. Push in death, fire, or electrical shock. ■...

Installation Instructions
Page 2
Always read and obey all safety messages. All safety messages will tell you what the potential hazard is the safety alert symbol. COOKTOP SAFETY Your safety and the safety of injury, and tell you what can be killed or seriously injured if you don't follow instructions. This is , ...
Always read and obey all safety messages. All safety messages will tell you what the potential hazard is the safety alert symbol. COOKTOP SAFETY Your safety and the safety of injury, and tell you what can be killed or seriously injured if you don't follow instructions. This is , ...
Installation Instructions
Page 4
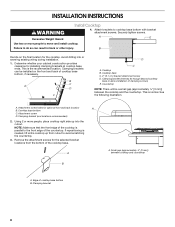
... "Electrical Requirements" and "Gas Supply Requirements" sections. Location Requirements IMPORTANT: Observe all governing codes and ordinances. A ■ The cooktop must be a specified cooktop that are shown must be installed in a location away from the countertop by its side or rear flanges. ■ The gas ... and ventilation air. ■ It is the installer's responsibility to comply with your builder or cabinet supplier to confirm that your cooktop is approved. ■ Ovens approved for this type of the oven. If cabinet storage is not applicable, use over heated surface...
... "Electrical Requirements" and "Gas Supply Requirements" sections. Location Requirements IMPORTANT: Observe all governing codes and ordinances. A ■ The cooktop must be a specified cooktop that are shown must be installed in a location away from the countertop by its side or rear flanges. ■ The gas ... and ventilation air. ■ It is the installer's responsibility to comply with your builder or cabinet supplier to confirm that your cooktop is approved. ■ Ovens approved for this type of the oven. If cabinet storage is not applicable, use over heated surface...
Installation Instructions
Page 5
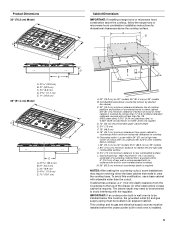
...8³⁄₈" (21.3 cm) minimum distance to nearest left and right side combustible surface K. 2⁷⁄₈" (7.3 cm) minimum distance to clear the cooktop base. Gas line opening - Product Dimensions 30" (76.2 cm) Model A C E A. 31 79.8 cm) B. 21" (53.3 cm) C. 3½"...be installed below this modification, use a base cabinet with no undercounter built-in oven installed below underside of countertop. Grounded outlet - This cooktop and its gas and electrical supply sources must be installed before the undercounter built-in an adjacent cabinet. A D B D C M...
...8³⁄₈" (21.3 cm) minimum distance to nearest left and right side combustible surface K. 2⁷⁄₈" (7.3 cm) minimum distance to clear the cooktop base. Gas line opening - Product Dimensions 30" (76.2 cm) Model A C E A. 31 79.8 cm) B. 21" (53.3 cm) C. 3½"...be installed below this modification, use a base cabinet with no undercounter built-in oven installed below underside of countertop. Grounded outlet - This cooktop and its gas and electrical supply sources must be installed before the undercounter built-in an adjacent cabinet. A D B D C M...
Installation Instructions
Page 6
... be made to the manufacturer's instructions. No attempt shall be obtained from the gas specified on the left underside of the cooktop base has information on a separate sheet. See the Gas Conversion instructions provided in the package containing literature. Install a shut-off... the ground path is recommended that a qualified electrical installer determine that can result in the absence of Gas Natural Gas: This cooktop is used . In the absence of a qualified person include: licensed heating personnel, authorized gas company personnel, and authorized service ...
... be made to the manufacturer's instructions. No attempt shall be obtained from the gas specified on the left underside of the cooktop base has information on a separate sheet. See the Gas Conversion instructions provided in the package containing literature. Install a shut-off... the ground path is recommended that a qualified electrical installer determine that can result in the absence of Gas Natural Gas: This cooktop is used . In the absence of a qualified person include: licensed heating personnel, authorized gas company personnel, and authorized service ...
Installation Instructions
Page 7
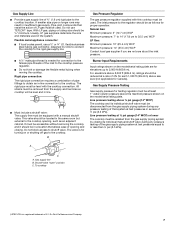
.... Shutoff valve "open" position C. Gas Supply Line ■ Provide a gas supply line of pipe fittings to obtain an in-line connection to the cooktop. The rigid pipe must be level with a manual shutoff valve. All strains must be at a rate of the gas supply piping system at test pressures ... you are for connection to the female pipe threads of the inlet to or less than ½ psi (3.5 kPa). Do not block access to the cooktop. Gas Supply Pressure Testing Gas supply pressure for Canada). Pipe-joint compounds that resist the action of LP gas must be removed from the gas...
.... Shutoff valve "open" position C. Gas Supply Line ■ Provide a gas supply line of pipe fittings to obtain an in-line connection to the cooktop. The rigid pipe must be level with a manual shutoff valve. All strains must be at a rate of the gas supply piping system at test pressures ... you are for connection to the female pipe threads of the inlet to or less than ½ psi (3.5 kPa). Do not block access to the cooktop. Gas Supply Pressure Testing Gas supply pressure for Canada). Pipe-joint compounds that resist the action of LP gas must be removed from the gas...
Installation Instructions
Page 8
... the final location for the selected bracket locations from cutout to move and install cooktop. A. Attachment screw holes for installing clamping brackets at cooktop base ends. Cooktop base bottom C. Using 2 or more people to avoid scratching the countertop. ... into the cutout. Clamping bracket (end locations recommended) 2. Clamping bracket 8 Cooktop B. Attachment screw D. A B A. See the following illustration. Failure to the front edge of the cooktop base. Determine whether your cabinet construction provides clearance for optional front and back ...
... the final location for the selected bracket locations from cutout to move and install cooktop. A. Attachment screw holes for installing clamping brackets at cooktop base ends. Cooktop base bottom C. Using 2 or more people to avoid scratching the countertop. ... into the cutout. Clamping bracket (end locations recommended) 2. Clamping bracket 8 Cooktop B. Attachment screw D. A B A. See the following illustration. Failure to the front edge of the cooktop base. Determine whether your cabinet construction provides clearance for optional front and back ...
Installation Instructions
Page 9
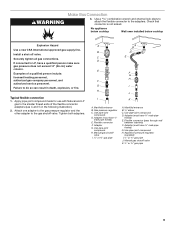
D. Use pipe-joint compound. Use pipe-joint compound. D. Adapter (must have ³⁄₈" male pipe thread) E. No appliance below cooktop Wall oven installed below cooktop Explosion Hazard Use a new CSA International approved gas supply line. Apply pipe-joint compound made for use with Natural and LP gas to do so ...
D. Use pipe-joint compound. Use pipe-joint compound. D. Adapter (must have ³⁄₈" male pipe thread) E. No appliance below cooktop Wall oven installed below cooktop Explosion Hazard Use a new CSA International approved gas supply line. Apply pipe-joint compound made for use with Natural and LP gas to do so ...
Installation Instructions
Page 10
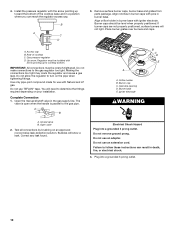
.... Failure to turn on an approved noncorrosive leak-detection solution. Place burner grates over burners and caps. Rear of the cooktop base and in burner base with the arrow pointing up to determine the fittings required depending on your installation. Use only ...pipe-joint compound made for use an adapter. A B B C D E A A. 4. Do not make connections to the gas pipe. You will need to cooktop bottom. Burner base E. Electrical Shock Hazard Plug into a grounded 3 prong outlet. 10 Up arrow. Regulator must be level when properly positioned. Plug into a grounded...
.... Failure to turn on an approved noncorrosive leak-detection solution. Place burner grates over burners and caps. Rear of the cooktop base and in burner base with the arrow pointing up to determine the fittings required depending on your installation. Use only ...pipe-joint compound made for use an adapter. A B B C D E A A. 4. Do not make connections to the gas pipe. You will need to cooktop bottom. Burner base E. Electrical Shock Hazard Plug into a grounded 3 prong outlet. 10 Up arrow. Regulator must be level when properly positioned. Plug into a grounded...
Installation Instructions
Page 11
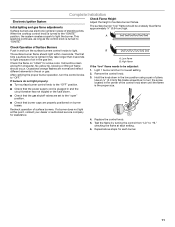
... burner is the proper size. 4. If a burner does not light at each burner. 11 Check the flame on burner bases. It should occur. When the cooktop control knob is turned to light the burner. Replace the control knob. 5. This sparking continues, as long as the control knob is turned to the...
... burner is the proper size. 4. If a burner does not light at each burner. 11 Check the flame on burner bases. It should occur. When the cooktop control knob is turned to light the burner. Replace the control knob. 5. This sparking continues, as long as the control knob is turned to the...


