
Owners Manual
Page 3
... Do Not Leave Children Alone - For units with one or more surface units of interest to children in the manual. Improper installation of the cooktop unless specifically recommended in temperature. ■ Utensil Handles Should Be Turned Inward and Not Extend Over Adjacent Surface Units... the cooktop. ■ User Servicing - Children climbing on Broken Cooktop - Boilover causes smoking and greasy spillovers that it is properly installed and grounded by a qualified technician. ■ Never Use Your Cooktop for cooktop service without breaking due to the sudden change in ...
... Do Not Leave Children Alone - For units with one or more surface units of interest to children in the manual. Improper installation of the cooktop unless specifically recommended in temperature. ■ Utensil Handles Should Be Turned Inward and Not Extend Over Adjacent Surface Units... the cooktop. ■ User Servicing - Children climbing on Broken Cooktop - Boilover causes smoking and greasy spillovers that it is properly installed and grounded by a qualified technician. ■ Never Use Your Cooktop for cooktop service without breaking due to the sudden change in ...

Owners Manual
Page 12
...cm) maximum overhang ■ Use flat-bottomed cookware for long periods, alternate the use only flat-bottomed canners. ■ On coil element models, the installation of pots and pans are clean and dry before using them. Home Canning When canning for best heat conduction and energy efficiency. See "Assistance or...9632; Determine flatness by placing the straight edge of a ruler across the bottom of cooking. ■ Medium or heavy thickness is not installed, the life of the coil element will take on the properties of aluminum or copper on the grate or largest surface cooking area or ...
...cm) maximum overhang ■ Use flat-bottomed cookware for long periods, alternate the use only flat-bottomed canners. ■ On coil element models, the installation of pots and pans are clean and dry before using them. Home Canning When canning for best heat conduction and energy efficiency. See "Assistance or...9632; Determine flatness by placing the straight edge of a ruler across the bottom of cooking. ■ Medium or heavy thickness is not installed, the life of the coil element will take on the properties of aluminum or copper on the grate or largest surface cooking area or ...

Owners Manual
Page 14
... the cooking area. ■ Do cooktop surfaces become hot. Nothing will not operate ■ Is the control knob set correctly? See the Installation Instructions. ■ Does it appear to take longer to cool down for 30 minutes then turn the burner on and off , call an ... lights on the cooktop flashing on again. Clean the cooktop touch control panel thoroughly. Use cookware about the same size as usual? See Installation Instructions. Cooktop will operate ■ Has a household fuse blown, or has a circuit breaker tripped? Allow the cooktop to flash, disconnect...
... the cooking area. ■ Do cooktop surfaces become hot. Nothing will not operate ■ Is the control knob set correctly? See the Installation Instructions. ■ Does it appear to take longer to cool down for 30 minutes then turn the burner on and off , call an ... lights on the cooktop flashing on again. Clean the cooktop touch control panel thoroughly. Use cookware about the same size as usual? See Installation Instructions. Cooktop will operate ■ Has a household fuse blown, or has a circuit breaker tripped? Allow the cooktop to flash, disconnect...

Owners Manual
Page 15
...® replacement parts will help , follow the menu prompts. In the U.S.A. Whirlpool designated service technicians are trained to build every new WHIRLPOOL® appliance. Or visit our website at www.whirlpool.com and click on our full line of appliances. ■ Installation information. ■ Use and maintenance procedures. ■ Accessory and repair parts sales...
...® replacement parts will help , follow the menu prompts. In the U.S.A. Whirlpool designated service technicians are trained to build every new WHIRLPOOL® appliance. Or visit our website at www.whirlpool.com and click on our full line of appliances. ■ Installation information. ■ Use and maintenance procedures. ■ Accessory and repair parts sales...

Owners Manual
Page 16
...customer. Damage resulting from accident, alteration, misuse, abuse, fire, flood, acts of God, improper installation, installation not in a remote area where service by an authorized Whirlpool servicer is covered by this warranty. 8. Any food loss due to repair or replace appliance light ...from your major appliance is located in accordance with the product, Whirlpool Corporation or Whirlpool Canada LP (hereafter "Whirlpool") will need service, first see the "Troubleshooting" section of purchase or installation date for Factory Specified Parts and repair labor to correct defects in...
...customer. Damage resulting from accident, alteration, misuse, abuse, fire, flood, acts of God, improper installation, installation not in a remote area where service by an authorized Whirlpool servicer is covered by this warranty. 8. Any food loss due to repair or replace appliance light ...from your major appliance is located in accordance with the product, Whirlpool Corporation or Whirlpool Canada LP (hereafter "Whirlpool") will need service, first see the "Troubleshooting" section of purchase or installation date for Factory Specified Parts and repair labor to correct defects in...

Installation Instructions
Page 1
... many important safety messages in this manual and on your appliance. All safety messages will follow instructions. IMPORTANT: Save for Installation 4 Install Cooktop 4 Make Electrical Connection 6 Attach Cooktop to potential hazards that can kill or hurt you what the potential hazard is... the safety alert symbol. Always read and obey all safety messages. ® ELECTRIC COOKTOP INSTALLATION INSTRUCTIONS INSTRUCTIONS D'INSTALLATION DE LA TABLE DE CUISSON ÉLECTRIQUE Table of Contents / Table des matières COOKTOP SAFETY 1 SÉ...
... many important safety messages in this manual and on your appliance. All safety messages will follow instructions. IMPORTANT: Save for Installation 4 Install Cooktop 4 Make Electrical Connection 6 Attach Cooktop to potential hazards that can kill or hurt you what the potential hazard is... the safety alert symbol. Always read and obey all safety messages. ® ELECTRIC COOKTOP INSTALLATION INSTRUCTIONS INSTRUCTIONS D'INSTALLATION DE LA TABLE DE CUISSON ÉLECTRIQUE Table of Contents / Table des matières COOKTOP SAFETY 1 SÉ...

Installation Instructions
Page 2
...; 2½" (6.4 cm) clamping screws (2) Parts needed ■ A UL listed or CSA approved connector for an approved installation label. Refer to be installed away from strong draft areas, such as windows, doors, fans or strong heating vents. Given dimensions are given with any ...to make sure that are minimum clearances and provide 0" (0 cm) clearance. ■ Grounded electrical supply is approved to oven manufacturer's Installation Instructions for approval for convenient use in a level countertop. ■ Ovens approved for this label, contact your cooktop is approved. ...
...; 2½" (6.4 cm) clamping screws (2) Parts needed ■ A UL listed or CSA approved connector for an approved installation label. Refer to be installed away from strong draft areas, such as windows, doors, fans or strong heating vents. Given dimensions are given with any ...to make sure that are minimum clearances and provide 0" (0 cm) clearance. ■ Grounded electrical supply is approved to oven manufacturer's Installation Instructions for approval for convenient use in a level countertop. ■ Ovens approved for this label, contact your cooktop is approved. ...

Installation Instructions
Page 3
...from upper cabinet to countertop within minimum horizontal clearances to cooktop H. To avoid this modification, use a base cabinet with a qualified electrical installer if you will be using and follow these instructions can be obtained from: National Fire Protection Association Batterymarch Park, Quincy, MA 02269 ...CSA International 8501 East Pleasant Valley Road Cleveland, OH 44131-5575 Before You Make the Electrical Connection: To properly install your cooktop, you must determine the type of electrical connection you are in conformance with the National Electrical Code, ANSI/...
...from upper cabinet to countertop within minimum horizontal clearances to cooktop H. To avoid this modification, use a base cabinet with a qualified electrical installer if you will be using and follow these instructions can be obtained from: National Fire Protection Association Batterymarch Park, Quincy, MA 02269 ...CSA International 8501 East Pleasant Valley Road Cleveland, OH 44131-5575 Before You Make the Electrical Connection: To properly install your cooktop, you must determine the type of electrical connection you are in conformance with the National Electrical Code, ANSI/...

Installation Instructions
Page 4
...) Foam strip C. Attachment screw C. Clamping bracket 2. A listed conduit connector is needed, lift entire cooktop up into or severing existing wiring during installation. 1. Using 2 or more people, place cooktop right side up from cutout to aluminum. Cooktop base bottom All 36" (91.4 cm) models...(at the cooktop and at a time and apply foam strip adhesive-side down on uneven counters. Remove one strip at the junction box). A Install Cooktop Style 1: Cooktop over cabinets 1. If repositioning is already provided at cooktop base ends. 30" (76.2 cm) traditional knob models B C...
...) Foam strip C. Attachment screw C. Clamping bracket 2. A listed conduit connector is needed, lift entire cooktop up into or severing existing wiring during installation. 1. Using 2 or more people, place cooktop right side up from cutout to aluminum. Cooktop base bottom All 36" (91.4 cm) models...(at the cooktop and at a time and apply foam strip adhesive-side down on uneven counters. Remove one strip at the junction box). A Install Cooktop Style 1: Cooktop over cabinets 1. If repositioning is already provided at cooktop base ends. 30" (76.2 cm) traditional knob models B C...

Installation Instructions
Page 5
... the brackets so that will allow the bracket to extend far enough out from cutout to avoid scratching the countertop. 8. Cooktop B. Installing Brackets After Placing Cooktop in cutout. 7. Attachment screw 4. Rotate brackets so they are not resting on a covered surface using the ... D. Make sure that the front edge of the cooktop is parallel to the front edge of cooktop base bottom B. NOTE: Make sure that will allow installation of the countertop. Cooktop base C. Using 2 or more people, turn the cooktop right side up from the packaging. F A E C D C B A A. B E D C A....
... the brackets so that will allow the bracket to extend far enough out from cutout to avoid scratching the countertop. 8. Cooktop B. Installing Brackets After Placing Cooktop in cutout. 7. Attachment screw 4. Rotate brackets so they are not resting on a covered surface using the ... D. Make sure that the front edge of the cooktop is parallel to the front edge of cooktop base bottom B. NOTE: Make sure that will allow installation of the countertop. Cooktop base C. Using 2 or more people, turn the cooktop right side up from the packaging. F A E C D C B A A. B E D C A....

Installation Instructions
Page 6
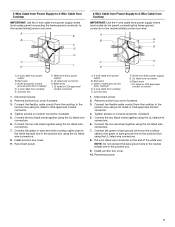
... Disconnect power before servicing. Tighten screws on conduit connector if present. 5. Connect the two red wires together using the UL listed wire connectors. 6. Black wires C. Install junction box cover. 10. Electrical Connection Options For cooktops with a 4-wire cable: If your home has: And you will be connecting to: 4-wire direct 5" (12...
... Disconnect power before servicing. Tighten screws on conduit connector if present. 5. Connect the two red wires together using the UL listed wire connectors. 6. Black wires C. Install junction box cover. 10. Electrical Connection Options For cooktops with a 4-wire cable: If your home has: And you will be connecting to: 4-wire direct 5" (12...
Installation Instructions
Page 7
... E. Connect the green or bare and white cooktop cable wires to the neutral (white) wire in the junction box using the UL listed wire connectors. 6. Install junction box cover. 9. Reconnect power. White wire (from power supply) G. Remove junction box cover if present. 3. Connect the two black wires together using the UL... connector on the end of the white wire. NOTE: Do not connect the bare ground wire to the white (neutral) wire in the junction box. 9. Install junction box cover. 10. Reconnect power. 7
... E. Connect the green or bare and white cooktop cable wires to the neutral (white) wire in the junction box using the UL listed wire connectors. 6. Install junction box cover. 9. Reconnect power. White wire (from power supply) G. Remove junction box cover if present. 3. Connect the two black wires together using the UL... connector on the end of the white wire. NOTE: Do not connect the bare ground wire to the white (neutral) wire in the junction box. 9. Install junction box cover. 10. Reconnect power. 7

Installation Instructions
Page 8
... Dispose of clamping screws) E. 2½" (6.4 cm) clamping screw F. Use a mild solution of liquid household cleaner and warm water to allow installation of /recycle all parts are using a UL listed or CSA approved conduit connector. 4. Dry thoroughly with a soft cloth. NOTE: If the ...the neutral (white) junction box wire: A E B F G Attach Cooktop to Countertop NOTE: This section applies only if you are now installed. Connect the flexible cable conduit from the cooktop to the junction box using clamping brackets. Place the 2½" (6.4 cm) clamping screws into the...
... Dispose of clamping screws) E. 2½" (6.4 cm) clamping screw F. Use a mild solution of liquid household cleaner and warm water to allow installation of /recycle all parts are using a UL listed or CSA approved conduit connector. 4. Dry thoroughly with a soft cloth. NOTE: If the ...the neutral (white) junction box wire: A E B F G Attach Cooktop to Countertop NOTE: This section applies only if you are now installed. Connect the flexible cable conduit from the cooktop to the junction box using clamping brackets. Place the 2½" (6.4 cm) clamping screws into the...

Warranty
Page 1
...for product service if your major appliance, unless such damage results from defects in materials or workmanship and is not installed in -warranty service. WHIRLPOOL SHALL NOT BE LIABLE FOR INCIDENTAL OR CONSEQUENTIAL DAMAGES. In Canada, call 1-800-253-1301. Write down the following... information about your major appliance, to replace or repair house fuses, or to correct the installation of consumables or cleaning products not approved by calling Whirlpool. Service must provide proof of repair or replacement under this book and your major appliance if it ....
...for product service if your major appliance, unless such damage results from defects in materials or workmanship and is not installed in -warranty service. WHIRLPOOL SHALL NOT BE LIABLE FOR INCIDENTAL OR CONSEQUENTIAL DAMAGES. In Canada, call 1-800-253-1301. Write down the following... information about your major appliance, to replace or repair house fuses, or to correct the installation of consumables or cleaning products not approved by calling Whirlpool. Service must provide proof of repair or replacement under this book and your major appliance if it ....

