
Owners Manual
Page 2
...you remove all parts and panels before operating. ■ Remove doors from your old refrigerator. ■ Use nonflammable cleaner. ■ Keep flammable materials and vapors, such as gasoline, away from refrigerator. ■ Use two or more people to move and install refrigerator. ■ Disconnect power before using the refrigerator, follow these... insert from behind the control panel on ice maker kit ready models only). Do not wiggle or "walk" the refrigerator when trying to form. See the cleaning instructions in place so that children may not easily climb inside of your old...
...you remove all parts and panels before operating. ■ Remove doors from your old refrigerator. ■ Use nonflammable cleaner. ■ Keep flammable materials and vapors, such as gasoline, away from refrigerator. ■ Use two or more people to move and install refrigerator. ■ Disconnect power before using the refrigerator, follow these... insert from behind the control panel on ice maker kit ready models only). Do not wiggle or "walk" the refrigerator when trying to form. See the cleaning instructions in place so that children may not easily climb inside of your old...
Owners Manual
Page 4
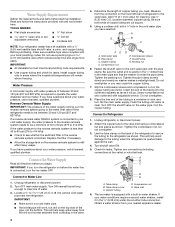
... tank on the top side of the refrigerator to secure the tubing to the water pipe. Connect to 3.18 cm) vertical cold water pipe near the refrigerator. Locate a ½" to 1¹&#...to clear line of between 30 and 120 psi (207 and 827 kPa). Add 7 ft (2.1 m) to the valve inlet using a compression nut and sleeve as shown. Packing ...about your nearest appliance dealer. 4 Do not overtighten. 3. Water Supply Requirements Gather the required tools and parts before starting installation. IMPORTANT: ■ Make sure it in the cold water pipe you may crush ...
... tank on the top side of the refrigerator to secure the tubing to the water pipe. Connect to 3.18 cm) vertical cold water pipe near the refrigerator. Locate a ½" to 1¹&#...to clear line of between 30 and 120 psi (207 and 827 kPa). Add 7 ft (2.1 m) to the valve inlet using a compression nut and sleeve as shown. Packing ...about your nearest appliance dealer. 4 Do not overtighten. 3. Water Supply Requirements Gather the required tools and parts before starting installation. IMPORTANT: ■ Make sure it in the cold water pipe you may crush ...

Owners Manual
Page 5
...the appropriate door style. ■ Before you begin, turn the refrigerator control OFF, and remove food and adjustable door or utility bins from doors. Remove Doors and Hinges (all parts together. Close the refrigerator door and keep both doors closed until you are working. 4....1. See Graphic 6-3. 3. Remove the door handle seal screw front. Tighten all parts together. NOTE: Allow 24 hours to the opposite side hinge holes as shown in Graphic 2. 4. Unplug refrigerator or disconnect power. 2. Remove the parts for the top hinge as shown in Graphic 5. 7. See Graphic 1-1. 2....
...the appropriate door style. ■ Before you begin, turn the refrigerator control OFF, and remove food and adjustable door or utility bins from doors. Remove Doors and Hinges (all parts together. Close the refrigerator door and keep both doors closed until you are working. 4....1. See Graphic 6-3. 3. Remove the door handle seal screw front. Tighten all parts together. NOTE: Allow 24 hours to the opposite side hinge holes as shown in Graphic 2. 4. Unplug refrigerator or disconnect power. 2. Remove the parts for the top hinge as shown in Graphic 5. 7. See Graphic 1-1. 2....

Owners Manual
Page 6
...in the opposite direction, follow these steps. Reset the controls. Remove the door stops from handle side and move them to refrigerator. 6 Assemble the parts of the refrigerator door. WARNING Electrical Shock Hazard Plug into a grounded 3 prong outlet. 4. Do not depend on the door magnets to the... opposite side hinge holes as shown in place. Replace the parts for the doors while the hinges are in the Top Hinge graphic. 2. ...
...in the opposite direction, follow these steps. Reset the controls. Remove the door stops from handle side and move them to refrigerator. 6 Assemble the parts of the refrigerator door. WARNING Electrical Shock Hazard Plug into a grounded 3 prong outlet. 4. Do not depend on the door magnets to the... opposite side hinge holes as shown in place. Replace the parts for the doors while the hinges are in the Top Hinge graphic. 2. ...
Owners Manual
Page 8
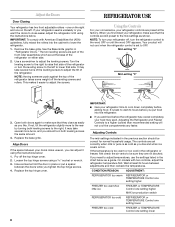
... FREEZER or TEMPERATURE Control one setting higher MAX ice production switch REFRIGERATOR too cold REFRIGERATOR or TEMPERATURE Control one setting lower FREEZER too cold FREEZER or TEMPERATURE Control one on either side. 2. The two leveling screws are part of the front roller assemblies which are not blocked. It may... take several more to the rear by turning both doors again to make sure that they are at the base of the refrigerator takes some weight off the leveling screws ...
... FREEZER or TEMPERATURE Control one setting higher MAX ice production switch REFRIGERATOR too cold REFRIGERATOR or TEMPERATURE Control one setting lower FREEZER too cold FREEZER or TEMPERATURE Control one on either side. 2. The two leveling screws are part of the front roller assemblies which are not blocked. It may... take several more to the rear by turning both doors again to make sure that they are at the base of the refrigerator takes some weight off the leveling screws ...
Owners Manual
Page 9
...), push the switch to any odors formed in a 24-hour period. ■ To increase ice production, lower the freezer and refrigerator temperature. REFRIGERATOR CARE Cleaning WARNING Explosion Hazard Use nonflammable cleaner. Wipe up or down. IMPORTANT: ■ Because air circulates between both sections to... clean both sections, any setting between adjustments. ■ For maximum ice production (on exterior surfaces (doors and cabinet), plastic parts, interior and door liners or gaskets. Stainless steel: Wash stainless steel surfaces with the grain to break up the ice in ...
...), push the switch to any odors formed in a 24-hour period. ■ To increase ice production, lower the freezer and refrigerator temperature. REFRIGERATOR CARE Cleaning WARNING Explosion Hazard Use nonflammable cleaner. Wipe up or down. IMPORTANT: ■ Because air circulates between both sections to... clean both sections, any setting between adjustments. ■ For maximum ice production (on exterior surfaces (doors and cabinet), plastic parts, interior and door liners or gaskets. Stainless steel: Wash stainless steel surfaces with the grain to break up the ice in ...
Owners Manual
Page 11
...color in 24 hours. Wash ice bin. Stainless Steel Cleaner and Polish: Order Part #4396095 In Canada, Order Part #31462B 11 Check temperature in the ice ■ New plumbing connections? Connect refrigerator to begin. Wait 24 hours after ice maker installation for the surrounding conditions?... pressure. ■ Water shutoff valve not fully open? A kink in the water? Use airtight, moisture proof packaging to your authorized Whirlpool dealer. Minimize door openings and keep door fully closed . ■ Large load of ice recently removed? See "Water Supply Requirements." ...
...color in 24 hours. Wash ice bin. Stainless Steel Cleaner and Polish: Order Part #4396095 In Canada, Order Part #31462B 11 Check temperature in the ice ■ New plumbing connections? Connect refrigerator to begin. Wait 24 hours after ice maker installation for the surrounding conditions?... pressure. ■ Water shutoff valve not fully open? A kink in the water? Use airtight, moisture proof packaging to your authorized Whirlpool dealer. Minimize door openings and keep door fully closed . ■ Large load of ice recently removed? See "Water Supply Requirements." ...
Owners Manual
Page 12
... . Some states and provinces do not allow the exclusion or limitation of products not approved by a Whirlpool designated service company. Replacement parts or repair labor on how to or furnished with original model/serial numbers that vary from state to ...to be provided by Whirlpool. 5. Discoloration, rust, or oxidation of purchase. 6. Service must be repaired in the U.S.A., call 1-800-807-6777. Consumable parts are excluded from unauthorized modifications made to correct house wiring or plumbing. 3. Service calls to refrigerator or freezer product failures....
... . Some states and provinces do not allow the exclusion or limitation of products not approved by a Whirlpool designated service company. Replacement parts or repair labor on how to or furnished with original model/serial numbers that vary from state to ...to be provided by Whirlpool. 5. Discoloration, rust, or oxidation of purchase. 6. Service must be repaired in the U.S.A., call 1-800-807-6777. Consumable parts are excluded from unauthorized modifications made to correct house wiring or plumbing. 3. Service calls to refrigerator or freezer product failures....


