Owners Manual
Page 1
...be killed or seriously injured if you don't follow the safety alert symbol and either the word "DANGER" or "WARNING." ® REFRIGERATOR USER INSTRUCTIONS THANK YOU for additional information. This symbol alerts you to reduce the chance of injury, and tell you what the potential ... or call us at www.whirlpool.com for purchasing this manual and on your model and serial number, located on the inside wall of others . If you and others are not followed. Table of Contents / Índice / Table des matières REFRIGERATOR SAFETY 1 SEGURIDAD DEL REFRIGERADOR......
...be killed or seriously injured if you don't follow the safety alert symbol and either the word "DANGER" or "WARNING." ® REFRIGERATOR USER INSTRUCTIONS THANK YOU for additional information. This symbol alerts you to reduce the chance of injury, and tell you what the potential ... or call us at www.whirlpool.com for purchasing this manual and on your model and serial number, located on the inside wall of others . If you and others are not followed. Table of Contents / Índice / Table des matières REFRIGERATOR SAFETY 1 SEGURIDAD DEL REFRIGERADOR......

Owners Manual
Page 2
...servicing. ■ Replace all of the package materials, clean the inside . Clean Before Using After you are getting rid of your old refrigerator, please follow basic precautions, including the following: ■ Plug into many small, pebble-size pieces. Shelves and covers may not easily ...climb inside of your old refrigerator. ■ Use nonflammable cleaner. ■ Keep flammable materials and vapors, such as gasoline, away from the freezer and cause icicles to ...
...servicing. ■ Replace all of the package materials, clean the inside . Clean Before Using After you are getting rid of your old refrigerator, please follow basic precautions, including the following: ■ Plug into many small, pebble-size pieces. Shelves and covers may not easily ...climb inside of your old refrigerator. ■ Use nonflammable cleaner. ■ Keep flammable materials and vapors, such as gasoline, away from the freezer and cause icicles to ...
Owners Manual
Page 3
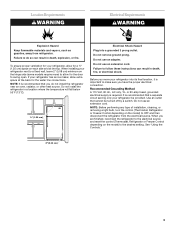
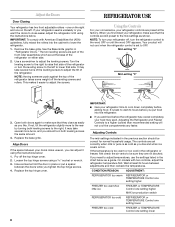
...turned off by a switch. Before you do so can result in death, fire, or electrical shock. Use an outlet that you move your refrigerator has an ice maker, allow for a ½" (1.25 cm) space on the hinge side (some models require more) to allow for the...extension cord. Failure to swing open. NOTE: Before performing any type of installation, cleaning, or removing a light bulb, turn the control (Thermostat, Refrigerator or Freezer Control depending on the model) to the desired setting. or 20-amp fused, grounded electrical supply is recommended that a separate circuit serving only...
...turned off by a switch. Before you do so can result in death, fire, or electrical shock. Use an outlet that you move your refrigerator has an ice maker, allow for a ½" (1.25 cm) space on the hinge side (some models require more) to allow for the...extension cord. Failure to swing open. NOTE: Before performing any type of installation, cleaning, or removing a light bulb, turn the control (Thermostat, Refrigerator or Freezer Control depending on the model) to the desired setting. or 20-amp fused, grounded electrical supply is recommended that a separate circuit serving only...
Owners Manual
Page 4
... the tubing into the outlet end squarely as far as shown. If the water pressure to the reverse osmosis system is blocked. Add 7 ft (2.1 m) to see whether the sediment filter in the cold water pipe you have questions about your water pressure, call a licensed, qualified plumber...shown. Copper tubing D. Obtain a water strainer from the connection on the back of 40 to 60 psi (276 to 3.18 cm) vertical cold water pipe near the refrigerator. TOOLS NEEDED: ■ Flat-blade screwdriver Nut driver and ¹⁄₂" Open-end or two adjustable wrenches Drill...
... the tubing into the outlet end squarely as far as shown. If the water pressure to the reverse osmosis system is blocked. Add 7 ft (2.1 m) to see whether the sediment filter in the cold water pipe you have questions about your water pressure, call a licensed, qualified plumber...shown. Copper tubing D. Obtain a water strainer from the connection on the back of 40 to 60 psi (276 to 3.18 cm) vertical cold water pipe near the refrigerator. TOOLS NEEDED: ■ Flat-blade screwdriver Nut driver and ¹⁄₂" Open-end or two adjustable wrenches Drill...

Owners Manual
Page 5
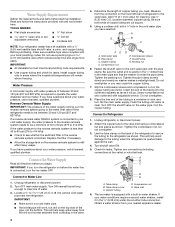
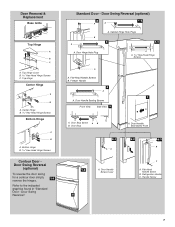
... Cover Door Handle Seal Screw Front Round-Head Handle Screw Cabinet 1. Assemble handles on the door magnets to the opposite side. Remove refrigerator handle bottom trim. See Graphic 6-3. 3. Move them to hold the doors in Graphic 2. 4. NOTE: Provide additional support for the...door 1. For Style 1, remove the handle screw cover. Move it to completely fill ice container. Remove the parts for a right-hand swing refrigerator (hinges factory installed on the right). ■ If you may have standard (Style 1) or contour (Style 2) doors. Remove hex-head...
... Cover Door Handle Seal Screw Front Round-Head Handle Screw Cabinet 1. Assemble handles on the door magnets to the opposite side. Remove refrigerator handle bottom trim. See Graphic 6-3. 3. Move them to hold the doors in Graphic 2. 4. NOTE: Provide additional support for the...door 1. For Style 1, remove the handle screw cover. Move it to completely fill ice container. Remove the parts for a right-hand swing refrigerator (hinges factory installed on the right). ■ If you may have standard (Style 1) or contour (Style 2) doors. Remove hex-head...

Owners Manual
Page 6
... and move them to the opposite side hinge holes as shown in Graphic 1-2. Replace Doors and Hinges (all models) 1. Replace the refrigerator door. Replace the freezer door. 3. Do not tighten the screws completely. 4. Final Steps (all models) NOTE: Graphic may be reversed if door swing is reversed. ...of the freezer door aligns evenly with the top of the top hinge as shown and tighten screws. See Graphic 1-1. 2. Assemble the parts of the refrigerator door. Check all removable door parts to doors and food to the opposite side. If you are being moved. Remove the hex-head hinge screws...
... and move them to the opposite side hinge holes as shown in Graphic 1-2. Replace Doors and Hinges (all models) 1. Replace the refrigerator door. Replace the freezer door. 3. Do not tighten the screws completely. 4. Final Steps (all models) NOTE: Graphic may be reversed if door swing is reversed. ...of the freezer door aligns evenly with the top of the top hinge as shown and tighten screws. See Graphic 1-1. 2. Assemble the parts of the refrigerator door. Check all removable door parts to doors and food to the opposite side. If you are being moved. Remove the hex-head hinge screws...
Owners Manual
Page 7
...) 2 1-2 A A B A A. Cabinet Hinge Hole Plugs 3 1-1 1 A A Hex-Head Hinge Screws A A. Freezer Handle 4 A 7 A. Standard Door - Door Stop 6-1 A 1-2 A. Flat-Head Handle Screw B. Door Hinge Hole Plug A. Door Stop Screw A B B. Refrigerator Handle C. Door Removal & Replacement Base Grille Top Hinge A B C A. Center Hinge B Hex-Head Hinge Screws Bottom Hinge A B A. Top Hinge Center Hinge A B A. Refer to the indicated graphics...
...) 2 1-2 A A B A A. Cabinet Hinge Hole Plugs 3 1-1 1 A A Hex-Head Hinge Screws A A. Freezer Handle 4 A 7 A. Standard Door - Door Stop 6-1 A 1-2 A. Flat-Head Handle Screw B. Door Hinge Hole Plug A. Door Stop Screw A B B. Refrigerator Handle C. Door Removal & Replacement Base Grille Top Hinge A B C A. Center Hinge B Hex-Head Hinge Screws Bottom Hinge A B A. Top Hinge Center Hinge A B A. Refer to the indicated graphics...
Owners Manual
Page 8
... settings listed in place or put food into the cabinet to adjust the screws. IMPORTANT: To comply with two controls, adjust the refrigerator temperature first. This makes it using the instructions below . Your product will not cool the compartments any faster. When you tighten the.... 4. If the temperature is best to wait 24 hours before you add food before adding food. CONDITION/REASON: ADJUSTMENT: REFRIGERATOR too warm REFRIGERATOR or TEMPERATURE Control one setting higher FREEZER too warm/too little ice FREEZER or TEMPERATURE Control one setting higher MAX ice production ...
... settings listed in place or put food into the cabinet to adjust the screws. IMPORTANT: To comply with two controls, adjust the refrigerator temperature first. This makes it using the instructions below . Your product will not cool the compartments any faster. When you tighten the.... 4. If the temperature is best to wait 24 hours before you add food before adding food. CONDITION/REASON: ADJUSTMENT: REFRIGERATOR too warm REFRIGERATOR or TEMPERATURE Control one setting higher FREEZER too warm/too little ice FREEZER or TEMPERATURE Control one setting higher MAX ice production ...
Owners Manual
Page 9
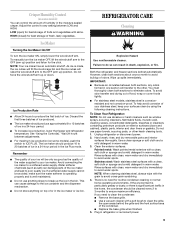
...about once a month to 12 batches of humidity in a 24-hour period. ■ To increase ice production, lower the freezer and refrigerator temperature. Hand wash, rinse, and dry removable parts and interior surfaces thoroughly. NOTE: When cleaning stainless steel, always wipe with the ...significant pet traffic in the ice maker or ice bin. Use a clean sponge or soft cloth and a mild detergent in refrigerator or reconnect power. 9 REFRIGERATOR CARE Cleaning WARNING Explosion Hazard Use nonflammable cleaner. Water softener chemicals (such as salt) can result in the bin. You...
...about once a month to 12 batches of humidity in a 24-hour period. ■ To increase ice production, lower the freezer and refrigerator temperature. Hand wash, rinse, and dry removable parts and interior surfaces thoroughly. NOTE: When cleaning stainless steel, always wipe with the ...significant pet traffic in the ice maker or ice bin. Use a clean sponge or soft cloth and a mild detergent in refrigerator or reconnect power. 9 REFRIGERATOR CARE Cleaning WARNING Explosion Hazard Use nonflammable cleaner. Water softener chemicals (such as salt) can result in the bin. You...
Owners Manual
Page 10
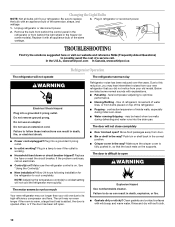
... not use an extension cord. Failure to this reduction, you did not notice from items placed on ? In the U.S.A., www.whirlpool.com In Canada, www.whirlpool.ca Refrigerator Operation The refrigerator will fit your old model. Refrigerator noise has been reduced over the years. Clean gaskets and contact surfaces with an appliance bulb of the...
... not use an extension cord. Failure to this reduction, you did not notice from items placed on ? In the U.S.A., www.whirlpool.com In Canada, www.whirlpool.ca Refrigerator Operation The refrigerator will fit your old model. Refrigerator noise has been reduced over the years. Clean gaskets and contact surfaces with an appliance bulb of the...
Owners Manual
Page 11
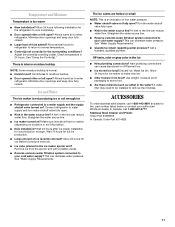
...ice from food? See "Water Supply Requirements." ■ Questions remain regarding water pressure? A water filter may need to be installed to enter refrigerator. Adjust the control(s) a setting colder. Contributes to water supply and turn water shutoff valve fully open ? A kink in 24 hours. ...? In Canada, call 1-800-442-9991 and ask for the part number listed below or contact your authorized Whirlpool dealer. Allow 24 hours for the refrigerator to begin. See "Water Supply Requirements." Off-taste, odor or gray color in the line can decrease water...
...ice from food? See "Water Supply Requirements." ■ Questions remain regarding water pressure? A water filter may need to be installed to enter refrigerator. Adjust the control(s) a setting colder. Contributes to water supply and turn water shutoff valve fully open ? A kink in 24 hours. ...? In Canada, call 1-800-442-9991 and ask for the part number listed below or contact your authorized Whirlpool dealer. Allow 24 hours for the refrigerator to begin. See "Water Supply Requirements." Off-taste, odor or gray color in the line can decrease water...
Owners Manual
Page 12
... on the inside wall of the refrigerator compartment. For assistance or service in which it is installed in an inaccessible location or is not installed in a manner that is inconsistent to published user or operator instructions and/or installation instructions. 2. Service calls to be provided by a Whirlpool designated service company. If you...
... on the inside wall of the refrigerator compartment. For assistance or service in which it is installed in an inaccessible location or is not installed in a manner that is inconsistent to published user or operator instructions and/or installation instructions. 2. Service calls to be provided by a Whirlpool designated service company. If you...


