Use and Care Guide
Page 3
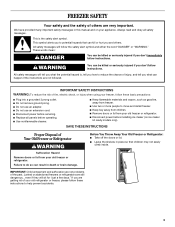
...: DANGER You can result in this manual and on ice maker kit ready models only). s Do not remove ground prong. s Keep key away from your appliance. IMPORTANT: Child entrapment and suffocation are very important. Always read and obey all panels before servicing. s Use nonflammable cleaner. Failure to move and install freezer. s Do not use an adapter. s Use two or more people to do...
...: DANGER You can result in this manual and on ice maker kit ready models only). s Do not remove ground prong. s Keep key away from your appliance. IMPORTANT: Child entrapment and suffocation are very important. Always read and obey all panels before servicing. s Use nonflammable cleaner. Failure to move and install freezer. s Do not use an adapter. s Use two or more people to do...
Use and Care Guide
Page 4
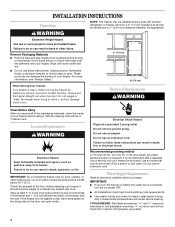
.... 3" (7.5 cm) 3" (7.5 cm) Electrical Requirements WARNING Clean Before Using After you remove all directions carefully before you turn the ice maker OFF. If the freezer is recommended that cannot be turned off by side with your freezer. Do not use sharp instruments, rubbing alcohol, flammable fluids, or abrasive cleaners to remove tape or glue. Install plastic tubing only in a location where the temperature will remain above freezing. Do not...
.... 3" (7.5 cm) 3" (7.5 cm) Electrical Requirements WARNING Clean Before Using After you remove all directions carefully before you turn the ice maker OFF. If the freezer is recommended that cannot be turned off by side with your freezer. Do not use sharp instruments, rubbing alcohol, flammable fluids, or abrasive cleaners to remove tape or glue. Install plastic tubing only in a location where the temperature will remain above freezing. Do not...

Use and Care Guide
Page 5
...;₄" (6.35 mm) water line at the valve) or nuts that the washer is less than 40 to the reverse osmosis system. Add 7 ft (2.1 m) to the tubing when the freezer is connected to operate the water dispenser and ice maker. Tighten the pipe clamp screws carefully and evenly so washer makes a watertight seal. Obtain a water strainer from collecting in conjunction with your water conditions require a second water strainer, install it...
...;₄" (6.35 mm) water line at the valve) or nuts that the washer is less than 40 to the reverse osmosis system. Add 7 ft (2.1 m) to the tubing when the freezer is connected to operate the water dispenser and ice maker. Tighten the pipe clamp screws carefully and evenly so washer makes a watertight seal. Obtain a water strainer from collecting in conjunction with your water conditions require a second water strainer, install it...
Use and Care Guide
Page 6
... door, see "Replace Door and Hinges." See Base Grille Graphic 1A. 3. Replace the freezer door. Invert the door stop screws. Reset the control. Remove the parts for a right-hand swing door (hinges factory installed on some models) IMPORTANT: If you want to hold the door in Graphic 2. 2. Lift the freezer door free from one side of the cabinet. Tighten all holes to the hinge bracket . Final Steps Reverse Door (optional on the right). Loosen set...
... door, see "Replace Door and Hinges." See Base Grille Graphic 1A. 3. Replace the freezer door. Invert the door stop screws. Reset the control. Remove the parts for a right-hand swing door (hinges factory installed on some models) IMPORTANT: If you want to hold the door in Graphic 2. 2. Lift the freezer door free from one side of the cabinet. Tighten all holes to the hinge bracket . Final Steps Reverse Door (optional on the right). Loosen set...

Use and Care Guide
Page 7
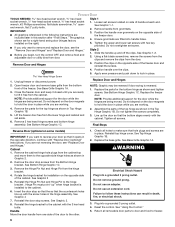
Door Stop Screws B. Door Stop C. Door Stop Screws B. Handle C. Set Screws A. Door Removal & Replacement Base Grille 1A Door Swing Reversal (optional) 2 A A. Grommet B. Clips B. Door Stop C. Handle 7 Top Hinge Cover B. 3/8" or 5/8" Hex-Head Hinge Screws (depending on model) C. Hinge Pin D. Hinge Pin D. Handle Screws C. Hinge Pin Nut E. 5/16" Hex-Head Hinge Screws Style 1 1-1 B A C A 5 Door Handle Seal Screw Style 2 1-2 B C A. Hinge Pin Nut E. 5/16" Hex-Head Hinge Screws Left Hand Hinge Door Stop Right Hand Hinge 4 Door Stop A 3 B C D E A. Top ...
Door Stop Screws B. Door Stop C. Door Stop Screws B. Handle C. Set Screws A. Door Removal & Replacement Base Grille 1A Door Swing Reversal (optional) 2 A A. Grommet B. Clips B. Door Stop C. Handle 7 Top Hinge Cover B. 3/8" or 5/8" Hex-Head Hinge Screws (depending on model) C. Hinge Pin D. Hinge Pin D. Handle Screws C. Hinge Pin Nut E. 5/16" Hex-Head Hinge Screws Style 1 1-1 B A C A 5 Door Handle Seal Screw Style 2 1-2 B C A. Hinge Pin Nut E. 5/16" Hex-Head Hinge Screws Left Hand Hinge Door Stop Right Hand Hinge 4 Door Stop A 3 B C D E A. Top ...

Use and Care Guide
Page 8
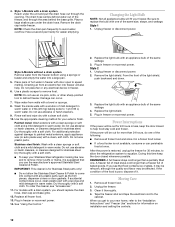
... the number of freezer space. If the vents are blocked, airflow will run constantly until freezer is normal. After the freezer is cooled. This is level. 6. The back of unfrozen food. Turn leg counterclockwise to lower a corner. 5. Turn leg clockwise to raise a corner. After freezer is opened . 4. Using the Control Turn the freezer temperature control to 6 or 8 hours (or longer), depending on two fixed supports. 3. This setting is opened . Let the freezer cool...
... the number of freezer space. If the vents are blocked, airflow will run constantly until freezer is normal. After the freezer is cooled. This is level. 6. The back of unfrozen food. Turn leg counterclockwise to lower a corner. 5. Turn leg clockwise to raise a corner. After freezer is opened . 4. Using the Control Turn the freezer temperature control to 6 or 8 hours (or longer), depending on two fixed supports. 3. This setting is opened . Let the freezer cool...
Use and Care Guide
Page 9
... selected setting. To activate, adjust the control knob to a softened water supply. Use this feature just before adding large amounts of ice produced. Fast Freeze (on some models) To Turn the Ice Maker On/Off NOTE: Do not force the wire shutoff arm up or down. The lock is warm, such as during start-up or defrosting. ✔ Tests the alarm regardless of ice in the ice storage bin. If...
... selected setting. To activate, adjust the control knob to a softened water supply. Use this feature just before adding large amounts of ice produced. Fast Freeze (on some models) To Turn the Ice Maker On/Off NOTE: Do not force the wire shutoff arm up or down. The lock is warm, such as during start-up or defrosting. ✔ Tests the alarm regardless of ice in the ice storage bin. If...

Use and Care Guide
Page 10
... your model. Remove the bin by sliding it back into the supports. 10 FREEZER FEATURES This manual covers several different models. The door shelves and the bottom of the cabinet have the best freezing capability. s Leave some or all of the gate up . Storage Gate (on freezer shelves. Replace the bin by tipping the front of your freezer, please remember: s The cabinet shelves have a slightly less cold temperature. Lift...
... your model. Remove the bin by sliding it back into the supports. 10 FREEZER FEATURES This manual covers several different models. The door shelves and the bottom of the cabinet have the best freezing capability. s Leave some or all of the gate up . Storage Gate (on freezer shelves. Replace the bin by tipping the front of your freezer, please remember: s The cabinet shelves have a slightly less cold temperature. Lift...
Use and Care Guide
Page 11
..., additional refrigerator-freezer, or in a cooler, an additional refrigerator or freezer, or a cool area. 3. Frost is for stainless steel. Replace all frozen food. Remove all frozen food. Remove base grille. Do not use cleaning waxes, concentrated detergents, bleaches, or cleaners containing petroleum on plastic parts, interior and door liners or gaskets. Do not use abrasive or harsh cleaners. Wrap frozen food in warm water. Do not use abrasive or...
..., additional refrigerator-freezer, or in a cooler, an additional refrigerator or freezer, or a cool area. 3. Frost is for stainless steel. Replace all frozen food. Remove all frozen food. Remove base grille. Do not use cleaning waxes, concentrated detergents, bleaches, or cleaners containing petroleum on plastic parts, interior and door liners or gaskets. Do not use abrasive or harsh cleaners. Wrap frozen food in warm water. Do not use abrasive or...
Use and Care Guide
Page 12
.... 3. Remove the drain cap inside walls with a towel or sponge. 8. Have a second pan handy for stainless steel. Changing the Light Bulb NOTE: Not all frozen food and store it . Style 1 1. Unplug freezer or disconnect power. Place pans of mild detergent in warm water. Directing air from walls with a solution of hot water in warm water. Do not place fan or any plastic parts such as the trim pieces, dispenser covers or door gaskets. Use...
.... 3. Remove the drain cap inside walls with a towel or sponge. 8. Have a second pan handy for stainless steel. Changing the Light Bulb NOTE: Not all frozen food and store it . Style 1 1. Unplug freezer or disconnect power. Place pans of mild detergent in warm water. Directing air from walls with a solution of hot water in warm water. Do not place fan or any plastic parts such as the trim pieces, dispenser covers or door gaskets. Use...
Use and Care Guide
Page 13
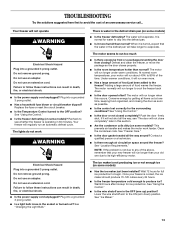
... the door opened often? s Is the control set correctly for ice production. s Is the door or not closed completely? This prevents air transfer and makes the motor work WARNING Electrical Shock Hazard Plug into a grounded 3 prong outlet. Contact a qualified person or a technician. The ice maker is cooled, the ice maker should produce 70-120 cubes every 24 hours. Lower the wire shutoff arm to drip into the defrost pan. Do not use...
... the door opened often? s Is the control set correctly for ice production. s Is the door or not closed completely? This prevents air transfer and makes the motor work WARNING Electrical Shock Hazard Plug into a grounded 3 prong outlet. Contact a qualified person or a technician. The ice maker is cooled, the ice maker should produce 70-120 cubes every 24 hours. Lower the wire shutoff arm to drip into the defrost pan. Do not use...
Use and Care Guide
Page 14
... the complete model and serial number of position (on . In order to keep food organized so it or has no ice been produced? Remove the ice from the air vents. s Are the shelves and basket out of your freezer has been connected to a water supply and the supply shutoff valve is difficult to open s Are food packages blocking the door ? See "Freezer Care." See "Using the Control." Call customer service toll free in...
... the complete model and serial number of position (on . In order to keep food organized so it or has no ice been produced? Remove the ice from the air vents. s Are the shelves and basket out of your freezer has been connected to a water supply and the supply shutoff valve is difficult to open s Are food packages blocking the door ? See "Freezer Care." See "Using the Control." Call customer service toll free in...
Use and Care Guide
Page 15
...-253-1301 in the U.S.A. Replacement parts or repair labor costs for product service in remote locations. 10. If you ever need it is installed in an inaccessible location or is not installed in accordance with published installation instructions. This major appliance is designed to know your authorized dealer to correct house wiring or plumbing. 2. Dealer name Address Phone number Model number Serial number Purchase date 15 Outside...
...-253-1301 in the U.S.A. Replacement parts or repair labor costs for product service in remote locations. 10. If you ever need it is installed in an inaccessible location or is not installed in accordance with published installation instructions. This major appliance is designed to know your authorized dealer to correct house wiring or plumbing. 2. Dealer name Address Phone number Model number Serial number Purchase date 15 Outside...


