Use and Care Guide
Page 1
Use & Care Manual Top Mount Refrigerator Important Safety Instructions 2 Installation 3 Connecting Water Supply 4 Door Removal Instructions 5 Temperature Controls 7 Ice Service 8 Normal Operating Sounds & Sights.... 9 Care and Cleaning 10 Warranty 11 Before you Call 12 ReaD aND Save TheSe INSTRuCTIONS ReaD aND Save TheSe INSTRuCTIONS P/N 241997501 (October 2008)
Use & Care Manual Top Mount Refrigerator Important Safety Instructions 2 Installation 3 Connecting Water Supply 4 Door Removal Instructions 5 Temperature Controls 7 Ice Service 8 Normal Operating Sounds & Sights.... 9 Care and Cleaning 10 Warranty 11 Before you Call 12 ReaD aND Save TheSe INSTRuCTIONS ReaD aND Save TheSe INSTRuCTIONS P/N 241997501 (October 2008)
Use and Care Guide
Page 2
...entrapment and suffocation are not problems of the appliance is equipped with any exterior wrapping material immediately after the refrigerator is important but not hazard-related. Read product labels for your protection against electrical shock hazards. child safety...maker. • Remove all instructions before replacing a light bulb to play. Consult a qualified electrician. Junked or abondoned refrigerators or freezers are labeled with insufficient power can damage the compressor. Important Safety Instructions Important Safety Instructions Safety Precautions Do not ...
...entrapment and suffocation are not problems of the appliance is equipped with any exterior wrapping material immediately after the refrigerator is important but not hazard-related. Read product labels for your protection against electrical shock hazards. child safety...maker. • Remove all instructions before replacing a light bulb to play. Consult a qualified electrician. Junked or abondoned refrigerators or freezers are labeled with insufficient power can damage the compressor. Important Safety Instructions Important Safety Instructions Safety Precautions Do not ...
Use and Care Guide
Page 3
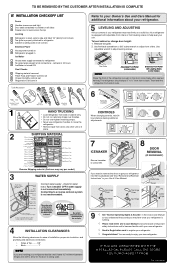
... power to the light bulb and other electrical components. Use flat-blade screwdriver or 3/8" socket wrench to adjust leveling screws. Then level the refrigerator from front to back. This kit can be installed on a solid floor. Installation important Turning the Freezer and Fresh Food Controls to "0" ...turns off power to your unit to 34° F. Installation caution Do Not install the refrigerator where the temperature will drop below 55° F. note Raise the front of your model. Do Not block the toe grille on the ...
... power to the light bulb and other electrical components. Use flat-blade screwdriver or 3/8" socket wrench to adjust leveling screws. Then level the refrigerator from front to back. This kit can be installed on a solid floor. Installation important Turning the Freezer and Fresh Food Controls to "0" ...turns off power to your unit to 34° F. Installation caution Do Not install the refrigerator where the temperature will drop below 55° F. note Raise the front of your model. Do Not block the toe grille on the ...
Use and Care Guide
Page 4
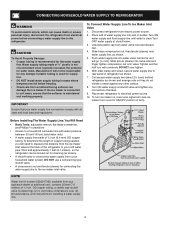
... kit number 5303917950, available from the ice maker inlet valve at additional cost, contains 25 feet (7.6 meters) of refrigerator as shown. 7. Disconnect refrigerator from water valve inlet and discard cap. 4. Turn OFF water supply at shutoff valve and tighten any connections that ...your water supply line connections comply with a wrench; Reconnect refrigerator to rear panel of ¼ inch OD copper tubing, a saddle type shutoff valve (nonpiercing), (2) ¼ inch brass compression nuts, ...
... kit number 5303917950, available from the ice maker inlet valve at additional cost, contains 25 feet (7.6 meters) of refrigerator as shown. 7. Disconnect refrigerator from water valve inlet and discard cap. 4. Turn OFF water supply at shutoff valve and tighten any connections that ...your water supply line connections comply with a wrench; Reconnect refrigerator to rear panel of ¼ inch OD copper tubing, a saddle type shutoff valve (nonpiercing), (2) ¼ inch brass compression nuts, ...
Use and Care Guide
Page 5
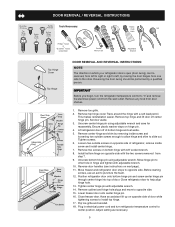
...Trace around the hinge with adjustable wrench. 14. Unscrew center hinge pin using adjustable wrench. Lift refrigerator door off center hinge pin. Tighten screws. 6. Move freezer and refrigerator door stops to center position. Set door aside. 3. Position refrigerator door onto bottom hinge pin and screw center... hinge hole plugs and move to "0" and remove the electrical power cord from door shelves. 1. important Before you begin, turn refrigerator temperature control to opposite side. Move hinge pin to install top hinge. 17. Install bottom hinge on next page). 11. Door...
...Trace around the hinge with adjustable wrench. 14. Unscrew center hinge pin using adjustable wrench. Lift refrigerator door off center hinge pin. Tighten screws. 6. Move freezer and refrigerator door stops to center position. Set door aside. 3. Position refrigerator door onto bottom hinge pin and screw center... hinge hole plugs and move to "0" and remove the electrical power cord from door shelves. 1. important Before you begin, turn refrigerator temperature control to opposite side. Move hinge pin to install top hinge. 17. Install bottom hinge on next page). 11. Door...

Use and Care Guide
Page 6
Door Removal / reversal Instructions To Remove Freezer Handle: (Handles may be easier to gently peel off of refrigerator door. 2. Remove two screws attaching handle to bottom of handle over dovetail button, swing handle into an upright position and pull ...locking it into place. 2. Place top of freezer door. 2. Self Adhesive Nameplate (some models) Nameplate To Remove REFRIGERATOR Handle: (Handles may be easier to reverse while doors are off.) 1. To attach REFRIGERATOR handle: 1. Swing top of handle away from door and slide handle down and off .) 1. Self-Adhesive Nameplate...
Door Removal / reversal Instructions To Remove Freezer Handle: (Handles may be easier to gently peel off of refrigerator door. 2. Remove two screws attaching handle to bottom of handle over dovetail button, swing handle into an upright position and pull ...locking it into place. 2. Place top of freezer door. 2. Self Adhesive Nameplate (some models) Nameplate To Remove REFRIGERATOR Handle: (Handles may be easier to reverse while doors are off.) 1. To attach REFRIGERATOR handle: 1. Swing top of handle away from door and slide handle down and off .) 1. Self-Adhesive Nameplate...
Use and Care Guide
Page 7
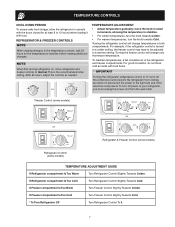
... additional changes. If Freezer compartment Is Too Cold Turn Freezer Control Slightly Towards Cold. * To Turn Refrigerator Off Turn Refrigerator Control To 0. 7 Turning the refrigerator control will change temperatures in both compartments. If Freezer compartment Is Too Warm Turn Freezer Control Slightly Towards... the light bulb and other electrical components. To turn the knob towards Cold. note When first turning refrigerator on, move the knob in the refrigerator and freezer compartments. This is turned to a colder setting, the freezer control may have to be adjusted...
... additional changes. If Freezer compartment Is Too Cold Turn Freezer Control Slightly Towards Cold. * To Turn Refrigerator Off Turn Refrigerator Control To 0. 7 Turning the refrigerator control will change temperatures in both compartments. If Freezer compartment Is Too Warm Turn Freezer Control Slightly Towards... the light bulb and other electrical components. To turn the knob towards Cold. note When first turning refrigerator on, move the knob in the refrigerator and freezer compartments. This is turned to a colder setting, the freezer control may have to be adjusted...
Use and Care Guide
Page 8
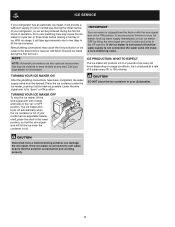
If the ice maker is not turned off automatically when the ice container is full. ice service If your refrigerator, no usage, it will take approximately one to two days to be discolored or have been completed, the water supply valve must be installed in ...most models at a rate of 8 cubes every 80 to its "down" or ON position. During the initial startup of your refrigerator has an automatic ice maker, it will provide a sufficient supply of operation. Discard ice made during the first 24 hours of ice for information. TURNING...
If the ice maker is not turned off automatically when the ice container is full. ice service If your refrigerator, no usage, it will take approximately one to two days to be discolored or have been completed, the water supply valve must be installed in ...most models at a rate of 8 cubes every 80 to its "down" or ON position. During the initial startup of your refrigerator has an automatic ice maker, it will provide a sufficient supply of operation. Discard ice made during the first 24 hours of ice for information. TURNING...
Use and Care Guide
Page 9
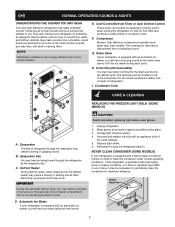
...Remember to periodically clean the condenser for air-cooled condensers (black coils on top of the compressor for maximum efficiency. If the refrigerator is operating as shown. 4. Hard surfaces, such as vinyl or wood floors, walls, and kitchen cabinets may make unfamiliar ..., and what is significant pet traffic in . Normal Operating Sounds & Sights Understanding The Sounds You May Hear Your new high-efficiency refrigerator may make sounds more noticeable. E. Compressor Modern, high-efficiency compressors operate much faster than older models. The compressor may create a boiling...
...Remember to periodically clean the condenser for air-cooled condensers (black coils on top of the compressor for maximum efficiency. If the refrigerator is operating as shown. 4. Hard surfaces, such as vinyl or wood floors, walls, and kitchen cabinets may make unfamiliar ..., and what is significant pet traffic in . Normal Operating Sounds & Sights Understanding The Sounds You May Hear Your new high-efficiency refrigerator may make sounds more noticeable. E. Compressor Modern, high-efficiency compressors operate much faster than older models. The compressor may create a boiling...
Use and Care Guide
Page 10
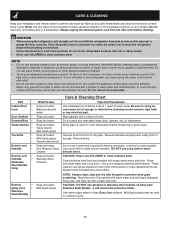
... light bulb or any spills immediately and clean both sections at most home improvement or major department stores. Do not shift the refrigerator from the wall outlet. • Do not use any surface. To turn off the compressor, but does not disconnect electrical power... of baking soda in warm water. CAUTION: Never use CHLORIDE to the light bulb or other abrasive cleaning materials. • Turning the refrigerator temperature control to "0" turns off power to side as window sprays, scouring cleansers, flammable liquids, cleaning waxes, concentratred detergents, bleaches or ...
... light bulb or any spills immediately and clean both sections at most home improvement or major department stores. Do not shift the refrigerator from the wall outlet. • Do not use any surface. To turn off the compressor, but does not disconnect electrical power... of baking soda in warm water. CAUTION: Never use CHLORIDE to the light bulb or other abrasive cleaning materials. • Turning the refrigerator temperature control to "0" turns off power to side as window sprays, scouring cleansers, flammable liquids, cleaning waxes, concentratred detergents, bleaches or ...
Use and Care Guide
Page 11
...THIS WRITTEN LIMITED WARRANTY OR ANY IMPLIED WARRANTY. THIS WRITTEN WARRANTY GIVES YOU SPECIFIC LEGAL RIGHTS. white westinghouse APPLIANCE WARRANTY INFORMATION White Westinghouse Appliance Warranty Information Your appliance is warranted by Electrolux Major Appliances North America, a division of Electrolux Home... this appliance that have been removed, altered or cannot be obtained by unauthorized service companies; Products with replacing any refrigerator or freezer failures. 6. Food loss due to any parts of purchase, Electrolux will pay costs, except as described...
...THIS WRITTEN LIMITED WARRANTY OR ANY IMPLIED WARRANTY. THIS WRITTEN WARRANTY GIVES YOU SPECIFIC LEGAL RIGHTS. white westinghouse APPLIANCE WARRANTY INFORMATION White Westinghouse Appliance Warranty Information Your appliance is warranted by Electrolux Major Appliances North America, a division of Electrolux Home... this appliance that have been removed, altered or cannot be obtained by unauthorized service companies; Products with replacing any refrigerator or freezer failures. 6. Food loss due to any parts of purchase, Electrolux will pay costs, except as described...
Use and Care Guide
Page 12
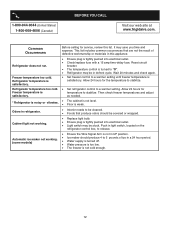
...pushed into electrical outlet. x The freezer is satisfactory. x Ensure plug is tightly pushed into electrical outlet. x Interior needs to stabilize. Refrigerator temperature too cold. Automatic ice maker not working . x Check/replace fuse with a 15 amp time-delay fuse. Allow 24 hours .... Push in a 24 hour period. x Water pressure is weak. Freezer temperature too cold. Freezer temperature is satisfactory. * Refrigerator is not level. x Refrigerator may be stuck. x The cabinet is noisy or vibrates. Cabinet light not working . (some models) Before calling for the...
...pushed into electrical outlet. x The freezer is satisfactory. x Ensure plug is tightly pushed into electrical outlet. x Interior needs to stabilize. Refrigerator temperature too cold. Automatic ice maker not working . x Check/replace fuse with a 15 amp time-delay fuse. Allow 24 hours .... Push in a 24 hour period. x Water pressure is weak. Freezer temperature too cold. Freezer temperature is satisfactory. * Refrigerator is not level. x Refrigerator may be stuck. x The cabinet is noisy or vibrates. Cabinet light not working . (some models) Before calling for the...
Installation Instructions
Page 1
...plumbing and electrical connections: • Sides & Top..........3/8" • Back 1" NOTE If you need to remove the doors to get your refrigerator beside a wall, leave 1/2" minimum between hinges and wall to allow for water leaks. You are ready to adjust leveling screws. IF ...Grille NOTE Adjustable Front Roller (some models) Raise Stationary Front Roller with adjustable front rollers or front leveling screws to help level your refrigerator. √ Congratulations! check for the door to swing open. 6 Humidity Control CONTROLS When changing controls, wait 24 hours before ...
...plumbing and electrical connections: • Sides & Top..........3/8" • Back 1" NOTE If you need to remove the doors to get your refrigerator beside a wall, leave 1/2" minimum between hinges and wall to allow for water leaks. You are ready to adjust leveling screws. IF ...Grille NOTE Adjustable Front Roller (some models) Raise Stationary Front Roller with adjustable front rollers or front leveling screws to help level your refrigerator. √ Congratulations! check for the door to swing open. 6 Humidity Control CONTROLS When changing controls, wait 24 hours before ...

Parts Catalog
Page 1
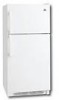
... 30917 Publication No. 5995532412 09/02/03 (EN/SERVICE/DCS) 390 Model No. All rights reserved. WWTR1502K Copyright © 2009 Electrolux Home Products, Inc. White-Westinghouse Product No. WWTR1502KW0 Series R134a Color white Volts 115 Wiring Diagram 241582401 Owner's Guide 241997501 Market North America Energy Guide 241613795 Service Data Sheet 241588203...
... 30917 Publication No. 5995532412 09/02/03 (EN/SERVICE/DCS) 390 Model No. All rights reserved. WWTR1502K Copyright © 2009 Electrolux Home Products, Inc. White-Westinghouse Product No. WWTR1502KW0 Series R134a Color white Volts 115 Wiring Diagram 241582401 Owner's Guide 241997501 Market North America Energy Guide 241613795 Service Data Sheet 241588203...

