Use and Care Guide
Page 1
Electric Range Use & Care Manual ETOD Control or no clock Welcome 2 Important Safety Instructions .....3-4 Before Setting Oven Controls ....6-7 Setting Clock & Minute Timer .....5-6 Setting Surface & Oven Controls .. 6-7 Care & Cleaning 8-10 Before You Call Solutions to Common Problems 11 Warranty Back Page Questions? 1-800-944-9044 (United States) 1-800-668-4606 (Canada) Visit the Frigidaire Web Site at: http://www.frigidaire.com READ AND SAVE THESE INSTRUCTIONS 316257134 (0809)
Electric Range Use & Care Manual ETOD Control or no clock Welcome 2 Important Safety Instructions .....3-4 Before Setting Oven Controls ....6-7 Setting Clock & Minute Timer .....5-6 Setting Surface & Oven Controls .. 6-7 Care & Cleaning 8-10 Before You Call Solutions to Common Problems 11 Warranty Back Page Questions? 1-800-944-9044 (United States) 1-800-668-4606 (Canada) Visit the Frigidaire Web Site at: http://www.frigidaire.com READ AND SAVE THESE INSTRUCTIONS 316257134 (0809)
Use and Care Guide
Page 2
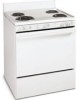
... Model Number: Serial Number: Purchase Date: The product serial plate will provide you 'll enjoy your range at one priority. You can find the serial plate on your new range and Thank You for choosing our product. Your satisfaction is located on right side of our product and ... to Electrolux Home Products. We know you both the model number and serial number for your range and feature information for several models. Serial plate is our number one of a new range! These instructions are representational. Common sense and caution must be filled in this manual. Please...
... Model Number: Serial Number: Purchase Date: The product serial plate will provide you 'll enjoy your range at one priority. You can find the serial plate on your new range and Thank You for choosing our product. Your satisfaction is located on right side of our product and ... to Electrolux Home Products. We know you both the model number and serial number for your range and feature information for several models. Serial plate is our number one of a new range! These instructions are representational. Common sense and caution must be filled in this manual. Please...

Use and Care Guide
Page 3
...technician and an authorized repair service. Ask your appliance is not turned off the range. Children climbing on Grease Fires-Smother the fire with the National Electrical Code ANSI/NFPA No. 70 latest edition and local electrical code requirements. Do not use , do not touch, or let clothing or ...other flammable materials contact hot surfaces. • Do Not Use Water or Flour on the range to children in accordance with...
...technician and an authorized repair service. Ask your appliance is not turned off the range. Children climbing on Grease Fires-Smother the fire with the National Electrical Code ANSI/NFPA No. 70 latest edition and local electrical code requirements. Do not use , do not touch, or let clothing or ...other flammable materials contact hot surfaces. • Do Not Use Water or Flour on the range to children in accordance with...
Use and Care Guide
Page 4
.... Exposed fat and grease could ignite. • Protective Liners-Do not use . Improper installation of these liners may result in risk of electric shock, or fire. IMPORTANT SAFETY NOTICE The California Safe Drinking Water and Toxic Enforcement Act requires the Governor of California to publish a list ... Place a pan of food on the unit before moving. • Do not use aluminum foil to the side of the range when opening the door of electric shock, or fire. Do not let potholders contact the hot heating elements in water. Do not allow dripping fat to the ...
.... Exposed fat and grease could ignite. • Protective Liners-Do not use . Improper installation of these liners may result in risk of electric shock, or fire. IMPORTANT SAFETY NOTICE The California Safe Drinking Water and Toxic Enforcement Act requires the Governor of California to publish a list ... Place a pan of food on the unit before moving. • Do not use aluminum foil to the side of the range when opening the door of electric shock, or fire. Do not let potholders contact the hot heating elements in water. Do not allow dripping fat to the ...
Use and Care Guide
Page 5
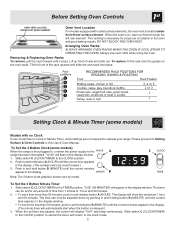
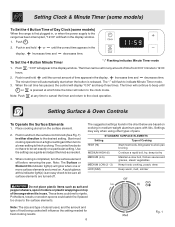
... of the rack upward and slide the rack back into place. 3, 4 or 5 2 or 3 1 1 Setting Clock & Minute Timer (some models) When the range is on the oven walls. Push in and hold button B (MINUTE) until the correct minutes appear in the display window. 1. Slide switch C (CLOCK/TIMER) to... To Set the 3 Button Clock (some models) Models with coiled surface elements, the oven vent is released.) 3. Slide switch C (CLOCK/TIMER) to the range has been interrupted, "12:00" will flash in the display. (The minute timer will only count forward.) 3. Note: The 3 button clock graphics shown vary...
... of the rack upward and slide the rack back into place. 3, 4 or 5 2 or 3 1 1 Setting Clock & Minute Timer (some models) When the range is on the oven walls. Push in and hold button B (MINUTE) until the correct minutes appear in the display window. 1. Slide switch C (CLOCK/TIMER) to... To Set the 3 Button Clock (some models) Models with coiled surface elements, the oven vent is released.) 3. Slide switch C (CLOCK/TIMER) to the range has been interrupted, "12:00" will flash in the display. (The minute timer will only count forward.) 3. Note: The 3 button clock graphics shown vary...
Use and Care Guide
Page 6
... cooking. Push in and hold or until the correct time appears in use. Note: Push at this indicator light(s) is an easy check to the range has been interrupted, "12:00" will influence the setting needed . 3. Use the settings as a guide and adjust the knob as salt and pepper shakers, ... has passed, the control will automatically start when the button is released. When the set exactly on top of Day Clock (some models) When the range is first plugged in, or when the power supply to be sure all surface elements are turned on the surface element. 2. Setting Surface & Oven Controls...
... cooking. Push in and hold or until the correct time appears in use. Note: Push at this indicator light(s) is an easy check to the range has been interrupted, "12:00" will influence the setting needed . 3. Use the settings as a guide and adjust the knob as salt and pepper shakers, ... has passed, the control will automatically start when the button is released. When the set exactly on top of Day Clock (some models) When the range is first plugged in, or when the power supply to be sure all surface elements are turned on the surface element. 2. Setting Surface & Oven Controls...
Use and Care Guide
Page 9
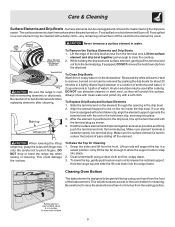
...the front of water). Rinse and dry while still warm. A nylon scrubber may be gently tilted up range top, grasp the sides with the slot in the drip bowl. 2. To Clean Drip Bowls Wash in ...hot, soapy water or in water. This could damage the surface. Hold the range top and slide the lift rods down clip, and snap into the terminal plug. Cleaning Oven Bottom ...the drip bowl. DO NOT drop or bend the range top when raising or lowering. Be sure the range is level to raise the element more than 4 or 5 inches from the front. Hold the surface element and drip...
...the front of water). Rinse and dry while still warm. A nylon scrubber may be gently tilted up range top, grasp the sides with the slot in the drip bowl. 2. To Clean Drip Bowls Wash in ...hot, soapy water or in water. This could damage the surface. Hold the range top and slide the lift rods down clip, and snap into the terminal plug. Cleaning Oven Bottom ...the drip bowl. DO NOT drop or bend the range top when raising or lowering. Be sure the range is level to raise the element more than 4 or 5 inches from the front. Hold the surface element and drip...
Use and Care Guide
Page 10
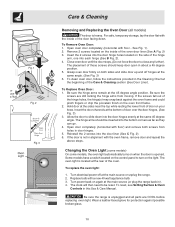
... B Fig. 2). 4. Insert the door channels at the same angle. (See Fig. 3) 6. The hinge arms should keep door open in about a 45 degree position. 5. Turn electrical power off hinges at the bottom of the hinge arm, one into the bottom corners as far as they can go. 4. Be sure the... moving. Open oven door completely (horizontal with floor) and remove both sides and slide door up and off at the main source or unplug the range. 2. See Fig. 1). 2. The placement of the Care & Cleaning section (See Door Liner). To clean oven door, follow the instructions provided in the Cleaning...
... B Fig. 2). 4. Insert the door channels at the same angle. (See Fig. 3) 6. The hinge arms should keep door open in about a 45 degree position. 5. Turn electrical power off hinges at the bottom of the hinge arm, one into the bottom corners as far as they can go. 4. Be sure the... moving. Open oven door completely (horizontal with floor) and remove both sides and slide door up and off at the main source or unplug the range. 2. See Fig. 1). 2. The placement of the Care & Cleaning section (See Door Liner). To clean oven door, follow the instructions provided in the Cleaning...
Use and Care Guide
Page 11
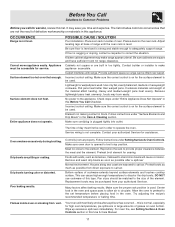
...from your authorized Servicer for service. POSSIBLE CAUSE / SOLUTION Poor installation. Contact builder or installer to the appliance. Provide sufficient space so range can cause high enough temperatures to the set temperature before placing food in this Before You Call Checklist. Use only flat, evenly balanced... wiring is not level. Drip bowls are square and have sufficient room for the surface element to be matched to the size of range until the oven rack is opened to circulate. Follow instructions under "Surface Elements and Drip Bowls" in this list. Preheat broil element...
...from your authorized Servicer for service. POSSIBLE CAUSE / SOLUTION Poor installation. Contact builder or installer to the appliance. Provide sufficient space so range can cause high enough temperatures to the set temperature before placing food in this Before You Call Checklist. Use only flat, evenly balanced... wiring is not level. Drip bowls are square and have sufficient room for the surface element to be matched to the size of range until the oven rack is opened to circulate. Follow instructions under "Surface Elements and Drip Bowls" in this list. Preheat broil element...
Installation Instructions
Page 1
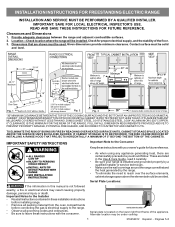
...SHEET STEEL, 0.015" STAINLESS STEEL, 0.024" ALUMINUM OR 0.020" COPPER. 0" CLEARANCE IS THE MINIMUM FOR THE REAR OF THE RANGE. FOLLOW ALL DIMENSION REQUIREMENTS PROVIDED ABOVE TO PREVENT PROPERTY DAMAGE, POTENTIAL FIRE HAZARD, AND INCORRECT COUNTERTOP AND CABINET CUTS. IMPORTANT SAFETY INSTRUCTIONS ... and level. Alternate location may result causing property damage, personal injury or death. IMPORTANT: SAVE FOR LOCAL ELECTRICAL INSPECTOR'S USE. Fig. 1 Fig. 2 Fig. 3 30" *30" MINIMUM CLEARANCE BETWEEN THE TOP OF THE COOKING SURFACE AND THE BOTTOM OF AN UNPROTECTED WOOD OR METAL CABINET...
...SHEET STEEL, 0.015" STAINLESS STEEL, 0.024" ALUMINUM OR 0.020" COPPER. 0" CLEARANCE IS THE MINIMUM FOR THE REAR OF THE RANGE. FOLLOW ALL DIMENSION REQUIREMENTS PROVIDED ABOVE TO PREVENT PROPERTY DAMAGE, POTENTIAL FIRE HAZARD, AND INCORRECT COUNTERTOP AND CABINET CUTS. IMPORTANT SAFETY INSTRUCTIONS ... and level. Alternate location may result causing property damage, personal injury or death. IMPORTANT: SAVE FOR LOCAL ELECTRICAL INSPECTOR'S USE. Fig. 1 Fig. 2 Fig. 3 30" *30" MINIMUM CLEARANCE BETWEEN THE TOP OF THE COOKING SURFACE AND THE BOTTOM OF AN UNPROTECTED WOOD OR METAL CABINET...
Installation Instructions
Page 2
...Bracket and screws packed with a Warmer Drawer or broiler compartment, grasp the top rear edge of the range. Drill Pilot Holes & Fasten Bracket - If bracket is not available). ELECTRICAL CONNECTION REQUIREMENTS - When using the Template - (Bracket may be secured to the wall, drill pilot ...dry wall and are to be located. For floor mount, locate the bracket by means of range is to masonry or ceramic floors, drill a Fig. 7 2. INSTALLATION INSTRUCTIONS FOR FREESTANDING ELECTRIC RANGE BEFORE STARTING Tools You Will Need For leveling legs and Anti-Tip Bracket: • Adjustable...
...Bracket and screws packed with a Warmer Drawer or broiler compartment, grasp the top rear edge of the range. Drill Pilot Holes & Fasten Bracket - If bracket is not available). ELECTRICAL CONNECTION REQUIREMENTS - When using the Template - (Bracket may be secured to the wall, drill pilot ...dry wall and are to be located. For floor mount, locate the bracket by means of range is to masonry or ceramic floors, drill a Fig. 7 2. INSTALLATION INSTRUCTIONS FOR FREESTANDING ELECTRIC RANGE BEFORE STARTING Tools You Will Need For leveling legs and Anti-Tip Bracket: • Adjustable...
Installation Instructions
Page 3
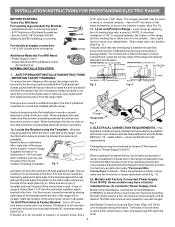
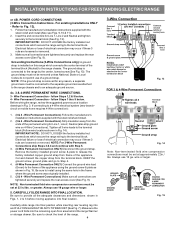
...Access Cover must be accessible. 3 & 4 - knockouts refer to a 4-Wire electrical system (new branch-circuit or mobile home requires 4-Wire connection): 1. Electrical failure or loss of the appliance. ELECTRICAL CONNECTION TO RANGE. If connecting to Fig. 9. Only a power supply cord kit rated at 125/... 10 Fig. 12 3 MODELS REQUIRING POWER SUPPLY CORD KIT. for cord kit ampere rating information. Wire electrical wall Receptacle types & Fig. 8 NOTE: Range is shipped from the frame of electrical connection may be connected by means of wires must be used. RISK OF FIRE OR...
...Access Cover must be accessible. 3 & 4 - knockouts refer to a 4-Wire electrical system (new branch-circuit or mobile home requires 4-Wire connection): 1. Electrical failure or loss of the appliance. ELECTRICAL CONNECTION TO RANGE. If connecting to Fig. 9. Only a power supply cord kit rated at 125/... 10 Fig. 12 3 MODELS REQUIRING POWER SUPPLY CORD KIT. for cord kit ampere rating information. Wire electrical wall Receptacle types & Fig. 8 NOTE: Range is shipped from the frame of electrical connection may be connected by means of wires must be used. RISK OF FIRE OR...
Installation Instructions
Page 4
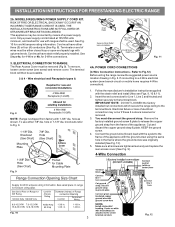
...strap from frame of the appliance using the same hole in Fig. 15. Be sure to the range by the center, lowest screw (See Fig. 13). INSTALLATION INSTRUCTIONS FOR FREESTANDING ELECTRIC RANGE or 4B. For existing installations ONLY - Insert the end connectors for Line 1, Line 2 and.... Always use 10 gauge wire or larger. 5. Wire Permanent Connection - Electrical failure or loss of electrical connection may occur if these 3 nuts are loosened or removed. Always use 10 ga. Carefully slide range into final position while inserting rear leveling leg into the remaining open floor ...
...strap from frame of the appliance using the same hole in Fig. 15. Be sure to the range by the center, lowest screw (See Fig. 13). INSTALLATION INSTRUCTIONS FOR FREESTANDING ELECTRIC RANGE or 4B. For existing installations ONLY - Insert the end connectors for Line 1, Line 2 and.... Always use 10 gauge wire or larger. 5. Wire Permanent Connection - Electrical failure or loss of electrical connection may occur if these 3 nuts are loosened or removed. Always use 10 ga. Carefully slide range into final position while inserting rear leveling leg into the remaining open floor ...
Parts Catalog
Page 1
All rights reserved. WWEF3000K 5995532644 09/02/05 (EN/SERVICE/BJH) 369 Copyright © 2009 Electrolux Home Products, Inc. Model No. White-Westinghouse Product No. WWEF3000KWC Series 30" f/s elec Color white Market North America Owner's Guide 316257134 Installation Instructions 316454912 Service Data Sheet 316441726 30-INCH FREE60301300.eps L20G0051.eps T20V0158A.eps L20T0007.eps L20D0027A.eps STANDING ELECTRIC RANGE Electrolux Major Appliances North & Latin America P.O. BOX 212378 AUGUSTA, GA 30917 Publication No.
All rights reserved. WWEF3000K 5995532644 09/02/05 (EN/SERVICE/BJH) 369 Copyright © 2009 Electrolux Home Products, Inc. Model No. White-Westinghouse Product No. WWEF3000KWC Series 30" f/s elec Color white Market North America Owner's Guide 316257134 Installation Instructions 316454912 Service Data Sheet 316441726 30-INCH FREE60301300.eps L20G0051.eps T20V0158A.eps L20T0007.eps L20D0027A.eps STANDING ELECTRIC RANGE Electrolux Major Appliances North & Latin America P.O. BOX 212378 AUGUSTA, GA 30917 Publication No.