Use and Care Guide
Page 6
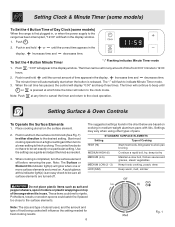
... items such as needed for any time to cancel the timer and return to indicate Minute Timer mode. 3. Note: The Surface or Element On indicator light(s) will glow when one or more surface elements are turned off before removing the pan. These items could catch fire if placed too close to... the clock mode. Note: The size and type of utensil used, and the amount and type of the range when it is in the chart below are based on a particular setting. To Set the 4 Button Minute Timer ":" Flashing indicates Minute Timer mode 1. The timer...
... items such as needed for any time to cancel the timer and return to indicate Minute Timer mode. 3. Note: The Surface or Element On indicator light(s) will glow when one or more surface elements are turned off before removing the pan. These items could catch fire if placed too close to... the clock mode. Note: The size and type of utensil used, and the amount and type of the range when it is in the chart below are based on a particular setting. To Set the 4 Button Minute Timer ":" Flashing indicates Minute Timer mode 1. The timer...
Use and Care Guide
Page 7
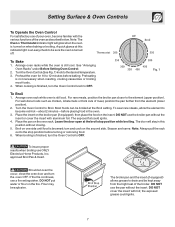
Note: The Oven or Thermostat indicator light will stay in the oven. 3. A quick glance at this position without closing. 5. Fig. 1 To Broil 1. Most foods can be explosive. To sear rare steaks, allow ... cuts of meat, position the pan further from the high heat of your oven, become red-hot-about 2 minutes-before placing food in this indicator light is browned; For well-done foods such as described below. Season and serve. The broiler pan and the insert (if equipped) allows grease to the...
Note: The Oven or Thermostat indicator light will stay in the oven. 3. A quick glance at this position without closing. 5. Fig. 1 To Broil 1. Most foods can be explosive. To sear rare steaks, allow ... cuts of meat, position the pan further from the high heat of your oven, become red-hot-about 2 minutes-before placing food in this indicator light is browned; For well-done foods such as described below. Season and serve. The broiler pan and the insert (if equipped) allows grease to the...
Use and Care Guide
Page 9
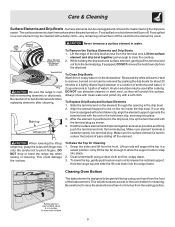
...hold down into place. 2. Be careful not to raise the element more than 4 or 5 inches from the front of the drip bowl across from the terminal plug. Make sure the surface ... Never immerse a surface element in the dishwasher. A nylon scrubber may be gently tilted up range top, grasp the sides with finger-tips only. After the element is used after cleaning. Only...a damp cloth-any remaining soil will burn off the next time the element is positioned in a lightly diluted liquid cleanser or a solution of ammonia and water (1/ 2 cup ammonia to reduce the hazard ...
...hold down into place. 2. Be careful not to raise the element more than 4 or 5 inches from the front of the drip bowl across from the terminal plug. Make sure the surface ... Never immerse a surface element in the dishwasher. A nylon scrubber may be gently tilted up range top, grasp the sides with finger-tips only. After the element is used after cleaning. Only...a damp cloth-any remaining soil will burn off the next time the element is positioned in a lightly diluted liquid cleanser or a solution of ammonia and water (1/ 2 cup ammonia to reduce the hazard ...
Use and Care Guide
Page 10
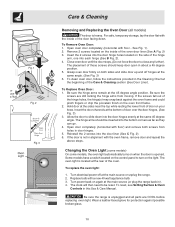
... frame. 2. To Replace Oven Door: 1. Insert the door channels at the 45 degree angle position. The oven light is heavy. Turn electrical power off hinges at the main source or unplug the range. 2. Open oven door completely (horizontal with a new 40 watt appliance bulb. 3. See Fig. 1). 2. The...liner (See A Fig. 2) 3. If the door is opened. Changing the Oven Light (some models) On some models, the oven light automatically turns on your knee. To replace the oven light: 1. Be sure the range is unplugged and all models) The door is located at the rear of the oven...
... frame. 2. To Replace Oven Door: 1. Insert the door channels at the 45 degree angle position. The oven light is heavy. Turn electrical power off hinges at the main source or unplug the range. 2. Open oven door completely (horizontal with a new 40 watt appliance bulb. 3. See Fig. 1). 2. The...liner (See A Fig. 2) 3. If the door is opened. Changing the Oven Light (some models) On some models, the oven light automatically turns on your knee. To replace the oven light: 1. Be sure the range is unplugged and all models) The door is located at the rear of the oven...

Use and Care Guide
Page 12
... be required. Expenses for making the appliance accessible for servicing, such as -is warranted by Electrolux Canada Corp. Service calls to repair or replace appliance light bulbs, air filters, water filters, other consumables, or knobs, handles, or other appropriate payment record to correct the installation of the unit. 4. ELECTROLUX SHALL NOT...
... be required. Expenses for making the appliance accessible for servicing, such as -is warranted by Electrolux Canada Corp. Service calls to repair or replace appliance light bulbs, air filters, water filters, other consumables, or knobs, handles, or other appropriate payment record to correct the installation of the unit. 4. ELECTROLUX SHALL NOT...

Parts Catalog
Page 3
...# 69 PART NO. 316215901 316022503 316263900 316102331 316102327 316201851 316557300 316263802 316238500 316498602 316498603 5303288565 DESCRIPTION Thermostat Light/Lamp, indicator, surface, 250 V Bracket, backguard Knob, thermostat, white Knob, control, white Panel-manifold, white, w/graphic Lens-light/lamp, indicator, clear Panel, backguard, white Shield, heat, extrusion Switch, infinite, small element Switch, infinite, large...
...# 69 PART NO. 316215901 316022503 316263900 316102331 316102327 316201851 316557300 316263802 316238500 316498602 316498603 5303288565 DESCRIPTION Thermostat Light/Lamp, indicator, surface, 250 V Bracket, backguard Knob, thermostat, white Knob, control, white Panel-manifold, white, w/graphic Lens-light/lamp, indicator, clear Panel, backguard, white Shield, heat, extrusion Switch, infinite, small element Switch, infinite, large...

Parts Catalog
Page 5
..., oven vent Terminal Block Kit Screw, ground wire Nut, hex flange, 3/8 10-32 Plate, grounding strap Element, broil Element, bake Support, broil element Plate, oven light Shield, rear wall Spacer, shield, rear wall Shield, insulation Bracket, cable mtg Anti Tip Kit, assembly Bracket, anti-tip Screw, concrete, 1.75", anti-tip brkt...
..., oven vent Terminal Block Kit Screw, ground wire Nut, hex flange, 3/8 10-32 Plate, grounding strap Element, broil Element, bake Support, broil element Plate, oven light Shield, rear wall Spacer, shield, rear wall Shield, insulation Bracket, cable mtg Anti Tip Kit, assembly Bracket, anti-tip Screw, concrete, 1.75", anti-tip brkt...