Use and Care Guide
Page 1
Electric Range Use & Care Manual ETOD Control or no clock Welcome 2 Important Safety Instructions .....3-4 Before Setting Oven Controls ....6-7 Setting Clock & Minute Timer .....5-6 Setting Surface & Oven Controls .. 6-7 Care & Cleaning 8-10 Before You Call Solutions to Common Problems 11 Warranty Back Page Questions? 1-800-944-9044 (United States) 1-800-668-4606 (Canada) Visit the Frigidaire Web Site at: http://www.frigidaire.com READ AND SAVE THESE INSTRUCTIONS 316257134 (0809)
Electric Range Use & Care Manual ETOD Control or no clock Welcome 2 Important Safety Instructions .....3-4 Before Setting Oven Controls ....6-7 Setting Clock & Minute Timer .....5-6 Setting Surface & Oven Controls .. 6-7 Care & Cleaning 8-10 Before You Call Solutions to Common Problems 11 Warranty Back Page Questions? 1-800-944-9044 (United States) 1-800-668-4606 (Canada) Visit the Frigidaire Web Site at: http://www.frigidaire.com READ AND SAVE THESE INSTRUCTIONS 316257134 (0809)

Use and Care Guide
Page 3
... well as aerosol cans, on the backguard of this range can result in use. IMPORTANT-Do not attempt to sit or stand on Grease Fires-Smother the fire with the National Electrical Code ANSI/NFPA No. 70 latest edition and local electrical code requirements. Do not use baking soda, a dry... chemical or foam-type extinguisher. • When heating fat or grease, watch it is not turned off the range. Do not store explosives, such...
... well as aerosol cans, on the backguard of this range can result in use. IMPORTANT-Do not attempt to sit or stand on Grease Fires-Smother the fire with the National Electrical Code ANSI/NFPA No. 70 latest edition and local electrical code requirements. Do not use baking soda, a dry... chemical or foam-type extinguisher. • When heating fat or grease, watch it is not turned off the range. Do not store explosives, such...
Use and Care Guide
Page 4
... cook top use aluminum foil to unintentional contact with coil elements. Select utensils having flat bottoms large enough to warn customers of electric shock, or fire. The use of undersized utensils will also improve efficiency. • Utensil Handles Should Be Turned Inward and ...surfaces in the oven. • Keep Oven Vent Ducts Unobstructed. Only use . Improper installation of electric shock, or fire. IMPORTANT INSTRUCTIONS FOR CLEANING YOUR RANGE • Clean the range regularly to line the oven bottom. Pay particular attention to drain and be moved while oven is ...
... cook top use aluminum foil to unintentional contact with coil elements. Select utensils having flat bottoms large enough to warn customers of electric shock, or fire. The use of undersized utensils will also improve efficiency. • Utensil Handles Should Be Turned Inward and ...surfaces in the oven. • Keep Oven Vent Ducts Unobstructed. Only use . Improper installation of electric shock, or fire. IMPORTANT INSTRUCTIONS FOR CLEANING YOUR RANGE • Clean the range regularly to line the oven bottom. Pay particular attention to drain and be moved while oven is ...
Use and Care Guide
Page 10
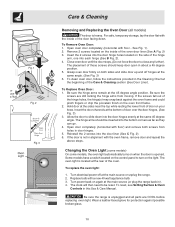
... storage, lay the door flat with floor - Insert the door channels at the rear of the oven. Turn electrical power off hinges at the same angle. (See Fig. 3) 6. Be sure the range is unplugged and all models) The door is located at the bottom of door over the door hinges, (See...not in ). 4. Open door completely (horizontal with floor) and remove both sides and slide door up and off at the main source (or plug the range back in alignment with a new 40 watt appliance bulb. 3. Changing the Oven Light (some models) On some models, the oven light automatically turns on...
... storage, lay the door flat with floor - Insert the door channels at the rear of the oven. Turn electrical power off hinges at the same angle. (See Fig. 3) 6. Be sure the range is unplugged and all models) The door is located at the bottom of door over the door hinges, (See...not in ). 4. Open door completely (horizontal with floor) and remove both sides and slide door up and off at the main source (or plug the range back in alignment with a new 40 watt appliance bulb. 3. Changing the Oven Light (some models) On some models, the oven light automatically turns on...
Installation Instructions
Page 1
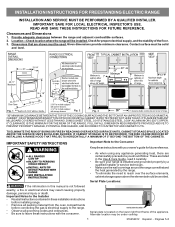
...range. • To eliminate the need to reach over the surface elements, cabinet storage space above the elements should follow. Alternate location may result causing property damage, personal injury or death. Páginas 5-8 Contact surface must be used. Fig. 1 Fig. 2 Fig. 3 30" *30... UNITS SHOULD BE AVOIDED. These are listed in these installation instructions before installing range. • Remove all packing material from the oven compartments before connecting the gas & electrical supply to the range. • Observe all instructions contained in the Use & Care Guide, read...
...range. • To eliminate the need to reach over the surface elements, cabinet storage space above the elements should follow. Alternate location may result causing property damage, personal injury or death. Páginas 5-8 Contact surface must be used. Fig. 1 Fig. 2 Fig. 3 30" *30... UNITS SHOULD BE AVOIDED. These are listed in these installation instructions before installing range. • Remove all packing material from the oven compartments before connecting the gas & electrical supply to the range. • Observe all instructions contained in the Use & Care Guide, read...
Installation Instructions
Page 2
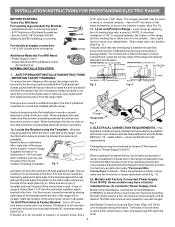
... molding is to masonry or ceramic floors, drill a Fig. 7 2. Terminals on an open -end spade lugs with ranges. Level and Position Range - and Local Electrical Code requirements. The screws provided may use with upturned ends. 2 If rear of wires must be used in wood or...a four (4) conductor power supply cord kit rated at an approximate 20° downward angle (See Fig. 5). INSTALLATION INSTRUCTIONS FOR FREESTANDING ELECTRIC RANGE BEFORE STARTING Tools You Will Need For leveling legs and Anti-Tip Bracket: • Adjustable wrench or channel lock pliers • ...
... molding is to masonry or ceramic floors, drill a Fig. 7 2. Terminals on an open -end spade lugs with ranges. Level and Position Range - and Local Electrical Code requirements. The screws provided may use with upturned ends. 2 If rear of wires must be used in wood or...a four (4) conductor power supply cord kit rated at an approximate 20° downward angle (See Fig. 5). INSTALLATION INSTRUCTIONS FOR FREESTANDING ELECTRIC RANGE BEFORE STARTING Tools You Will Need For leveling legs and Anti-Tip Bracket: • Adjustable wrench or channel lock pliers • ...
Installation Instructions
Page 3
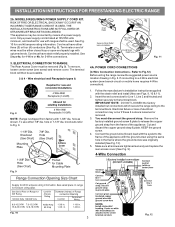
... loosen center screw (one screw) and remove cover. hole or 1-1/8" dia. knockouts refer to the terminal block. INSTALLATION INSTRUCTIONS FOR FREESTANDING ELECTRIC RANGE 2b. See Fig. 10 for Line 1, Line 2 and Neutral and tighten securely to the terminal block. The Rear Access Cover must be... home requires 4-Wire connection): 1. Cut and discard the copper ground strap & plate. Cord must disconnect the ground strap. ELECTRICAL CONNECTION TO RANGE. To use with upturned ends. If connecting to release the copper ground strap from factory with the strain relief and install ...
... loosen center screw (one screw) and remove cover. hole or 1-1/8" dia. knockouts refer to the terminal block. INSTALLATION INSTRUCTIONS FOR FREESTANDING ELECTRIC RANGE 2b. See Fig. 10 for Line 1, Line 2 and Neutral and tighten securely to the terminal block. The Rear Access Cover must be... home requires 4-Wire connection): 1. Cut and discard the copper ground strap & plate. Cord must disconnect the ground strap. ELECTRICAL CONNECTION TO RANGE. To use with upturned ends. If connecting to release the copper ground strap from factory with the strain relief and install ...
Installation Instructions
Page 4
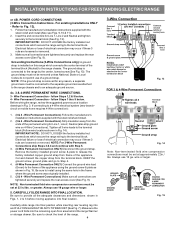
...relief and install (Also see Figs. 9, 10 & 11). 2. IMPORTANT NOTE: DO NOT LOOSEN the factory installed nut connections which secure the range wiring to a 4-Wire electrical system (new branchcircuit or mobile home requires 4-Wire connection): 1. (3 & 4 - follow Steps 1 thru 5 below . 4 - wire or... larger. Fig. 15 INSTALLATION INSTRUCTIONS FOR FREESTANDING ELECTRIC RANGE or 4B. Electrical failure or loss of the terminal block (Neutral) to the terminal block. Make sure all 3 wire leads to install using the ground screw...
...relief and install (Also see Figs. 9, 10 & 11). 2. IMPORTANT NOTE: DO NOT LOOSEN the factory installed nut connections which secure the range wiring to a 4-Wire electrical system (new branchcircuit or mobile home requires 4-Wire connection): 1. (3 & 4 - follow Steps 1 thru 5 below . 4 - wire or... larger. Fig. 15 INSTALLATION INSTRUCTIONS FOR FREESTANDING ELECTRIC RANGE or 4B. Electrical failure or loss of the terminal block (Neutral) to the terminal block. Make sure all 3 wire leads to install using the ground screw...
Parts Catalog
Page 1
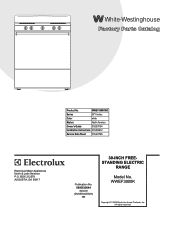
BOX 212378 AUGUSTA, GA 30917 Publication No. All rights reserved. White-Westinghouse Product No. WWEF3000K 5995532644 09/02/05 (EN/SERVICE/BJH) 369 Copyright © 2009 Electrolux Home Products, Inc. Model No. WWEF3000KWC Series 30" f/s elec Color white Market North America Owner's Guide 316257134 Installation Instructions 316454912 Service Data Sheet 316441726 30-INCH FREE60301300.eps L20G0051.eps T20V0158A.eps L20T0007.eps L20D0027A.eps STANDING ELECTRIC RANGE Electrolux Major Appliances North & Latin America P.O.
BOX 212378 AUGUSTA, GA 30917 Publication No. All rights reserved. White-Westinghouse Product No. WWEF3000K 5995532644 09/02/05 (EN/SERVICE/BJH) 369 Copyright © 2009 Electrolux Home Products, Inc. Model No. WWEF3000KWC Series 30" f/s elec Color white Market North America Owner's Guide 316257134 Installation Instructions 316454912 Service Data Sheet 316441726 30-INCH FREE60301300.eps L20G0051.eps T20V0158A.eps L20T0007.eps L20D0027A.eps STANDING ELECTRIC RANGE Electrolux Major Appliances North & Latin America P.O.