

Quick Install Guide (pdf)
Page 3
...the AC adapter into the Ethernet port located on the back of the unit. My Book World Edition | 2 Important: Wait for drive expansion only) E Ethernet Port F Power Port G Recovery Button H Kensington Security Slot A BB D C E F G H Hardware Setup 1. Connect the other end of the Ethernet cable directly into the DC ...by an LED illuminated on the outer ring. My Book World Edition Front and Rear View A Capacity Gauge LED (inner ring) B Power Button C Power/Activity LED (outer ring) D USB Port (for the drive to the full user manual provided on the CD. Connect one end of ...
...the AC adapter into the Ethernet port located on the back of the unit. My Book World Edition | 2 Important: Wait for drive expansion only) E Ethernet Port F Power Port G Recovery Button H Kensington Security Slot A BB D C E F G H Hardware Setup 1. Connect the other end of the Ethernet cable directly into the DC ...by an LED illuminated on the outer ring. My Book World Edition Front and Rear View A Capacity Gauge LED (inner ring) B Power Button C Power/Activity LED (outer ring) D USB Port (for the drive to the full user manual provided on the CD. Connect one end of ...

Quick Install Guide (pdf)
Page 4
...the computer to get your CD-ROM drive. WD Anywhere Access™ Setup This section contains instructions to your system, you must uninstall it before installing WD Anywhere Access. 1. Insert the software CD into your My Book World Edition quickly set up and running. The ...and proceed to my existing WD Anywhere Access account, enter your computer, you must install utilities manually. Read the license agreement. If AutoPlay is required. To use My Book World Edition, installation of MioNet. Holding the button down until the LED flashes once, then release. Note:...
...the computer to get your CD-ROM drive. WD Anywhere Access™ Setup This section contains instructions to your system, you must uninstall it before installing WD Anywhere Access. 1. Insert the software CD into your My Book World Edition quickly set up and running. The ...and proceed to my existing WD Anywhere Access account, enter your computer, you must install utilities manually. Read the license agreement. If AutoPlay is required. To use My Book World Edition, installation of MioNet. Holding the button down until the LED flashes once, then release. Note:...

Quick Install Guide (pdf)
Page 6
Congratulations! For further information and instructions on the CD. Return to the full user manual provided on the usage and setup of this software). My Book World Edition | 5 7. Click Install next to the WD Anywhere Backup logo in Step 2. You may now install WD Anywhere Backup™...the WD Installer screen and click Exit. 10.Click Restart Now. My Book World Edition is complete. Click Finish. 8. For more information on your system. WD Anywhere Access account setup is now installed and mapped as a drive letter on WD Anywhere Backup™, visit support.wdc.com. 9.
Congratulations! For further information and instructions on the CD. Return to the full user manual provided on the usage and setup of this software). My Book World Edition | 5 7. Click Install next to the WD Anywhere Backup logo in Step 2. You may now install WD Anywhere Backup™...the WD Installer screen and click Exit. 10.Click Restart Now. My Book World Edition is complete. Click Finish. 8. For more information on your system. WD Anywhere Access account setup is now installed and mapped as a drive letter on WD Anywhere Backup™, visit support.wdc.com. 9.

User Manual (pdf)
Page 1
Single and Dual-drive Remote Access Storage Systems My Book™ World Edition™ User Manual
Single and Dual-drive Remote Access Storage Systems My Book™ World Edition™ User Manual

User Manual (pdf)
Page 4
....wdc.com. Once configuration is not currently installed, you can access Drive Management. MY BOOK WORLD EDITION USER MANUAL 1 Introduction My Book World Edition in this manual for instructions on setting up , create, and manage shared folders accessible from anywhere in the world. INTRODUCTION - 1 Note: The dual-drive My Book World Edition II is turned off.* Follow the steps in Your Network-The Basics Congratulations...
....wdc.com. Once configuration is not currently installed, you can access Drive Management. MY BOOK WORLD EDITION USER MANUAL 1 Introduction My Book World Edition in this manual for instructions on setting up , create, and manage shared folders accessible from anywhere in the world. INTRODUCTION - 1 Note: The dual-drive My Book World Edition II is turned off.* Follow the steps in Your Network-The Basics Congratulations...
User Manual (pdf)
Page 5
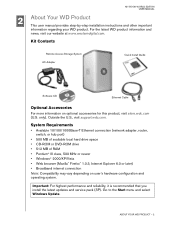
... Requirements • Available 10/100/1000Base-T Ethernet connection (network adapter, router, switch, or hub port) • 500 MB of available local hard drive space • CD-ROM or DVD-ROM drive • 512 MB of RAM •...BOOK WORLD EDITION USER MANUAL 2 About Your WD Product This user manual provides step-by-step installation instructions and other important information regarding your WD product. For the latest WD product information and news, visit our website at www.westerndigital.com. Kit Contents Remote Access Storage System AC Adapter Quick Install Guide Software CD Ethernet...
... Requirements • Available 10/100/1000Base-T Ethernet connection (network adapter, router, switch, or hub port) • 500 MB of available local hard drive space • CD-ROM or DVD-ROM drive • 512 MB of RAM •...BOOK WORLD EDITION USER MANUAL 2 About Your WD Product This user manual provides step-by-step installation instructions and other important information regarding your WD product. For the latest WD product information and news, visit our website at www.westerndigital.com. Kit Contents Remote Access Storage System AC Adapter Quick Install Guide Software CD Ethernet...

User Manual (pdf)
Page 6
...Support Your WD product includes 30 days of free technical support during the applicable warranty period for setup and technical support. Drives may be handled with WD technical support. Go to register.wdc.com and follow the instructions as news about your ...external storage product: • Do not drop or jolt the device. • Do not move the device during unpacking and installation. Be aware of the device. For more information regarding updating your new WD product found on the large label on top of your system, visit windowsupdate.microsoft.com. MY BOOK WORLD EDITION USER MANUAL...
...Support Your WD product includes 30 days of free technical support during the applicable warranty period for setup and technical support. Drives may be handled with WD technical support. Go to register.wdc.com and follow the instructions as news about your ...external storage product: • Do not drop or jolt the device. • Do not move the device during unpacking and installation. Be aware of the device. For more information regarding updating your new WD product found on the large label on top of your system, visit windowsupdate.microsoft.com. MY BOOK WORLD EDITION USER MANUAL...
User Manual (pdf)
Page 7
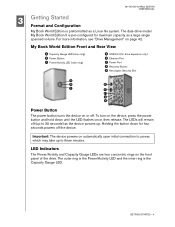
...off. The LEDs will remain off the device. The dual-drive model My Book World Edition II is pre-configured for maximum capacity as a Linux file system. My Book World Edition Front and Rear View A Capacity Gauge LED (inner ring)... LEDs are two concentric rings on the device, press the power button and hold down for drive expansion only) E Ethernet Port F Power Port G Recovery Button H Kensington Security Slot A BB D C E F.... MY BOOK WORLD EDITION USER MANUAL 3 Getting Started Format and Configuration My Book World Edition is preformatted as a large single spanned volume.
...off. The LEDs will remain off the device. The dual-drive model My Book World Edition II is pre-configured for maximum capacity as a Linux file system. My Book World Edition Front and Rear View A Capacity Gauge LED (inner ring)... LEDs are two concentric rings on the device, press the power button and hold down for drive expansion only) E Ethernet Port F Power Port G Recovery Button H Kensington Security Slot A BB D C E F.... MY BOOK WORLD EDITION USER MANUAL 3 Getting Started Format and Configuration My Book World Edition is preformatted as a large single spanned volume.

User Manual (pdf)
Page 8
...Device is illuminated upon installation. The recovery button also resets network configuration to reset the device using an Ethernet cable. • USB 2.0 port-Connects an external USB hard drive. • Power port-Connects to default without erasing shared folders or volumes. The unit may take ...adapter and cable. Rear View Ports • Ethernet port-Connects to an open router, hub, or network switch port using the recovery button. 1. Press and hold down the recovery button. 3. MY BOOK WORLD EDITION USER MANUAL Power/Activity LED Appearance Steady Outer LED ring rotating...
...Device is illuminated upon installation. The recovery button also resets network configuration to reset the device using an Ethernet cable. • USB 2.0 port-Connects an external USB hard drive. • Power port-Connects to default without erasing shared folders or volumes. The unit may take ...adapter and cable. Rear View Ports • Ethernet port-Connects to an open router, hub, or network switch port using the recovery button. 1. Press and hold down the recovery button. 3. MY BOOK WORLD EDITION USER MANUAL Power/Activity LED Appearance Steady Outer LED ring rotating...

User Manual (pdf)
Page 9
For more information on the Kensington Security Slot and available products, visit www.kensington.com. MY BOOK WORLD EDITION USER MANUAL Kensington® Security Slot For drive security, this My Book device is equipped with a Kensington Security Slot, which supports a standard Kensington security cable (sold separately). GETTING STARTED - 6
For more information on the Kensington Security Slot and available products, visit www.kensington.com. MY BOOK WORLD EDITION USER MANUAL Kensington® Security Slot For drive security, this My Book device is equipped with a Kensington Security Slot, which supports a standard Kensington security cable (sold separately). GETTING STARTED - 6
User Manual (pdf)
Page 10
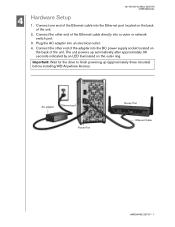
... 2. Important: Wait for the drive to finish powering up automatically after approximately 30 seconds indicated by an LED illuminated on the back of the adapter into a router or network switch port. 3. AC adapter Ethernet port Power Port Router Port Ethernet Cable HARDWARE SETUP - 7 The... Access. Connect the other end of the unit. Connect one end of the Ethernet cable directly into the DC power supply socket located on the outer ring. Connect the other end of the Ethernet cable into an electrical outlet. 4. MY BOOK WORLD EDITION USER MANUAL 4 Hardware Setup 1.
... 2. Important: Wait for the drive to finish powering up automatically after approximately 30 seconds indicated by an LED illuminated on the back of the adapter into a router or network switch port. 3. AC adapter Ethernet port Power Port Router Port Ethernet Cable HARDWARE SETUP - 7 The... Access. Connect the other end of the unit. Connect one end of the Ethernet cable directly into the DC power supply socket located on the outer ring. Connect the other end of the Ethernet cable into an electrical outlet. 4. MY BOOK WORLD EDITION USER MANUAL 4 Hardware Setup 1.

User Manual (pdf)
Page 11
...computer, you must install utilities manually. WD ANYWHERE ACCESS SETUP - 8 A software license key is required. Click the Start button and point to get your CD-ROM drive. In Step 1, click Install. Read the license agreement. MY BOOK WORLD EDITION USER MANUAL 5 WD Anywhere Access Setup... This section contains instructions to My Computer. If the regular version of MioNet. To use My Book World Edition, installing WD Anywhere Access ...
...computer, you must install utilities manually. WD ANYWHERE ACCESS SETUP - 8 A software license key is required. Click the Start button and point to get your CD-ROM drive. In Step 1, click Install. Read the license agreement. MY BOOK WORLD EDITION USER MANUAL 5 WD Anywhere Access Setup... This section contains instructions to My Computer. If the regular version of MioNet. To use My Book World Edition, installing WD Anywhere Access ...

User Manual (pdf)
Page 12
WD Anywhere Access (powered by MioNet) is initialized. 4. WD ANYWHERE ACCESS SETUP - 9 The WD Anywhere Access Registration Wizard starts. If adding the computer to your existing account, click I am adding this computer to my existing WD Anywhere Access account, enter your user name and password in the next screen, click Next, and proceed to MioNet, then click Next. Click I am creating my new WD Anywhere Access account if new to step 6. MY BOOK WORLD EDITION USER MANUAL 3. Click Finish.
WD Anywhere Access (powered by MioNet) is initialized. 4. WD ANYWHERE ACCESS SETUP - 9 The WD Anywhere Access Registration Wizard starts. If adding the computer to your existing account, click I am adding this computer to my existing WD Anywhere Access account, enter your user name and password in the next screen, click Next, and proceed to MioNet, then click Next. Click I am creating my new WD Anywhere Access account if new to step 6. MY BOOK WORLD EDITION USER MANUAL 3. Click Finish.

User Manual (pdf)
Page 13
If you enter here changes the admin user name and password of the My Book World Edition device) fields, then click Next. If creating a new account, fill out all fields then click Next. Note: The Storage Device Name field is limited to ... (name by which WD Anywhere Access references your computer) and Storage Device Name (name of the My Book World Edition device. 6. Spaces and special characters are not supported. Enter easy-to 15 alphanumeric characters. MY BOOK WORLD EDITION USER MANUAL 5. WD ANYWHERE ACCESS SETUP - 10 Note: The user name and password you need to change this ...
If you enter here changes the admin user name and password of the My Book World Edition device) fields, then click Next. If creating a new account, fill out all fields then click Next. Note: The Storage Device Name field is limited to ... (name by which WD Anywhere Access references your computer) and Storage Device Name (name of the My Book World Edition device. 6. Spaces and special characters are not supported. Enter easy-to 15 alphanumeric characters. MY BOOK WORLD EDITION USER MANUAL 5. WD ANYWHERE ACCESS SETUP - 10 Note: The user name and password you need to change this ...

User Manual (pdf)
Page 14
Return to the WD logo in the lower right corner. You may now install WD Anywhere Backup Software from the WD Installer screen (click More info under the bottom Install button for further details about this software). Click Install next to the WD Installer screen and click Exit in Step 2. Click Finish. 8. WD ANYWHERE ACCESS SETUP - 11 For more information on WD Anywhere Backup, visit support.wdc.com. 9. WD Anywhere Access account setup is complete. MY BOOK WORLD EDITION USER MANUAL 7.
Return to the WD logo in the lower right corner. You may now install WD Anywhere Backup Software from the WD Installer screen (click More info under the bottom Install button for further details about this software). Click Install next to the WD Installer screen and click Exit in Step 2. Click Finish. 8. WD ANYWHERE ACCESS SETUP - 11 For more information on WD Anywhere Backup, visit support.wdc.com. 9. WD Anywhere Access account setup is complete. MY BOOK WORLD EDITION USER MANUAL 7.

User Manual (pdf)
Page 15
My Book World Edition is now installed and mapped as a drive letter on your system. WD ANYWHERE ACCESS SETUP - 12 Click Restart Now. Continue to section 6 to install remote access and share My Book World Edition. MY BOOK WORLD EDITION USER MANUAL Congratulations! 10.
My Book World Edition is now installed and mapped as a drive letter on your system. WD ANYWHERE ACCESS SETUP - 12 Click Restart Now. Continue to section 6 to install remote access and share My Book World Edition. MY BOOK WORLD EDITION USER MANUAL Congratulations! 10.

User Manual (pdf)
Page 16
Enter the WD Anywhere Access password you created in section 5 and click OK. 3. Click Sign In Now. 2. USING WD ANYWHERE ACCESS - 13 Click OK to the e-mail verification request. MY BOOK WORLD EDITION USER MANUAL 6 Using WD Anywhere Access Signing In 1. After restarting or when starting up your computer, the WD Anywhere Access welcome screen displays.
Enter the WD Anywhere Access password you created in section 5 and click OK. 3. Click Sign In Now. 2. USING WD ANYWHERE ACCESS - 13 Click OK to the e-mail verification request. MY BOOK WORLD EDITION USER MANUAL 6 Using WD Anywhere Access Signing In 1. After restarting or when starting up your computer, the WD Anywhere Access welcome screen displays.

User Manual (pdf)
Page 17
... and folders accessible for storage and sharing. MY BOOK WORLD EDITION USER MANUAL 4. They will appear in the My Book device from another location, install a WD Anywhere Access client from the software CD on your "My Resources" view. 2. Note: If AutoPlay is inserted into the CD-ROM drive, the program autoruns. Note: You can add up... My Computer, the WD Installer icon, the WDAnywhereAccess folder, and Setup.exe. Once the CD is disabled on the computer that you must install utilities manually.
... and folders accessible for storage and sharing. MY BOOK WORLD EDITION USER MANUAL 4. They will appear in the My Book device from another location, install a WD Anywhere Access client from the software CD on your "My Resources" view. 2. Note: If AutoPlay is inserted into the CD-ROM drive, the program autoruns. Note: You can add up... My Computer, the WD Installer icon, the WDAnywhereAccess folder, and Setup.exe. Once the CD is disabled on the computer that you must install utilities manually.

User Manual (pdf)
Page 18
Enter the same username and password you assigned when you first set up and installed your My Book device. 4. Click I am adding this computer to my existing WD Anywhere Access account. USING WD ANYWHERE ACCESS - 15 MY BOOK WORLD EDITION USER MANUAL 3.
Enter the same username and password you assigned when you first set up and installed your My Book device. 4. Click I am adding this computer to my existing WD Anywhere Access account. USING WD ANYWHERE ACCESS - 15 MY BOOK WORLD EDITION USER MANUAL 3.

User Manual (pdf)
Page 19
Enter a name for this new computer. A screen appears to confirm the added computer. 5. MY BOOK WORLD EDITION USER MANUAL 6. Click Finish. 7. USING WD ANYWHERE ACCESS - 16 The main WD Anywhere Access screen appears with the newly added systems and folders that you can access.
Enter a name for this new computer. A screen appears to confirm the added computer. 5. MY BOOK WORLD EDITION USER MANUAL 6. Click Finish. 7. USING WD ANYWHERE ACCESS - 16 The main WD Anywhere Access screen appears with the newly added systems and folders that you can access.


