User Manual (pdf)
Page 1
Western Digital EIDE Hard Drive Installation Guide
Western Digital EIDE Hard Drive Installation Guide

User Manual (pdf)
Page 2
... Western Digital. No license is assumed by Western Digital for any time without notice. © 2003 Western Digital Technologies, Inc. All rights reserved. Other marks may result from its use . Western Digital reserves the right to other rights of third parties which may be accurate and reliable. Western Digital EIDE Hard Drive Installation Guide Information furnished by Western Digital is a trademark of Western Digital Technologies, Inc. Western Digital and the Western Digital...
... Western Digital. No license is assumed by Western Digital for any time without notice. © 2003 Western Digital Technologies, Inc. All rights reserved. Other marks may result from its use . Western Digital reserves the right to other rights of third parties which may be accurate and reliable. Western Digital EIDE Hard Drive Installation Guide Information furnished by Western Digital is a trademark of Western Digital Technologies, Inc. Western Digital and the Western Digital...
User Manual (pdf)
Page 5
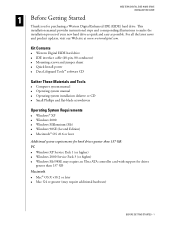
... Gather These Materials and Tools ! Small Phillips and flat-blade screwdrivers Operating System Requirements ! Mac® OS X v10.2 or later ! WESTERN DIGITAL EIDE HARD DRIVE INSTALLATION GUIDE 1 Before Getting Started Thank you for hard drives greater than 137 GB Macintosh ! For all the latest news and product updates, visit our Web site at www.westerndigital.com. Kit Contents ! Operating...
... Gather These Materials and Tools ! Small Phillips and flat-blade screwdrivers Operating System Requirements ! Mac® OS X v10.2 or later ! WESTERN DIGITAL EIDE HARD DRIVE INSTALLATION GUIDE 1 Before Getting Started Thank you for hard drives greater than 137 GB Macintosh ! For all the latest news and product updates, visit our Web site at www.westerndigital.com. Kit Contents ! Operating...
User Manual (pdf)
Page 6
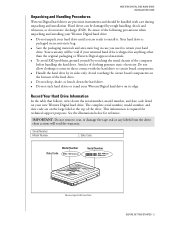
... the following precautions when unpacking and installing your Western Digital hard drive on its sides only. Do not allow clothing to install it. these actions will be handled with the hard drive or circuit board components. ! WESTERN DIGITAL EIDE HARD DRIVE INSTALLATION GUIDE Unpacking and Handling Procedures Western Digital hard drives are on the large label at the top of the drive. Your hard drive is shipped in case you need...
... the following precautions when unpacking and installing your Western Digital hard drive on its sides only. Do not allow clothing to install it. these actions will be handled with the hard drive or circuit board components. ! WESTERN DIGITAL EIDE HARD DRIVE INSTALLATION GUIDE Unpacking and Handling Procedures Western Digital hard drives are on the large label at the top of the drive. Your hard drive is shipped in case you need...
User Manual (pdf)
Page 7
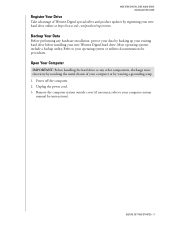
..., refer to your computer system manual for procedures. Refer to your operating system or utilities documentation for instructions). BEFORE GETTING STARTED - 3 WESTERN DIGITAL EIDE HARD DRIVE INSTALLATION GUIDE Register Your Drive Take advantage of your new hard drive online at https://www.wdc.com/products/registration. Backup Your Data Before performing any other components, discharge static electricity by touching...
..., refer to your computer system manual for procedures. Refer to your operating system or utilities documentation for instructions). BEFORE GETTING STARTED - 3 WESTERN DIGITAL EIDE HARD DRIVE INSTALLATION GUIDE Register Your Drive Take advantage of your new hard drive online at https://www.wdc.com/products/registration. Backup Your Data Before performing any other components, discharge static electricity by touching...
User Manual (pdf)
Page 8
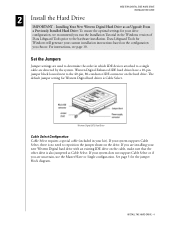
WESTERN DIGITAL EIDE HARD DRIVE INSTALLATION GUIDE 2 Install the Hard Drive IMPORTANT - If your system does not support Cable Select or if you choose. INSTALL THE HARD DRIVE - 4 Western Digital Enhanced IDE hard drives have a 10-pin jumper block located next to the hardware installation. Western Digital EIDE Hard Drive Cable Select Configuration Cable Select requires a special cable (included in the Windows version of Data Lifeguard Tools prior to the 40-pin...
WESTERN DIGITAL EIDE HARD DRIVE INSTALLATION GUIDE 2 Install the Hard Drive IMPORTANT - If your system does not support Cable Select or if you choose. INSTALL THE HARD DRIVE - 4 Western Digital Enhanced IDE hard drives have a 10-pin jumper block located next to the hardware installation. Western Digital EIDE Hard Drive Cable Select Configuration Cable Select requires a special cable (included in the Windows version of Data Lifeguard Tools prior to the 40-pin...
User Manual (pdf)
Page 9
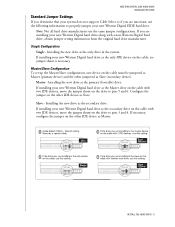
WESTERN DIGITAL EIDE HARD DRIVE INSTALLATION GUIDE Standard Jumper Settings If you determine that your system does not support Cable Select or if you are uncertain, use the same ...other IDE device as the only IDE device on the drive to properly jumper your new Western Digital hard drive as the primary (bootable) drive: If installing your new Western Digital EIDE hard drive. Single Configuration Single - Master - Installing the new drive as the secondary drive: If installing your new Western Digital hard drive as the secondary drive on the cable with two IDE devices, move the...
WESTERN DIGITAL EIDE HARD DRIVE INSTALLATION GUIDE Standard Jumper Settings If you determine that your system does not support Cable Select or if you are uncertain, use the same ...other IDE device as the only IDE device on the drive to properly jumper your new Western Digital hard drive as the primary (bootable) drive: If installing your new Western Digital EIDE hard drive. Single Configuration Single - Master - Installing the new drive as the secondary drive: If installing your new Western Digital hard drive as the secondary drive on the cable with two IDE devices, move the...
User Manual (pdf)
Page 10
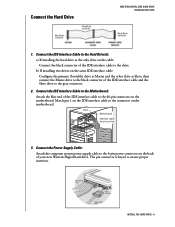
... the computer system power supply cable to the 4-pin power connector on the IDE interface cable to ensure proper insertion. Pin 1 Motherboard Interface cable from hard drive 3. INSTALL THE HARD DRIVE - 6 Match pin 1 on the back of the IDE interface cable and the Slave drive to the black connector of your new Western Digital hard drive. Connect the Hard Drive WESTERN DIGITAL EIDE HARD DRIVE INSTALLATION GUIDE 1.
... the computer system power supply cable to the 4-pin power connector on the IDE interface cable to ensure proper insertion. Pin 1 Motherboard Interface cable from hard drive 3. INSTALL THE HARD DRIVE - 6 Match pin 1 on the back of the IDE interface cable and the Slave drive to the black connector of your new Western Digital hard drive. Connect the Hard Drive WESTERN DIGITAL EIDE HARD DRIVE INSTALLATION GUIDE 1.
User Manual (pdf)
Page 11
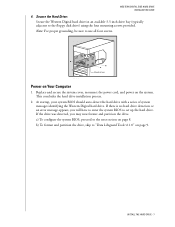
... detected, you will have to enter the system BIOS to set up the hard drive. INSTALL THE HARD DRIVE - 7 WESTERN DIGITAL EIDE HARD DRIVE INSTALLATION GUIDE 4. At startup, your system BIOS should auto-detect the hard drive with a series of system messages identifying the Western Digital hard drive. b) To format and partition the drive, skip to use all four screws. Æ Mounting frame Power on page 8. This concludes...
... detected, you will have to enter the system BIOS to set up the hard drive. INSTALL THE HARD DRIVE - 7 WESTERN DIGITAL EIDE HARD DRIVE INSTALLATION GUIDE 4. At startup, your system BIOS should auto-detect the hard drive with a series of system messages identifying the Western Digital hard drive. b) To format and partition the drive, skip to use all four screws. Æ Mounting frame Power on page 8. This concludes...
User Manual (pdf)
Page 12
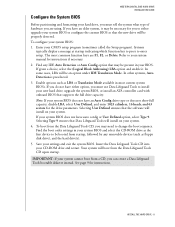
...). Selecting Type 9 ensures that Data Lifeguard Tools will be an option under IDE Translation Mode. WESTERN DIGITAL EIDE HARD DRIVE INSTALLATION GUIDE Configure the System BIOS Before partitioning and formatting your hard drive, you must use Data Lifeguard Tools to install your new hard drive, upgrade the system BIOS, or install an ATA controller card with onboard BIOS that supports the full...
...). Selecting Type 9 ensures that Data Lifeguard Tools will be an option under IDE Translation Mode. WESTERN DIGITAL EIDE HARD DRIVE INSTALLATION GUIDE Configure the System BIOS Before partitioning and formatting your hard drive, you must use Data Lifeguard Tools to install your new hard drive, upgrade the system BIOS, or install an ATA controller card with onboard BIOS that supports the full...

User Manual (pdf)
Page 13
... the CD. View Installation Tutorial - overcome the 137 GB, 32 GB, or 8.4 GB system BIOS limitations. ! Copy all the files or a specific folder from one drive to use a floppy...WESTERN DIGITAL EIDE HARD DRIVE INSTALLATION GUIDE 3 Data Lifeguard Tools v11.0 Western Digital provides Data Lifeguard Tools to -Drive Copy Utility - Create, view, and print a customized installation manual. ! DATA LIFEGUARD TOOLS V11.0 - 9 set a specific hard drive size. ! Partition and format an installed hard drive; Register Online - Follow the directions as prompted. Hard Drive...
... the CD. View Installation Tutorial - overcome the 137 GB, 32 GB, or 8.4 GB system BIOS limitations. ! Copy all the files or a specific folder from one drive to use a floppy...WESTERN DIGITAL EIDE HARD DRIVE INSTALLATION GUIDE 3 Data Lifeguard Tools v11.0 Western Digital provides Data Lifeguard Tools to -Drive Copy Utility - Create, view, and print a customized installation manual. ! DATA LIFEGUARD TOOLS V11.0 - 9 set a specific hard drive size. ! Partition and format an installed hard drive; Register Online - Follow the directions as prompted. Hard Drive...
User Manual (pdf)
Page 14
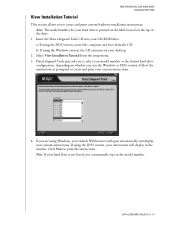
... in the model number. If you can manually type in the window. DATA LIFEGUARD TOOLS V11.0 - 10 WESTERN DIGITAL EIDE HARD DRIVE INSTALLATION GUIDE View Installation Tutorial This section allows you to select your model number or the desired hard drive configuration, depending on whether you run the Windows or DOS version. Follow the instructions as prompted to print...
... in the model number. If you can manually type in the window. DATA LIFEGUARD TOOLS V11.0 - 10 WESTERN DIGITAL EIDE HARD DRIVE INSTALLATION GUIDE View Installation Tutorial This section allows you to select your model number or the desired hard drive configuration, depending on whether you run the Windows or DOS version. Follow the instructions as prompted to print...
User Manual (pdf)
Page 15
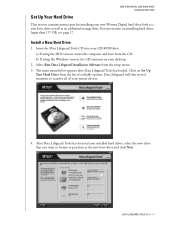
... installing your new Western Digital hard drive both as a new boot drive as well as the new boot drive and click Next. WESTERN DIGITAL EIDE HARD DRIVE INSTALLATION GUIDE Set Up Your Hard Drive This section contains instructions for all of available options. Data Lifeguard will take several moments to format or partition as an additional storage drive. Click on installing hard drives larger than 137 GB, see page 17. Install...
... installing your new Western Digital hard drive both as a new boot drive as well as the new boot drive and click Next. WESTERN DIGITAL EIDE HARD DRIVE INSTALLATION GUIDE Set Up Your Hard Drive This section contains instructions for all of available options. Data Lifeguard will take several moments to format or partition as an additional storage drive. Click on installing hard drives larger than 137 GB, see page 17. Install...

User Manual (pdf)
Page 16
... The next screen outlines your operating system limitations. Caution: All existing data on the hard drive will not format or partition a currently installed boot drive (the drive icon cannot be erased. To add partitions, use the slider bar to delete existing ...installing hard drives larger than 137 GB, see page 17. If you are prompted to continue, click Yes to continue. Click Erase, then Next to proceed with format and partition. WESTERN DIGITAL EIDE HARD DRIVE INSTALLATION GUIDE Note: Data Lifeguard will be selected). 5. Select Installation Type as Add the drive...
... The next screen outlines your operating system limitations. Caution: All existing data on the hard drive will not format or partition a currently installed boot drive (the drive icon cannot be erased. To add partitions, use the slider bar to delete existing ...installing hard drives larger than 137 GB, see page 17. If you are prompted to continue, click Yes to continue. Click Erase, then Next to proceed with format and partition. WESTERN DIGITAL EIDE HARD DRIVE INSTALLATION GUIDE Note: Data Lifeguard will be selected). 5. Select Installation Type as Add the drive...
User Manual (pdf)
Page 17
WESTERN DIGITAL EIDE HARD DRIVE INSTALLATION GUIDE 8. Follow the on the drive. Note: Windows installation will inform you must change the setting to install the operating system. DATA LIFEGUARD TOOLS V11.0 - 13 Click Done to use. c) If an operating system has already been installed, restart the system. 10. Remove the Data Lifeguard Tools CD from the CD-ROM drive and choose from...
WESTERN DIGITAL EIDE HARD DRIVE INSTALLATION GUIDE 8. Follow the on the drive. Note: Windows installation will inform you must change the setting to install the operating system. DATA LIFEGUARD TOOLS V11.0 - 13 Click Done to use. c) If an operating system has already been installed, restart the system. 10. Remove the Data Lifeguard Tools CD from the CD-ROM drive and choose from...
User Manual (pdf)
Page 18
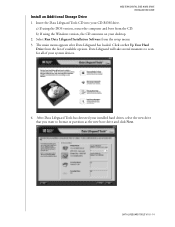
... using the DOS version, restart the computer and boot from the CD. Insert the Data Lifeguard Tools CD into your installed hard drives, select the new drive that you want to scan for all of available options. a) If using the Windows version, the CD autoruns on Set... Up Your Hard Drive from the setup menu. 3. DATA LIFEGUARD TOOLS V11.0 - 14 The main menu appears after Data Lifeguard has loaded. After Data Lifeguard Tools has detected your CD-ROM drive. WESTERN DIGITAL EIDE HARD DRIVE INSTALLATION GUIDE Install an Additional Storage...
... using the DOS version, restart the computer and boot from the CD. Insert the Data Lifeguard Tools CD into your installed hard drives, select the new drive that you want to scan for all of available options. a) If using the Windows version, the CD autoruns on Set... Up Your Hard Drive from the setup menu. 3. DATA LIFEGUARD TOOLS V11.0 - 14 The main menu appears after Data Lifeguard has loaded. After Data Lifeguard Tools has detected your CD-ROM drive. WESTERN DIGITAL EIDE HARD DRIVE INSTALLATION GUIDE Install an Additional Storage...
User Manual (pdf)
Page 19
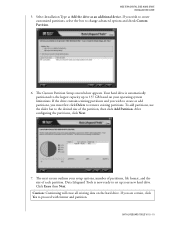
... and check Custom Partition. 6. After configuring the partitions, click Next. 7. Select Installation Type as Add the drive as an additional device. Your hard drive is now ready to set up to the largest capacity up your setup options, number...GB based on the hard drive. The Custom Partition Setup screen below appears. Click Erase then Next. If the drive contains existing partitions and you wish to create or add partitions, you must first click Delete to the desired size of each partition. DATA LIFEGUARD TOOLS V11.0 - 15 WESTERN DIGITAL EIDE HARD DRIVE INSTALLATION GUIDE...
... and check Custom Partition. 6. After configuring the partitions, click Next. 7. Select Installation Type as Add the drive as an additional device. Your hard drive is now ready to set up to the largest capacity up your setup options, number...GB based on the hard drive. The Custom Partition Setup screen below appears. Click Erase then Next. If the drive contains existing partitions and you wish to create or add partitions, you must first click Delete to the desired size of each partition. DATA LIFEGUARD TOOLS V11.0 - 15 WESTERN DIGITAL EIDE HARD DRIVE INSTALLATION GUIDE...
User Manual (pdf)
Page 20
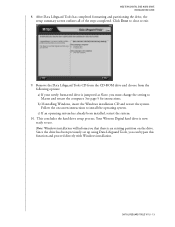
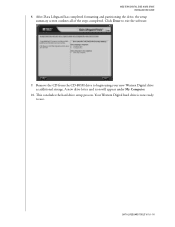
After Data Lifeguard has completed formatting and partitioning the drive, the setup summary screen outlines all of the steps completed. DATA LIFEGUARD TOOLS V11.0 - 16 A new drive letter and icon will appear under My Computer. 10. Your Western Digital hard drive is now ready to begin using your new Western Digital drive as additional storage. Remove the CD from the CD-ROM drive to use. This concludes the hard drive setup process. Click Done to exit the software. 9. WESTERN DIGITAL EIDE HARD DRIVE INSTALLATION GUIDE 8.
After Data Lifeguard has completed formatting and partitioning the drive, the setup summary screen outlines all of the steps completed. DATA LIFEGUARD TOOLS V11.0 - 16 A new drive letter and icon will appear under My Computer. 10. Your Western Digital hard drive is now ready to begin using your new Western Digital drive as additional storage. Remove the CD from the CD-ROM drive to use. This concludes the hard drive setup process. Click Done to exit the software. 9. WESTERN DIGITAL EIDE HARD DRIVE INSTALLATION GUIDE 8.
User Manual (pdf)
Page 21
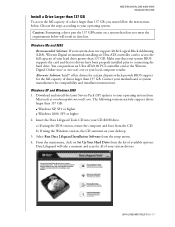
... From the main menu, click on your system devices. WESTERN DIGITAL EIDE HARD DRIVE INSTALLATION GUIDE Install a Drive Larger than 137 GB To access the full capacity of a drive larger than 137 GB. The following versions natively support drives larger than 137 GB. a) If using the Windows version, the CD autoruns on Set Up Your Hard Drive from the CD. Alternate Solution: Intel® offers...
... From the main menu, click on your system devices. WESTERN DIGITAL EIDE HARD DRIVE INSTALLATION GUIDE Install a Drive Larger than 137 GB To access the full capacity of a drive larger than 137 GB. The following versions natively support drives larger than 137 GB. a) If using the Windows version, the CD autoruns on Set Up Your Hard Drive from the CD. Alternate Solution: Intel® offers...

User Manual (pdf)
Page 22
WESTERN DIGITAL EIDE HARD DRIVE INSTALLATION GUIDE 5. Choose your new drive. Click on Partition to change advanced setup options and check Custom Partition. DATA LIFEGUARD TOOLS V11.0 - 18 To create customized partitions, select the box to Full Size. 7. If Data Lifeguard Tools has detected Windows XP SP1 or Windows 2000 SP3, Dynamic Drive... and begin using your Installation Type. Click Next. 8. After Data Lifeguard Tools displays the steps completed, click Done to achieve full drive capacity. The following message will automatically be selected and installed in the next step....
WESTERN DIGITAL EIDE HARD DRIVE INSTALLATION GUIDE 5. Choose your new drive. Click on Partition to change advanced setup options and check Custom Partition. DATA LIFEGUARD TOOLS V11.0 - 18 To create customized partitions, select the box to Full Size. 7. If Data Lifeguard Tools has detected Windows XP SP1 or Windows 2000 SP3, Dynamic Drive... and begin using your Installation Type. Click Next. 8. After Data Lifeguard Tools displays the steps completed, click Done to achieve full drive capacity. The following message will automatically be selected and installed in the next step....


