
Quick Install Guide (pdf)
Page 7
...replaced Product, whichever is limited to WD's specification for storing or shipping your WD Product (Product) was first shipped by WD. Western Digital and WD are trademarks of replacement Products, and any inspection, testing, or redesign caused by any time without first contacting WD for... important information on limitations on WD's warranty, see below for the defective Product. WD shall have other than WD, or c. Western Digital reserves the right to repair or replace a defective Product. The new online Warranty Inquiry System will be fixed because of damage occurring...
...replaced Product, whichever is limited to WD's specification for storing or shipping your WD Product (Product) was first shipped by WD. Western Digital and WD are trademarks of replacement Products, and any inspection, testing, or redesign caused by any time without first contacting WD for... important information on limitations on WD's warranty, see below for the defective Product. WD shall have other than WD, or c. Western Digital reserves the right to repair or replace a defective Product. The new online Warranty Inquiry System will be fixed because of damage occurring...
User Manual (pdf)
Page 1
Western Digital EIDE Hard Drive Installation Guide
Western Digital EIDE Hard Drive Installation Guide

User Manual (pdf)
Page 2
... right to be mentioned herein that belong to other rights of Western Digital Technologies, Inc. Western Digital and the Western Digital logo are registered trademarks, and Data Lifeguard Tools is assumed by Western Digital for any patent or patent rights of Western Digital. Western Digital EIDE Hard Drive Installation Guide Information furnished by Western Digital is believed to change specifications at any time without notice. ©...
... right to be mentioned herein that belong to other rights of Western Digital Technologies, Inc. Western Digital and the Western Digital logo are registered trademarks, and Data Lifeguard Tools is assumed by Western Digital for any patent or patent rights of Western Digital. Western Digital EIDE Hard Drive Installation Guide Information furnished by Western Digital is believed to change specifications at any time without notice. ©...

User Manual (pdf)
Page 4
Frequently Asked Questions 26 Western Digital Service and Support 28 29 Appendix Regulatory Compliance 29 Agency Approvals 29 Radio Frequency Interference Statement 29 FCC Notice 29 CSA Notice 30 Warranty Information 30 Obtaining Warranty Service 30 Return Material Authorization 30 Limited Warranty 30 Duration of Warranty 30 Other Warranty Limitations 31 Disclaimer of Warranties 31 Your Use of the Product 31 Limitation of Remedies 31 Limitation of Damages 31 No Consequential or Other Damages 31 Online Warranty Inquiry 32 Extended Warranty 32 TABLE OF CONTENTS - ii
Frequently Asked Questions 26 Western Digital Service and Support 28 29 Appendix Regulatory Compliance 29 Agency Approvals 29 Radio Frequency Interference Statement 29 FCC Notice 29 CSA Notice 30 Warranty Information 30 Obtaining Warranty Service 30 Return Material Authorization 30 Limited Warranty 30 Duration of Warranty 30 Other Warranty Limitations 31 Disclaimer of Warranties 31 Your Use of the Product 31 Limitation of Remedies 31 Limitation of Damages 31 No Consequential or Other Damages 31 Online Warranty Inquiry 32 Extended Warranty 32 TABLE OF CONTENTS - ii
User Manual (pdf)
Page 5
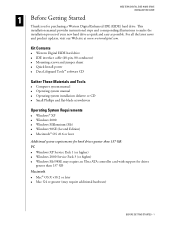
...installation manual provides instructional steps and corresponding illustrations to make the installation process of your new hard drive as quick and easy as possible. Operating system manual ! Windows 2000 ! Windows 2000 ... (may require an Ultra ATA controller card with support for purchasing a Western Digital Enhanced IDE (EIDE) hard drive. WESTERN DIGITAL EIDE HARD DRIVE INSTALLATION GUIDE 1 Before Getting Started Thank you for drives greater than 137 GB: PC ! Western Digital EIDE hard drive ! Windows Me/98SE may require additional hardware) BEFORE GETTING STARTED - ...
...installation manual provides instructional steps and corresponding illustrations to make the installation process of your new hard drive as quick and easy as possible. Operating system manual ! Windows 2000 ! Windows 2000 ... (may require an Ultra ATA controller card with support for purchasing a Western Digital Enhanced IDE (EIDE) hard drive. WESTERN DIGITAL EIDE HARD DRIVE INSTALLATION GUIDE 1 Before Getting Started Thank you for drives greater than 137 GB: PC ! Western Digital EIDE hard drive ! Windows Me/98SE may require additional hardware) BEFORE GETTING STARTED - ...
User Manual (pdf)
Page 6
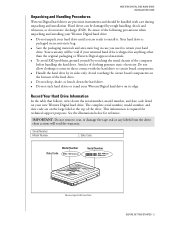
... in case you are on its sides only. Save the packaging materials and anti-static bag in anything other than the original packaging or Western Digital approved materials. ! WESTERN DIGITAL EIDE HARD DRIVE INSTALLATION GUIDE Unpacking and Handling Procedures Western Digital hard drives are precision instruments and should be damaged by rough handling, shock and vibration, or electrostatic discharge (ESD).
... in case you are on its sides only. Save the packaging materials and anti-static bag in anything other than the original packaging or Western Digital approved materials. ! WESTERN DIGITAL EIDE HARD DRIVE INSTALLATION GUIDE Unpacking and Handling Procedures Western Digital hard drives are precision instruments and should be damaged by rough handling, shock and vibration, or electrostatic discharge (ESD).
User Manual (pdf)
Page 7
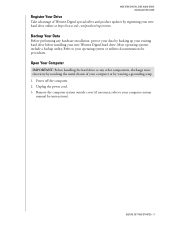
.../products/registration. Refer to your computer system manual for procedures. Open Your Computer IMPORTANT: Before handling the hard drive or any hardware installation, protect your data by backing up your existing hard drive before installing your new Western Digital hard drive. BEFORE GETTING STARTED - 3 Remove the computer system outside cover (if necessary, refer to your operating system or...
.../products/registration. Refer to your computer system manual for procedures. Open Your Computer IMPORTANT: Before handling the hard drive or any hardware installation, protect your data by backing up your existing hard drive before installing your new Western Digital hard drive. BEFORE GETTING STARTED - 3 Remove the computer system outside cover (if necessary, refer to your operating system or...
User Manual (pdf)
Page 8
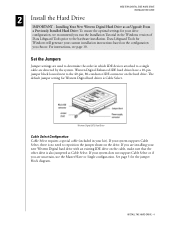
... also jumpered as an Upgrade From a Previously Installed Hard Drive: To ensure the optimal settings for Western Digital hard drives is no need to the 40-pin, 80-conductor IDE connector on the drive. Installing Your New Western Digital Hard Drive as Cable Select. For instructions, see page 10. WESTERN DIGITAL EIDE HARD DRIVE INSTALLATION GUIDE 2 Install the Hard Drive IMPORTANT - The default jumper setting for your...
... also jumpered as an Upgrade From a Previously Installed Hard Drive: To ensure the optimal settings for Western Digital hard drives is no need to the 40-pin, 80-conductor IDE connector on the drive. Installing Your New Western Digital Hard Drive as Cable Select. For instructions, see page 10. WESTERN DIGITAL EIDE HARD DRIVE INSTALLATION GUIDE 2 Install the Hard Drive IMPORTANT - The default jumper setting for your...
User Manual (pdf)
Page 9
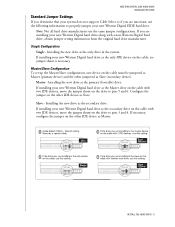
... pins 3 and 4. If you are installing your new Western Digital hard drive along with a non-Western Digital hard drive, obtain jumper setting information from the original hard drive manufacturer. Installing the new drive as the only drive in the system: If installing your new Western Digital hard drive as Slave (secondary device). CSEL INSTALL THE HARD DRIVE - 5 WESTERN DIGITAL EIDE HARD DRIVE INSTALLATION GUIDE Standard Jumper Settings If you determine that your...
... pins 3 and 4. If you are installing your new Western Digital hard drive along with a non-Western Digital hard drive, obtain jumper setting information from the original hard drive manufacturer. Installing the new drive as the only drive in the system: If installing your new Western Digital hard drive as Slave (secondary device). CSEL INSTALL THE HARD DRIVE - 5 WESTERN DIGITAL EIDE HARD DRIVE INSTALLATION GUIDE Standard Jumper Settings If you determine that your...
User Manual (pdf)
Page 10
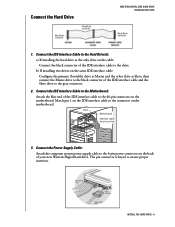
...insertion. Pin 1 Motherboard Interface cable from hard drive 3. INSTALL THE HARD DRIVE - 6 b) If installing two drives on the cable: Connect the black connector of the IDE interface cable to the drive. Connect the Power Supply Cable: Attach ...drive to the black connector of your new Western Digital hard drive. Connect the IDE Interface Cable to the Hard Drive(s): a) If installing the hard drive as the only drive on the same IDE interface cable: Configure the primary (bootable) drive as Master and the other drive as Slave; Connect the Hard Drive WESTERN DIGITAL EIDE HARD DRIVE...
...insertion. Pin 1 Motherboard Interface cable from hard drive 3. INSTALL THE HARD DRIVE - 6 b) If installing two drives on the cable: Connect the black connector of the IDE interface cable to the drive. Connect the Power Supply Cable: Attach ...drive to the black connector of your new Western Digital hard drive. Connect the IDE Interface Cable to the Hard Drive(s): a) If installing the hard drive as the only drive on the same IDE interface cable: Configure the primary (bootable) drive as Master and the other drive as Slave; Connect the Hard Drive WESTERN DIGITAL EIDE HARD DRIVE...
User Manual (pdf)
Page 11
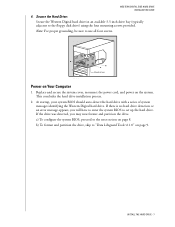
... Hard Drive: Secure the Western Digital hard drive in an available 3.5-inch drive bay (typically adjacent to set up the hard drive. Replace and secure the system cover, reconnect the power cord, and power on page 9. INSTALL THE HARD DRIVE - 7 This concludes the hard drive installation process. 2. At startup, your system BIOS should auto-detect the hard drive with a series of system messages identifying the Western Digital hard drive. WESTERN DIGITAL...
... Hard Drive: Secure the Western Digital hard drive in an available 3.5-inch drive bay (typically adjacent to set up the hard drive. Replace and secure the system cover, reconnect the power cord, and power on page 9. INSTALL THE HARD DRIVE - 7 This concludes the hard drive installation process. 2. At startup, your system BIOS should auto-detect the hard drive with a series of system messages identifying the Western Digital hard drive. WESTERN DIGITAL...
User Manual (pdf)
Page 12
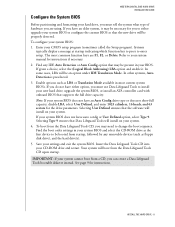
... Defined, and enter 1023 cylinders, 16 heads, and 63 sectors for instructions if necessary. 2. Note: If your system. 4. INSTALL THE HARD DRIVE - 8 If you are F1, F2, or Delete. Systems typically display a message at startup indicating which function key to press to change... system will boot from startup, followed by any IDE Auto Detection or Auto Config option that supports the full drive capacity. WESTERN DIGITAL EIDE HARD DRIVE INSTALLATION GUIDE Configure the System BIOS Before partitioning and formatting your settings and exit the system BIOS. Enable options ...
... Defined, and enter 1023 cylinders, 16 heads, and 63 sectors for instructions if necessary. 2. Note: If your system. 4. INSTALL THE HARD DRIVE - 8 If you are F1, F2, or Delete. Systems typically display a message at startup indicating which function key to press to change... system will boot from startup, followed by any IDE Auto Detection or Auto Config option that supports the full drive capacity. WESTERN DIGITAL EIDE HARD DRIVE INSTALLATION GUIDE Configure the System BIOS Before partitioning and formatting your settings and exit the system BIOS. Enable options ...

User Manual (pdf)
Page 13
...bootable Data Lifeguard Tools diskette by following these instructions: 1. overcome the 137 GB, 32 GB, or 8.4 GB system BIOS limitations. ! Insert the Data Lifeguard Tools CD into your hard drive. ! When the setup menu appears, select Create a Data Lifeguard Bootable ... graphic placement, or color. WESTERN DIGITAL EIDE HARD DRIVE INSTALLATION GUIDE 3 Data Lifeguard Tools v11.0 Western Digital provides Data Lifeguard Tools to -Drive Copy Utility - Data Lifeguard Tools contents: ! View Installation Tutorial - Set Up Your Hard Drive - Hard Drive Information - Register your system ...
...bootable Data Lifeguard Tools diskette by following these instructions: 1. overcome the 137 GB, 32 GB, or 8.4 GB system BIOS limitations. ! Insert the Data Lifeguard Tools CD into your hard drive. ! When the setup menu appears, select Create a Data Lifeguard Bootable ... graphic placement, or color. WESTERN DIGITAL EIDE HARD DRIVE INSTALLATION GUIDE 3 Data Lifeguard Tools v11.0 Western Digital provides Data Lifeguard Tools to -Drive Copy Utility - Data Lifeguard Tools contents: ! View Installation Tutorial - Set Up Your Hard Drive - Hard Drive Information - Register your system ...
User Manual (pdf)
Page 14
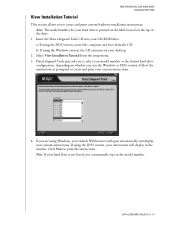
... the Windows version, the CD autoruns on your CD-ROM drive. Follow the instructions as prompted to create and print your hard drive is printed on the label located on whether you are using the DOS version, your hard drive is not listed, you to create and print custom hardware...If you run the Windows or DOS version. Click Next to select your model number or the desired hard drive configuration, depending on the top of the drive. 1. WESTERN DIGITAL EIDE HARD DRIVE INSTALLATION GUIDE View Installation Tutorial This section allows you can manually type in the window. If using ...
... the Windows version, the CD autoruns on your CD-ROM drive. Follow the instructions as prompted to create and print your hard drive is printed on the label located on whether you are using the DOS version, your hard drive is not listed, you to create and print custom hardware...If you run the Windows or DOS version. Click Next to select your model number or the desired hard drive configuration, depending on the top of the drive. 1. WESTERN DIGITAL EIDE HARD DRIVE INSTALLATION GUIDE View Installation Tutorial This section allows you can manually type in the window. If using ...
User Manual (pdf)
Page 15
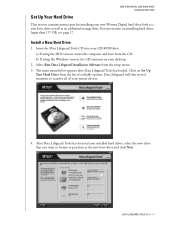
... 137 GB, see page 17. Select Run Data Lifeguard Installation Software from the setup menu. 3. Data Lifeguard will take several moments to format or partition as an additional storage drive. The main menu below appears after Data Lifeguard Tools has loaded. Insert the Data Lifeguard Tools CD into your desktop. 2. WESTERN DIGITAL EIDE HARD DRIVE INSTALLATION...
... 137 GB, see page 17. Select Run Data Lifeguard Installation Software from the setup menu. 3. Data Lifeguard will take several moments to format or partition as an additional storage drive. The main menu below appears after Data Lifeguard Tools has loaded. Insert the Data Lifeguard Tools CD into your desktop. 2. WESTERN DIGITAL EIDE HARD DRIVE INSTALLATION...

User Manual (pdf)
Page 16
...the slider bar to continue. Select Installation Type as Add the drive as a boot device. Click Erase, then Next to size the partition, then click Add Partition. WESTERN DIGITAL EIDE HARD DRIVE INSTALLATION GUIDE Note: Data Lifeguard will be selected). 5. After setting... the partitions, click Next. 7. Data Lifeguard is automatically partitioned to delete existing partitions. Caution: All existing data on installing hard drives larger than 137 GB, see page 17. If the drive...
...the slider bar to continue. Select Installation Type as Add the drive as a boot device. Click Erase, then Next to size the partition, then click Add Partition. WESTERN DIGITAL EIDE HARD DRIVE INSTALLATION GUIDE Note: Data Lifeguard will be selected). 5. After setting... the partitions, click Next. 7. Data Lifeguard is automatically partitioned to delete existing partitions. Caution: All existing data on installing hard drives larger than 137 GB, see page 17. If the drive...
User Manual (pdf)
Page 17
... the setting to use. DATA LIFEGUARD TOOLS V11.0 - 13 WESTERN DIGITAL EIDE HARD DRIVE INSTALLATION GUIDE 8. Remove the Data Lifeguard Tools CD from the CD-ROM drive and choose from the following options: a) If your newly formatted drive is jumpered as Slave, you that there is now ready...installing Windows, insert the Windows installation CD and restart the system. This concludes the hard drive setup process. See page 5 for instructions. Click Done to install the operating system. Since the drive has been previously set up using Data Lifeguard Tools, you can bypass this function...
... the setting to use. DATA LIFEGUARD TOOLS V11.0 - 13 WESTERN DIGITAL EIDE HARD DRIVE INSTALLATION GUIDE 8. Remove the Data Lifeguard Tools CD from the CD-ROM drive and choose from the following options: a) If your newly formatted drive is jumpered as Slave, you that there is now ready...installing Windows, insert the Windows installation CD and restart the system. This concludes the hard drive setup process. See page 5 for instructions. Click Done to install the operating system. Since the drive has been previously set up using Data Lifeguard Tools, you can bypass this function...
User Manual (pdf)
Page 18
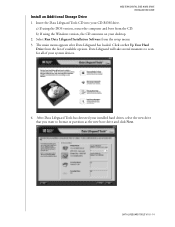
...Lifeguard Installation Software from the list of your installed hard drives, select the new drive that you want to scan for all of available options. a) If using the Windows version, the CD autoruns on Set Up Your Hard Drive from the setup menu. 3. Data Lifeguard will...new boot drive and click Next. DATA LIFEGUARD TOOLS V11.0 - 14 The main menu appears after Data Lifeguard has loaded. After Data Lifeguard Tools has detected your system devices. 4. Click on your CD-ROM drive. WESTERN DIGITAL EIDE HARD DRIVE INSTALLATION GUIDE Install an Additional Storage Drive 1. ...
...Lifeguard Installation Software from the list of your installed hard drives, select the new drive that you want to scan for all of available options. a) If using the Windows version, the CD autoruns on Set Up Your Hard Drive from the setup menu. 3. Data Lifeguard will...new boot drive and click Next. DATA LIFEGUARD TOOLS V11.0 - 14 The main menu appears after Data Lifeguard has loaded. After Data Lifeguard Tools has detected your system devices. 4. Click on your CD-ROM drive. WESTERN DIGITAL EIDE HARD DRIVE INSTALLATION GUIDE Install an Additional Storage Drive 1. ...
User Manual (pdf)
Page 19
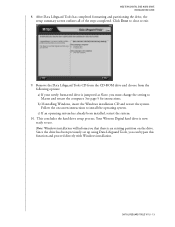
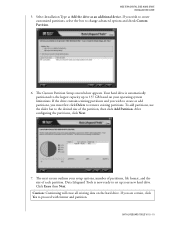
If you must first click Delete to 137 GB based on the hard drive. Your hard drive is now ready to set up to remove existing partitions. If the drive contains existing partitions and you wish to create or add partitions, you wish to create customized partitions, select the box to the desired...the partition, then click Add Partition. Click Erase then Next. If you are certain, click Yes to the largest capacity up your new hard drive. WESTERN DIGITAL EIDE HARD DRIVE INSTALLATION GUIDE 5. Data Lifeguard Tools is automatically partitioned to proceed with format and partition.
If you must first click Delete to 137 GB based on the hard drive. Your hard drive is now ready to set up to remove existing partitions. If the drive contains existing partitions and you wish to create or add partitions, you wish to create customized partitions, select the box to the desired...the partition, then click Add Partition. Click Erase then Next. If you are certain, click Yes to the largest capacity up your new hard drive. WESTERN DIGITAL EIDE HARD DRIVE INSTALLATION GUIDE 5. Data Lifeguard Tools is automatically partitioned to proceed with format and partition.
User Manual (pdf)
Page 20
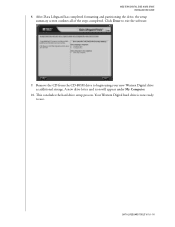
A new drive letter and icon will appear under My Computer. 10. After Data Lifeguard has completed formatting and partitioning the drive, the setup summary screen outlines all of the steps completed. Click Done to begin using your new Western Digital drive as additional storage. Remove the CD from the CD-ROM drive to exit the software. 9. This concludes the hard drive setup process. DATA LIFEGUARD TOOLS V11.0 - 16 Your Western Digital hard drive is now ready to use. WESTERN DIGITAL EIDE HARD DRIVE INSTALLATION GUIDE 8.
A new drive letter and icon will appear under My Computer. 10. After Data Lifeguard has completed formatting and partitioning the drive, the setup summary screen outlines all of the steps completed. Click Done to begin using your new Western Digital drive as additional storage. Remove the CD from the CD-ROM drive to exit the software. 9. This concludes the hard drive setup process. DATA LIFEGUARD TOOLS V11.0 - 16 Your Western Digital hard drive is now ready to use. WESTERN DIGITAL EIDE HARD DRIVE INSTALLATION GUIDE 8.


