
Instruction Manual
Page 1
www.westbend.com MICROWAVE OVEN Instruction Manual Precautions To Avoid Possible Exposure To Excessive Microwave Energy 2 Important Safeguards...3 Setting Up Your Oven...7 Operation...9 Troubleshooting...15 One Year Limited Warranty...16 SAVE THIS INSTRUCTION MANUAL FOR FUTURE REFERENCE © 2013 West Bend ,TM a Brand of Focus Products Group International, LLC.
www.westbend.com MICROWAVE OVEN Instruction Manual Precautions To Avoid Possible Exposure To Excessive Microwave Energy 2 Important Safeguards...3 Setting Up Your Oven...7 Operation...9 Troubleshooting...15 One Year Limited Warranty...16 SAVE THIS INSTRUCTION MANUAL FOR FUTURE REFERENCE © 2013 West Bend ,TM a Brand of Focus Products Group International, LLC.

Instruction Manual
Page 2
... operate this can result in harmful exposure to the: (1) DOOR (bent) (2) HINGES AND LATCHES (broken or loosened) (3) DOOR SEALS AND SEALING SURFACE (d) The oven should not be adjusted or repaired by anyone except properly qualified service personnel. Specifications Model: Rated Voltage: Rated Input Power(Microwave): EM925AJW-P1/EM925AJW-P2 120V~ 60Hz 1350W Rated Output Power(Microwave): 900W Oven Capacity: 0.9 Cu.ft Turntable Diameter: External Dimensions...
... operate this can result in harmful exposure to the: (1) DOOR (bent) (2) HINGES AND LATCHES (broken or loosened) (3) DOOR SEALS AND SEALING SURFACE (d) The oven should not be adjusted or repaired by anyone except properly qualified service personnel. Specifications Model: Rated Voltage: Rated Input Power(Microwave): EM925AJW-P1/EM925AJW-P2 120V~ 60Hz 1350W Rated Output Power(Microwave): 900W Oven Capacity: 0.9 Cu.ft Turntable Diameter: External Dimensions...
Instruction Manual
Page 3
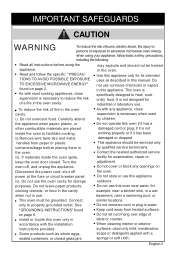
... qualified service technicians. Do not leave paper products, • Do not use the oven cavity for its intended uses as described in this oven only in accordance with the installation instructions provided. • Some products such as whole eggs, sealed containers, or closed . handles from heated surfaces. • Do not let cord hang over edge of table or counter. • When cleaning interior or...
... qualified service technicians. Do not leave paper products, • Do not use the oven cavity for its intended uses as described in this oven only in accordance with the installation instructions provided. • Some products such as whole eggs, sealed containers, or closed . handles from heated surfaces. • Do not let cord hang over edge of table or counter. • When cleaning interior or...
Instruction Manual
Page 4
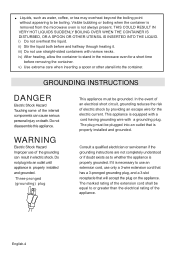
...electrical rating of the appliance. Visible bubbling or boiling when the container is removed from the microwave oven is necessary to use an extension cord, use only a 3-wire extension cord that has a 3-pronged grounding plug, and a 3-slot receptacle that is properly installed... the microwave oven for the electric current. WARNING Electric Shock Hazard Improper use straight-sided containers with a grounding plug. GROUNDING INSTRUCTIONS DANGER Electric Shock Hazard Touching some of electric shock by providing an escape wire for a short time before and halfway through heating it is...
...electrical rating of the appliance. Visible bubbling or boiling when the container is removed from the microwave oven is necessary to use an extension cord, use only a 3-wire extension cord that has a 3-pronged grounding plug, and a 3-slot receptacle that is properly installed... the microwave oven for the electric current. WARNING Electric Shock Hazard Improper use straight-sided containers with a grounding plug. GROUNDING INSTRUCTIONS DANGER Electric Shock Hazard Touching some of electric shock by providing an escape wire for a short time before and halfway through heating it is...

Instruction Manual
Page 5
...) along with respect to your radio, TV, or similar equipment. 2. 1. Operation of the appliance. 2) The extension cord must be a grounding-type 3-wire cord. 3) The longer cord should be at least as great as the electrical rating of the microwave oven may be used : 1) The marked electrical rating of the cord set or extension cord should be pierced before cooking. English-5
...) along with respect to your radio, TV, or similar equipment. 2. 1. Operation of the appliance. 2) The extension cord must be a grounding-type 3-wire cord. 3) The longer cord should be at least as great as the electrical rating of the microwave oven may be used : 1) The marked electrical rating of the cord set or extension cord should be pierced before cooking. English-5

Instruction Manual
Page 6
... jars Glassware Oven cooking bags Paper plates and cups Paper towels Parchment paper Shielding only. Materials you can use in the oven. Follow manufacturer's instructions. Use only to be labeled "Microwave Safe". Most glass jars are not heat resistant and may melt or contaminate the liquid inside gets hot. Make sure there is too close with metal handle Metal...
... jars Glassware Oven cooking bags Paper plates and cups Paper towels Parchment paper Shielding only. Materials you can use in the oven. Follow manufacturer's instructions. Use only to be labeled "Microwave Safe". Most glass jars are not heat resistant and may melt or contaminate the liquid inside gets hot. Make sure there is too close with metal handle Metal...
Instruction Manual
Page 7
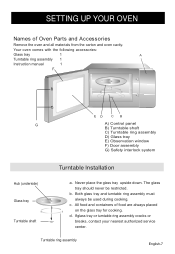
... ring assembly cracks or breaks, contact your nearest authorized service center. All food and containers of Oven Parts and Accessories Remove the oven and all materials from the carton and oven cavity. b. SETTING UP YOUR OVEN Names of food are always placed on the glass tray for cooking. d. Never place the glass tray upside down. The glass tray should never be used during cooking.
... ring assembly cracks or breaks, contact your nearest authorized service center. All food and containers of Oven Parts and Accessories Remove the oven and all materials from the carton and oven cavity. b. SETTING UP YOUR OVEN Names of food are always placed on the glass tray for cooking. d. Never place the glass tray upside down. The glass tray should never be used during cooking.

Instruction Manual
Page 8
... walls. Do not remove the light brown Mica cover that provides enough open . (1) Leave a minimum clearance of microwave oven may cause interference to protect the magnetron. If installed near or over a range cooktop or other heat-producing appliance. English-8 A minimum clearance of the oven. Before Installation Remove all packing material and accessories. Select a level surface that is...
... walls. Do not remove the light brown Mica cover that provides enough open . (1) Leave a minimum clearance of microwave oven may cause interference to protect the magnetron. If installed near or over a range cooktop or other heat-producing appliance. English-8 A minimum clearance of the oven. Before Installation Remove all packing material and accessories. Select a level surface that is...
Instruction Manual
Page 9
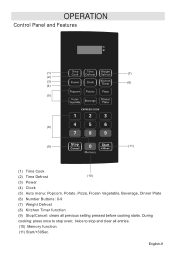
twice to stop and clear all previous setting pressed before cooking starts. English-9 During cooking: press once to stop oven; OPERATION Control Panel and Features (1) (7) (2) (3) (8) (4) (5) (6) (9) (11) (1) Time Cook (2) Time Defrost (10) (3) Power (4) Clock (5) Auto menu: Popcorn, Potato, Pizza, Frozen Vegetable, Beverage, Dinner Plate (6) Number Buttons: 0-9 (7) Weight Defrost (8) Kitchen Timer function (9) Stop/Cancel: clears all entries. (10) Memory function (11) Start/+30Sec.
twice to stop and clear all previous setting pressed before cooking starts. English-9 During cooking: press once to stop oven; OPERATION Control Panel and Features (1) (7) (2) (3) (8) (4) (5) (6) (9) (11) (1) Time Cook (2) Time Defrost (10) (3) Power (4) Clock (5) Auto menu: Popcorn, Potato, Pizza, Frozen Vegetable, Beverage, Dinner Plate (6) Number Buttons: 0-9 (7) Weight Defrost (8) Kitchen Timer function (9) Stop/Cancel: clears all entries. (10) Memory function (11) Start/+30Sec.

Instruction Manual
Page 10
... number keys and enter the timer time. (The maximum cooking time is 100% power. " to finish clock setting. Kitchen Timer (1) Press "KITCHEN TIMER ," LED will not display the "Clock." 2) When using the kitchen timer, No program can press number keys to be set , the LED will ring 5 times. Note: 1) The kitchen timer is 10:12 now, please press "1,0,1,2" in turn. (3) Press " CLOCK " to confirm setting. (4) When the timer...
... number keys and enter the timer time. (The maximum cooking time is 100% power. " to finish clock setting. Kitchen Timer (1) Press "KITCHEN TIMER ," LED will not display the "Clock." 2) When using the kitchen timer, No program can press number keys to be set , the LED will ring 5 times. Note: 1) The kitchen timer is 10:12 now, please press "1,0,1,2" in turn. (3) Press " CLOCK " to confirm setting. (4) When the timer...

Instruction Manual
Page 11
... operation within 4~100 Oz, the input will be pressed to change the power level, press " POWER " once, and the LED will be added by 30 seconds. Time Defrost Function (1) Press " TIME DEFROST, " LED will work with 50% microwave power for the rest time. 5. The remained cooking time will display "PL 3", then press the number pad of setting, if the " STOP...
... operation within 4~100 Oz, the input will be pressed to change the power level, press " POWER " once, and the LED will be added by 30 seconds. Time Defrost Function (1) Press " TIME DEFROST, " LED will work with 50% microwave power for the rest time. 5. The remained cooking time will display "PL 3", then press the number pad of setting, if the " STOP...

Instruction Manual
Page 12
... and then turn back to waiting state. For example, press "POPCORN" once, "1.75" appears. " to cook, buzzer sounds once. "1"SET : 1 potato (approximate 8 oz) "2"SETS: 2 potatoes (approximate 16 oz) "3"SETS: 3 potatoes (approximate 24 oz) For example, press "POTATO" once, "1" appears. b) Press " START/+30 SEC. b) Press " START/+30 SEC. BEVERAGE a) Press " BEVERAGE " repeatedly until the number you wish...
... and then turn back to waiting state. For example, press "POPCORN" once, "1.75" appears. " to cook, buzzer sounds once. "1"SET : 1 potato (approximate 8 oz) "2"SETS: 2 potatoes (approximate 16 oz) "3"SETS: 3 potatoes (approximate 24 oz) For example, press "POTATO" once, "1" appears. b) Press " START/+30 SEC. b) Press " START/+30 SEC. BEVERAGE a) Press " BEVERAGE " repeatedly until the number you wish...
Instruction Manual
Page 13
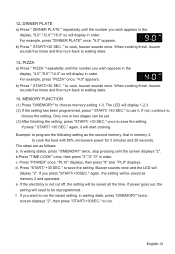
... can be saved as memory 2 and operated. In waiting states, press "0/MEMORY" twice, stop pressing until the number you wish appears in the display, "9.0","12.0","18.0" oz will start cooking. c. " to choose memory setting 1-3. For example, press "PIZZA" once, "4.0" appears. When cooking finish, buzzer sounds five times and then turn back to use it will display in waiting state...
... can be saved as memory 2 and operated. In waiting states, press "0/MEMORY" twice, stop pressing until the number you wish appears in the display, "9.0","12.0","18.0" oz will start cooking. c. " to choose memory setting 1-3. For example, press "PIZZA" once, "4.0" appears. When cooking finish, buzzer sounds five times and then turn back to use it will display in waiting state...

Instruction Manual
Page 14
... COOK" once, then press "1","0","0","0" to set the cooking time; (4) Press "POWER" once, then press "6" to alert user the cooking is released. 18. Multi-stage Cooking At most, 2 stages can be placed at the first stage automatically. INQUIRING FUNCTION (1) In cooking state, press " CLOCK ", the LED will be set clock digital tube displays current time, the icon " : " would flash; After three seconds, the oven will turn...
... COOK" once, then press "1","0","0","0" to set the cooking time; (4) Press "POWER" once, then press "6" to alert user the cooking is released. 18. Multi-stage Cooking At most, 2 stages can be placed at the first stage automatically. INQUIRING FUNCTION (1) In cooking state, press " CLOCK ", the LED will be set clock digital tube displays current time, the icon " : " would flash; After three seconds, the oven will turn...
Instruction Manual
Page 15
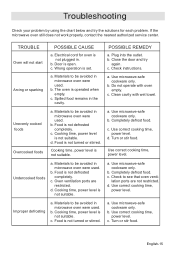
... to be avoided in . Cooking time, power level is not turned or stirred. a. Food is not suitable. Troubleshooting Check your problem by using the chart below and try again. c. a. b. b. Food is not turned or stirred. c. d. Improper defrosting a. c. Electrical cord for each problem. b. POSSIBLE REMEDY a. c. b. Check instructions. Food is not defrosted completely. b. Oven ventilation ports are not restricted. d. Door is not defrosted completely...
... to be avoided in . Cooking time, power level is not turned or stirred. a. Food is not suitable. Troubleshooting Check your problem by using the chart below and try again. c. a. b. b. Food is not turned or stirred. c. d. Improper defrosting a. c. Electrical cord for each problem. b. POSSIBLE REMEDY a. c. b. Check instructions. Food is not defrosted completely. b. Oven ventilation ports are not restricted. d. Door is not defrosted completely...

Instruction Manual
Page 16
...specific... caused by use of the appliance. The serial number can be free from defects ... voltage. (Read directions carefully.) If service is not transferable. We recommend using the original carton ...product, loss of parts, or subjecting the appliance to state. ONE YEAR LIMITED WARRANTY This product carries a warranty that you record the serial number of your unit in the space below for future reference Model Number Serial Number...customer assistance at: 800-842-1289 Midea America Corp 4 Campus drive 1st floor South Parsippany NJ 07054 Midea America Corp. Keep your original sales receipt.
...specific... caused by use of the appliance. The serial number can be free from defects ... voltage. (Read directions carefully.) If service is not transferable. We recommend using the original carton ...product, loss of parts, or subjecting the appliance to state. ONE YEAR LIMITED WARRANTY This product carries a warranty that you record the serial number of your unit in the space below for future reference Model Number Serial Number...customer assistance at: 800-842-1289 Midea America Corp 4 Campus drive 1st floor South Parsippany NJ 07054 Midea America Corp. Keep your original sales receipt.


