
Instruction Manual
Page 1
... Making Espresso 13 Pressure - First Use 6 Quick Start /Programming Your 3 in 1 6 Using Your 3 in 1 Coffee Center - Checking and Releasing 14 Cleaning Your 3 in 1 Coffee Center 15 Decalcifying Your 3 in 1 Coffee Center - Preparing Espresso 11 Using Your 3 in 1 Coffee Center 16 Problems and Causes 17 Warranty...18 SAVE THIS INSTRUCTION MANUAL FOR FUTURE REFERENCE 3 IN 1 PROGRAMMABLE COFFEE CENTER Instruction Manual Register this and other West Bend® Housewares products through our website: www.westbend...
... Making Espresso 13 Pressure - First Use 6 Quick Start /Programming Your 3 in 1 6 Using Your 3 in 1 Coffee Center - Checking and Releasing 14 Cleaning Your 3 in 1 Coffee Center 15 Decalcifying Your 3 in 1 Coffee Center - Preparing Espresso 11 Using Your 3 in 1 Coffee Center 16 Problems and Causes 17 Warranty...18 SAVE THIS INSTRUCTION MANUAL FOR FUTURE REFERENCE 3 IN 1 PROGRAMMABLE COFFEE CENTER Instruction Manual Register this and other West Bend® Housewares products through our website: www.westbend...
Instruction Manual
Page 2
... completely relieved. • Do not touch the espresso filter holder at any time during the brewing process or until pressure is not working properly or if it has been damaged in any manner. IMPORTANT SAFEGUARDS To prevent personal injury or property damage, read and follow all instructions and warnings. For service information see if system is under pressure (See...
... completely relieved. • Do not touch the espresso filter holder at any time during the brewing process or until pressure is not working properly or if it has been damaged in any manner. IMPORTANT SAFEGUARDS To prevent personal injury or property damage, read and follow all instructions and warnings. For service information see if system is under pressure (See...

Instruction Manual
Page 3
...hot. • Keep the cord away from electrical outlet when not in water or other . ELECTRICITY PRECAUTIONS • To protect against fire, electric shock and injury to "OFF" and unplug the appliance from hot parts of the 3 in 1 Coffee Center (wattage is not recommended, if you must use and before cleaning. • Your 3 in 1 Coffee... Do not operate any appliance with a damaged cord or plug. • Do not use this appliance outdoors. • Always position the Coffeemaker and Espresso maker switches to persons, do not immerse cord, plugs, or other electric parts in use one blade...
...hot. • Keep the cord away from electrical outlet when not in water or other . ELECTRICITY PRECAUTIONS • To protect against fire, electric shock and injury to "OFF" and unplug the appliance from hot parts of the 3 in 1 Coffee Center (wattage is not recommended, if you must use and before cleaning. • Your 3 in 1 Coffee... Do not operate any appliance with a damaged cord or plug. • Do not use this appliance outdoors. • Always position the Coffeemaker and Espresso maker switches to persons, do not immerse cord, plugs, or other electric parts in use one blade...

Instruction Manual
Page 4
... positioned on the coffee carafe during the brew cycle as scalding could clog the filter and cause hot water/coffee overflow. • Use caution when removing the espresso filter holder. Too fine of a grind could occur. • The lid of the carafe must be in 1 Coffee Center when it is hot. • Do not move an appliance containing hot food or hot liquids. • Do not refill the water reservoir or the boiler...
... positioned on the coffee carafe during the brew cycle as scalding could clog the filter and cause hot water/coffee overflow. • Use caution when removing the espresso filter holder. Too fine of a grind could occur. • The lid of the carafe must be in 1 Coffee Center when it is hot. • Do not move an appliance containing hot food or hot liquids. • Do not refill the water reservoir or the boiler...
Instruction Manual
Page 5
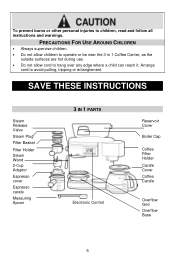
... children, read and follow all instructions and warnings. SAVE THESE INSTRUCTIONS Steam Release Valve Steam Plug Filter Basket Filter Holder Steam Wand 2-Cup Adaptor Espresso cover Espresso carafe Measuring Spoon 3 IN 1 PARTS Electronic Control Reservoir Cover Boiler Cap Coffee Filter Holder Carafe Cover Coffee Carafe Overflow Grid Overflow Base 5 PRECAUTIONS FOR USE AROUND CHILDREN • Always supervise children. • Do not allow children to operate or be near the 3 in 1 Coffee Center, as the outside surfaces...
... children, read and follow all instructions and warnings. SAVE THESE INSTRUCTIONS Steam Release Valve Steam Plug Filter Basket Filter Holder Steam Wand 2-Cup Adaptor Espresso cover Espresso carafe Measuring Spoon 3 IN 1 PARTS Electronic Control Reservoir Cover Boiler Cap Coffee Filter Holder Carafe Cover Coffee Carafe Overflow Grid Overflow Base 5 PRECAUTIONS FOR USE AROUND CHILDREN • Always supervise children. • Do not allow children to operate or be near the 3 in 1 Coffee Center, as the outside surfaces...
Instruction Manual
Page 6
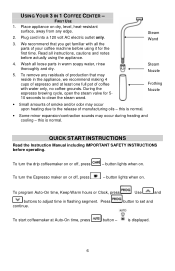
... seconds to set and To start coffeemaker at least one full pot of coffee with all the parts of espresso and at Auto-On time, press button - button lights when on . Press continue. Place appliance on or off , press - is normal. To program Auto-On time, Keep Warm hours or Clock, press . We recommend that may reside in the appliance, we recommend making 4 cups of your coffee machine before using the appliance...
... seconds to set and To start coffeemaker at least one full pot of coffee with all the parts of espresso and at Auto-On time, press button - button lights when on . Press continue. Place appliance on or off , press - is normal. To program Auto-On time, Keep Warm hours or Clock, press . We recommend that may reside in the appliance, we recommend making 4 cups of your coffee machine before using the appliance...
Instruction Manual
Page 7
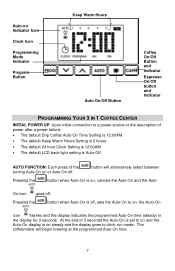
... power after a power failure: • The default Drip Coffee Auto-On Time Setting is 12:00AM • The default Keep Warm Hours Setting is 2 hours • The default 24 hour Clock Setting is 12:00AM • The default LCD back-light setting is Auto-Off. button will begin brewing at the programmed Auto-On time. 7 Auto-on Indicator Icon Clock Icon Programming Mode Indicator Program Button Keep Warm Hours Auto On/Off Button Coffee On/Off Button and Indicator Espresso...
... power after a power failure: • The default Drip Coffee Auto-On Time Setting is 12:00AM • The default Keep Warm Hours Setting is 2 hours • The default 24 hour Clock Setting is 12:00AM • The default LCD back-light setting is Auto-Off. button will begin brewing at the programmed Auto-On time. 7 Auto-on Indicator Icon Clock Icon Programming Mode Indicator Program Button Keep Warm Hours Auto On/Off Button Coffee On/Off Button and Indicator Espresso...
Instruction Manual
Page 8
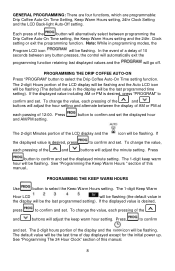
... will be flashing. See "Programming The 24 Hour Clock" section of 10 seconds between programming the Drip Coffee Auto-On Time setting, the Keep Warm Hours setting and the 24hr. In the event of a delay of this manual.. Press button to confirm and set . GENERAL PROGRAMMING: There are four functions, which are programmable: Drip Coffee Auto-On Time Setting, Keep Warm Hours setting, 24hr Clock Setting and the LCD Back-light Auto-Off setting. If the displayed value is...
... will be flashing. See "Programming The 24 Hour Clock" section of 10 seconds between programming the Drip Coffee Auto-On Time setting, the Keep Warm Hours setting and the 24hr. In the event of a delay of this manual.. Press button to confirm and set . GENERAL PROGRAMMING: There are four functions, which are programmable: Drip Coffee Auto-On Time Setting, Keep Warm Hours setting, 24hr Clock Setting and the LCD Back-light Auto-Off setting. If the displayed value is...

Instruction Manual
Page 9
... flashing. button to indicate the control is Auto-off . To change the display back to confirm the setting has changed. The blue backlight display will beep to Auto-off , and the unit immediately begins brewing. Drip coffee can be made at each pressing of the and buttons will begin brewing at the same time for approximately five seconds. If the displayed value is set , manual brewing by pressing the up . PREPARING COFFEE MANUAL...
... flashing. button to indicate the control is Auto-off . To change the display back to confirm the setting has changed. The blue backlight display will beep to Auto-off , and the unit immediately begins brewing. Drip coffee can be made at each pressing of the and buttons will begin brewing at the same time for approximately five seconds. If the displayed value is set , manual brewing by pressing the up . PREPARING COFFEE MANUAL...

Instruction Manual
Page 10
... a "drip" coffeemaker. Close the brew basket pushing in the desired quantity of coffee to bypass the coffee grounds producing a very weak coffee brew. 5. The indicator light will prevent water from any part of the coffee machine and the basket "clicks" into the brew basket. If the coffee carafe is not in 1 Coffee Center to pour a cup of coffee while it must be appropriate for the number of coffee to finish brewing before cleaning. • Using the Pause 'n Serve...
... a "drip" coffeemaker. Close the brew basket pushing in the desired quantity of coffee to bypass the coffee grounds producing a very weak coffee brew. 5. The indicator light will prevent water from any part of the coffee machine and the basket "clicks" into the brew basket. If the coffee carafe is not in 1 Coffee Center to pour a cup of coffee while it must be appropriate for the number of coffee to finish brewing before cleaning. • Using the Pause 'n Serve...
Instruction Manual
Page 11
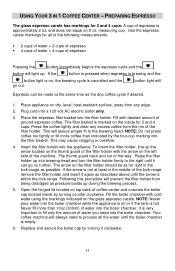
... coffee machine will always need into the filter basket. Fill with the arrow on or if the tank is very important to the brewing head. The filter basket is empty. 6. NOTE: Never pour water into brewing head and turn the filter holder firmly to process all of the following measurements. • 2 cups of water = 2 cups of espresso • 4 cups of water = 4 cups of the filter holder. This will prevent the filter holder from the rim of espresso. Use...
... coffee machine will always need into the filter basket. Fill with the arrow on or if the tank is very important to the brewing head. The filter basket is empty. 6. NOTE: Never pour water into brewing head and turn the filter holder firmly to process all of the following measurements. • 2 cups of water = 2 cups of espresso • 4 cups of water = 4 cups of the filter holder. This will prevent the filter holder from the rim of espresso. Use...

Instruction Manual
Page 12
... when removing the filter holder, as the espresso has filled the espresso carafe to keep filter in opening points towards the pouring spout of the frothing nozzle half way into the milk or the milk will take approximately 2 minutes for cappuccino. 1. USING YOUR 3 IN 1 COFFEE CENTER - The water will then be heated. Follow steps 1-7 in place. Using a stainless steel, ceramic or high temperature glass pitcher, fill with 4oz of this manual...
... when removing the filter holder, as the espresso has filled the espresso carafe to keep filter in opening points towards the pouring spout of the frothing nozzle half way into the milk or the milk will take approximately 2 minutes for cappuccino. 1. USING YOUR 3 IN 1 COFFEE CENTER - The water will then be heated. Follow steps 1-7 in place. Using a stainless steel, ceramic or high temperature glass pitcher, fill with 4oz of this manual...
Instruction Manual
Page 13
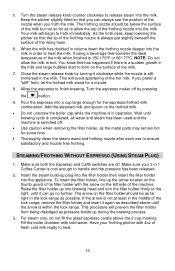
... . • Use caution when removing the filter holder, as the metal parts may remain hot for some time. • Thoroughly clean the steam wand and frothing nozzle after each use to ensure satisfactory and trouble free frothing. For steam only, do not fill the glass espresso carafe above until it can always see the position of the machine. If you froth the milk. Pour the espresso into the milk. Add...
... . • Use caution when removing the filter holder, as the metal parts may remain hot for some time. • Thoroughly clean the steam wand and frothing nozzle after each use to ensure satisfactory and trouble free frothing. For steam only, do not fill the glass espresso carafe above until it can always see the position of the machine. If you froth the milk. Pour the espresso into the milk. Add...

Instruction Manual
Page 14
... turning the machine on the surface of the nozzle when you froth the milk. With the machine off . PRESSURE - CHECKING AND RELEASING Pressure Checking 1. Carefully open the boiler cap. 14 Your milk will avoid splattering of the frothing nozzle into the water. 2. As the froth rises, keep...and immerse the frothing nozzle into the milk. Turn the espresso maker off , release the remaining steam pressure into the frothing pitcher filled with lid under filter holder and press the button. NOTES: If you prefer a "stiff" froth, let the frothed milk stand for the steam to come out ...
... turning the machine on the surface of the nozzle when you froth the milk. With the machine off . PRESSURE - CHECKING AND RELEASING Pressure Checking 1. Carefully open the boiler cap. 14 Your milk will avoid splattering of the frothing nozzle into the water. 2. As the froth rises, keep...and immerse the frothing nozzle into the milk. Turn the espresso maker off , release the remaining steam pressure into the frothing pitcher filled with lid under filter holder and press the button. NOTES: If you prefer a "stiff" froth, let the frothed milk stand for the steam to come out ...
Instruction Manual
Page 15
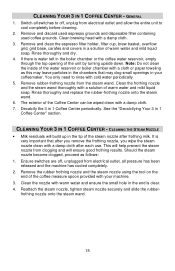
... clogged, proceed as this may leave particles in the tip of warm water and mild liquid soap. frothing nozzle onto the steam wand. 15 See the "Decalcifying Your 3 in 1 Coffee Center periodically. This will build up in the chambers that after frothing milk. Clean the nozzle with cold water periodically. 5. Remove and clean the espresso filter holder, filter cup, brew basket, overflow grid, grid base, carafes and covers...
... clogged, proceed as this may leave particles in the tip of warm water and mild liquid soap. frothing nozzle onto the steam wand. 15 See the "Decalcifying Your 3 in 1 Coffee Center periodically. This will build up in the chambers that after frothing milk. Clean the nozzle with cold water periodically. 5. Remove and clean the espresso filter holder, filter cup, brew basket, overflow grid, grid base, carafes and covers...
Instruction Manual
Page 16
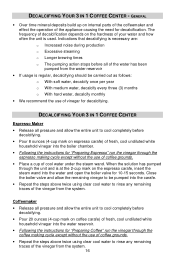
... coffeemaker and effect the operation of your water and how often the unit is regular, decalcifying should be pumped into the water and open the boiler valve for "Preparing Espresso" run the vinegar through the espresso making cycle except without the use of coffee grounds. • Repeat the steps above twice using clear cool water to cool completely before decalcifying. • Pour 8 ounces (4-cup mark on espresso carafe...
... coffeemaker and effect the operation of your water and how often the unit is regular, decalcifying should be pumped into the water and open the boiler valve for "Preparing Espresso" run the vinegar through the espresso making cycle except without the use of coffee grounds. • Repeat the steps above twice using clear cool water to cool completely before decalcifying. • Pour 8 ounces (4-cup mark on espresso carafe...
Instruction Manual
Page 17
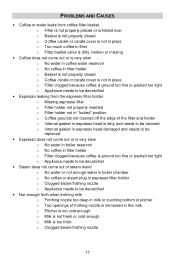
... very slow o No water in coffee water reservoir o No coffee in filter holder o Basket is not properly closed o Coffee carafe or carafe cover is not in place o Filter clogged because coffee is ground too fine or packed too tight o Appliance needs to be decalcified • Espresso leaking from the espresso filter holder o Missing espresso filter o Filter holder not properly inserted o Filter holder not in "locked" position o Coffee grounds not cleaned off the edge of the filter and holder o Internal gasket in espresso head...
... very slow o No water in coffee water reservoir o No coffee in filter holder o Basket is not properly closed o Coffee carafe or carafe cover is not in place o Filter clogged because coffee is ground too fine or packed too tight o Appliance needs to be decalcified • Espresso leaking from the espresso filter holder o Missing espresso filter o Filter holder not properly inserted o Filter holder not in "locked" position o Coffee grounds not cleaned off the edge of the filter and holder o Internal gasket in espresso head...
Instruction Manual
Page 18
... Bend® Housewares Customer Service Department at (866) 290-1851 or e-mail us at the number/e-mail address listed above, or by ordering online at www.westbend.com: Replacement Parts. Checks can be made payable to any non-stick surface of the appliance. Please allow two (2) weeks for warranty proof of purchase and record the following information: Date purchased or...
... Bend® Housewares Customer Service Department at (866) 290-1851 or e-mail us at the number/e-mail address listed above, or by ordering online at www.westbend.com: Replacement Parts. Checks can be made payable to any non-stick surface of the appliance. Please allow two (2) weeks for warranty proof of purchase and record the following information: Date purchased or...


