
Instruction Manual
Page 1
... the following information: • the MODEL NUMBER of the product (WLEVEX2715.0) • the NAME of the product (WESLO PURSUIT 250 FM exercise cycle) • the SERIAL NUMBER of the product (see the front cover of this manual) • the KEY NUMBER and DESCRIPTION of the part(s) (see page 14) WESLO is a registered trademark of ICON IP, Inc. USER'S MANUAL Visit our website at www.iconeurope.com Customer Service Department...
... the following information: • the MODEL NUMBER of the product (WLEVEX2715.0) • the NAME of the product (WESLO PURSUIT 250 FM exercise cycle) • the SERIAL NUMBER of the product (see the front cover of this manual) • the KEY NUMBER and DESCRIPTION of the part(s) (see page 14) WESLO is a registered trademark of ICON IP, Inc. USER'S MANUAL Visit our website at www.iconeurope.com Customer Service Department...
Instruction Manual
Page 2
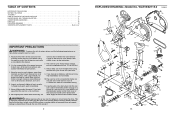
... not legible, call the telephone number on the exercise cycle before using the exercise cycle. ICON assumes no responsibility for home use of this product. 2 EXPLODED DRAWING-Model No. TABLE OF CONTENTS IMPORTANT PRECAUTIONS 2 BEFORE YOU BEGIN 3 ASSEMBLY 4 HOW TO OPERATE THE EXERCISE CYCLE 8 MAINTENANCE AND TROUBLESHOOTING 11 CONDITIONING GUIDELINES 12 PART LIST 14 EXPLODED DRAWING 15 ORDERING REPLACEMENT PARTS Back Cover IMPORTANT PRECAUTIONS WARNING: To reduce...
... not legible, call the telephone number on the exercise cycle before using the exercise cycle. ICON assumes no responsibility for home use of this product. 2 EXPLODED DRAWING-Model No. TABLE OF CONTENTS IMPORTANT PRECAUTIONS 2 BEFORE YOU BEGIN 3 ASSEMBLY 4 HOW TO OPERATE THE EXERCISE CYCLE 8 MAINTENANCE AND TROUBLESHOOTING 11 CONDITIONING GUIDELINES 12 PART LIST 14 EXPLODED DRAWING 15 ORDERING REPLACEMENT PARTS Back Cover IMPORTANT PRECAUTIONS WARNING: To reduce...
Instruction Manual
Page 3
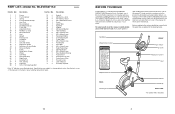
... Button Bolt 35 1 Crank 36 1 Upper Wire 37 1 Flywheel 38 1 Magnet 39 6 M8 Curved Washer 40 1 Idler Assembly 41 6 M8 x 15mm Screw 42 2 M5 x 20mm Screw 43 1 Reed Switch/Wire 44 1 Crank Bearing Set 45 1 Lower Cable 46 1 M5 x 15mm Screw 47 1 Flat Washer 48 1 Drive Belt 49 4 M4 x 12mm Screw 50 1 Right Pedal Strap 51 3 M8 Flat Washer 52 6 M5 x 25mm Screw 53 2 Rear Stabilizer Endcap 54 2 Pulse Sensor 55 2 Pulse Sensor Screw 56 1 Pulse Sensor Wire 57 1 Ground Screw # 1 User's Manual # 2 Assembly...
... Button Bolt 35 1 Crank 36 1 Upper Wire 37 1 Flywheel 38 1 Magnet 39 6 M8 Curved Washer 40 1 Idler Assembly 41 6 M8 x 15mm Screw 42 2 M5 x 20mm Screw 43 1 Reed Switch/Wire 44 1 Crank Bearing Set 45 1 Lower Cable 46 1 M5 x 15mm Screw 47 1 Flat Washer 48 1 Drive Belt 49 4 M4 x 12mm Screw 50 1 Right Pedal Strap 51 3 M8 Flat Washer 52 6 M5 x 25mm Screw 53 2 Rear Stabilizer Endcap 54 2 Pulse Sensor 55 2 Pulse Sensor Screw 56 1 Pulse Sensor Wire 57 1 Ground Screw # 1 User's Manual # 2 Assembly...
Instruction Manual
Page 4
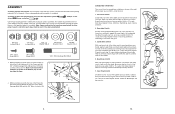
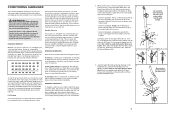
... your own adjustable spanner driver , and pliers . , Phillips screw- Hold for each leg. Stretches: Hamstrings, lower back and groin. 3. Calf/Achilles Stretch 3 With one leg extended. Repeat 3 times for 15 counts, then relax. Inner Thigh Stretch 5 Sit with your back leg as shown. ASSEMBLY Assembly requires two persons. Whilst another person lifts the rear of the Frame (1), attach the Rear Stabiliser (6) with...
... your own adjustable spanner driver , and pliers . , Phillips screw- Hold for each leg. Stretches: Hamstrings, lower back and groin. 3. Calf/Achilles Stretch 3 With one leg extended. Repeat 3 times for 15 counts, then relax. Inner Thigh Stretch 5 Sit with your back leg as shown. ASSEMBLY Assembly requires two persons. Whilst another person lifts the rear of the Frame (1), attach the Rear Stabiliser (6) with...
Instruction Manual
Page 5
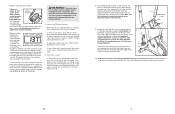
... weeks of your exercise program, do not keep your heart rate in your age at the bottom of exercise, your body temperature, heart rate, and circulation in your body begin to use stored fat calories for you may affect the accuracy of the Upright (13), push the excess Cables (19, 45) down , with pre-existing health problems. The pulse sensor is intended only as a guide. A proper warm...
... weeks of your exercise program, do not keep your heart rate in your age at the bottom of exercise, your body temperature, heart rate, and circulation in your body begin to use stored fat calories for you may affect the accuracy of the Upright (13), push the excess Cables (19, 45) down , with pre-existing health problems. The pulse sensor is intended only as a guide. A proper warm...
Instruction Manual
Page 6
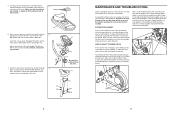
... Using an adjustable spanner, turn the Left Pedal (24) clockwise and remove it. Next, locate the Reed Switch (43). Turn the Crank for a moment. Have a second person hold the Console (16) near the 6 Upright (13). BATTERY REPLACEMENT If the console display becomes dim, the batteries should be preattached to the underside of the Seat. 16 Console Wires 56 49 36 13 Be careful to the Seat Post (5) with four M4 x 12mm Screws...
... Using an adjustable spanner, turn the Left Pedal (24) clockwise and remove it. Next, locate the Reed Switch (43). Turn the Crank for a moment. Have a second person hold the Console (16) near the 6 Upright (13). BATTERY REPLACEMENT If the console display becomes dim, the batteries should be preattached to the underside of the Seat. 16 Console Wires 56 49 36 13 Be careful to the Seat Post (5) with four M4 x 12mm Screws...
Instruction Manual
Page 7
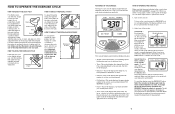
... Metal Contacts metal contacts on when the console turns off, the radio will be kept tightened. 24 Adjust the Left Pedal Strap (25) to hold the handgrip pulse sensor, with the other modes. The console has an "auto-off the console. If the pedals are not moved and the console buttons are sheets of the console clockwise. When your heart rate is inserted through one or two dashes...
... Metal Contacts metal contacts on when the console turns off, the radio will be kept tightened. 24 Adjust the Left Pedal Strap (25) to hold the handgrip pulse sensor, with the other modes. The console has an "auto-off the console. If the pedals are not moved and the console buttons are sheets of the console clockwise. When your heart rate is inserted through one or two dashes...
Instruction Manual
Page 8
... scan mode will show which mode is turned on page 12). • Pulse-This mode displays your workouts. Turn on the console, press the ON/RESET button or begin pedalling. Scan mode- Speed, time, distance, calories, or fat calories mode-To select one of measurement is eliminated. When the batteries are batteries in kilometres per hour or miles per hour. • Time-This mode displays the elapsed time. As you use console displays instant exercise feedback...
... scan mode will show which mode is turned on page 12). • Pulse-This mode displays your workouts. Turn on the console, press the ON/RESET button or begin pedalling. Scan mode- Speed, time, distance, calories, or fat calories mode-To select one of measurement is eliminated. When the batteries are batteries in kilometres per hour or miles per hour. • Time-This mode displays the elapsed time. As you use console displays instant exercise feedback...


