
English Manual
Page 1
... NOT CONTACT THE STORE; USER’'S MANUAL www.weslo.com Model No. MT ON THE WEB: www.wesloservice.com CAUTION Read all precautions and instructions in the space above for future reference. WLEX89912.1 Serial No. please contact Customer Care. Serial Number Decal QUESTIONS? IMPORTANT: Please register this product (see the limited warranty on the back cover of this manual) before using this manual for reference.
... NOT CONTACT THE STORE; USER’'S MANUAL www.weslo.com Model No. MT ON THE WEB: www.wesloservice.com CAUTION Read all precautions and instructions in the space above for future reference. WLEX89912.1 Serial No. please contact Customer Care. Serial Number Decal QUESTIONS? IMPORTANT: Please register this product (see the limited warranty on the back cover of this manual) before using this manual for reference.
English Manual
Page 2
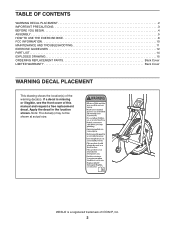
... of ICON IP, Inc. 2 WESLO is missing or illegible, see the front cover of the warning decal(s). TABLE OF CONTENTS WARNING DECAL PLACEMENT 2 IMPORTANT PRECAUTIONS 3 BEFORE YOU BEGIN 4 ASSEMBLY 5 HOW TO USE THE EXERCISE BIKE 8 FCC INFORMATION 10 MAINTENANCE AND TROUBLESHOOTING 11 EXERCISE GUIDELINES 12 PART LIST 14 EXPLODED DRAWING 15 ORDERING REPLACEMENT PARTS Back Cover LIMITED WARRANTY Back Cover WARNING DECAL PLACEMENT This drawing shows the location(s) of this manual...
... of ICON IP, Inc. 2 WESLO is missing or illegible, see the front cover of the warning decal(s). TABLE OF CONTENTS WARNING DECAL PLACEMENT 2 IMPORTANT PRECAUTIONS 3 BEFORE YOU BEGIN 4 ASSEMBLY 5 HOW TO USE THE EXERCISE BIKE 8 FCC INFORMATION 10 MAINTENANCE AND TROUBLESHOOTING 11 EXERCISE GUIDELINES 12 PART LIST 14 EXPLODED DRAWING 15 ORDERING REPLACEMENT PARTS Back Cover LIMITED WARRANTY Back Cover WARNING DECAL PLACEMENT This drawing shows the location(s) of this manual...
English Manual
Page 3
... a free wheel; the pedals will continue to ensure that could become caught on your exercise bike before using the exercise bike; Always keep your pedaling speed in a controlled way. 6. Before beginning any worn parts immediately. 14. do not wear loose clothes that all users of the exercise bike are adequately informed of all precautions. 2. It is the responsibility of the owner to move until the flywheel stops. Place...
... a free wheel; the pedals will continue to ensure that could become caught on your exercise bike before using the exercise bike; Always keep your pedaling speed in a controlled way. 6. Before beginning any worn parts immediately. 14. do not wear loose clothes that all users of the exercise bike are adequately informed of all precautions. 2. It is the responsibility of the owner to move until the flywheel stops. Place...
English Manual
Page 4
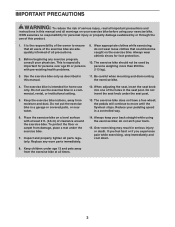
... for increasing cardiovascular fitness, building endurance, and toning the body. To help us assist you, note the product model number and serial number before you use the exercise bike. Length: 3 ft. 4 in. (102 cm) Width: 1 ft. 7 in. (48 cm) Weight: 44 lbs. (20 kg) Handlebar Seat Seat Post Seat Knob Pedal Shield Console Resistance Knob Flywheel Leveling Cap 4 The PURSUIT R 1.2 exercise bike provides a selection of this manual. For your workouts at home more effective...
... for increasing cardiovascular fitness, building endurance, and toning the body. To help us assist you, note the product model number and serial number before you use the exercise bike. Length: 3 ft. 4 in. (102 cm) Width: 1 ft. 7 in. (48 cm) Weight: 44 lbs. (20 kg) Handlebar Seat Seat Post Seat Knob Pedal Shield Console Resistance Knob Flywheel Leveling Cap 4 The PURSUIT R 1.2 exercise bike provides a selection of this manual. For your workouts at home more effective...
English Manual
Page 5
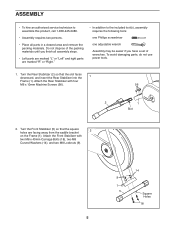
... adjustable wrench Assembly may be easier if you nish all assembly steps. •• Left parts are marked “"L”" or “"Left”" and right parts are facing away from the saddle bracket 2 on the Frame (1). Do not dispose of the packing materials until you have a set of wrenches. To avoid damaging parts, do not use power tools. 1. Turn...
... adjustable wrench Assembly may be easier if you nish all assembly steps. •• Left parts are marked “"L”" or “"Left”" and right parts are facing away from the saddle bracket 2 on the Frame (1). Do not dispose of the packing materials until you have a set of wrenches. To avoid damaging parts, do not use power tools. 1. Turn...
English Manual
Page 6
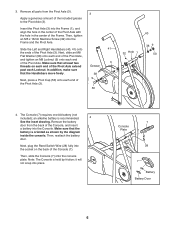
... 32 Hole 1 38 9 50 4. Next, plug the Reed Switch Wire (28) fully into place. 7 Console Plate 28 7 Battery Battery Door 6 it will not snap into the socket on each end of the Console, and insert a battery into the Console. Insert the Pivot Axle (3) into the Frame and the Pivot Axle. Then, tighten an M5 x 16mm Machine Screw (32) into the Frame (1), and align...
... 32 Hole 1 38 9 50 4. Next, plug the Reed Switch Wire (28) fully into place. 7 Console Plate 28 7 Battery Battery Door 6 it will not snap into the socket on each end of the Console, and insert a battery into the Console. Insert the Pivot Axle (3) into the Frame and the Pivot Axle. Then, tighten an M5 x 16mm Machine Screw (32) into the Frame (1), and align...
English Manual
Page 7
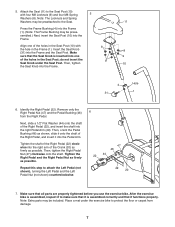
... into the Pedal Arm. Remove only the Right Pedal Nut (47) and the Pedal Bushing (46) from damage. 7 Make sure that it into one of the Right Pedal, and insert it functions properly. Make sure that the Seat Knob is assembled correctly and that all parts are properly tightened before you use the exercise bike. do not insert the Seat Knob under the exercise bike to the Seat Post...
... into the Pedal Arm. Remove only the Right Pedal Nut (47) and the Pedal Bushing (46) from damage. 7 Make sure that it into one of the Right Pedal, and insert it functions properly. Make sure that the Seat Knob is assembled correctly and that all parts are properly tightened before you use the exercise bike. do not insert the Seat Knob under the exercise bike to the Seat Post...

English Manual
Page 8
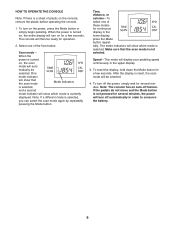
.... •• Speed (SPD) mode—-Displays your workouts. If the exercise bike rocks slightly on your knees when the pedals are described below. HOW TO USE THE EXERCISE BIKE HOW TO ADJUST THE SEAT HOW TO INSTALL A BATTERY For effective exer- To adjust the seat, first hold the seat and turn one or both of your exercise, the pedaling resistance can be operated, a battery must be installed. Make sure to remove it is...
.... •• Speed (SPD) mode—-Displays your workouts. If the exercise bike rocks slightly on your knees when the pedals are described below. HOW TO USE THE EXERCISE BIKE HOW TO ADJUST THE SEAT HOW TO INSTALL A BATTERY For effective exer- To adjust the seat, first hold the seat and turn one or both of your exercise, the pedaling resistance can be operated, a battery must be installed. Make sure to remove it is...
English Manual
Page 9
.... To turn on the console, remove the plastic before operating the console. 1. matically be ready for continuous display in the upper display. 3. After the display is reset, the scan mode will display your pedaling speed continuously in the lower display, press the Mode button repeatedly. Make sure that the scan mode Mode Indicators is selected, and a second mode indicator will then be selected. When the power is turned on, the entire display will...
.... To turn on the console, remove the plastic before operating the console. 1. matically be ready for continuous display in the upper display. 3. After the display is reset, the scan mode will display your pedaling speed continuously in the lower display, press the Mode button repeatedly. Make sure that the scan mode Mode Indicators is selected, and a second mode indicator will then be selected. When the power is turned on, the entire display will...
English Manual
Page 10
... device, pursuant to Part 15 of the FCC Rules. This equipment generates, uses, and can be determined by turning the equipment off and on a circuit different from the circuit to which can radiate radio frequency energy and, if not installed and used in accordance with the limits for compliance could void the user’'s authority to radio...
... device, pursuant to Part 15 of the FCC Rules. This equipment generates, uses, and can be determined by turning the equipment off and on a circuit different from the circuit to which can radiate radio frequency energy and, if not installed and used in accordance with the limits for compliance could void the user’'s authority to radio...
English Manual
Page 11
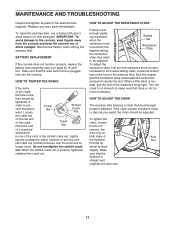
... not enough pedaling resistance when the Slotted Tab resistance knob is not too much resistance. To adjust the resistance strap, first turn the slot- Make sure that must be adjusted. BATTERY REPLACEMENT If the console does not function properly, replace the battery (see assembly step 4 on both sides of direct sunlight. ted crank nut counterclockwise until the arms are no longer loose. To tighten the chain, loosen, but do not remove, the...
... not enough pedaling resistance when the Slotted Tab resistance knob is not too much resistance. To adjust the resistance strap, first turn the slot- Make sure that must be adjusted. BATTERY REPLACEMENT If the console does not function properly, replace the battery (see assembly step 4 on both sides of direct sunlight. ted crank nut counterclockwise until the arms are no longer loose. To tighten the chain, loosen, but do not remove, the...

English Manual
Page 12
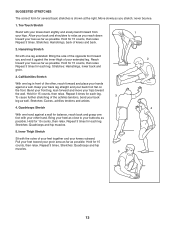
... highest number in your training zone. For aerobic exercise, adjust the intensity of your condition, complete three workouts each week, if desired. never hold your physician. You can use stored fat calories for energy. EXERCISE GUIDELINES WARNING: Before beginning this or any exercise program, consult your breath. This is near the middle number in your exercise program. The chart below shows recommended heart rates for...
... highest number in your training zone. For aerobic exercise, adjust the intensity of your condition, complete three workouts each week, if desired. never hold your physician. You can use stored fat calories for energy. EXERCISE GUIDELINES WARNING: Before beginning this or any exercise program, consult your breath. This is near the middle number in your exercise program. The chart below shows recommended heart rates for...
English Manual
Page 13
... 15 counts, then relax. Stretches: Hamstrings, lower back and groin. 3. Hold for 15 counts, then relax. Repeat 3 times for each leg. Stretches: Quadriceps and hip muscles. 5 13...of the opposite foot toward your toes as far as possible. Bend your front leg, lean forward and move your extended leg. Stretches: Calves, achilles tendons and ankles. 4. Pull your feet toward you..., reach forward and place your back foot flat on the floor. SUGGESTED STRETCHES The correct form for balance, reach back and grasp one hand against a wall. Reach 2 toward the ...
... 15 counts, then relax. Stretches: Hamstrings, lower back and groin. 3. Hold for 15 counts, then relax. Repeat 3 times for each leg. Stretches: Quadriceps and hip muscles. 5 13...of the opposite foot toward your toes as far as possible. Bend your front leg, lean forward and move your extended leg. Stretches: Calves, achilles tendons and ankles. 4. Pull your feet toward you..., reach forward and place your back foot flat on the floor. SUGGESTED STRETCHES The correct form for balance, reach back and grasp one hand against a wall. Reach 2 toward the ...
English Manual
Page 14
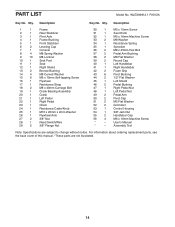
... Screw 16 1 Flywheel 17 1 Resistance Strap 18 2 M8 x 40mm Carriage Bolt 19 1 Crank Bearing Assembly 20 1 Crank 21 1 Left Pedal 22 1 Right Pedal 23 1 Chain 24 1 Resistance Cable/Knob 25 1 M10 x 20mm x 2mm Washer 26 1 Flywheel Axle 27 2 3/8" Nut 28 1 Reed Switch/Wire 29 2 3/8" Flange Nut 30 1 M5 x 15mm Screw 31 1 Seat Knob 32 1 M5 x 16mm Machine Screw 33 2 M8 Washer 34 1 Resistance Spring 35 1 Sprocket 36 2 M8 x 45mm Hex Bolt 37 2 Pedal Arm...
... Screw 16 1 Flywheel 17 1 Resistance Strap 18 2 M8 x 40mm Carriage Bolt 19 1 Crank Bearing Assembly 20 1 Crank 21 1 Left Pedal 22 1 Right Pedal 23 1 Chain 24 1 Resistance Cable/Knob 25 1 M10 x 20mm x 2mm Washer 26 1 Flywheel Axle 27 2 3/8" Nut 28 1 Reed Switch/Wire 29 2 3/8" Flange Nut 30 1 M5 x 15mm Screw 31 1 Seat Knob 32 1 M5 x 16mm Machine Screw 33 2 M8 Washer 34 1 Resistance Spring 35 1 Sprocket 36 2 M8 x 45mm Hex Bolt 37 2 Pedal Arm...
English Manual
Page 15
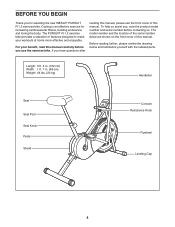
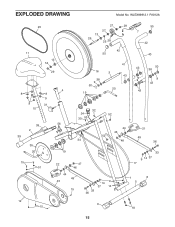
EXPLODED DRAWING Model No. WLEX89912.1 R1012A 23 27 29 55 27 7 13 26 25 28 42 11 13 54 29 4 8 8 9 9 31 10 39 56 2 39 35 42 55 16 38 9 50 19 41 3 43 20 40 43 50 38 9 43 43 32 24 52 30 53 44 46 52 34 48 21 49 36 20 15 51 19 22 47 46 33 9 14 37 17 44 49 45 15 14 9 37 14 33 36 1 6 5 12 15 6 18 15
EXPLODED DRAWING Model No. WLEX89912.1 R1012A 23 27 29 55 27 7 13 26 25 28 42 11 13 54 29 4 8 8 9 9 31 10 39 56 2 39 35 42 55 16 38 9 50 19 41 3 43 20 40 43 50 38 9 43 43 32 24 52 30 53 44 46 52 34 48 21 49 36 20 15 51 19 22 47 46 33 9 14 37 17 44 49 45 15 14 9 37 14 33 36 1 6 5 12 15 6 18 15
English Manual
Page 16
... model number and serial number of the product (see the front cover of this manual) •• the name of the product (see the front cover of this manual) •• the key number and description of the replacement part(s) (see the front cover of this product to repairing or replacing, at ICON’'s option, the product through one of its authorized service centers. Accordingly, the above limitation...
... model number and serial number of the product (see the front cover of this manual) •• the name of the product (see the front cover of this manual) •• the key number and description of the replacement part(s) (see the front cover of this product to repairing or replacing, at ICON’'s option, the product through one of its authorized service centers. Accordingly, the above limitation...


