
English Manual
Page 1
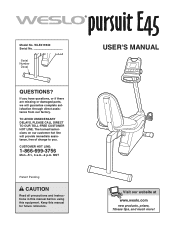
... parts, we will provide immediate assistance, free of charge to you. MST Patent Pending CAUTION Read all precautions and instructions in this manual before using this manual for future reference. USER'S MANUAL Visit our website at www.weslo.com new products, prizes, fitness tips, and much more! WLEX19940 Serial No. CUSTOMER HOT LINE: 1-866-699-3756 Mon.-Fri., 6 a.m.-6 p.m. Keep this equipment. Serial Number...
... parts, we will provide immediate assistance, free of charge to you. MST Patent Pending CAUTION Read all precautions and instructions in this manual before using this manual for future reference. USER'S MANUAL Visit our website at www.weslo.com new products, prizes, fitness tips, and much more! WLEX19940 Serial No. CUSTOMER HOT LINE: 1-866-699-3756 Mon.-Fri., 6 a.m.-6 p.m. Keep this equipment. Serial Number...
English Manual
Page 2
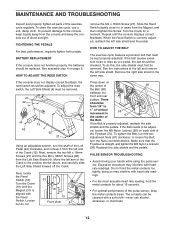
... 13 PART LIST 14 EXPLODED DRAWING 15 HOW TO ORDER REPLACEMENT PARTS Back Cover LIMITED WARRANTY Back Cover IMPORTANT PRECAUTIONS WARNING: To reduce the risk of heart rate readings. Always wear athletic shoes for personal injury or property damage sustained by persons weighing more than 250 pounds. 8. This is not legible, call our Customer Service Department toll-free at all instructions before using the exercise...
... 13 PART LIST 14 EXPLODED DRAWING 15 HOW TO ORDER REPLACEMENT PARTS Back Cover LIMITED WARRANTY Back Cover IMPORTANT PRECAUTIONS WARNING: To reduce the risk of heart rate readings. Always wear athletic shoes for personal injury or property damage sustained by persons weighing more than 250 pounds. 8. This is not legible, call our Customer Service Department toll-free at all instructions before using the exercise...

English Manual
Page 3
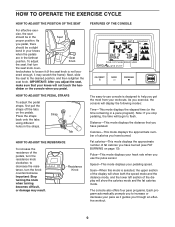
...). Water Bottle Holder* Book Holder Seat Handle Console Resistance Knob Handle Pulse Sensor FRONT Backrest Pedal/Strap Seat Seat Knob REAR RIGHT SIDE *No water bottle is WLEX19940. until 6 p.m. Before reading further, please familiarize yourself with the parts that will let you use the exercise cycle. To help us assist you have questions after reading this healthful exercise in the drawing below. The PURSUIT E45 exercise cycle offers a selection of...
...). Water Bottle Holder* Book Holder Seat Handle Console Resistance Knob Handle Pulse Sensor FRONT Backrest Pedal/Strap Seat Seat Knob REAR RIGHT SIDE *No water bottle is WLEX19940. until 6 p.m. Before reading further, please familiarize yourself with the parts that will let you use the exercise cycle. To help us assist you have questions after reading this healthful exercise in the drawing below. The PURSUIT E45 exercise cycle offers a selection of...

English Manual
Page 4
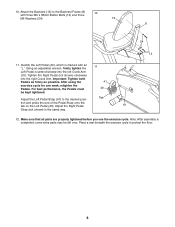
... parts used in parenthesis below to the quantity needed for shipping. ASSEMBLY Assembly requires two persons. and Phillips screw- Use the part drawings below each drawing refers to see if it has been pre-attached. If a part is completed. Do not dispose of the part, from the PART LIST on page 14. Place all parts of the exercise cycle in the parts bag, check to the key number...
... parts used in parenthesis below to the quantity needed for shipping. ASSEMBLY Assembly requires two persons. and Phillips screw- Use the part drawings below each drawing refers to see if it has been pre-attached. If a part is completed. Do not dispose of the part, from the PART LIST on page 14. Place all parts of the exercise cycle in the parts bag, check to the key number...

English Manual
Page 5
... x 75mm Carriage Bolts (35) and two M10 Nylon Locknuts (45). 35 2 2. Attach the Front Stabilizer (2) to the Upright with four M4 x 16mm Screws (21). Make sure that the wires and the cable are not pinched. Hold the Console (9) near the Upright (6). gram inside the Console. 9 1 45 Batteries 3. The Console (9) requires three "AA" batteries (not 2 included); Insert three batteries into the Console as shown by...
... x 75mm Carriage Bolts (35) and two M10 Nylon Locknuts (45). 35 2 2. Attach the Front Stabilizer (2) to the Upright with four M4 x 16mm Screws (21). Make sure that the wires and the cable are not pinched. Hold the Console (9) near the Upright (6). gram inside the Console. 9 1 45 Batteries 3. The Console (9) requires three "AA" batteries (not 2 included); Insert three batteries into the Console as shown by...
English Manual
Page 6
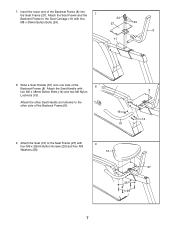
... x 25mm Button Screws (69) and four M10 Split Washers (17). Using pliers, squeeze the prongs on the Frame (1). Attach the Rear Stabilizer to the Reed Switch Wire (20). Insert the excess wire and cable down into the Seat Carriage until it into the wire clip inside of the console cable (CC) into the metal bracket on the Lower Cable (65) as shown. Thread the Seat Knob (30) clockwise...
... x 25mm Button Screws (69) and four M10 Split Washers (17). Using pliers, squeeze the prongs on the Frame (1). Attach the Rear Stabilizer to the Reed Switch Wire (20). Insert the excess wire and cable down into the Seat Carriage until it into the wire clip inside of the console cable (CC) into the metal bracket on the Lower Cable (65) as shown. Thread the Seat Knob (30) clockwise...
English Manual
Page 7
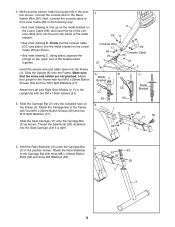
Insert the lower end of the 8 Backrest Frame (8). Slide a Seat Handle (61) onto one side of the Backrest Frame (8) into the Seat Frame (27). Attach the Seat (12) to the Seat Frame (27) with two M6 x 38mm Button Bolts (14) and two M6 Nylon Locknuts (15). 7. Attach the Seat Handle with four M6 x 22mm Button Screws (29) and four M8 Washers (55). 9 12...
Insert the lower end of the 8 Backrest Frame (8). Slide a Seat Handle (61) onto one side of the Backrest Frame (8) into the Seat Frame (27). Attach the Seat (12) to the Seat Frame (27) with two M6 x 38mm Button Bolts (14) and two M6 Nylon Locknuts (15). 7. Attach the Seat Handle with four M6 x 22mm Button Screws (29) and four M8 Washers (55). 9 12...
English Manual
Page 8
... exercise cycle for one week, retighten the Pedals. Important: Tighten both Pedals as firmly as possible. Attach the Backrest (13) to protect the floor. 8 For best performance, the Pedals must be left Crank Arm (19). Tab tion and press the end of the Pedal Strap onto the tab on the Left Pedal (40). Using an adjustable wrench, firmly tighten the Left Pedal counterclockwise into the right Crank Arm...
... exercise cycle for one week, retighten the Pedals. Important: Tighten both Pedals as firmly as possible. Attach the Backrest (13) to protect the floor. 8 For best performance, the Pedals must be left Crank Arm (19). Tab tion and press the end of the Pedal Strap onto the tab on the Left Pedal (40). Using an adjustable wrench, firmly tighten the Left Pedal counterclockwise into the right Crank Arm...
English Manual
Page 9
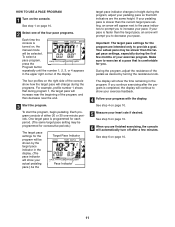
... you adjust the seat, make sure that you stop pedaling, the time will show both the speed mode and the distance mode, and the lower left section of the pedals, turn the seat knob coun- HOW TO ADJUST THE PEDAL STRAPS To adjust the pedal straps, first pull the straps off the tabs on page 13). dlebar or the console when you through an effective workout. 9 The console also offers four pace programs. Each program...
... you adjust the seat, make sure that you stop pedaling, the time will show both the speed mode and the distance mode, and the lower left section of the pedals, turn the seat knob coun- HOW TO ADJUST THE PEDAL STRAPS To adjust the pedal straps, first pull the straps off the tabs on page 13). dlebar or the console when you through an effective workout. 9 The console also offers four pace programs. Each program...
English Manual
Page 10
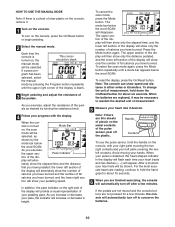
... mode bar below the word SCAN. The upper section of the display will automatically turn off after a few minutes, the console will show speed and distance in the display will flash each time your pace, the indicator will appear. To reset the display, press the On/Reset button. When the batteries are finished exercising, the console will then show only the distance pedaled, and the lower left contacts. Avoid moving...
... mode bar below the word SCAN. The upper section of the display will automatically turn off after a few minutes, the console will show speed and distance in the display will flash each time your pace, the indicator will appear. To reset the display, press the On/Reset button. When the batteries are finished exercising, the console will then show only the distance pedaled, and the lower left contacts. Avoid moving...
English Manual
Page 11
... show your exercise feedback. 4 Follow your exercise program. The display will show the time remaining in the upper right corner of the display. To start the program, begin pedaling. See step 5 on , the manual mode will be slower than the target pace settings, especially during the first few minutes. Important: The target pace settings for the program will be shown by turning the resistance knob. See step 4 on...
... show your exercise feedback. 4 Follow your exercise program. The display will show the time remaining in the upper right corner of the display. To start the program, begin pedaling. See step 5 on , the manual mode will be slower than the target pace settings, especially during the first few minutes. Important: The target pace settings for the program will be shown by turning the resistance knob. See step 4 on...
English Manual
Page 12
... tighten both pedals. Move the left arm of the Crank to the console, keep the metal contacts clean. HOW TO ADJUST THE BELT The exercise cycle features a precision belt that the Flywheel is properly adjusted, reattach the side shields and the pedals. If the belt causes excessive noise or slips as you pedal, the belt should be adjust- Remove the right side shield in the center of the pulse sensor...
... tighten both pedals. Move the left arm of the Crank to the console, keep the metal contacts clean. HOW TO ADJUST THE BELT The exercise cycle features a precision belt that the Flywheel is properly adjusted, reattach the side shields and the pedals. If the belt causes excessive noise or slips as you pedal, the belt should be adjust- Remove the right side shield in the center of the pulse sensor...
English Manual
Page 13
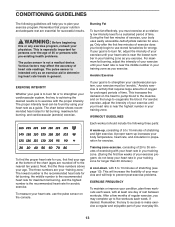
... the three numbers above your "training zone." Training zone exercise, consisting of 20 to 30 minutes of exercising with your heart rate in your training zone. (During the first few minutes of exercise does your body begin to use the pulse sensor on the lungs to oxygenate the blood. WARNING: Before beginning this or any exercise program, consult your heart rate as you exercise. WORKOUT GUIDELINES Each workout should include...
... the three numbers above your "training zone." Training zone exercise, consisting of 20 to 30 minutes of exercising with your heart rate in your training zone. (During the first few minutes of exercise does your body begin to use the pulse sensor on the lungs to oxygenate the blood. WARNING: Before beginning this or any exercise program, consult your heart rate as you exercise. WORKOUT GUIDELINES Each workout should include...
English Manual
Page 14
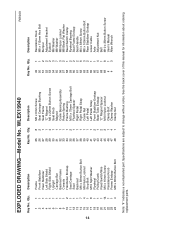
... this manual for information about ordering replacement parts. EXPLODED DRAWING-Model No. Description 1 1 Frame 2 1 Front Stabilizer 3 1 Rear Stabilizer 4 1 Left Side Shield 5 1 Right Side Shield 6 1 Upright 7 1 Carriage Bar 8 1 Backrest Frame 9 1 Console 10 2 Handlebar Endcap 11 1 Seat Carriage 12 1 Seat 13 1 Backrest 14 7 M6 x 38mm Button Bolt 15 4 M6 Nylon Locknut 16 1 Stop Bolt 17 8 M10 Split Washer 18 1 Flywheel 19 1 Pulley/Crank 20 1 Reed Switch/Wire 21 14 M4 x 16mm Screw 22 1 Resistance Knob...
... this manual for information about ordering replacement parts. EXPLODED DRAWING-Model No. Description 1 1 Frame 2 1 Front Stabilizer 3 1 Rear Stabilizer 4 1 Left Side Shield 5 1 Right Side Shield 6 1 Upright 7 1 Carriage Bar 8 1 Backrest Frame 9 1 Console 10 2 Handlebar Endcap 11 1 Seat Carriage 12 1 Seat 13 1 Backrest 14 7 M6 x 38mm Button Bolt 15 4 M6 Nylon Locknut 16 1 Stop Bolt 17 8 M10 Split Washer 18 1 Flywheel 19 1 Pulley/Crank 20 1 Reed Switch/Wire 21 14 M4 x 16mm Screw 22 1 Resistance Knob...
English Manual
Page 15
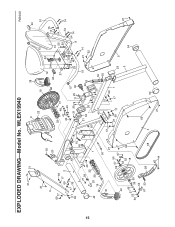
EXPLODED DRAWING-Model No. WLEX19940 R0604A 15 21 21 21 65 6 20 69 17 69 17 69 2 17 17 35 42 69 21 58 45 32 42 20 39 19 16 45 1 41 40 66 57 53 56 36 59 52 50 21 59 57 56 67 53 52 62 18 67 33 28 68 44 9 38 60 22 19 37 10 61 24 12 24 15 14 60 13 32 48 31 27 55 54 47 46 49 10 29 54 14 55 55 15 29 54 67 21 25 11 25 30 29 14 8 21 34 26 56 43 61 26 63 25 25 55 21 14 62 55 17 51 17 69 21 69 17 17 7 23 5 3 21 64 62 4 64 21
EXPLODED DRAWING-Model No. WLEX19940 R0604A 15 21 21 21 65 6 20 69 17 69 17 69 2 17 17 35 42 69 21 58 45 32 42 20 39 19 16 45 1 41 40 66 57 53 56 36 59 52 50 21 59 57 56 67 53 52 62 18 67 33 28 68 44 9 38 60 22 19 37 10 61 24 12 24 15 14 60 13 32 48 31 27 55 54 47 46 49 10 29 54 14 55 55 15 29 54 67 21 25 11 25 30 29 14 8 21 34 26 56 43 61 26 63 25 25 55 21 14 62 55 17 51 17 69 21 69 17 17 7 23 5 3 21 64 62 4 64 21
English Manual
Page 16
... product (WESLO® PURSUIT E45 exercise cycle) • The SERIAL NUMBER of the product (see the front cover of this warranty is a registered trademark of ninety (90) days from defects in China © 2004 ICON IP, Inc. Accordingly, the above limitation may not apply to you specific legal rights. This warranty gives you . ICON HEALTH & FITNESS, INC., 1500 S. 1000 W., LOGAN, UT 84321-9813 Part No. 214229...
... product (WESLO® PURSUIT E45 exercise cycle) • The SERIAL NUMBER of the product (see the front cover of this warranty is a registered trademark of ninety (90) days from defects in China © 2004 ICON IP, Inc. Accordingly, the above limitation may not apply to you specific legal rights. This warranty gives you . ICON HEALTH & FITNESS, INC., 1500 S. 1000 W., LOGAN, UT 84321-9813 Part No. 214229...


