
English Manual
Page 1
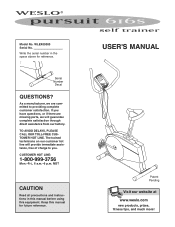
... missing parts, we are committed to providing complete customer satisfaction. TO AVOID DELAYS, PLEASE CALL OUR TOLL-FREE CUSTOMER HOT LINE. MST CAUTION Read all precautions and instructions in the space above for future reference. CUSTOMER HOT LINE: 1-800-999-3756 Mon.ÐFri., 6 a.m.Ð6 p.m. Write the serial number in this manual before using this manual for reference. Serial Number Decal...
... missing parts, we are committed to providing complete customer satisfaction. TO AVOID DELAYS, PLEASE CALL OUR TOLL-FREE CUSTOMER HOT LINE. MST CAUTION Read all precautions and instructions in the space above for future reference. CUSTOMER HOT LINE: 1-800-999-3756 Mon.ÐFri., 6 a.m.Ð6 p.m. Write the serial number in this manual before using this manual for reference. Serial Number Decal...
English Manual
Page 2
TABLE OF CONTENTS IMPORTANT PRECAUTIONS 3 BEFORE YOU BEGIN 4 ASSEMBLY 5 HOW TO USE THE EXERCISE CYCLE 9 MAINTENANCE AND STORAGE 11 CONDITIONING GUIDELINES 12 PART LIST 14 EXPLODED DRAWING 15 ORDERING REPLACEMENT PARTS Back Cover LIMITED WARRANTY Back Cover 2
TABLE OF CONTENTS IMPORTANT PRECAUTIONS 3 BEFORE YOU BEGIN 4 ASSEMBLY 5 HOW TO USE THE EXERCISE CYCLE 9 MAINTENANCE AND STORAGE 11 CONDITIONING GUIDELINES 12 PART LIST 14 EXPLODED DRAWING 15 ORDERING REPLACEMENT PARTS Back Cover LIMITED WARRANTY Back Cover 2
English Manual
Page 3
... health problems. Read all instructions in this manual. 3. If you feel pain or dizziness while exercising, stop immediately and begin cooling down. 11. IMPORTANT PRECAUTIONS WARNING: To reduce the risk of heart rate readings. tions before using. do not arch your back straight when using the WESLO¨ PURSUIT 616s exercise cycle. 1. do not wear loose clothing that all users of the exercise cycle are adequately informed...
... health problems. Read all instructions in this manual. 3. If you feel pain or dizziness while exercising, stop immediately and begin cooling down. 11. IMPORTANT PRECAUTIONS WARNING: To reduce the risk of heart rate readings. tions before using. do not arch your back straight when using the WESLO¨ PURSUIT 616s exercise cycle. 1. do not wear loose clothing that all users of the exercise cycle are adequately informed...
English Manual
Page 4
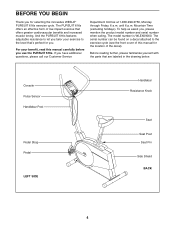
... parts that offers greater cardiovascular benefits and increased muscle toning. Console Pulse Sensor Handlebar Post Pedal Strap Pedal LEFT SIDE Handlebar Resistance Knob Seat Seat Post Seat Pin Side Shield BACK 4 For your benefit, read this manual for you tailor your exercise to the level thatÕs perfect for the location of the decal). The model number is WLEX09000. And the PURSUIT 616s features adjustable resistance to the exercise cycle (see the front cover...
... parts that offers greater cardiovascular benefits and increased muscle toning. Console Pulse Sensor Handlebar Post Pedal Strap Pedal LEFT SIDE Handlebar Resistance Knob Seat Seat Post Seat Pin Side Shield BACK 4 For your benefit, read this manual for you tailor your exercise to the level thatÕs perfect for the location of the decal). The model number is WLEX09000. And the PURSUIT 616s features adjustable resistance to the exercise cycle (see the front cover...
English Manual
Page 5
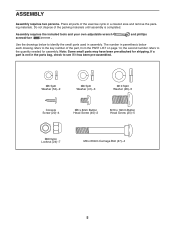
Place all parts of the exercise cycle in parenthesis below to identify the small parts used in the parts bag, check to the quantity needed for shipping. Assembly requires the included tools and your own adjustable wrench screwdriver . The number in a cleared area and remove the packing materials. the second number refers to see if it has been pre-assembled. If a part is completed...
Place all parts of the exercise cycle in parenthesis below to identify the small parts used in the parts bag, check to the quantity needed for shipping. Assembly requires the included tools and your own adjustable wrench screwdriver . The number in a cleared area and remove the packing materials. the second number refers to see if it has been pre-assembled. If a part is completed...

English Manual
Page 6
... in the Console Plate (11). Next, attach the Console to the inset drawing. Make sure that it covers the connector Connect the Reed Switch Wire (13) to the Handlebar Post (2) with four Console Screws (20). Attach the Handlebar Post with two M8 x 63mm Carriage Bolts (47) and two M8 Nylon Locknuts (24). 1. Next, feed the Extension Wire (56) up on the rear of the...
... in the Console Plate (11). Next, attach the Console to the inset drawing. Make sure that it covers the connector Connect the Reed Switch Wire (13) to the Handlebar Post (2) with four Console Screws (20). Attach the Handlebar Post with two M8 x 63mm Carriage Bolts (47) and two M8 Nylon Locknuts (24). 1. Next, feed the Extension Wire (56) up on the rear of the...

English Manual
Page 7
... insert the Seat Pin under the Seat Post. Adjust the Left Pedal Strap (34) to the desired position. Using an adjustable wrench, tighten the Left Pedal counterclockwise into the right arm of the Crank (29). Tighten the Right Pedal (not shown) clockwise into the left arm of the Crank. Tighten both Pedals as fully as shown and insert it fully into the Frame (1). Important: After using the exercise cycle for...
... insert the Seat Pin under the Seat Post. Adjust the Left Pedal Strap (34) to the desired position. Using an adjustable wrench, tighten the Left Pedal counterclockwise into the right arm of the Crank (29). Tighten the Right Pedal (not shown) clockwise into the left arm of the Crank. Tighten both Pedals as fully as shown and insert it fully into the Frame (1). Important: After using the exercise cycle for...
English Manual
Page 8
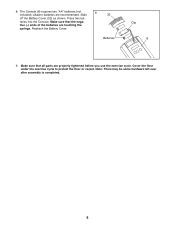
8. Press two batteries into the Console. Slide off the Battery Cover (32) as shown. Make sure that all parts are properly tightened before you use the exercise cycle. The Console (8) requires two ÒAAÓ batteries (not included); alkaline batteries are touching the springs. Reattach the Battery Cover. 8 32 Batteries Clip 8 9. Note: There may be some hardware left over after assembly is completed. 8 Make sure that the negative (Ð) ends of the batteries are recommended. Cover the floor under the exercise cycle to protect the floor or carpet.
8. Press two batteries into the Console. Slide off the Battery Cover (32) as shown. Make sure that all parts are properly tightened before you use the exercise cycle. The Console (8) requires two ÒAAÓ batteries (not included); alkaline batteries are touching the springs. Reattach the Battery Cover. 8 32 Batteries Clip 8 9. Note: There may be some hardware left over after assembly is completed. 8 Make sure that the negative (Ð) ends of the batteries are recommended. Cover the floor under the exercise cycle to protect the floor or carpet.
English Manual
Page 9
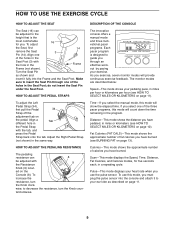
... Pedal 34 Strap off the adjustment tab on the Console (8). HOW TO ADJUST THE PEDALING RESISTANCE The pedaling resistance can be adjusted with 9 the Resistance Knob (9) locat- terclockwise. To adjust the Seat, first 14 remove the Seat 3 Pin (14). TimeÑIf you must plug the pulse sensor into the console and attach it to your ear lobe as shown and insert it fully into the Frame and the Seat Post. PulseÑThis mode displays your heart rate...
... Pedal 34 Strap off the adjustment tab on the Console (8). HOW TO ADJUST THE PEDALING RESISTANCE The pedaling resistance can be adjusted with 9 the Resistance Knob (9) locat- terclockwise. To adjust the Seat, first 14 remove the Seat 3 Pin (14). TimeÑIf you must plug the pulse sensor into the console and attach it to your ear lobe as shown and insert it fully into the Frame and the Seat Post. PulseÑThis mode displays your heart rate...

English Manual
Page 10
...- Change your actual pedaling pace. ries modes, for twenty minutes. To reset the display, press the on /reset button or simply begin pedaling. When you use . To turn on the power, press the on /reset button. 10 the console will then be ready for continuous display, repeatedly press the display button until the program indicator disappears. To select one of the pacer programs, two columns of Target bars will be installed. (See step 8 on page 8.) 1 Turn...
...- Change your actual pedaling pace. ries modes, for twenty minutes. To reset the display, press the on /reset button or simply begin pedaling. When you use . To turn on the power, press the on /reset button. 10 the console will then be ready for continuous display, repeatedly press the display button until the program indicator disappears. To select one of the pacer programs, two columns of Target bars will be installed. (See step 8 on page 8.) 1 Turn...

English Manual
Page 11
... pulse sensor, first plug the pulse sensor wire into the console. After changing the unit of measurement, remove one of heart rate readings. The console can display distance and speed in kilometers; Various factors, including the userÕs movement, may have measured your heart rate, we recommend switching to another suitable place on the console as an exercise aid in determining heart rate trends in the display after a few times before you stop pedaling when using the pulse sensor...
... pulse sensor, first plug the pulse sensor wire into the console. After changing the unit of measurement, remove one of heart rate readings. The console can display distance and speed in kilometers; Various factors, including the userÕs movement, may have measured your heart rate, we recommend switching to another suitable place on the console as an exercise aid in determining heart rate trends in the display after a few times before you stop pedaling when using the pulse sensor...
English Manual
Page 12
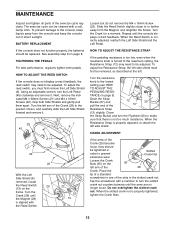
..., the batteries should be adjusted. To adjust the reed switch, you must first be replaced. Next, remove the indicated M4 x 38mm Screws (21) and M4 x 16mm Screws (22). Turn the left side shield. Turn the Crank (29) until the console displays correct feedback. HOW TO ADJUST THE RESISTANCE STRAP If the pedaling resistance is too low, even when the resistance knob is properly adjusted, re-attach the left arm of the 29 Crank. The exercise cycle...
..., the batteries should be adjusted. To adjust the reed switch, you must first be replaced. Next, remove the indicated M4 x 38mm Screws (21) and M4 x 16mm Screws (22). Turn the left side shield. Turn the Crank (29) until the console displays correct feedback. HOW TO ADJUST THE RESISTANCE STRAP If the pedaling resistance is too low, even when the resistance knob is properly adjusted, re-attach the left arm of the 29 Crank. The exercise cycle...
English Manual
Page 13
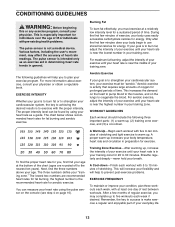
... training zone. The chart below shows recommended heart rates for individuals over the age of your exercise until your heart rate is activity that requires large amounts of oxygen for prolonged periods of exercise, your body uses easily accessible carbohydrate calories for you to exercise with pre-existing health problems. The pulse sensor is in your exercise must exercise at least one day of heart rate readings. WORKOUT GUIDELINES Each workout...
... training zone. The chart below shows recommended heart rates for individuals over the age of your exercise until your heart rate is activity that requires large amounts of oxygen for prolonged periods of exercise, your body uses easily accessible carbohydrate calories for you to exercise with pre-existing health problems. The pulse sensor is in your exercise must exercise at least one day of heart rate readings. WORKOUT GUIDELINES Each workout...
English Manual
Page 14
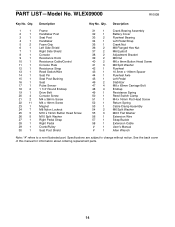
... replacement parts. 14 Description Key No. PART LISTÑModel No. Qty. Description 1 1 2 1 3 1 4 1 5 2 6 1 7 1 8 1 9 1 10 1 11 1 12 1 13 1 14 1 15 1 16 1 17 1 18 2 19 1 20 4 21 2 22 11 23 1 24 7 25 5 26 5 27 1 28 1 29 1 30 1 Frame Handlebar Post Seat Post Handlebar Foam Grip Left Side Shield Right Side Shield Console Resistance Knob Resistance Cable/Control Console Plate Resistance Strap Reed Switch/Wire Seat Pin Seat Post Bushing Seat Pulse Sensor 1 1/4Ó Round Endcap Drive Belt Console Screw M4 x 38mm Screw...
... replacement parts. 14 Description Key No. PART LISTÑModel No. Qty. Description 1 1 2 1 3 1 4 1 5 2 6 1 7 1 8 1 9 1 10 1 11 1 12 1 13 1 14 1 15 1 16 1 17 1 18 2 19 1 20 4 21 2 22 11 23 1 24 7 25 5 26 5 27 1 28 1 29 1 30 1 Frame Handlebar Post Seat Post Handlebar Foam Grip Left Side Shield Right Side Shield Console Resistance Knob Resistance Cable/Control Console Plate Resistance Strap Reed Switch/Wire Seat Pin Seat Post Bushing Seat Pulse Sensor 1 1/4Ó Round Endcap Drive Belt Console Screw M4 x 38mm Screw...
English Manual
Page 16
... of the product (WESLO¨ PURSUIT 616s exercise cycle) ¥ The SERIAL NUMBER of the product (see the PART LIST on how long an implied warranty lasts. Mountain Time (excluding holidays). Accordingly, the above is authorized by ICON. ICON HEALTH & FITNESS, INC., 1500 S. 1000 W., LOGAN, UT 84321-9813 Part No. 170131 R1000B Printed in its authorized service centers. This warranty gives you . until 6 p.m. All repairs for a period...
... of the product (WESLO¨ PURSUIT 616s exercise cycle) ¥ The SERIAL NUMBER of the product (see the PART LIST on how long an implied warranty lasts. Mountain Time (excluding holidays). Accordingly, the above is authorized by ICON. ICON HEALTH & FITNESS, INC., 1500 S. 1000 W., LOGAN, UT 84321-9813 Part No. 170131 R1000B Printed in its authorized service centers. This warranty gives you . until 6 p.m. All repairs for a period...


