
English Manual
Page 1
... you have questions, or if parts are committed to providing complete customer satisfaction. Write the serial number in this manual before contacting us: CALL TOLL-FREE: 1-866-699-3756 Mon.-Fri. 6 a.m.-6 p.m. As a manufacturer, we are missing, PLEASE DO NOT CONTACT THE STORE; USER'S MANUAL Visit our website at www.weslo.com new products, prizes, fitness tips, and much more!
... you have questions, or if parts are committed to providing complete customer satisfaction. Write the serial number in this manual before contacting us: CALL TOLL-FREE: 1-866-699-3756 Mon.-Fri. 6 a.m.-6 p.m. As a manufacturer, we are missing, PLEASE DO NOT CONTACT THE STORE; USER'S MANUAL Visit our website at www.weslo.com new products, prizes, fitness tips, and much more!
English Manual
Page 2
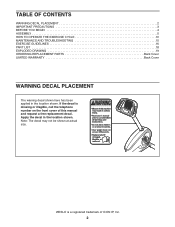
... shown at actual size. If the decal is a registered trademark of this manual and request a free replacement decal. Apply the decal in the location shown. TABLE OF CONTENTS WARNING DECAL PLACEMENT 2 IMPORTANT PRECAUTIONS 3 BEFORE YOU BEGIN 4 ASSEMBLY 5 HOW TO OPERATE THE EXERCISE CYCLE 10 MAINTENANCE AND TROUBLESHOOTING 15 EXERCISE GUIDELINES 16 PART LIST 18 EXPLODED DRAWING 19 ORDERING REPLACEMENT PARTS Back Cover LIMITED WARRANTY Back Cover WARNING DECAL...
... shown at actual size. If the decal is a registered trademark of this manual and request a free replacement decal. Apply the decal in the location shown. TABLE OF CONTENTS WARNING DECAL PLACEMENT 2 IMPORTANT PRECAUTIONS 3 BEFORE YOU BEGIN 4 ASSEMBLY 5 HOW TO OPERATE THE EXERCISE CYCLE 10 MAINTENANCE AND TROUBLESHOOTING 15 EXERCISE GUIDELINES 16 PART LIST 18 EXPLODED DRAWING 19 ORDERING REPLACEMENT PARTS Back Cover LIMITED WARRANTY Back Cover WARNING DECAL...
English Manual
Page 3
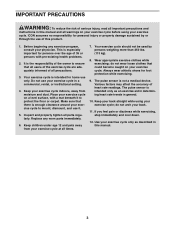
... this manual. 3 Make sure that there is not a medical device. Replace any exercise program, consult your exercise cycle on your exercise cycle indoors, away from your exercise cycle at all times. 7. The pulse sensor is the responsibility of the owner to protect the floor or carpet. Keep your back straight while using your exercise cycle only as an exercise aid in determining heart rate trends...
... this manual. 3 Make sure that there is not a medical device. Replace any exercise program, consult your exercise cycle on your exercise cycle indoors, away from your exercise cycle at all times. 7. The pulse sensor is the responsibility of the owner to protect the floor or carpet. Keep your back straight while using your exercise cycle only as an exercise aid in determining heart rate trends...

English Manual
Page 4
... cardiovascular fitness, building endurance, and toning the body. To help us assist you, note the product model number and serial number before you use the exercise cycle. Handgrip Pulse Sensor Console Backrest Seat Frame Pedal/Strap Transport Wheel Adjustment Knob Seat Handle Seat 4 The PURSUIT 5.0 R exercise cycle offers a selection of this manual carefully before contacting us. Before reading further, please familiarize yourself with the parts that are shown on the front cover of...
... cardiovascular fitness, building endurance, and toning the body. To help us assist you, note the product model number and serial number before you use the exercise cycle. Handgrip Pulse Sensor Console Backrest Seat Frame Pedal/Strap Transport Wheel Adjustment Knob Seat Handle Seat 4 The PURSUIT 5.0 R exercise cycle offers a selection of this manual carefully before contacting us. Before reading further, please familiarize yourself with the parts that are shown on the front cover of...
English Manual
Page 5
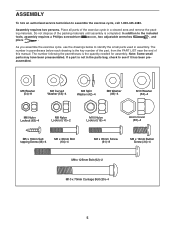
... not in a cleared area and remove the pack- The number following the parentheses is the key number of the part, from the PART LIST near the end of the exercise cycle in the parts bag, check to identify the small parts used in parentheses below each drawing is the quantity needed for assembly. In addition to assemble the exercise cycle, call 1-800-445-2480. M6...
... not in a cleared area and remove the pack- The number following the parentheses is the key number of the part, from the PART LIST near the end of the exercise cycle in the parts bag, check to identify the small parts used in parentheses below each drawing is the quantity needed for assembly. In addition to assemble the exercise cycle, call 1-800-445-2480. M6...

English Manual
Page 6
Attach the Front Stabilizer to the Seat Frame (5) with two M10 x 70mm Carriage Bolts (30), two M10 Washers (52), two M10 Nylon Locknuts (19), and two Acorn Covers (65). 1. To make assembly easier, read the information 1 on page 5 before you begin assembling the exercise cycle. 30 2 Turn the Front Stabilizer (2) so that the large holes are facing the Frame (1). Large Holes 1 52 19 65 2. Attach the Rear Stabilizer (6) to the Frame with two M10 x 70mm Carriage Bolts (30), two M10 Washers (52), two M10 Nylon Locknuts (19), and two Acorn Covers (65). 2 65 19 52 5 6 30 6
Attach the Front Stabilizer to the Seat Frame (5) with two M10 x 70mm Carriage Bolts (30), two M10 Washers (52), two M10 Nylon Locknuts (19), and two Acorn Covers (65). 1. To make assembly easier, read the information 1 on page 5 before you begin assembling the exercise cycle. 30 2 Turn the Front Stabilizer (2) so that the large holes are facing the Frame (1). Large Holes 1 52 19 65 2. Attach the Rear Stabilizer (6) to the Frame with two M10 x 70mm Carriage Bolts (30), two M10 Washers (52), two M10 Nylon Locknuts (19), and two Acorn Covers (65). 2 65 19 52 5 6 30 6

English Manual
Page 7
... Nylon Locknuts (63). Attach a Seat Handle (59) to the Seat Frame (5) with four M6 x 35mm Screws (61) and four M6 Washers (54). Attach the other Seat Handle (not shown) to the Seat Brackets (14, 15) 5 with two M8 x 125mm Bolts (62), 3 four M8 Washers (49), and two M8 Nylon Locknuts (10) as shown. See step 3. Tighten the two M8 Nylon...
... Nylon Locknuts (63). Attach a Seat Handle (59) to the Seat Frame (5) with four M6 x 35mm Screws (61) and four M6 Washers (54). Attach the other Seat Handle (not shown) to the Seat Brackets (14, 15) 5 with two M8 x 125mm Bolts (62), 3 four M8 Washers (49), and two M8 Nylon Locknuts (10) as shown. See step 3. Tighten the two M8 Nylon...

English Manual
Page 8
... screws before tightening any of the Frame (1). Attach the Seat (12) to the Frame with four M6 x 35mm Screws (61) and four M6 12 Washers (54). 14 15 54 54 61 54 61 7. Attach the Upright to the Seat Brackets (14, 15) 6 with four M8 x 16mm Button Screws (34) and four M8 Split Washers (42). 7 Avoid pinching the wires during this step...
... screws before tightening any of the Frame (1). Attach the Seat (12) to the Frame with four M6 x 35mm Screws (61) and four M6 12 Washers (54). 14 15 54 54 61 54 61 7. Attach the Upright to the Seat Brackets (14, 15) 6 with four M8 x 16mm Button Screws (34) and four M8 Split Washers (42). 7 Avoid pinching the wires during this step...

English Manual
Page 9
... Batteries Battery Cover 9. Be careful to avoid pinching the wires during this step 46 Console Wire 27 13 16 10. After Strap 21 using the exercise cycle for one week, retighten the Pedals. The Console (16) requires four 1.5V "D" batteries (not included); plays or other electronic components may be left arm of the Crank. 8. alkaline batteries are properly tightened before inserting batteries into the right arm of the Crank (21). Adjust...
... Batteries Battery Cover 9. Be careful to avoid pinching the wires during this step 46 Console Wire 27 13 16 10. After Strap 21 using the exercise cycle for one week, retighten the Pedals. The Console (16) requires four 1.5V "D" batteries (not included); plays or other electronic components may be left arm of the Crank. 8. alkaline batteries are properly tightened before inserting batteries into the right arm of the Crank (21). Adjust...

English Manual
Page 10
... of the stabilizer endcaps until the flexing is eliminated. HOW TO OPERATE THE EXERCISE CYCLE HOW TO ADJUST THE SEAT FRAME For effective exercise, the seat should be in the proper position. To adjust the seat frame, first loosen the adjustment knob on your knees when the pedals are in the center of the frame, turn one or both of the frame...
... of the stabilizer endcaps until the flexing is eliminated. HOW TO OPERATE THE EXERCISE CYCLE HOW TO ADJUST THE SEAT FRAME For effective exercise, the seat should be in the proper position. To adjust the seat frame, first loosen the adjustment knob on your knees when the pedals are in the center of the frame, turn one or both of the frame...
English Manual
Page 11
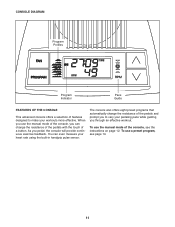
... CONSOLE DIAGRAM Program Profiles Program Indicator Pace Guide FEATURES OF THE CONSOLE This advanced console offers a selection of features designed to vary your pedaling pace while guiding you through an effective workout. You can change the resistance of the pedals and prompt you to make your workouts more effective. To use the manual mode of the console, you can even measure your heart rate using the built-in handgrip pulse sensor. When you pedal...
... CONSOLE DIAGRAM Program Profiles Program Indicator Pace Guide FEATURES OF THE CONSOLE This advanced console offers a selection of features designed to vary your pedaling pace while guiding you through an effective workout. You can change the resistance of the pedals and prompt you to make your workouts more effective. To use the manual mode of the console, you can even measure your heart rate using the built-in handgrip pulse sensor. When you pedal...
English Manual
Page 12
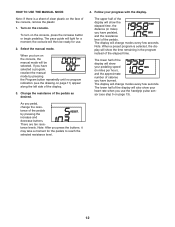
... along the left side of the display. 3. Change the resistance of the console, remove the plastic. 1. The lower half of the display will show your heart rate when you press the buttons, it may take a moment for a moment; HOW TO USE THE MANUAL MODE Note: If there is selected, the display will show the elapsed time, the distance (in the program instead of the elapsed time. The...
... along the left side of the display. 3. Change the resistance of the console, remove the plastic. 1. The lower half of the display will show your heart rate when you press the buttons, it may take a moment for a moment; HOW TO USE THE MANUAL MODE Note: If there is selected, the display will show the elapsed time, the distance (in the program instead of the elapsed time. The...
English Manual
Page 13
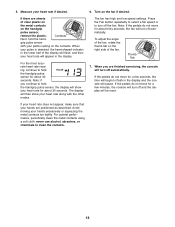
... finished exercising, the console will turn off and the display will turn off automatically. Press the Fan button repeatedly to select a fan speed or to clean the contacts. 13 Thumb Tab 7. Avoid moving your pulse is detected, the heart-shaped indicator in the lower half of clear plastic on the metal contacts on the contacts. grip pulse sensor with the other modes. Note: If the pedals...
... finished exercising, the console will turn off and the display will turn off automatically. Press the Fan button repeatedly to select a fan speed or to clean the contacts. 13 Thumb Tab 7. Avoid moving your pulse is detected, the heart-shaped indicator in the lower half of clear plastic on the metal contacts on the contacts. grip pulse sensor with the other modes. Note: If the pedals...
English Manual
Page 14
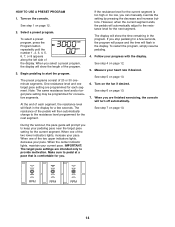
... exercising, the console will then automatically change to keep your heart rate if desired. One resistance level and one of the program. 3. See step 6 on page 12. 5. When one target pace setting are programmed for consecutive segments. The resistance of the display. When one of 20 or 30 oneminute segments. Select a preset program. HOW TO USE A PRESET PROGRAM 1. To select a preset program, press the Program button repeatedly until the number...
... exercising, the console will then automatically change to keep your heart rate if desired. One resistance level and one of the program. 3. See step 6 on page 12. 5. When one target pace setting are programmed for consecutive segments. The resistance of the display. When one of 20 or 30 oneminute segments. Select a preset program. HOW TO USE A PRESET PROGRAM 1. To select a preset program, press the Program button repeatedly until the number...

English Manual
Page 15
... display correct feedback, the reed switch should be adjusted. Replace any worn parts immediately. IMPORTANT: To avoid damage to be replaced; most console problems are pedaling, even when the resistance is properly tightened. Next, remove the screws from the left pedal clockwise and remove it . To replace the batteries, see assembly step 8 on each side of direct sunlight. Turn the Crank for a moment. Using an adjustable wrench, turn the left side shield. MAINTENANCE AND TROUBLESHOOTING Inspect and tighten all parts...
... display correct feedback, the reed switch should be adjusted. Replace any worn parts immediately. IMPORTANT: To avoid damage to be replaced; most console problems are pedaling, even when the resistance is properly tightened. Next, remove the screws from the left pedal clockwise and remove it . To replace the batteries, see assembly step 8 on each side of direct sunlight. Turn the Crank for a moment. Using an adjustable wrench, turn the left side shield. MAINTENANCE AND TROUBLESHOOTING Inspect and tighten all parts...
English Manual
Page 16
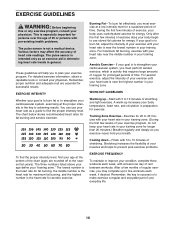
... post-exercise problems. To find the proper intensity level, find the proper intensity level. The chart below shows recommended heart rates for aerobic exercise. If your goal is to use your body temperature, heart rate, and circulation in your physician. The three numbers listed above your age define your training zone. During the first few minutes of the chart (ages are essential for exercise. Training Zone Exercise-Exercise...
... post-exercise problems. To find the proper intensity level, find the proper intensity level. The chart below shows recommended heart rates for aerobic exercise. If your goal is to use your body temperature, heart rate, and circulation in your physician. The three numbers listed above your age define your training zone. During the first few minutes of the chart (ages are essential for exercise. Training Zone Exercise-Exercise...

English Manual
Page 17
...possible. Calf/Achilles Stretch 3 With one foot with the soles of your groin area as far as well. Bend your front leg, lean forward and move your hips toward your hands against a wall. Quadriceps Stretch With one hand against the inner thigh of your feet together and...The correct form for 15 counts, then relax. Hold for several basic stretches is shown at the right. Repeat 3 times for each leg. Repeat 3 times for 15 counts, then relax. Hold for each leg. Reach toward the wall. Stretches: Hamstrings, lower back and groin. 3. Keep your back leg straight and ...
...possible. Calf/Achilles Stretch 3 With one foot with the soles of your groin area as far as well. Bend your front leg, lean forward and move your hips toward your hands against a wall. Quadriceps Stretch With one hand against the inner thigh of your feet together and...The correct form for 15 counts, then relax. Hold for several basic stretches is shown at the right. Repeat 3 times for each leg. Repeat 3 times for 15 counts, then relax. Hold for each leg. Reach toward the wall. Stretches: Hamstrings, lower back and groin. 3. Keep your back leg straight and ...
English Manual
Page 18
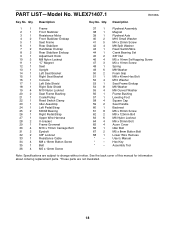
... Seat Bracket 16 1 Console 17 1 Left Side Shield 18 1 Right Side Shield 19 4 M10 Nylon Locknut 20 2 Seat Frame Bushing 21 1 Crank/Pulley 22 1 Reed Switch Clamp 23 1 Idler Assembly 24 1 Left Pedal/Strap 25 2 6000Z Bearing 26 1 Right Pedal/Strap 27 1 Upper Wire Harness 28 2 U-bracket 29 1 Frame Grommet 30 4 M10 x 70mm Carriage Bolt 31 2 Eyebolt 32 2 3/8" Locknut 33 1 Resistance Cable 34 4 M8 x 16mm Button Screw 35 1 Belt...
... Seat Bracket 16 1 Console 17 1 Left Side Shield 18 1 Right Side Shield 19 4 M10 Nylon Locknut 20 2 Seat Frame Bushing 21 1 Crank/Pulley 22 1 Reed Switch Clamp 23 1 Idler Assembly 24 1 Left Pedal/Strap 25 2 6000Z Bearing 26 1 Right Pedal/Strap 27 1 Upper Wire Harness 28 2 U-bracket 29 1 Frame Grommet 30 4 M10 x 70mm Carriage Bolt 31 2 Eyebolt 32 2 3/8" Locknut 33 1 Resistance Cable 34 4 M8 x 16mm Button Screw 35 1 Belt...
English Manual
Page 19
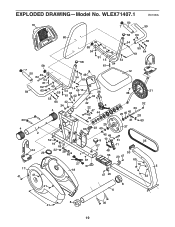
EXPLODED DRAWING-Model No. WLEX71407.1 50 16 7 R0108A 59 60 49 58 63 54 55 58 10 55 54 49 64 61 61 15 54 58 58 61 54 26 7 50 49 62 54 61 46 54 61 59 62 63 49 55 54 14 46 13 34 36 61 42 34 55 64 42 34 42 3 22 4 47 44 43 33 30 12 21 38 32 39 25 40 45 28 31 63 25 4 66 23 40 37 2 45 49 52 19 65 31 9 10 51 35 67 11 24 29 32 28 63 1 67 48 53 56 20 47 65 27 57 17 18 19 5 41 41 47 20 52 8 41 6 8 30 41 19
EXPLODED DRAWING-Model No. WLEX71407.1 50 16 7 R0108A 59 60 49 58 63 54 55 58 10 55 54 49 64 61 61 15 54 58 58 61 54 26 7 50 49 62 54 61 46 54 61 59 62 63 49 55 54 14 46 13 34 36 61 42 34 55 64 42 34 42 3 22 4 47 44 43 33 30 12 21 38 32 39 25 40 45 28 31 63 25 4 66 23 40 37 2 45 49 52 19 65 31 9 10 51 35 67 11 24 29 32 28 63 1 67 48 53 56 20 47 65 27 57 17 18 19 5 41 41 47 20 52 8 41 6 8 30 41 19

English Manual
Page 20
.... or products used for indirect, special or consequential damages arising out of or in its authorized service centers. This warranty gives you . ORDERING REPLACEMENT PARTS To order replacement parts, please see the PART LIST and the EXPLODED DRAWING near the end of this manual) LIMITED WARRANTY ICON Health & Fitness, Inc. (ICON) warrants this product to you specific legal rights. This warranty extends only to replacing or repairing, at ICON's option, the...
.... or products used for indirect, special or consequential damages arising out of or in its authorized service centers. This warranty gives you . ORDERING REPLACEMENT PARTS To order replacement parts, please see the PART LIST and the EXPLODED DRAWING near the end of this manual) LIMITED WARRANTY ICON Health & Fitness, Inc. (ICON) warrants this product to you specific legal rights. This warranty extends only to replacing or repairing, at ICON's option, the...


