
German Manual
Page 15
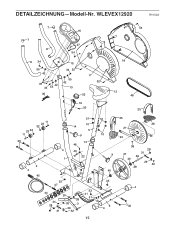
DETAILZEICHNUNG-Modell-Nr. WLEVEX12920 R1002A 7 54 16 7 8 27 54 8 34 55 42 49 34 55 42 36 15 34 52 55 42 13 17 52 53 19 50 18 12 48 25 23 32 11 11 23 32 30 51 10 14 5 9 14 46 4 43 22 1 51 10 9 2 4 45 40 33 33 33 47 44 34 28 31 20 28 35 3 29 32 33 41 51 10 6 4 15 25 26 21 24 38 28 37 31 39 40 29 32 28 4 30
DETAILZEICHNUNG-Modell-Nr. WLEVEX12920 R1002A 7 54 16 7 8 27 54 8 34 55 42 49 34 55 42 36 15 34 52 55 42 13 17 52 53 19 50 18 12 48 25 23 32 11 11 23 32 30 51 10 14 5 9 14 46 4 43 22 1 51 10 9 2 4 45 40 33 33 33 47 44 34 28 31 20 28 35 3 29 32 33 41 51 10 6 4 15 25 26 21 24 38 28 37 31 39 40 29 32 28 4 30
Uk Manual
Page 1
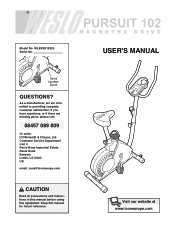
USER'S MANUAL Visit our website at www.iconeurope.com Model No. Customer Service Department Unit 4 Revie Road Industrial Estate Revie Road Beeston Leeds, LS118JG UK email: [email protected] CAUTION Read all precautions and instructions in this manual before using this manual for future reference. Serial Number Decal QUESTIONS? Keep this equipment. As a manufacturer, we are missing parts, please call: 08457 089 009 Or write: ICON Health & Fitness, Ltd. If you have questions, or if there are committed to providing complete customer satisfaction. WLEVEX12920 Serial No.
USER'S MANUAL Visit our website at www.iconeurope.com Model No. Customer Service Department Unit 4 Revie Road Industrial Estate Revie Road Beeston Leeds, LS118JG UK email: [email protected] CAUTION Read all precautions and instructions in this manual before using this manual for future reference. Serial Number Decal QUESTIONS? Keep this equipment. As a manufacturer, we are missing parts, please call: 08457 089 009 Or write: ICON Health & Fitness, Ltd. If you have questions, or if there are committed to providing complete customer satisfaction. WLEVEX12920 Serial No.
Uk Manual
Page 2
... or dizziness whilst exercising, stop immediately and cool down. 10. The pulse sensor is intended only as described in a commercial, rental, or institutional setting. The pulse sensor is not a medical device. TABLE OF CONTENTS IMPORTANT PRECAUTIONS 2 BEFORE YOU BEGIN 3 ASSEMBLY 4 HOW TO OPERATE THE EXERCISE CYCLE 8 MAINTENANCE AND TROUBLESHOOTING 11 CONDITIONING GUIDELINES 12 PART LIST 14 EXPLODED DRAWING 15 ORDERING REPLACEMENT PARTS Back Cover IMPORTANT PRECAUTIONS...
... or dizziness whilst exercising, stop immediately and cool down. 10. The pulse sensor is intended only as described in a commercial, rental, or institutional setting. The pulse sensor is not a medical device. TABLE OF CONTENTS IMPORTANT PRECAUTIONS 2 BEFORE YOU BEGIN 3 ASSEMBLY 4 HOW TO OPERATE THE EXERCISE CYCLE 8 MAINTENANCE AND TROUBLESHOOTING 11 CONDITIONING GUIDELINES 12 PART LIST 14 EXPLODED DRAWING 15 ORDERING REPLACEMENT PARTS Back Cover IMPORTANT PRECAUTIONS...
Uk Manual
Page 3
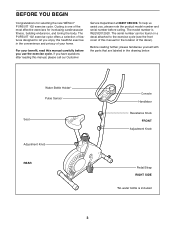
... your home. If you enjoy this manual, please call our Customer Service Department at 08457 089 009. The serial number can be found on a decal attached to let you have questions after reading this healthful exercise in the drawing below. BEFORE YOU BEGIN Congratulations for increasing cardiovascular fitness, building endurance, and toning the body. Water Bottle Holder* Pulse Sensor Seat Adjustment Knob REAR 3 Console Handlebar Resistance Knob FRONT Adjustment Knob Pedal/Strap RIGHT...
... your home. If you enjoy this manual, please call our Customer Service Department at 08457 089 009. The serial number can be found on a decal attached to let you have questions after reading this healthful exercise in the drawing below. BEFORE YOU BEGIN Congratulations for increasing cardiovascular fitness, building endurance, and toning the body. Water Bottle Holder* Pulse Sensor Seat Adjustment Knob REAR 3 Console Handlebar Resistance Knob FRONT Adjustment Knob Pedal/Strap RIGHT...
Uk Manual
Page 4
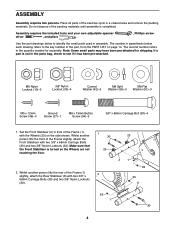
... 23 2 23 21 33 33 6 33 1 30 4 Place all parts of the exercise cycle in front of the Frame (1) slightly, attach the Rear Stabiliser (6) with two 3/8" x 68mm Carriage Bolts (30) and two 3/8" Nylon Locknuts (33). The second number refers to the key number of the packing materials until assembly is turned so the Wheels are not touching the floor. 2. M8...
... 23 2 23 21 33 33 6 33 1 30 4 Place all parts of the exercise cycle in front of the Frame (1) slightly, attach the Rear Stabiliser (6) with two 3/8" x 68mm Carriage Bolts (30) and two 3/8" Nylon Locknuts (33). The second number refers to the key number of the packing materials until assembly is turned so the Wheels are not touching the floor. 2. M8...

Uk Manual
Page 5
... Lower Cable (45). Turn the Resistance Cable (19) until it is tight. Be careful to the Frame (1). The Console (16) requires three 1.5V AA batteries; Cut and remove the zip tie holding the Reed Switch Wire to avoid pinching the Wires and Cables. Next, connect the Resistance Cable (19) to the Reed Switch Wire (43). Insert the Adjustment Knob (9) into the battery compartment. Insert three batteries into the Frame and the Upright, and turn the Knob...
... Lower Cable (45). Turn the Resistance Cable (19) until it is tight. Be careful to the Frame (1). The Console (16) requires three 1.5V AA batteries; Cut and remove the zip tie holding the Reed Switch Wire to avoid pinching the Wires and Cables. Next, connect the Resistance Cable (19) to the Reed Switch Wire (43). Insert the Adjustment Knob (9) into the battery compartment. Insert three batteries into the Frame and the Upright, and turn the Knob...

Uk Manual
Page 6
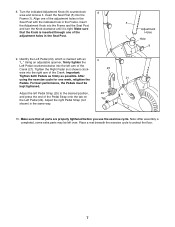
Move the Console (16) toward the Handlebar (15), at the same time inserting the excess ground wire up into the hole in the Handlebar. Attach the Console to the underside of the Seat. 34 55 42 34 7 15 Console Wire 36 34 55 42 13 12 5 51 ...Attach the Handlebar to avoid pinching the wires. Attach the Seat (12) to the Handlebar with three M8 Flat Washers (51) and three M8 Nylon Locknuts (10). Connect the ground wire to the Seat Post (5) with the 5 Ground Screw (27). Be careful to the Upper Wire (36). Hold the Console (16) near 6 the Upright (13), connect the console wire...
Move the Console (16) toward the Handlebar (15), at the same time inserting the excess ground wire up into the hole in the Handlebar. Attach the Console to the underside of the Seat. 34 55 42 34 7 15 Console Wire 36 34 55 42 13 12 5 51 ...Attach the Handlebar to avoid pinching the wires. Attach the Seat (12) to the Handlebar with three M8 Flat Washers (51) and three M8 Nylon Locknuts (10). Connect the ground wire to the Seat Post (5) with the 5 Ground Screw (27). Be careful to the Upper Wire (36). Hold the Console (16) near 6 the Upright (13), connect the console wire...
Uk Manual
Page 7
... Pedals. Identify the Left Pedal (24), which is inserted through one of the Crank (21). Adjust the left arm of the adjustment holes in the same way. 9 25 24 Tab 5 Adjustment Holes 1 Hole 9 21 10. Turn the indicated Adjustment Knob (9) counterclock- 8 wise and remove it is completed, some extra parts may be kept tightened. Make sure that all parts are properly tightened before you use the exercise...
... Pedals. Identify the Left Pedal (24), which is inserted through one of the Crank (21). Adjust the left arm of the adjustment holes in the same way. 9 25 24 Tab 5 Adjustment Holes 1 Hole 9 21 10. Turn the indicated Adjustment Knob (9) counterclock- 8 wise and remove it is completed, some extra parts may be kept tightened. Make sure that all parts are properly tightened before you use the exercise...

Uk Manual
Page 8
... and the upright, and turn the resistance knob clockwise; Make sure that the knob is the most comfortable for you pedal, there Seat should be adjusted to the desired position, and press the ends of the pedals, turn the knob clockwise until it . Adjust the straps to the height that is inserted through one of the adjustment holes in the seat post. Hole wise and remove it...
... and the upright, and turn the resistance knob clockwise; Make sure that the knob is the most comfortable for you pedal, there Seat should be adjusted to the desired position, and press the ends of the pedals, turn the knob clockwise until it . Adjust the straps to the height that is inserted through one of the adjustment holes in the seat post. Hole wise and remove it...
Uk Manual
Page 9
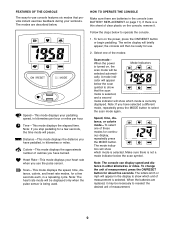
... change the unit of measurement. 9 Heart Rate-This mode displays your heart rate when you have pedalled, in the console (see BATTERY REPLACEMENT on the power, press the ON/RESET button or begin pedalling. The entire display will briefly appear; cally. Note: The console can display speed and distance in a repeating cycle. Distance-This mode displays the distance you use the pulse sensor. Calorie-This mode displays the approximate number of measurement is selected. To turn on page 11). Speed, time, distance, or calorie mode...
... change the unit of measurement. 9 Heart Rate-This mode displays your heart rate when you have pedalled, in the console (see BATTERY REPLACEMENT on the power, press the ON/RESET button or begin pedalling. The entire display will briefly appear; cally. Note: The console can display speed and distance in a repeating cycle. Distance-This mode displays the distance you use the pulse sensor. Calorie-This mode displays the approximate number of measurement is selected. To turn on page 11). Speed, time, distance, or calorie mode...

Uk Manual
Page 10
... heart rate, if desired. To turn off the power, simply wait for a few seconds. If the pedals are not moved and the console buttons are applying the proper amount of heart rate readings. Hold your thumb on the pulse sensor for about 15 seconds for a few minutes, the power will be too high or too low, or if your heart rate is not displayed, lift your heart rate...
... heart rate, if desired. To turn off the power, simply wait for a few seconds. If the pedals are not moved and the console buttons are applying the proper amount of heart rate readings. Hold your thumb on the pulse sensor for about 15 seconds for a few minutes, the power will be too high or too low, or if your heart rate is not displayed, lift your heart rate...
Uk Manual
Page 11
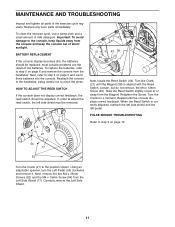
... a small amount of the exercise cycle regularly. HOW TO ADJUST THE REED SWITCH If the console does not display correct feedback, the reed switch should be removed. 52 24 21 46 43 38 Next, locate the Reed Switch (43). PULSE SENSOR TROUBLESHOOTING Refer to step 3 on page 10. 21 54 17 52 Turn the Crank (21) to adjust the reed switch, the left pedal. Next, remove the five M4 x 25mm Screws (52) and the...
... a small amount of the exercise cycle regularly. HOW TO ADJUST THE REED SWITCH If the console does not display correct feedback, the reed switch should be removed. 52 24 21 46 43 38 Next, locate the Reed Switch (43). PULSE SENSOR TROUBLESHOOTING Refer to step 3 on page 10. 21 54 17 52 Turn the Crank (21) to adjust the reed switch, the left pedal. Next, remove the five M4 x 25mm Screws (52) and the...
Uk Manual
Page 12
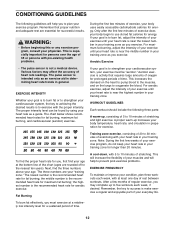
... or any exercise program, consult your training zone as an exercise aid in determining heart rate trends in your physician. EXERCISE INTENSITY Whether your goal is the recommended heart rate for fat burning, maximum fat burning, and cardiovascular (aerobic) exercise. The chart below shows recommended heart rates for aerobic exercise. the highest number is to burn fat or to strengthen your body begin to use stored fat...
... or any exercise program, consult your training zone as an exercise aid in determining heart rate trends in your physician. EXERCISE INTENSITY Whether your goal is the recommended heart rate for fat burning, maximum fat burning, and cardiovascular (aerobic) exercise. The chart below shows recommended heart rates for aerobic exercise. the highest number is to burn fat or to strengthen your body begin to use stored fat...

Uk Manual
Page 13
SUGGESTED STRETCHES The correct form for each leg. Stretches: Hamstrings, back of the other hand. Calf/Achilles Stretch 3 With one leg in front of knees and back. 2. Repeat 3 times for several basic stretches is shown at the right. Bring your heel as close... 3 times. Allow your back and shoulders to your groin area as far as possible. Move slowly as possible. Bend your front leg, lean forward and move your hips. Pull your feet toward the wall. Stretches: Hamstrings, lower back and groin. 3. Repeat 3 times for 15 counts, then relax. Toe Touch Stretch ...
SUGGESTED STRETCHES The correct form for each leg. Stretches: Hamstrings, back of the other hand. Calf/Achilles Stretch 3 With one leg in front of knees and back. 2. Repeat 3 times for several basic stretches is shown at the right. Bring your heel as close... 3 times. Allow your back and shoulders to your groin area as far as possible. Move slowly as possible. Bend your front leg, lean forward and move your hips. Pull your feet toward the wall. Stretches: Hamstrings, lower back and groin. 3. Repeat 3 times for 15 counts, then relax. Toe Touch Stretch ...

Uk Manual
Page 14
... ordering replacement parts. 14 PART LIST-Model No. WLEVEX12920 R1002A Key No. Description 1 1 Frame 2 1 Front Stabiliser 3 1 "C" Magnet Bracket 4 4 Stabiliser Endcap 5 1 Seat Post 6 1 Rear Stabiliser 7 2 Handlebar Endcap 8 2 Foam Grip 9 2 Adjustment Knob 10 4 M8 Nylon Locknut 11 2 M6 x 32mm Bolt 12 1 Seat 13 1 Upright 14 2 Frame Bushing 15 1 Handlebar 16 1 Console 17 1 Left Side Shield 18 1 Right Side Shield 19 1 Resistance Control/Cable 20 1 M8 x 5mm Spacer 21 1 Crank/Pulley 22 1 Reed Switch...
... ordering replacement parts. 14 PART LIST-Model No. WLEVEX12920 R1002A Key No. Description 1 1 Frame 2 1 Front Stabiliser 3 1 "C" Magnet Bracket 4 4 Stabiliser Endcap 5 1 Seat Post 6 1 Rear Stabiliser 7 2 Handlebar Endcap 8 2 Foam Grip 9 2 Adjustment Knob 10 4 M8 Nylon Locknut 11 2 M6 x 32mm Bolt 12 1 Seat 13 1 Upright 14 2 Frame Bushing 15 1 Handlebar 16 1 Console 17 1 Left Side Shield 18 1 Right Side Shield 19 1 Resistance Control/Cable 20 1 M8 x 5mm Spacer 21 1 Crank/Pulley 22 1 Reed Switch...
Uk Manual
Page 15
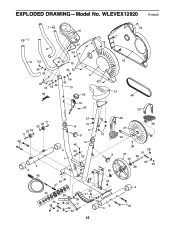
EXPLODED DRAWING-Model No. WLEVEX12920 R1002A 7 54 16 7 8 27 54 8 34 55 42 49 34 55 42 36 15 34 52 55 42 13 17 52 53 19 50 18 12 48 25 23 32 11 11 23 32 30 51 10 14 5 9 14 46 4 43 22 1 51 10 9 2 4 45 40 33 33 33 47 44 34 28 31 20 28 35 3 29 32 33 41 51 10 6 4 15 25 26 21 24 38 28 37 31 39 40 29 32 28 4 30
EXPLODED DRAWING-Model No. WLEVEX12920 R1002A 7 54 16 7 8 27 54 8 34 55 42 49 34 55 42 36 15 34 52 55 42 13 17 52 53 19 50 18 12 48 25 23 32 11 11 23 32 30 51 10 14 5 9 14 46 4 43 22 1 51 10 9 2 4 45 40 33 33 33 47 44 34 28 31 20 28 35 3 29 32 33 41 51 10 6 4 15 25 26 21 24 38 28 37 31 39 40 29 32 28 4 30
Uk Manual
Page 16
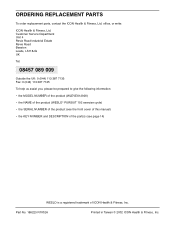
ORDERING REPLACEMENT PARTS To order replacement parts, contact the ICON Health & Fitness, Ltd. Part No. 186223 R1002A Printed in Taiwan © 2002 ICON Health & Fitness, Inc. office, or write: ICON Health & Fitness, Ltd. Customer Service Department...information: • the MODEL NUMBER of the product (WLEVEX12920) • the NAME of the product (WESLO® PURSUIT 102 exercise cycle) • the SERIAL NUMBER of the product (see the front cover of this manual) • the KEY NUMBER and DESCRIPTION of the part(s) (see page 14) WESLO is a registered trademark of ICON Health & Fitness...
ORDERING REPLACEMENT PARTS To order replacement parts, contact the ICON Health & Fitness, Ltd. Part No. 186223 R1002A Printed in Taiwan © 2002 ICON Health & Fitness, Inc. office, or write: ICON Health & Fitness, Ltd. Customer Service Department...information: • the MODEL NUMBER of the product (WLEVEX12920) • the NAME of the product (WESLO® PURSUIT 102 exercise cycle) • the SERIAL NUMBER of the product (see the front cover of this manual) • the KEY NUMBER and DESCRIPTION of the part(s) (see page 14) WESLO is a registered trademark of ICON Health & Fitness...


