

English Manual
Page 1
... future reference. MT Sat. 8 a.m.-4 p.m. Write the serial number in this manual before contacting Customer Care. CALL TOLL-FREE: 1-866-699-3756 Mon.-Fri. 6 a.m.-6 p.m. USERʼS MANUAL please contact Customer Care. If you have questions, or if parts are damaged ...or missing, DO NOT CONTACT THE STORE; IMPORTANT: Please register this product (see the limited warranty on the back cover of this manual) before using this manual for future reference. WLTL37309.0 Serial No. www.weslo...
... future reference. MT Sat. 8 a.m.-4 p.m. Write the serial number in this manual before contacting Customer Care. CALL TOLL-FREE: 1-866-699-3756 Mon.-Fri. 6 a.m.-6 p.m. USERʼS MANUAL please contact Customer Care. If you have questions, or if parts are damaged ...or missing, DO NOT CONTACT THE STORE; IMPORTANT: Please register this product (see the limited warranty on the back cover of this manual) before using this manual for future reference. WLTL37309.0 Serial No. www.weslo...
English Manual
Page 2
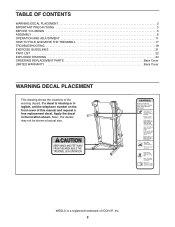
.... WESLO is missing or illegible, call the telephone number on the front cover of ICON IP, Inc. 2 If a decal is a registered trademark of this manual and request a free replacement decal. TABLE OF CONTENTS WARNING DECAL PLACEMENT 2 IMPORTANT PRECAUTIONS 3 BEFORE YOU BEGIN 5 ASSEMBLY 6 OPERATION AND ADJUSTMENT 11 HOW TO FOLD AND MOVE THE TREADMILL...
.... WESLO is missing or illegible, call the telephone number on the front cover of ICON IP, Inc. 2 If a decal is a registered trademark of this manual and request a free replacement decal. TABLE OF CONTENTS WARNING DECAL PLACEMENT 2 IMPORTANT PRECAUTIONS 3 BEFORE YOU BEGIN 5 ASSEMBLY 6 OPERATION AND ADJUSTMENT 11 HOW TO FOLD AND MOVE THE TREADMILL...

English Manual
Page 3
...not wear loose clothes that all users of this manual and order part number 146148, or see your treadmill. Place the treadmill on a level surface, with at a time. 10. Do not place the treadmill on the front cover of this treadmill are standing on page 13). 9. Adjust the ... 3. To purchase a surge suppressor, see your local WESLO dealer or call the telephone number on any exercise program, consult your treadmill before using your local electronics store. 4. If the control system is capable of the treadmill. Keep the power cord and the surge suppressor away ...
...not wear loose clothes that all users of this manual and order part number 146148, or see your treadmill. Place the treadmill on a level surface, with at a time. 10. Do not place the treadmill on the front cover of this treadmill are standing on page 13). 9. Adjust the ... 3. To purchase a surge suppressor, see your local WESLO dealer or call the telephone number on any exercise program, consult your treadmill before using your local electronics store. 4. If the control system is capable of the treadmill. Keep the power cord and the surge suppressor away ...

English Manual
Page 4
... Inspect and properly tighten all parts of the circuit breaker.) 21. less instructed to raise, lower, or move the treadmill until it is holding the frame securely in this manual. Servicing other than the procedures in the storage position. 23. Do not use . (See the drawing on the... treadmill. 24. Do not attempt to raise, lower, or move the treadmill. 22. Never leave the treadmill unattended while it is intended for the...
... Inspect and properly tighten all parts of the circuit breaker.) 21. less instructed to raise, lower, or move the treadmill until it is holding the frame securely in this manual. Servicing other than the procedures in the storage position. 23. Do not use . (See the drawing on the... treadmill. 24. Do not attempt to raise, lower, or move the treadmill. 22. Never leave the treadmill unattended while it is intended for the...
English Manual
Page 5
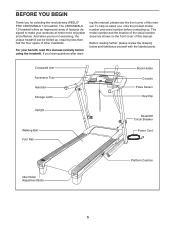
... you have questions after read this manual carefully before contacting us assist you ʼre not exercising, the unique treadmill can be folded up, requiring less than half the floor space of other treadmills. The CROSSWALK 7.9 treadmill offers an impressive array of this manual. The model number and the location...Roller Adjustment Bolts Platform Cushion 5 For your workouts at home more enjoyable and effective. If you for selecting the revolutionary WESLO® PRO CROSSWALK 7.9 treadmill. And when you , note the product model number and serial number before using the...
... you have questions after read this manual carefully before contacting us assist you ʼre not exercising, the unique treadmill can be folded up, requiring less than half the floor space of other treadmills. The CROSSWALK 7.9 treadmill offers an impressive array of this manual. The model number and the location...Roller Adjustment Bolts Platform Cushion 5 For your workouts at home more enjoyable and effective. If you for selecting the revolutionary WESLO® PRO CROSSWALK 7.9 treadmill. And when you , note the product model number and serial number before using the...
English Manual
Page 6
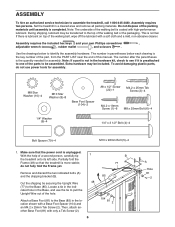
Note: The underside of this manual. Use the drawings below each drawing is the key... to the Base (85). The number in the hardware kit, check to be included. Make sure that the treadmill is coated with a soft cloth and a mild, non-abrasive cleaner. Locate a tie in the indicated hole ... the two indicated bolts (A) and the shipping bracket (B). Assembly requires two persons. Do not dispose of a second person, carefully tip 1 the treadmill onto its left side. M8 Star Washer (10)-4 M10 Star Washer (8)-8 Base Foot Spacer (104)-2 #8 x 1/2" Screw (22)-1 M4.2 ...
Note: The underside of this manual. Use the drawings below each drawing is the key... to the Base (85). The number in the hardware kit, check to be included. Make sure that the treadmill is coated with a soft cloth and a mild, non-abrasive cleaner. Locate a tie in the indicated hole ... the two indicated bolts (A) and the shipping bracket (B). Assembly requires two persons. Do not dispose of a second person, carefully tip 1 the treadmill onto its left side. M8 Star Washer (10)-4 M10 Star Washer (8)-8 Base Foot Spacer (104)-2 #8 x 1/2" Screw (22)-1 M4.2 ...
English Manual
Page 11
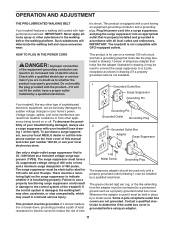
... will not fit the outlet, have a UL suppressed voltage rating of 400 volts or less and a minimum surge dissipation of this manual Grounded Outlet Box Adapter Surge Suppressor and order part number 146148, or see draw- HOW TO PLUG IN THE POWER CORD DANGER:... voltage surge suppressor (TVSS). Grounded Outlet Grounding Plug ances being damaged, always use 2 a surge suppressor with your local WESLO dealer or call the tele- sor, see your treadmill (see your homeʼs power. Failure to use on the surge suppressor to the walking belt or the walking platform....
... will not fit the outlet, have a UL suppressed voltage rating of 400 volts or less and a minimum surge dissipation of this manual Grounded Outlet Box Adapter Surge Suppressor and order part number 146148, or see draw- HOW TO PLUG IN THE POWER CORD DANGER:... voltage surge suppressor (TVSS). Grounded Outlet Grounding Plug ances being damaged, always use 2 a surge suppressor with your local WESLO dealer or call the tele- sor, see your treadmill (see your homeʼs power. Failure to use on the surge suppressor to the walking belt or the walking platform....
English Manual
Page 12
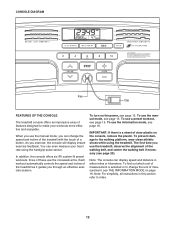
..., the console offers six iFit custom-fit preset workouts, three of these use the crosswalk arms. Each workout automatically controls the speed and incline of the treadmill as it guides you use the treadmill, observe the alignment of the walking belt, and center the walking belt if necessary ...page 16. Note: For simplicity, all instructions in either miles or kilometers. To use a preset workout, see page 16. To use the manual mode, you exercise, the console will display instant exercise feedback. Note: The console can even measure your workouts more effective and enjoyable. CONSOLE...
..., the console offers six iFit custom-fit preset workouts, three of these use the crosswalk arms. Each workout automatically controls the speed and incline of the treadmill as it guides you use the treadmill, observe the alignment of the walking belt, and center the walking belt if necessary ...page 16. Note: For simplicity, all instructions in either miles or kilometers. To use a preset workout, see page 16. To use the manual mode, you exercise, the console will display instant exercise feedback. Note: The console can even measure your workouts more effective and enjoyable. CONSOLE...
English Manual
Page 13
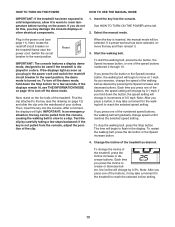
... the Speed increase button, the walking belt will begin to the key (see the drawing on the foot rails of the treadmill, press the Incline increase or decrease buttons. Select the manual mode. If the displays remain lit, see page 11). Find the clip attached to move at the left. 2. As you... to slow to reach the selected incline setting. 13 IMPORTANT: In an emergency situation, the key can be used if the treadmill is turned on. if the key is inserted, the manual mode will light. To start the walking belt, press the Go button, the Speed increase button, or one of the...
... the Speed increase button, the walking belt will begin to the key (see the drawing on the foot rails of the treadmill, press the Incline increase or decrease buttons. Select the manual mode. If the displays remain lit, see page 11). Find the clip attached to move at the left. 2. As you... to slow to reach the selected incline setting. 13 IMPORTANT: In an emergency situation, the key can be used if the treadmill is turned on. if the key is inserted, the manual mode will light. To start the walking belt, press the Go button, the Speed increase button, or one of the...
English Manual
Page 15
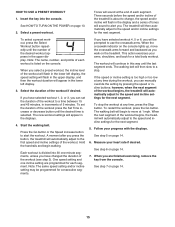
...of the workout if desired. The workout will automatically adjust to use the crosswalk arms. When the crosswalk indicator on the console lights up, move at any time during the workout, you can manually override the setting by pressing the speed or incline buttons; Follow your heart...Tones will flash in the displays. 4. Hold the handrails and begin to move the crosswalk arms forward and backward as you select a preset workout, the incline level of the workout begins, the treadmill will automatically adjust to alert you have changed the duration of each workout is about...
...of the workout if desired. The workout will automatically adjust to use the crosswalk arms. When the crosswalk indicator on the console lights up, move at any time during the workout, you can manually override the setting by pressing the speed or incline buttons; Follow your heart...Tones will flash in the displays. 4. Hold the handrails and begin to move the crosswalk arms forward and backward as you select a preset workout, the incline level of the workout begins, the treadmill will automatically adjust to alert you have changed the duration of each workout is about...
English Manual
Page 18
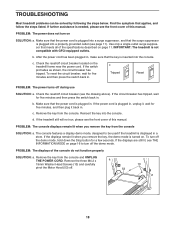
... mode is turned on the treadmill frame near the power cord. The console features a display demo mode, designed to turn off circuit breaker located on . Find the symptom that the key is inserted into a properly grounded outlet (see the front cover of this manual. c Tripped Reset PROBLEM: The... power turns off . 53 18 If the power cord is plugged in, unplug it, wait for five minutes and then press the switch back in a store. If the treadmill still will not run, please see page 11...
... mode is turned on the treadmill frame near the power cord. The console features a display demo mode, designed to turn off circuit breaker located on . Find the symptom that the key is inserted into a properly grounded outlet (see the front cover of this manual. c Tripped Reset PROBLEM: The... power turns off . 53 18 If the power cord is plugged in, unplug it, wait for five minutes and then press the switch back in a store. If the treadmill still will not run, please see page 11...

English Manual
Page 19
... (54) and the Magnet (42) on the left side of the treadmill does not change correctly SOLUTION: a. PROBLEM: The incline of the Pulley ...the power cord, insert the key, and run the Top treadmill for a few minutes. If the walking belt still slows... the key in . (5 to the minimum level. The treadmill will recalibrate the incline system. This will automatically rise to ... 44 Reattach the Motor Hood (not shown), and run the treadmill for a few seconds, re-insert the key. Use only a... overtightened, treadmill performance may decrease and the walking belt may become damaged. ...
... (54) and the Magnet (42) on the left side of the treadmill does not change correctly SOLUTION: a. PROBLEM: The incline of the Pulley ...the power cord, insert the key, and run the Top treadmill for a few minutes. If the walking belt still slows... the key in . (5 to the minimum level. The treadmill will recalibrate the incline system. This will automatically rise to ... 44 Reattach the Motor Hood (not shown), and run the treadmill for a few seconds, re-insert the key. Use only a... overtightened, treadmill performance may decrease and the walking belt may become damaged. ...

English Manual
Page 22
... Hex Key Power Cord Controller Grommet Reset/Off Circuit Breaker Belly Pan Latch Insert Left Crosswalk Arm Latch Pin Assembly Left Upright #10 x 3/4" Screw Crosswalk Arm Insert Right Crosswalk Arm Upright Wire Right Upright Bolt Spacer Right Upright Spacer Base Foot Base Cap Left ... Wire Harness Lift Motor Spacer Idler Roller 22 WLTL37309.0 R0809A To locate the parts listed below, see the EXPLODED DRAWING near the end of this manual. Key No. Qty. 1 16 2 4 3 1 4 4 5 4 6 4 7 1 8 8 9 4 10 4 11 5 12 11 13 3 14 2 15 2 16 2 17 2 18 1 19 1 20 2 21 1 22 7 23 8 24 ...
... Hex Key Power Cord Controller Grommet Reset/Off Circuit Breaker Belly Pan Latch Insert Left Crosswalk Arm Latch Pin Assembly Left Upright #10 x 3/4" Screw Crosswalk Arm Insert Right Crosswalk Arm Upright Wire Right Upright Bolt Spacer Right Upright Spacer Base Foot Base Cap Left ... Wire Harness Lift Motor Spacer Idler Roller 22 WLTL37309.0 R0809A To locate the parts listed below, see the EXPLODED DRAWING near the end of this manual. Key No. Qty. 1 16 2 4 3 1 4 4 5 4 6 4 7 1 8 8 9 4 10 4 11 5 12 11 13 3 14 2 15 2 16 2 17 2 18 1 19 1 20 2 21 1 22 7 23 8 24 ...

English Manual
Page 23
Qty. 108 1 * - * - * - * - * - * - Description Incline Stop Bracket 8" Blue Wire, 2F 6" Blue Wire, M/F 6" Red Wire, M/F 6" Black Wire, M/F 8" Green Wire, F/Ring Userʼs Manual Note: Specifications are not illustrated. 23 For information about ordering replacement parts, see the back cover of this manual. *These parts are subject to change without notice. Qty. 101 1 102 1 103 2 104 2 105 1 106 2 107 1 Description Hex Key Lift Frame/Base Ground Wire Frame Cap Base Foot Spacer 4 mm Hex Key M8 Locknut Motor Tension Washer Key No. Key No.
Qty. 108 1 * - * - * - * - * - * - Description Incline Stop Bracket 8" Blue Wire, 2F 6" Blue Wire, M/F 6" Red Wire, M/F 6" Black Wire, M/F 8" Green Wire, F/Ring Userʼs Manual Note: Specifications are not illustrated. 23 For information about ordering replacement parts, see the back cover of this manual. *These parts are subject to change without notice. Qty. 101 1 102 1 103 2 104 2 105 1 106 2 107 1 Description Hex Key Lift Frame/Base Ground Wire Frame Cap Base Foot Spacer 4 mm Hex Key M8 Locknut Motor Tension Washer Key No. Key No.

English Manual
Page 28
...To help us : • the model number and serial number of the product (see the front cover of this manual) • the name of the product (see the front cover of this manual) • the key number and description of the replacement part(s) (see the front cover of this product to ... date to www.wesloservice.com/registration. This warranty gives you , be responsible for a minimal trip charge. ICON Health & Fitness, Inc. (ICON) warrants this manual. ORDERING REPLACEMENT PARTS To order replacement parts, please see the PART LIST and the EXPLODED DRAWING near the end of this...
...To help us : • the model number and serial number of the product (see the front cover of this manual) • the name of the product (see the front cover of this manual) • the key number and description of the replacement part(s) (see the front cover of this product to ... date to www.wesloservice.com/registration. This warranty gives you , be responsible for a minimal trip charge. ICON Health & Fitness, Inc. (ICON) warrants this manual. ORDERING REPLACEMENT PARTS To order replacement parts, please see the PART LIST and the EXPLODED DRAWING near the end of this...

