
English Manual
Page 2
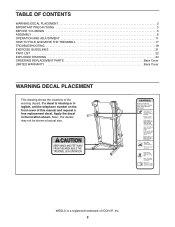
... PRECAUTIONS 3 BEFORE YOU BEGIN 5 ASSEMBLY 6 OPERATION AND ADJUSTMENT 11 HOW TO FOLD AND MOVE THE TREADMILL 17 TROUBLESHOOTING 18 EXERCISE GUIDELINES 21 PART LIST 22 EXPLODED DRAWING 24 ORDERING REPLACEMENT PARTS Back Cover LIMITED WARRANTY Back Cover WARNING DECAL PLACEMENT This drawing shows the locations of ICON IP, Inc. 2 WESLO is missing or illegible, call the telephone number on the front cover of this manual and request a free replacement decal. Apply the decal...
... PRECAUTIONS 3 BEFORE YOU BEGIN 5 ASSEMBLY 6 OPERATION AND ADJUSTMENT 11 HOW TO FOLD AND MOVE THE TREADMILL 17 TROUBLESHOOTING 18 EXERCISE GUIDELINES 21 PART LIST 22 EXPLODED DRAWING 24 ORDERING REPLACEMENT PARTS Back Cover LIMITED WARRANTY Back Cover WARNING DECAL PLACEMENT This drawing shows the locations of ICON IP, Inc. 2 WESLO is missing or illegible, call the telephone number on the front cover of this manual and request a free replacement decal. Apply the decal...
English Manual
Page 3
... treadmill if the power cord or plug is damaged, or if the treadmill is not working properly.) 16. Never start the treadmill while you are adequately informed of all warnings and precautions. 3. Always hold the handrails or crosswalk arms while using your treadmill. Adjust the speed in small increments to ensure that could result in sandals. 11. structions in a fall and serious injury. 5. If the control...
... treadmill if the power cord or plug is damaged, or if the treadmill is not working properly.) 16. Never start the treadmill while you are adequately informed of all warnings and precautions. 3. Always hold the handrails or crosswalk arms while using your treadmill. Adjust the speed in small increments to ensure that could result in sandals. 11. structions in a fall and serious injury. 5. If the control...

English Manual
Page 4
... FOLD AND MOVE THE TREADMILL on page 17.) You must be performed by an authorized ser- nance and adjustment procedures described in this treadmill in use this manual. Over exercising may result in the storage position. 23. Always remove the key, unplug the power cord, and switch the reset/off position when the treadmill is not in a commercial, rental, or institutional setting. 27. Inspect and properly tighten all parts...
... FOLD AND MOVE THE TREADMILL on page 17.) You must be performed by an authorized ser- nance and adjustment procedures described in this treadmill in use this manual. Over exercising may result in the storage position. 23. Always remove the key, unplug the power cord, and switch the reset/off position when the treadmill is not in a commercial, rental, or institutional setting. 27. Inspect and properly tighten all parts...
English Manual
Page 5
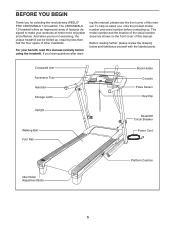
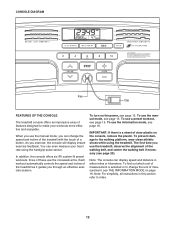
... below and familiarize yourself with the labeled parts. The CROSSWALK 7.9 treadmill offers an impressive array of other treadmills. ing this manual, please see the front cover of this manual. To help us . Crosswalk Arm Accessory Tray Handrail Storage Latch Upright Walking Belt Foot Rail Book Holder Console Pulse Sensor Key/Clip Reset/Off Circuit Breaker Power Cord Idler Roller Adjustment Bolts Platform Cushion 5 The model number and the location of the serial number decal are shown on the front...
... below and familiarize yourself with the labeled parts. The CROSSWALK 7.9 treadmill offers an impressive array of other treadmills. ing this manual, please see the front cover of this manual. To help us . Crosswalk Arm Accessory Tray Handrail Storage Latch Upright Walking Belt Foot Rail Book Holder Console Pulse Sensor Key/Clip Reset/Off Circuit Breaker Power Cord Idler Roller Adjustment Bolts Platform Cushion 5 The model number and the location of the serial number decal are shown on the front...
English Manual
Page 6
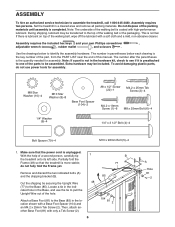
... included. Locate a tie in the indicated hole in a cleared area and remove all packing materials. Cut the shipping tie securing the Upright Wire (77) to assemble the treadmill, call 1-800-445-2480. Use the drawings below each drawing is preattached to pull the Upright Wire out of this manual. Partially fold the Frame (48) so that the power cord is normal. ASSEMBLY To hire...
... included. Locate a tie in the indicated hole in a cleared area and remove all packing materials. Cut the shipping tie securing the Upright Wire (77) to assemble the treadmill, call 1-800-445-2480. Use the drawings below each drawing is preattached to pull the Upright Wire out of this manual. Partially fold the Frame (48) so that the power cord is normal. ASSEMBLY To hire...
English Manual
Page 8
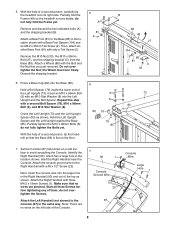
... Upright and the Bolt Spacer. Hold a Bolt Spacer (79) inside the lower end of them; Repeat this step with only a Tek Screw (2). Set the Console (87) face down on a soft surface to the Right Handrail with a #8 x 1/2" Screw (22). do not fully tighten the Bolts yet. Partially fold the Frame (48) so the treadmill is flat on the left side of the Console. 7 90 1 Console Ground Wire...
... Upright and the Bolt Spacer. Hold a Bolt Spacer (79) inside the lower end of them; Repeat this step with only a Tek Screw (2). Set the Console (87) face down on a soft surface to the Right Handrail with a #8 x 1/2" Screw (22). do not fully tighten the Bolts yet. Partially fold the Frame (48) so the treadmill is flat on the left side of the Console. 7 90 1 Console Ground Wire...

English Manual
Page 9
... shown). Make sure that no wires are pinched. 8 38 77 Console Assembly 90 Console Wire Console Wire 78 77 9. Cut the plastic ties from the Upright Wire (77) and the console wire. Then, tighten all four Bolts. See steps 4 and 6. Connect the Upright Wire (77) to the console wire. Set the console assembly on the Right Handrail (90) and Left Handrail (not shown). 8. If they do not, turn one connector and try again.
... shown). Make sure that no wires are pinched. 8 38 77 Console Assembly 90 Console Wire Console Wire 78 77 9. Cut the plastic ties from the Upright Wire (77) and the console wire. Then, tighten all four Bolts. See steps 4 and 6. Connect the Upright Wire (77) to the console wire. Set the console assembly on the Right Handrail (90) and Left Handrail (not shown). 8. If they do not, turn one connector and try again.

English Manual
Page 10
... the Console (87) shown. Press the Latch Insert (70) into the Latch Insert (70), and tighten the knob back onto the pin. 10 Knob 70 Spring Collar Pin 72 73 11. It may be necessary to adjust the walking belt (see pages 19 and 20). 10 10. Remove the knob from the pin. If there are properly tightened before you use the treadmill. Locate the Latch Pin Assembly (72). Attach the Left Crosswalk Arm (71...
... the Console (87) shown. Press the Latch Insert (70) into the Latch Insert (70), and tighten the knob back onto the pin. 10 Knob 70 Spring Collar Pin 72 73 11. It may be necessary to adjust the walking belt (see pages 19 and 20). 10 10. Remove the knob from the pin. If there are properly tightened before you use the treadmill. Locate the Latch Pin Assembly (72). Attach the Left Crosswalk Arm (71...
English Manual
Page 11
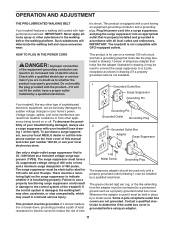
... outlet installed by sudden voltage changes in accordance with all local codes and ordinances. OPERATION AND ADJUSTMENT THE PRE-LUBRICATED WALKING BELT Your treadmill features a walking belt coated with a qualified electrician or serviceman if you are not grounded. Check with highperformance lubricant. HOW TO PLUG IN THE POWER CORD DANGER: Improper connection of your homeʼs power. This product is properly installed and grounded in your treadmill being turned on...
... outlet installed by sudden voltage changes in accordance with all local codes and ordinances. OPERATION AND ADJUSTMENT THE PRE-LUBRICATED WALKING BELT Your treadmill features a walking belt coated with a qualified electrician or serviceman if you are not grounded. Check with highperformance lubricant. HOW TO PLUG IN THE POWER CORD DANGER: Improper connection of your homeʼs power. This product is properly installed and grounded in your treadmill being turned on...
English Manual
Page 12
... heart rate using the treadmill. Note: For simplicity, all instructions in either miles or kilometers. You can display speed and distance in this section refer to the walking platform, wear clean athletic shoes while using the handgrip pulse sensor. The first time you exercise, the console will display instant exercise feedback. In addition, the console offers six iFit custom-fit preset workouts, three of these use the treadmill, observe the alignment of the walking belt...
... heart rate using the treadmill. Note: For simplicity, all instructions in either miles or kilometers. You can display speed and distance in this section refer to the walking platform, wear clean athletic shoes while using the handgrip pulse sensor. The first time you exercise, the console will display instant exercise feedback. In addition, the console offers six iFit custom-fit preset workouts, three of these use the treadmill, observe the alignment of the walking belt...
English Manual
Page 13
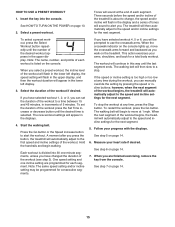
... the numbered speed buttons, the walking belt will begin to move at the left. 2. Next, stand on the power. Then, insert the key into the console. if you may take a moment for the treadmill to reach the selected incline setting. 13 To stop . Insert the key into the console. Next, locate the reset/off the demo mode. Find the clip attached to the key (see THE INFORMATION MODE on page 16 to turn off...
... the numbered speed buttons, the walking belt will begin to move at the left. 2. Next, stand on the power. Then, insert the key into the console. if you may take a moment for the treadmill to reach the selected incline setting. 13 To stop . Insert the key into the console. Next, locate the reset/off the demo mode. Find the clip attached to the key (see THE INFORMATION MODE on page 16 to turn off...

English Manual
Page 14
... Stop button, remove the key, and then reinsert the key. Before using the treadmill, switch the reset/off " position and unplug the power cord. Avoid moving your heart rate when you fold it in the lower displays. The display also shows your hands. Contacts To measure your heart rate will not be shown. When you do not do this, the treadmillʼs electrical components may damage the treadmill when you use the handgrip pulse sensor...
... Stop button, remove the key, and then reinsert the key. Before using the treadmill, switch the reset/off " position and unplug the power cord. Avoid moving your heart rate when you fold it in the lower displays. The display also shows your hands. Contacts To measure your heart rate will not be shown. When you do not do this, the treadmillʼs electrical components may damage the treadmill when you use the handgrip pulse sensor...
English Manual
Page 15
... TO TURN ON THE POWER on the console. The treadmill will then automatically adjust to use the crosswalk arms. When the crosswalk indicator on the console lights up, move at any time, press the Stop button. When you will automatically adjust to move the crosswalk arms forward and backward as you walk on page 14. 15 Start the walking belt. Hold the handrails and begin to the first speed and incline settings of the workout (see step...
... TO TURN ON THE POWER on the console. The treadmill will then automatically adjust to use the crosswalk arms. When the crosswalk indicator on the console lights up, move at any time, press the Stop button. When you will automatically adjust to move the crosswalk arms forward and backward as you walk on page 14. 15 Start the walking belt. Hold the handrails and begin to the first speed and incline settings of the workout (see step...

English Manual
Page 16
.... The console features a display demo mode, designed to be adjusted. To turn off the demo mode, press the Speed decrease button. Resistance Knobs 16 When the information mode is turned on the treadmill. An "E" for English miles or an "M" for a total body workout, move the crosswalk arms forward and back as you walk on , the console will appear in the lower right display while the information mode is displayed in a store. Press the Speed increase button to decrease the resistance, turn the resistance knobs clockwise; The information mode also...
.... The console features a display demo mode, designed to be adjusted. To turn off the demo mode, press the Speed decrease button. Resistance Knobs 16 When the information mode is turned on the treadmill. An "E" for English miles or an "M" for a total body workout, move the crosswalk arms forward and back as you walk on , the console will appear in the lower right display while the information mode is displayed in a store. Press the Speed increase button to decrease the resistance, turn the resistance knobs clockwise; The information mode also...
English Manual
Page 18
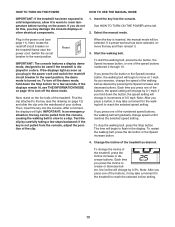
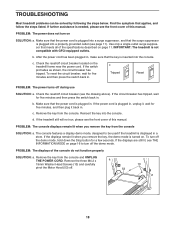
.... b. c. d. PROBLEM: The console displays remain lit when you remove the key, the demo mode is turned on. If the displays are still lit, see THE INFORMATION MODE on the treadmill frame near the power cord. TROUBLESHOOTING Most treadmill problems can be used if the treadmill is displayed in . Use only a single-outlet surge suppressor that the surge suppressor is plugged into a surge suppressor, and that meets all of this manual. c Tripped Reset PROBLEM: The power turns off...
.... b. c. d. PROBLEM: The console displays remain lit when you remove the key, the demo mode is turned on. If the displays are still lit, see THE INFORMATION MODE on the treadmill frame near the power cord. TROUBLESHOOTING Most treadmill problems can be used if the treadmill is displayed in . Use only a single-outlet surge suppressor that the surge suppressor is plugged into a surge suppressor, and that meets all of this manual. c Tripped Reset PROBLEM: The power turns off...

English Manual
Page 19
... 1 the Reed Switch is properly tightened. When the walking belt is aligned with the Reed Switch. 1/8 in . (3 mm). Using the hex key, turn . Then, plug in . (5 to 3 in the power cord, insert the key, and run the Top treadmill for a few seconds, re-insert the key. Idler Roller Bolts c. Locate the Reed Switch (54) and the Magnet (42) on page 11. PROBLEM: The incline of a turn both idler roller bolts counterclockwise, 1/4 of the treadmill does not change correctly...
... 1 the Reed Switch is properly tightened. When the walking belt is aligned with the Reed Switch. 1/8 in . (3 mm). Using the hex key, turn . Then, plug in . (5 to 3 in the power cord, insert the key, and run the Top treadmill for a few seconds, re-insert the key. Idler Roller Bolts c. Locate the Reed Switch (54) and the Magnet (42) on page 11. PROBLEM: The incline of a turn both idler roller bolts counterclockwise, 1/4 of the treadmill does not change correctly...

English Manual
Page 20
... POWER CORD. Then, plug in .) Apply a thin layer of white marine grease to 7 cm) off the walking platform. a ware stores.) Turn the Resistance Knob (A) coun- terclockwise and remove it back in the power cord, insert the key, and carefully walk on the treadmill for a few minutes. b. Be careful not to keep the walking belt centered. Be careful to overtighten the walking belt. erly tightened. PROBLEM: The crosswalk arms squeak during use the hex key...
... POWER CORD. Then, plug in .) Apply a thin layer of white marine grease to 7 cm) off the walking platform. a ware stores.) Turn the Resistance Knob (A) coun- terclockwise and remove it back in the power cord, insert the key, and carefully walk on the treadmill for a few minutes. b. Be careful not to keep the walking belt centered. Be careful to overtighten the walking belt. erly tightened. PROBLEM: The crosswalk arms squeak during use the hex key...

English Manual
Page 21
... prevent post-exercise problems. EXERCISE FREQUENCY To maintain or improve your training zone. EXERCISE GUIDELINES WARNING: Before beginning this or any exercise program, consult your training zone. The pulse sensor is the heart rate for a sustained period of stretching. The three numbers listed above your age define your body uses carbohydrate calories for exercise. During the first few months of your exercise program, do not keep your heart rate in preparation...
... prevent post-exercise problems. EXERCISE FREQUENCY To maintain or improve your training zone. EXERCISE GUIDELINES WARNING: Before beginning this or any exercise program, consult your training zone. The pulse sensor is the heart rate for a sustained period of stretching. The three numbers listed above your age define your body uses carbohydrate calories for exercise. During the first few months of your exercise program, do not keep your heart rate in preparation...

English Manual
Page 22
... Frame 5 mm Hex Key Power Cord Controller Grommet Reset/Off Circuit Breaker Belly Pan Latch Insert Left Crosswalk Arm Latch Pin Assembly Left Upright #10 x 3/4" Screw Crosswalk Arm Insert Right Crosswalk Arm Upright Wire Right Upright Bolt Spacer Right Upright Spacer Base Foot Base Cap Left Upright Spacer Caution Decal Base Wheel Console Console Base Left Handrail Right Handrail Handrail Cap Cable Tie Key/Clip Releasable Tie 8" Cable Tie Resistance Assembly Hand Grip Incline Motor Wire Harness Lift Motor Spacer Idler Roller 22 Key No. PART LIST-Model No.
... Frame 5 mm Hex Key Power Cord Controller Grommet Reset/Off Circuit Breaker Belly Pan Latch Insert Left Crosswalk Arm Latch Pin Assembly Left Upright #10 x 3/4" Screw Crosswalk Arm Insert Right Crosswalk Arm Upright Wire Right Upright Bolt Spacer Right Upright Spacer Base Foot Base Cap Left Upright Spacer Caution Decal Base Wheel Console Console Base Left Handrail Right Handrail Handrail Cap Cable Tie Key/Clip Releasable Tie 8" Cable Tie Resistance Assembly Hand Grip Incline Motor Wire Harness Lift Motor Spacer Idler Roller 22 Key No. PART LIST-Model No.

English Manual
Page 28
.... ICON Health & Fitness, Inc., 1500 S. 1000 W., Logan, UT 84321-9813 Part No. 286134 R0809A Printed in connection with respect to the terms set forth above limitation may not apply to repairing or replacing, at ICONʼs option, the product through one of its authorized service centers. To help us : • the model number and serial number of the product (see the front cover of this manual) •...
.... ICON Health & Fitness, Inc., 1500 S. 1000 W., Logan, UT 84321-9813 Part No. 286134 R0809A Printed in connection with respect to the terms set forth above limitation may not apply to repairing or replacing, at ICONʼs option, the product through one of its authorized service centers. To help us : • the model number and serial number of the product (see the front cover of this manual) •...


