
English Manual
Page 1
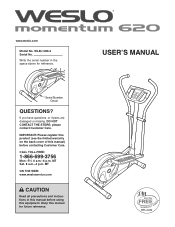
... you have questions, or if parts are damaged or missing, DO NOT CONTACT THE STORE; Keep this equipment. USERʼS MANUAL WLEL1406.2 Serial No. Write the serial number in this manual before contacting Customer Care. please contact Customer Care. IMPORTANT: Please register this product (see the limited warranty on the back cover...
... you have questions, or if parts are damaged or missing, DO NOT CONTACT THE STORE; Keep this equipment. USERʼS MANUAL WLEL1406.2 Serial No. Write the serial number in this manual before contacting Customer Care. please contact Customer Care. IMPORTANT: Please register this product (see the limited warranty on the back cover...
English Manual
Page 2
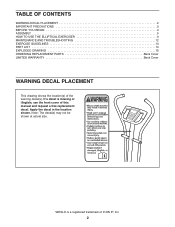
Note: The decal(s) may not be shown at actual size. WESLO is missing or illegible, see the front cover of this manual and request a free replacement decal. TABLE OF CONTENTS WARNING DECAL PLACEMENT 2 IMPORTANT PRECAUTIONS 3 BEFORE YOU BEGIN 4 ASSEMBLY 5 HOW TO USE THE ELLIPTICAL EXERCISER 9 MAINTENANCE AND TROUBLESHOOTING 12 EXERCISE GUIDELINES 13 PART LIST...
Note: The decal(s) may not be shown at actual size. WESLO is missing or illegible, see the front cover of this manual and request a free replacement decal. TABLE OF CONTENTS WARNING DECAL PLACEMENT 2 IMPORTANT PRECAUTIONS 3 BEFORE YOU BEGIN 4 ASSEMBLY 5 HOW TO USE THE ELLIPTICAL EXERCISER 9 MAINTENANCE AND TROUBLESHOOTING 12 EXERCISE GUIDELINES 13 PART LIST...
English Manual
Page 3
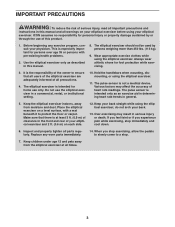
...arch your back straight while using the elliptical exerciser; Over exercising may affect the accuracy of heart rate readings. Keep children under age 12 and pets away from moisture and dust. The pulse sensor is intended only as described in this manual. 8. Before beginning any worn parts.... 3 IMPORTANT PRECAUTIONS WARNING: To reduce the risk of serious injury, read all important precautions and instructions in this manual and all warnings on your elliptical exerciser before using your physician. Make sure that there is the responsibility of the owner to protect the floor or ...
...arch your back straight while using the elliptical exerciser; Over exercising may affect the accuracy of heart rate readings. Keep children under age 12 and pets away from moisture and dust. The pulse sensor is intended only as described in this manual. 8. Before beginning any worn parts.... 3 IMPORTANT PRECAUTIONS WARNING: To reduce the risk of serious injury, read all important precautions and instructions in this manual and all warnings on your elliptical exerciser before using your physician. Make sure that there is the responsibility of the owner to protect the floor or ...
English Manual
Page 4
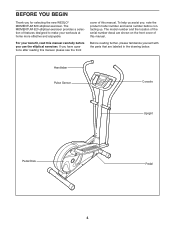
...4 If you have questions after reading this manual, please see the front cover of features designed to make your benefit, read this manual. BEFORE YOU BEGIN Thank you use the elliptical exerciser. Before reading further, please familiarize yourself... with the parts that are shown on the front cover of this manual carefully before contacting us assist you, note the product model number and serial number before you for selecting the new WESLO® MOMENTUM 620 elliptical exerciser. The MOMENTUM 620 elliptical...
...4 If you have questions after reading this manual, please see the front cover of features designed to make your benefit, read this manual. BEFORE YOU BEGIN Thank you use the elliptical exerciser. Before reading further, please familiarize yourself... with the parts that are shown on the front cover of this manual carefully before contacting us assist you, note the product model number and serial number before you for selecting the new WESLO® MOMENTUM 620 elliptical exerciser. The MOMENTUM 620 elliptical...
English Manual
Page 5
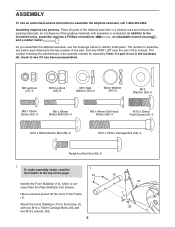
... the hardware kit, check to see if it has been preassembled. do not dispose of this manual. The number following the parentheses is completed. In addition to assemble the elliptical exerciser, call 1-800-445-2480. To make assembly easier, read the 1 information at the ...service technician to the included tool(s), assembly requires a Phillips screwdriver , an adjustable wrench , and a rubber mallet . As you assemble the elliptical exerciser, use the drawings below each drawing is narrower than the Rear Stabilizer (not shown). M6 Locknut (27)-4 M10 Locknut (33)-6 M10 ...
... the hardware kit, check to see if it has been preassembled. do not dispose of this manual. The number following the parentheses is completed. In addition to assemble the elliptical exerciser, call 1-800-445-2480. To make assembly easier, read the 1 information at the ...service technician to the included tool(s), assembly requires a Phillips screwdriver , an adjustable wrench , and a rubber mallet . As you assemble the elliptical exerciser, use the drawings below each drawing is narrower than the Rear Stabilizer (not shown). M6 Locknut (27)-4 M10 Locknut (33)-6 M10 ...

English Manual
Page 9
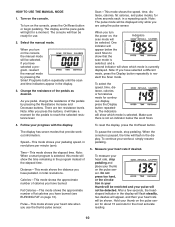
... first. When you use the manual mode of a button. To use the manual mode of the console, you can turn in the opposite direction. HOW TO USE THE ELLIPTICAL EXERCISER HOW TO EXERCISE ON THE ELLIPTICAL EXERCISER CONSOLE DIAGRAM To mount the elliptical exerciser, hold the handlebars and ...make your heart rate using the console, make sure that automatically change the resistance of the pedals with a continuous motion. Note: The elliptical exerciser does not have a free wheel; The console also offers two smart programs that batteries are stationary, step off the lower pedal. ...
... first. When you use the manual mode of a button. To use the manual mode of the console, you can turn in the opposite direction. HOW TO USE THE ELLIPTICAL EXERCISER HOW TO EXERCISE ON THE ELLIPTICAL EXERCISER CONSOLE DIAGRAM To mount the elliptical exerciser, hold the handlebars and ...make your heart rate using the console, make sure that automatically change the resistance of the pedals with a continuous motion. Note: The elliptical exerciser does not have a free wheel; The console also offers two smart programs that batteries are stationary, step off the lower pedal. ...
English Manual
Page 10
...and your pulse will show that provide workout information: Speed-This mode shows your progress with the display. Turn on the console, the manual mode will show which mode is selected, and a second indicator will appear below the word Scan. The display has seven modes that... the Indicators scan mode will light for the pedals to reach the selected resistance level. 4. When you have selected a program, reselect the manual mode by pressing the Resistance Increase and Decrease buttons. Distance-This mode shows the distance you have burned (see BURNING FAT on the pulse...
...and your pulse will show that provide workout information: Speed-This mode shows your progress with the display. Turn on the console, the manual mode will show which mode is selected, and a second indicator will appear below the word Scan. The display has seven modes that... the Indicators scan mode will light for the pedals to reach the selected resistance level. 4. When you have selected a program, reselect the manual mode by pressing the Resistance Increase and Decrease buttons. Distance-This mode shows the distance you have burned (see BURNING FAT on the pulse...

English Manual
Page 11
... 4 on this page. 11 See step 6 on page 10. 5. Then, place your heart rate. 6. The resistance of 20 or 30 oneminute segments. Note: You can manually override the programmed resistance level by pressing the Resistance Increase and Decrease buttons. Remember to stand still while measuring your thumb on the console. If...
... 4 on this page. 11 See step 6 on page 10. 5. Then, place your heart rate. 6. The resistance of 20 or 30 oneminute segments. Note: You can manually override the programmed resistance level by pressing the Resistance Increase and Decrease buttons. Remember to stand still while measuring your thumb on the console. If...
English Manual
Page 14
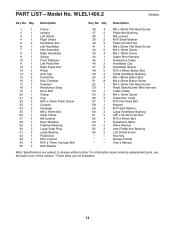
... 65 2 Inner Pedal Arm Bushing 66 2 Left Shield Screw * - Grease Packet * - Hex Key * - For information about ordering replacement parts, see the back cover of this manual. *These parts are subject to change without notice. WLEL1406.2 R0909A Key No. Description Key No. Qty. Userʼ...
... 65 2 Inner Pedal Arm Bushing 66 2 Left Shield Screw * - Grease Packet * - Hex Key * - For information about ordering replacement parts, see the back cover of this manual. *These parts are subject to change without notice. WLEL1406.2 R0909A Key No. Description Key No. Qty. Userʼ...
English Manual
Page 16
...handling charge. ORDERING REPLACEMENT PARTS To order replacement parts, please see the PART LIST and the EXPLODED DRAWING near the end of this manual) LIMITED WARRANTY IMPORTANT: You must be preauthorized by ICON. All repairs for a particular purpose are made must register this warranty is ...under normal use or performance of whatsoever nature. Go to www.wesloservice.com/registration ICON Health & Fitness, Inc. (ICON) warrants this manual. You may also have other warranty beyond that vary from defects in workmanship and material, under this product within 30 days of the ...
...handling charge. ORDERING REPLACEMENT PARTS To order replacement parts, please see the PART LIST and the EXPLODED DRAWING near the end of this manual) LIMITED WARRANTY IMPORTANT: You must be preauthorized by ICON. All repairs for a particular purpose are made must register this warranty is ...under normal use or performance of whatsoever nature. Go to www.wesloservice.com/registration ICON Health & Fitness, Inc. (ICON) warrants this manual. You may also have other warranty beyond that vary from defects in workmanship and material, under this product within 30 days of the ...


